FAST角点检测python实现及基于opencv实现 (角点检测、非极大值抑制)
写在前面:
黄宁然,看你看过的算法系列,即将进入尾声。
参考文献镇楼:
[1]Deepak Geetha Viswanathan, Features from Accelerated Segment Test (FAST).
[2] Fire丶Chicken,计算机视觉(角点检测)- 3 - FAST角点检测
[3] zhaocj, Opencv2.4.9源码分析——FAST.
注:csdn发文助手提示“外链过多”,故文献链接网址请见评论区。
问题来源:
笔者的执念。
1、原理简介
FAST(Features from Accelerated Segment Test)算子最初由Rosten 和Drummond用于图像中的兴趣点检测[1]。与SUSAN类似,其同样使用圆形模板,通过判断模板中的像素与中心位置像素的偏离程度,来判定中心位置是否为角点。圆形模板区域如图1所示。
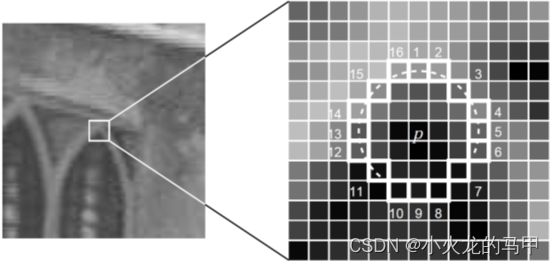
对于中心位置p,取圆形半径为3像素,画圆,并取圆周上的16个像素点。通过判断这组16个像素与中心位置p像素的偏离度,来判定中心位置是否为角点。具体的:设置阈值t,若圆周上,有连续N个点,其像素值与中心位置像素值之差大于t(或小于-t),则认为中心位置p为角点,所以有两个条件:
条件1: I x − I p > t I_x-I_p>t Ix−Ip>t
条件2: I x − I p < − t I_x-I_p<-t Ix−Ip<−t
N一般选择12,但N=9时,往往能取得较好的效果[2]。且从文献[3]opencv源码分析来看,取的值是9。
在计算中心位置p是否为角点时,可以首先判断p1、p9、p5、p13这四个点的情况,进行初筛。如果N=12,则p1、p9、p5、p13这四个点必须至少有3个点满足条件1(或条件2);如果N=9,则p1、p9必须至少有1个点满足条件1(或条件2)、同时p5、p13必须至少有一个点满足条件1(或条件2)。
在初筛通过后,再对圆周上剩余的点进行检测。
2、非极大值抑制
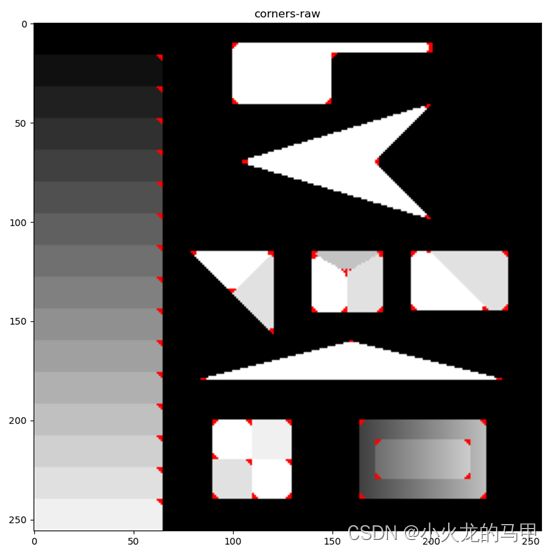
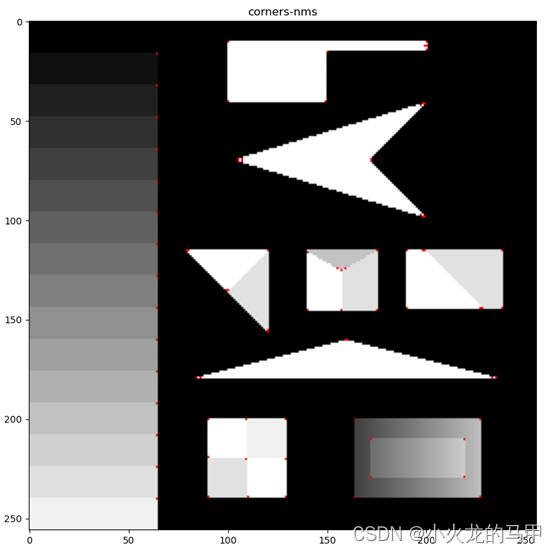
按上述算子求解出图像的角点后,可能会出现检测出的角点相邻、小区域内有多个重复特征点的情况。为此,使用非极大值抑制,对角点进行筛选。具体的,在判断某像素位置为角点后,求解该角点的得分值,即圆周上16个点与该中心位置像素差值的绝对值总和。
在求出每个角点的得分值后,使用3*3(或5*5)的邻域,对每个角点进行筛选,即在该邻域内,仅保留得分最高的角点,其它角点删除。
3、python源码实现
#coding=utf8
import numpy as np
from PIL import Image
import matplotlib.pyplot as plt
import matplotlib.cm as cm
import math
import cv2
import os,sys
import scipy.ndimage
import time
import scipy
定义参数:
fast_N =9#取9时,初筛条件是第1和第9个必须至少有一个满足,同时第5和第13个也必须至少有一个满足
detect_radius = 3
row_mask = np.array([0,0,1,2,3,4,5,6,6,6,5,4,3,2,1,0])#圆周上16个点的行坐标
col_mask = np.array([3,4,5,6,6,6,5,4,3,2,1,0,0,0,1,2])#圆周上16个点的列坐标
角点检测函数:
def fast_corner_detect(img_src,t=10):
	score_arr = np.zeros(img_src.shape,dtype=np.float32)#用来存储得分情况,得分为0时,表示不是角点
	img = img_src.copy()
	img = img.astype(np.float32)
	row_s,col_s = detect_radius,detect_radius
	row_e,col_e = img_src.shape[0]-detect_radius,img.shape[1]-detect_radius
	for r in range(row_s,row_e):#遍历所有行
		for c in range(col_s,col_e):#遍历所有列
			fast_zone = img[r-detect_radius:r+detect_radius+1,c-detect_radius:c+detect_radius+1]#获取矩形区域
			data = (fast_zone[row_mask,col_mask]).astype(np.float32)#获取圆周上的16个点
			r0 = img[r,c].astype(np.float32)
			condition1 = ((data-r0)>t).astype(int)#将bool转成0-1的int
			condition2 = ((r0-data)>t ).astype(int)#将bool转成0-1的int
			# 先快速判断第1、5、9、13
			if ( (condition1[0] + condition1[8])>=1 and (condition1[4]+condition1[12])>=1 ):
				temp = condition1.copy()
				temp = np.concatenate((temp,temp[0:fast_N-1]),axis=0)#考虑到循环判断,需复制扩展
				temp_s = ''.join(str(i)for i in temp)#将0-1的int转为string
				temp_s = temp_s.replace("0"," ")#将0替换为空格,方便分割
				temp_s_arr = temp_s.split() #分割每一段含有1的部分
				temp_d_arr = np.array([len(s) for s in temp_s_arr])#计算每一段的长度,即连续满足条件的点数
				if(max(temp_d_arr)>=fast_N): #如果最大连续满足条件的点数,达到N,则判定为角点
					score = np.sum(np.abs(data-r0)) #计算得分情况
					score_arr[r,c]=score
					continue#已检测到角点,后续不再执行
			if ((condition2[0] + condition2[8]) >= 1 and (condition2[4] + condition2[12]) >= 1):
				temp = condition2.copy()
				temp = np.concatenate((temp, temp[0:fast_N - 1]), axis=0)
				temp_s = ''.join(str(i) for i in temp)
				temp_s = temp_s.replace("0", " ")
				temp_s_arr = temp_s.split()
				temp_d_arr = np.array([len(s) for s in temp_s_arr])
				if (max(temp_d_arr) >= fast_N):
					score = np.sum(np.abs(data - r0))
					score_arr[r, c] = score
	return score_arr
非极大值抑制函数:
220719更新:该nms代码存在些许不足之处,详见后续的博文,https://blog.csdn.net/xiaohuolong1827/article/details/125859795
def corner_nms(corner,kernal=3):
	out = corner.copy()
	row_s = int(kernal/2)
	row_e = out.shape[0] - int(kernal/2)
	col_s,col_e = int(kernal/2),out.shape[1] - int(kernal/2)
	for r in range(row_s,row_e):
		for c in range(col_s,col_e):
			if corner[r,c]==0: #不是可能的角点
				continue
			zone = corner[r-int(kernal/2):r+int(kernal/2)+1,c-int(kernal/2):c+int(kernal/2)+1]
			index = corner[r,c]<zone
			(x,y) = np.where(index==True)
			if len(x)>0 : #说明corner[r,c]不是最大,直接归零将其抑制
				out[r,c] = 0
			else:
				out[r,c] = 255
	return out
测试圆周像素位置函数:
def mask_test():
	temp = np.array([
		[0, 0, 16, 1, 2, 0, 0],
		[0, 15, 0, 0, 0, 3, 0],
		[14, 0, 0, 0, 0, 0, 4],
		[13, 0, 0, 0, 0, 0, 5],
		[12, 0, 0, 0, 0, 0, 6],
		[0, 11, 0, 0, 0, 7, 0],
		[0, 0, 10, 9, 8, 0, 0]
	])
	data = temp[row_mask,col_mask]
	print(data)
	return
主函数调用:
if __name__ == '__main__':
	img_src = cv2.imread('susan_input1.png',cv2.IMREAD_GRAYSCALE)
	score_arr = fast_corner_detect(img_src, t=10)
	img_show = img_src.copy()
	if(len(img_show.shape)==2):
		img_show = cv2.cvtColor(img_show,cv2.COLOR_GRAY2BGR)
	img_show[score_arr!=0] = (255,0,0)
	print(len(np.where(score_arr!=0)[0]))
	plt.figure()
	plt.title("corners-raw")
	plt.imshow(img_show, cmap=cm.gray)


	img_show2 = img_src.copy()
	if (len(img_show2.shape) == 2):
		img_show2 = cv2.cvtColor(img_show2, cv2.COLOR_GRAY2BGR)
	score_nms = corner_nms(score_arr)
	img_show2[score_nms != 0] = (255, 0, 0)
	plt.figure()
	plt.title("corners-nms")
	plt.imshow(img_show2, cmap=cm.gray)

	plt.show()
	print('end')
4、opencv实现
Opencv自带FAST算子,可以方便实现FAST的角点检测。
使用的Opencv版本:3.4.2.16.(4.4.0.42也可运行)
主要代码就几行:
fast = cv2.FastFeatureDetector_create(threshold=10,type=cv2.FastFeatureDetector_TYPE_9_16)
kps3 = fast.detect(img_src)
img_show3 = cv2.drawKeypoints(image=img_src,keypoints=kps3,outImage=None,color=(0,0,255))
在主程序中调用:
if __name__ == '__main__':
	img_src = cv2.imread('susan_input1.png',cv2.IMREAD_GRAYSCALE)
	score_arr = fast_corner_detect(img_src, t=10)
	img_show = img_src.copy()
	if(len(img_show.shape)==2):
		img_show = cv2.cvtColor(img_show,cv2.COLOR_GRAY2BGR)
	img_show[score_arr!=0] = (255,0,0)
	print(len(np.where(score_arr!=0)[0]))
	plt.figure()
	plt.title("corners-raw")
	plt.imshow(img_show, cmap=cm.gray)

	img_show2 = img_src.copy()
	if (len(img_show2.shape) == 2):
		img_show2 = cv2.cvtColor(img_show2, cv2.COLOR_GRAY2BGR)
	score_nms = corner_nms(score_arr)
	img_show2[score_nms != 0] = (255, 0, 0)
	plt.figure()
	plt.title("corners-nms")
	plt.imshow(img_show2, cmap=cm.gray)

	fast = cv2.FastFeatureDetector_create(threshold=10,type=cv2.FastFeatureDetector_TYPE_9_16)
	fast.setNonmaxSuppression(False)
	kps3 = fast.detect(img_src)
	print(len(kps3))
	img_show3 = cv2.drawKeypoints(image=img_src,keypoints=kps3,outImage=None,color=(0,0,255))
	plt.figure()
	plt.title("corners-opencv-raw")
	plt.imshow(img_show3, cmap=cm.gray)

	fast.setNonmaxSuppression(True)
	kps4 = fast.detect(img_src)
	img4 = cv2.drawKeypoints(image=img_src, keypoints=kps4, outImage=None, color=(0, 0, 255))
	plt.figure()
	plt.title("corners-opencv-nms")
	plt.imshow(img4, cmap=cm.gray)

	plt.show()

	print('end')
检测结果:
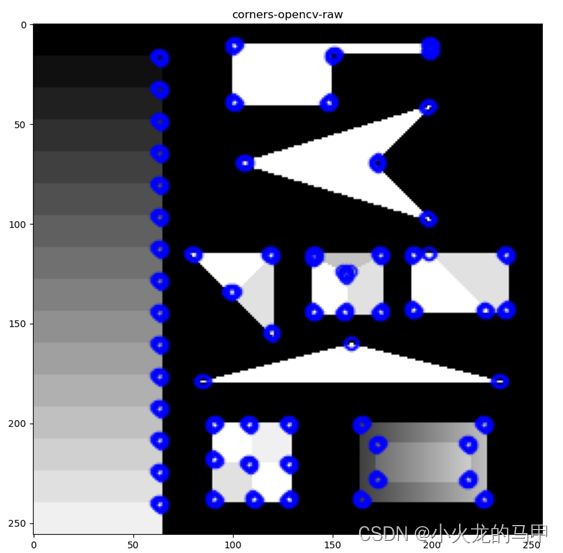
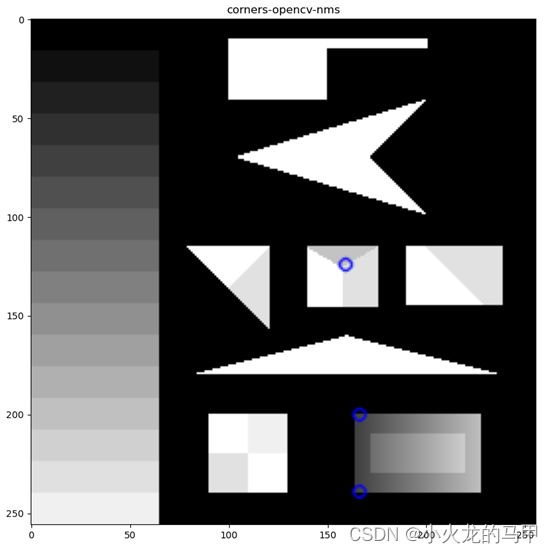
在不使用非极大值抑制时,自行编写的代码与opencv检测的角点个数相同;opencv在开启非极大值抑制后,可能参数没有设置好,导致过抑制。不知nms的参数如何设置。但用其它图片测试时,开启nms,检测的角点尚可。
5、源码下载
https://download.csdn.net/download/xiaohuolong1827/85726475
6、其它
已是6月下旬,黄宁然,你怎么还没w。
