基于BERT模型实现文本分类任务(transformers+torch)
BERT的原理分析可以看这:《BERT: Pre-training of Deep Bidirectional Transformers for Language Understanding》论文笔记
代码实现主要用到huggingface的transformers库(4.9.1)和torch库(1.6.0)
pip install transformers
pip install torch
先说下我的做法:
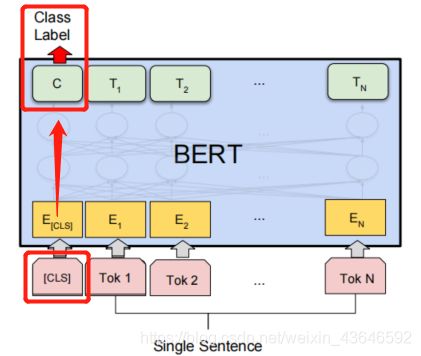
取了最后4层,按768那个维度进行拼接,拼完就是4*768。然后最后取concat_last_4layers[:,0,:],即[CLS] 这个token对应的经过最后4层concat后的输出。将其通过一个全连接层进行分类。

⭐首先导入相关库:
from transformers import BertTokenizer,BertModel,BertConfig
from transformers import AdamW, get_linear_schedule_with_warmup
import torch
import torch.nn as nn
from torch.utils.data import Dataset, DataLoader, TensorDataset
from transformers import logging
logging.set_verbosity_error()
import pandas as pd
import numpy as np
⭐导入数据集(英文电影评论数据):
数据集链接:https://pan.baidu.com/s/1vhh5FmU01KqyjRtxByyxcQ
提取码:bx4k
df = pd.read_csv('./Dataset.csv')
df.info()
df['sentiment'].value_counts()
分消极和积极两种标签,类别也比较均衡:
1 12256
0 12244
Name: sentiment, dtype: int64
⭐文本预处理:
切分数据集,并用bert-base-uncased预训练模型的tokenizer进行文本预处理。(调用每个预训练模型都会有对应的tokenizer配套。)
x = list(df['review'])
y = list(df['sentiment'])
from sklearn.model_selection import train_test_split
x_train, x_test, y_train, y_test =  train_test_split(x, y, test_size=0.2)
tokenizer = BertTokenizer.from_pretrained('bert-base-uncased')
train_encoding = tokenizer(x_train, truncation=True, padding=True, max_length=64)
test_encoding = tokenizer(x_test, truncation=True, padding=True, max_length=64)

#可以这样查看词典
# vocab = tokenizer.vocab
# print(vocab['hello'])
tokenzier后会返回一个字典,有如下3个键-值对:
input_ids:字的编码(即在词典中的索引)
token_type_ids:标识是第一个句子还是第二个句子
attention_mask:标识是不是填充
print(train_encoding.keys())
dict_keys([‘input_ids’, ‘token_type_ids’, ‘attention_mask’])
⭐数据集封装、批处理:
这里我自定义了一个数据集,继承torch.utils.data.Dataset,它属于map式数据集,必须重写如下两个函数。
【注:关于Datasets类的继承使用可以看这:pytorch技巧 五: 自定义数据集 torch.utils.data.DataLoader 及Dataset的使用】
# 数据集读取, 继承torch的Dataset类,方便后面用DataLoader封装数据集
class NewsDataset(Dataset):
    def __init__(self, encodings, labels):
        self.encodings = encodings
        self.labels = labels

    #这里的idx是为了让后面的DataLoader成批处理成迭代器,按idx映射到对应数据
    def __getitem__(self, idx):
        item = {key: torch.tensor(val[idx]) for key, val in self.encodings.items()}
        item['labels'] = torch.tensor(int(self.labels[idx]))
        return item

    #数据集长度。通过len(这个实例对象),可以查看长度
    def __len__(self):
        return len(self.labels)
#将数据集包装成torch的Dataset形式
train_dataset = NewsDataset(train_encoding, y_train)
test_dataset = NewsDataset(test_encoding, y_test)
# 单个读取到批量读取
train_loader = DataLoader(train_dataset, batch_size=16, shuffle=True)
test_dataloader = DataLoader(test_dataset, batch_size=16, shuffle=True)

#可以看看长啥样
#batch = next(iter(train_loader))
#print(batch)
#print(batch['input_ids'].shape)
⭐构建BERT分类模型:
下面首先是加载预训练模型,然后通过config参数可以对模型的层数等参数进行配置。然后我定义了个freeze_bert参数来确定是否冻结bert层(即是否让它参与训练)。
通过设置这个 'output_hidden_states’参数为True,是为了让模型输出所有层的输出状态(包括嵌入层的输出和BERT模型的12层一共13层)。我按论文里的做法,取了最后4层,按768那个维度进行拼接,拼完就是4*768。然后最后取concat_last_4layers[:,0,:],即[CLS] 这个token对应的经过最后4层concat后的输出。将其通过一个全连接层进行分类。
【注:具体self.bert层的输出请查看huggingface的官方api手册,因为不同版本的transformers库,模型的输入格式不太一样。】
class my_bert_model(nn.Module):
    def __init__(self, freeze_bert=False, hidden_size=768):
        super().__init__()
        config = BertConfig.from_pretrained('bert-base-uncased')
        config.update({'output_hidden_states':True})
        self.bert = BertModel.from_pretrained("bert-base-uncased",config=config)
        self.fc = nn.Linear(hidden_size*4, 2)

        #是否冻结bert,不让其参数更新
        if freeze_bert:
            for p in self.bert.parameters():
                p.requires_grad = False

    def forward(self, input_ids, attention_mask):
        outputs = self.bert(input_ids, attention_mask)
        all_hidden_states = torch.stack(outputs[2])  #因为输出的是所有层的输出,是元组保存的,所以转成矩阵
        concat_last_4layers = torch.cat((all_hidden_states[-1],   #取最后4层的输出
                                         all_hidden_states[-2],
                                         all_hidden_states[-3],
                                         all_hidden_states[-4]), dim=-1)

        cls_concat = concat_last_4layers[:,0,:]   #取 [CLS] 这个token对应的经过最后4层concat后的输出
        result = self.fc(cls_concat)

        return result
⭐实例化模型、定义损失函数和优化器:
device = torch.device("cuda" if torch.cuda.is_available() else "cpu")
print(device,'能用')

model = my_bert_model().to(device)
criterion = nn.CrossEntropyLoss().to(device)

# 优化方法
#过滤掉被冻结的参数,反向传播需要更新的参数
optim = AdamW(filter(lambda p: p.requires_grad, model.parameters()), lr=2e-5)
total_steps = len(train_loader) * 1
scheduler = get_linear_schedule_with_warmup(optim,
                                            num_warmup_steps = 0, # Default value in run_glue.py
                                            num_training_steps = total_steps)
⭐定义训练函数:
# 训练函数
def train():
    model.train()
    total_train_loss = 0
    iter_num = 0
    total_iter = len(train_loader)
    for batch in train_loader:
        # 正向传播
        optim.zero_grad()
        input_ids = batch['input_ids'].to(device)
        attention_mask = batch['attention_mask'].to(device)
        labels = batch['labels'].to(device)
        outputs = model(input_ids, attention_mask=attention_mask)
        loss = criterion(outputs, labels)
        total_train_loss += loss.item()

        loss.backward()
        nn.utils.clip_grad_norm_(model.parameters(), 1.0)   #梯度裁剪,防止梯度爆炸

        # 参数更新
        optim.step()
        scheduler.step()

        iter_num += 1
        if(iter_num % 100==0):
            print("epoth: %d, iter_num: %d, loss: %.4f, %.2f%%" % (epoch, iter_num, loss.item(), iter_num/total_iter*100))

    print("Epoch: %d, Average training loss: %.4f"%(epoch, total_train_loss/len(train_loader)))
⭐定义测试函数:
# 精度计算
def flat_accuracy(preds, labels):
    pred_flat = np.argmax(preds, axis=1).flatten()
    labels_flat = labels.flatten()
    return np.sum(pred_flat == labels_flat) / len(labels_flat)

def validation():
    model.eval()
    total_eval_accuracy = 0
    total_eval_loss = 0
    with torch.no_grad():
        for batch in test_dataloader:
            # 正常传播
            input_ids = batch['input_ids'].to(device)
            attention_mask = batch['attention_mask'].to(device)
            labels = batch['labels'].to(device)
            outputs = model(input_ids, attention_mask=attention_mask)

            loss = criterion(outputs, labels)
            logits = outputs

            total_eval_loss += loss.item()
            logits = logits.detach().cpu().numpy()
            label_ids = labels.to('cpu').numpy()
            total_eval_accuracy += flat_accuracy(logits, label_ids)

    avg_val_accuracy = total_eval_accuracy / len(test_dataloader)
    print("Accuracy: %.4f" % (avg_val_accuracy))
    print("Average testing loss: %.4f"%(total_eval_loss/len(test_dataloader)))
    print("-------------------------------")
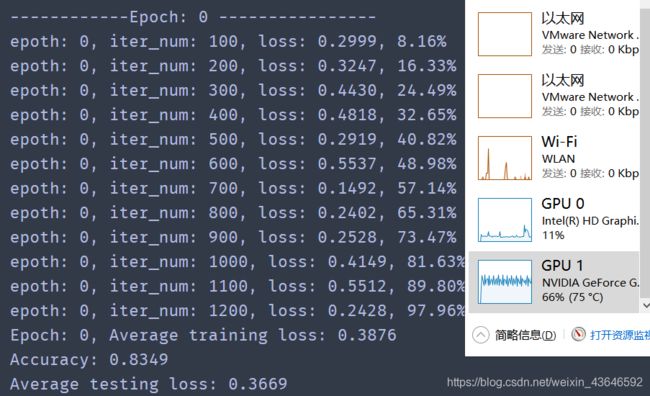
⭐用GPU跑了1个epoch(几分钟左右),准确率83%,如下:
for epoch in range(1):
    print("------------Epoch: %d ----------------" % epoch)
    train()
    validation()
