kaggle实战:极度不均衡样本下的信用卡数据分析
公众号:尤而小屋
作者:Peter
编辑:Peter
大家好,我是Peter~
今天给大家带来一篇新的kaggle文章:极度不均衡的信用卡数据分析,主要内容包含:
- 理解数据:通过直方图、箱型图等辅助理解数据分布
- 预处理:归一化和分布情况;数据分割
- 随机采样:上采样和下采样,主要是欠采样(下采样)
- 异常检测:如何从数据中找到异常点,并且进行删除
- 数据建模:利用逻辑回归和神经网络进行建模分析
- 模型评价:分类模型的多种评价指标
原notebook地址为:https://www.kaggle.com/code/janiobachmann/credit-fraud-dealing-with-imbalanced-datasets/notebook
所谓的【非均衡】:信用卡数据中欺诈和非欺诈的比例是不均衡的,肯定是非欺诈的比例占据绝大多数。本文提供一种方法:如何处理这种极度不均衡的数据
导入库
导入各种库和包:绘图、特征工程、降维、分类模型、评价指标相关等
基本信息
读取数据,查看基本信息
数据的形状如下:
In [3]:
df.shape
Out[3]:
(284807, 31)
In [4]:
# 缺失值的最大值
df.isnull().sum().max()
Out[4]:
0
结果表明是没有缺失值的。
下面是查看数据中字段的相关类型,我们发现有30个float64类型,1个int64类型
In [5]:
pd.value_counts(df.dtypes)
Out[5]:
float64    30
int64       1
dtype: int64
In [6]:
columns = df.columns
columns
Out[6]:
Index(['Time', 'V1', 'V2', 'V3', 'V4', 'V5', 'V6', 'V7', 'V8', 'V9', 'V10',
       'V11', 'V12', 'V13', 'V14', 'V15', 'V16', 'V17', 'V18', 'V19', 'V20',
       'V21', 'V22', 'V23', 'V24', 'V25', 'V26', 'V27', 'V28', 'Amount',
       'Class'],
      dtype='object')
查看数据的统计信息:
df.describe()
正负样本不均衡
In [8]:
df["Class"].value_counts(normalize=True)
Out[8]:
0    0.998273  # 不欺诈
1    0.001727  # 欺诈
Name: Class, dtype: float64
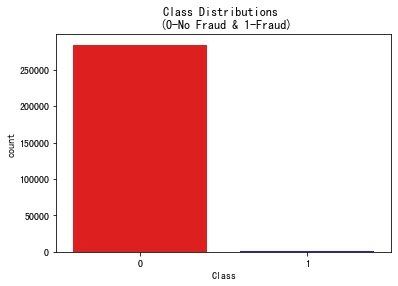
我们发现属于0类的样本远高于属于1的样本,非常地不均衡。这就是本文重点关注的问题。
In [9]:
# 绘图
colors = ["red", "blue"]

sns.countplot("Class", data=df, palette=colors)
plt.title("Class Distributions \n (0-No Fraud & 1-Fraud)")
plt.show()
通过柱状图也能够明显观察到非欺诈-0 和 欺诈-1的比例是极度不均衡的。
查看特征分布
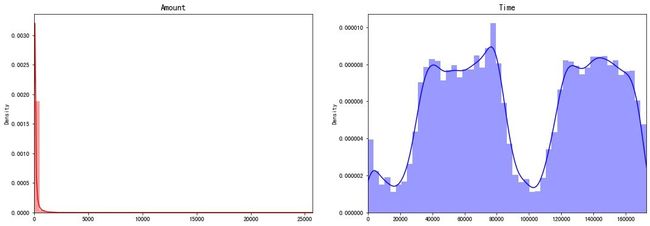
部分特征的分布,发现存在偏态状况:
直方图分布
In [10]:
fig, ax = plt.subplots(1,2,figsize=(18,6))

amount_val = df["Amount"].values
time_val = df["Time"].values

sns.distplot(amount_val, ax=ax[0], color="r")
ax[0].set_title("Amount", fontsize=14)
ax[0].set_xlim([min(amount_val), max(amount_val)])  # 设置范围


sns.distplot(time_val, ax=ax[1], color="b")
ax[1].set_title("Time", fontsize=14)
ax[1].set_xlim([min(time_val), max(time_val)])  # 设置范围

plt.show()
观察两个字段Amount和Time在不同取值下的分布情况,发现:
- Amount的偏态现象严重,极大多数的数据集中在左侧
- Time中,数据主要集中在两个阶段
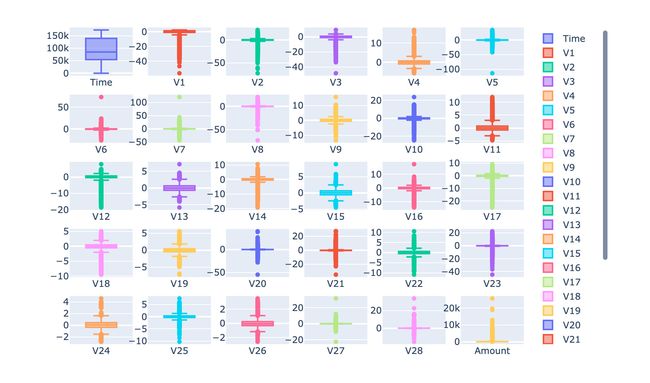
特征分布箱型图
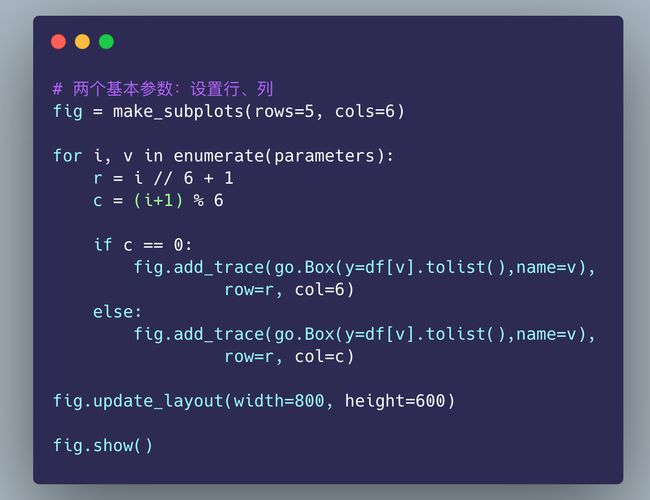
查看每个特征取值的箱型图:
数据预处理
数据缩放和分布
针对Amount和Time字段的归一化操作。原始数据中的其他字段已经进行了归一化的操作。
- StandardScaler:将数据减去均值除以标准差
- RobustScaler:如果数据有离群点,有对数据中心化和数据的缩放鲁棒性更强的参数
In [13]:
from sklearn.preprocessing import StandardScaler, RobustScaler

# ss = StandardScaler()
rs = RobustScaler()

# 好方法
df['scaled_amount'] = rs.fit_transform(df['Amount'].values.reshape(-1,1))
df['scaled_time'] = rs.fit_transform(df['Time'].values.reshape(-1,1))
In [14]:
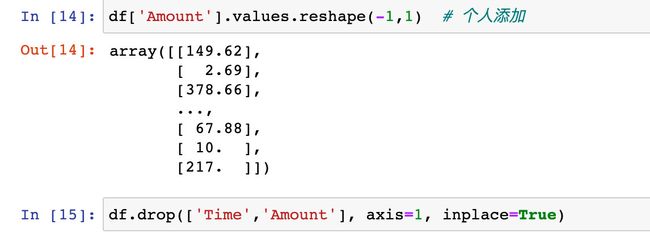
删除原始字段,使用归一化后的字段和数据
df['Amount'].values.reshape(-1,1) # 个人添加
技巧1:新字段位置
将新生成的字段放在最前面
# 把两个缩放的字段放在最前面

# 1、单独提出来
scaled_amount = df['scaled_amount']
scaled_time = df['scaled_time']

# 2、删除原字段信息
df.drop(['scaled_amount', 'scaled_time'], axis=1, inplace=True)

# 3、插入
df.insert(0, 'scaled_amount', scaled_amount)
df.insert(1, 'scaled_time', scaled_time)
分割数据(基于原DataFrame)
在开始进行随机欠采样之前,我们需要将原始数据进行分割。
尽管我们会对数据进行欠采样和上采样,但是我们希望在测试的时候,仍然是使用原始的数据集(原来的数据顺序)
In [18]:
from sklearn.model_selection import train_test_split
from sklearn.model_selection import StratifiedShuffleSplit
查看Class中0-no fraud和1-fraud的比例:
In [19]:
df["Class"].value_counts(normalize=True)
Out[19]:
0    0.998273
1    0.001727
Name: Class, dtype: float64
生成特征数据集X和标签数据y:
In [20]:
X = df.drop("Class", axis=1)
y = df["Class"]
In [21]:
技巧2:生成随机索引
sfk = StratifiedKFold(
    n_splits=5,   # 生成5份
    random_state=None,
    shuffle=False)

for train_index, test_index in sfk.split(X,y):
    # 随机生成的index
    print(train_index)
    print("------------")
    print(test_index)

    # 根据随机生成的索引再生成数据
    original_X_train = X.iloc[train_index]
    original_X_test = X.iloc[test_index]

    original_y_train = y.iloc[train_index]
    original_y_test = y.iloc[test_index]


[ 30473  30496  31002 ... 284804 284805 284806]
------------
[    0     1     2 ... 57017 57018 57019]

[     0      1      2 ... 284804 284805 284806]
------------
[ 30473  30496  31002 ... 113964 113965 113966]

[     0      1      2 ... 284804 284805 284806]
------------
[ 81609  82400  83053 ... 170946 170947 170948]

[     0      1      2 ... 284804 284805 284806]
------------
[150654 150660 150661 ... 227866 227867 227868]

[     0      1      2 ... 227866 227867 227868]
------------
[212516 212644 213092 ... 284804 284805 284806]
将生成的数据转成numpy数组:
In [22]:
original_Xtrain = original_X_train.values
original_Xtest = original_X_test.values

original_ytrain = original_y_train.values
original_ytest = original_y_test.values
查看训练集 original_ytrain 和 original_ytest 的唯一值以及每个唯一值所占的比例:
In [23]:
技巧3:数据唯一值及比例
# 训练集
# 针对的是numpy数组
train_unique_label, train_counts_label = np.unique(original_ytrain, return_counts=True)

# 测试集
test_unique_label, test_counts_label = np.unique(original_ytest, return_counts=True)
In [24]:
print(train_counts_label / len(original_ytrain))

print(test_counts_label / len(original_ytest))
[0.99827076 0.00172924]
[0.99827952 0.00172048]
欠采样
原理
欠采样也称之为下采样,主要是通过删除原数据中类别较多的数据,从而和类别少的数据达到平衡,以免造成模型的过拟合。
步骤
- 确定数据不平衡度是多少:通过value_counts()来统计,查看每个类别的数量和占比
- 在本例中一旦我们确定了fraud的数量,我们就需要将no-fraud的数量采样和其相同,形成50%:50%
- 实施采样之后,随机打乱采样的子样本
缺点
下采样会造成数据信息的缺失。比如原数据中no-fraud有284315条数据,但是经过欠采样只有492,大量的数据被放弃了。
实施采样
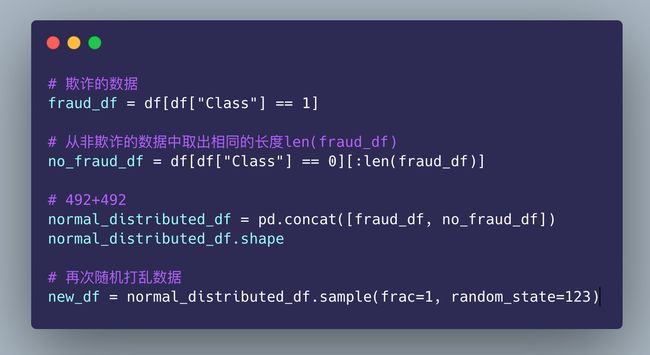
取出欺诈的数据,同时从非欺诈中取出相同长度的数据:
均匀分布
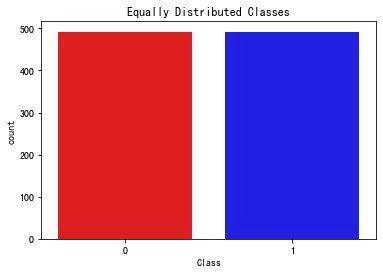
现在我们发现样本是均匀的:
In [28]:
# 显示数量

new_df["Class"].value_counts()
Out[28]:
1    492
0    492
Name: Class, dtype: int64
In [29]:
# 显示比例

new_df["Class"].value_counts(normalize=True)
Out[29]:
1    0.5
0    0.5
Name: Class, dtype: float64
In [30]:
当我们再次查看数据分布的时候发现:已经是均匀分布了
sns.countplot("Class",
              data=new_df,
              palette=colors)

plt.title("Equally Distributed Classes", fontsize=12)
plt.show()
相关性分析
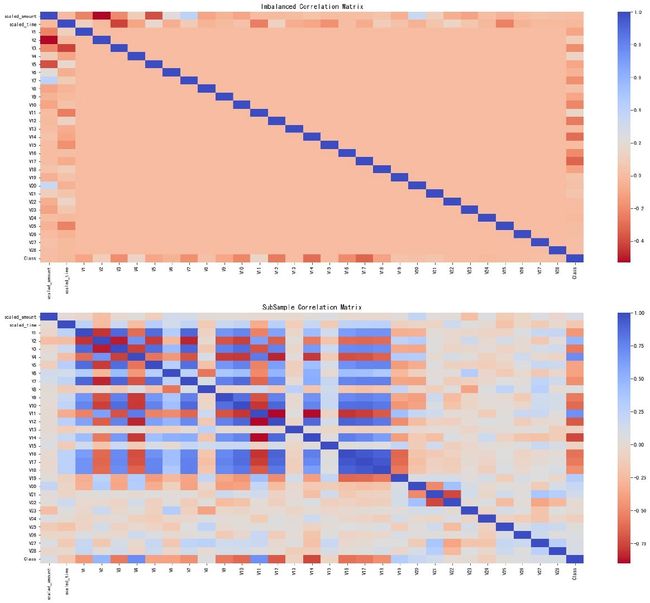
相关性分析主要是通过相关系数矩阵来实现的。下面绘制基于原始数据和欠采样数据的相关系数矩阵图:
系数矩阵热力图
In [31]:
f, (ax1, ax2) = plt.subplots(2,1,figsize=(24, 20))

# 原始数据df
corr = df.corr()
sns.heatmap(corr, cmap="coolwarm_r",annot_kws={"size":20}, ax=ax1)
ax1.set_title("Imbalanced Correlation Matrix", fontsize=14)

# 欠采样数据new_df
new_corr = new_df.corr()
sns.heatmap(new_corr, cmap="coolwarm_r",annot_kws={"size":20}, ax=ax2)
ax2.set_title("SubSample Correlation Matrix", fontsize=14)

plt.show()
小结:
- 正相关:特征V2、V4、V11、V19是正相关的。值越大,结果越可能出现fraud
- 负相关:特征V17, V14, V12 和 V10 是负相关的;值越小,结果越可能出现fraud
箱型图
In [32]:
负相关的特征箱型图
# 负相关的数据
# 生成4个子图
f, axes = plt.subplots(ncols=4, figsize=(20,4))

sns.boxplot(x="Class",  # 分类的类别 0-1
            y="V17",   # 选择某个字段进行绘图
            data=new_df,   # 绘图的数据
            palette=colors,
            ax=axes[0])  # 选择某个ax来绘图
axes[0].set_title('V17')  # 子图标题


sns.boxplot(x="Class",
            y="V14",
            data=new_df,
            palette=colors,
            ax=axes[1])
axes[1].set_title('V14')


sns.boxplot(x="Class",
            y="V12",
            data=new_df,
            palette=colors,
            ax=axes[2])

axes[2].set_title('V12')


sns.boxplot(x="Class",
            y="V10",
            data=new_df,
            palette=colors,
            ax=axes[3])
axes[3].set_title('V10')

plt.show()
正相关特征的箱型图:
# 正相关
f, axes = plt.subplots(ncols=4, figsize=(20,4))

sns.boxplot(x="Class",
            y="V2",
            data=new_df,
            palette=colors,
            ax=axes[0])
axes[0].set_title('V2')


sns.boxplot(x="Class",
            y="V4",
            data=new_df,
            palette=colors,
            ax=axes[1])
axes[1].set_title('V4')


sns.boxplot(x="Class",
            y="V11",
            data=new_df,
            palette=colors,
            ax=axes[2])
axes[2].set_title('V11')


sns.boxplot(x="Class",
            y="V19",
            data=new_df,
            palette=colors,
            ax=axes[3])
axes[3].set_title('V19')

plt.show()
异常检测
目的
异常检测的目的主要是:发现数据中的离群点来进行删除。
方法
- IQR:我们通过第75个百分位和第25个百分位之间的差异来计算。我们的目标是创建一个超过第75和 25 个百分位的阈值,以防某些实例超过此阈值,如果超过阈值该实例将被删除。
- 箱型图boxplot:除了很容易看到第 25 和第 75 个百分位数(正方形的两端)之外,还很容易看到极端异常值(超出下限和上限的点)
异常值去除权衡
在通过四分位法删除异常值的时候,我们通过将一个数字(例如1.5)乘以(四分位距)来确定阈值。该阈值越高,检测到的异常值越少,反之检测到的异常值越多。这个比例(例如1.5)我们可以在实际进行控制
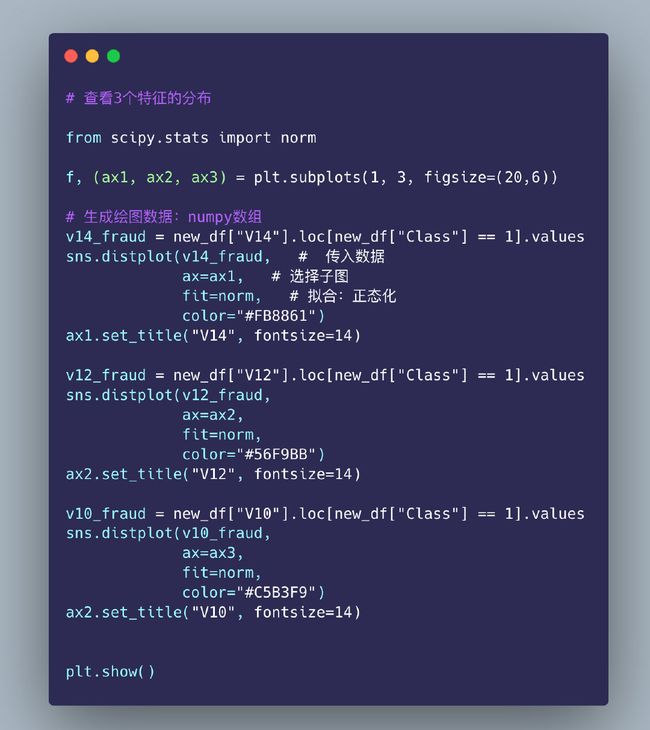
特征分布-直方图
In [34]:
技巧4:删除离群点
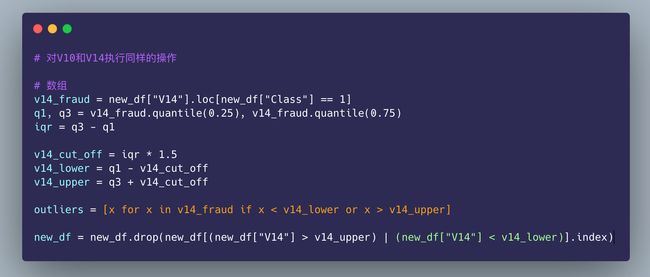
删除3个特征下的离群点,以V12为例:
In [35]:
第一步先确定上下分位数的值:
# 数组
v12_fraud = new_df["V12"].loc[new_df["Class"] == 1]

# 25%和75%分位数
q1, q3 = v12_fraud.quantile(0.25), v12_fraud.quantile(0.75)
iqr = q3 - q1
In [36]:
# 确定上下限
v12_cut_off = iqr * 1.5
v12_lower = q1 - v12_cut_off
v12_upper = q3 + v12_cut_off

print(v12_lower)
print(v12_upper)

-17.25930926645337
5.597044719256134
In [37]:
找出满足要求的离群点的数据
# 确定离群点
outliers = [x for x in v12_fraud if x < v12_lower or x > v12_upper]

print(outliers)
print("------------")
print("离群点数量:",len(outliers))
[-17.6316063138707, -17.7691434633638, -18.6837146333443,
-18.5536970096458, -18.0475965708216, -18.4311310279993]
------------
离群点数量: 6
对单个列字段的数据执行下面删除离群点的操作:
In [38]:
# 技巧:如何删除异常值
new_df = new_df.drop(new_df[(new_df["V12"] > v12_upper) | (new_df["V12"] < v12_lower)].index)
new_df
对其他的特征执行相同的操作:
可以看到:欠采样之后的数据原本是984,现在变成了978条数据,删除了6个离群点的数据
In [39]:
In [40]:
# 对V10和V14执行同样的操作

# 数组
v10_fraud = new_df["V10"].loc[new_df["Class"] == 1]
q1, q3 = v10_fraud.quantile(0.25), v10_fraud.quantile(0.75)
iqr = q3 - q1

v10_cut_off = iqr * 1.5
v10_lower = q1 - v10_cut_off
v10_upper = q3 + v10_cut_off

outliers = [x for x in v10_fraud if x < v10_lower or x > v10_upper]

new_df = new_df.drop(new_df[(new_df["V10"] > v10_upper) | (new_df["V10"] < v10_lower)].index)
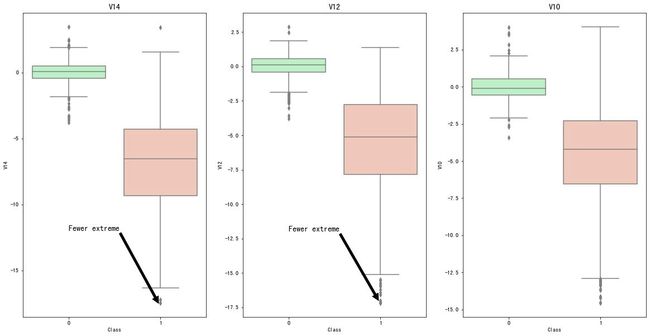
查看删除了异常点后的数据:
In [42]:
f, (ax1, ax2, ax3) = plt.subplots(1,3,figsize=(20,10))

colors = ['#B3F9C5', '#f9c5b3']

sns.boxplot(x="Class",  # 分类字段
            y="V14",   # y轴的取值
            data=new_df,  # 数据框
            ax=ax1,  # 子图
            palette=colors)
ax1.set_title("V14", fontsize=14)  # 标题
ax1.annotate("Fewer extreme",   # 注解
             xy=(0.98,-17.5),
             xytext=(0,-12),
             arrowprops=dict(facecolor="black"),
             fontsize=14)

sns.boxplot(x="Class", y="V12", data=new_df, ax=ax2, palette=colors)
ax2.set_title("V12", fontsize=14)
ax2.annotate("Fewer extreme",
             xy=(0.98,-17),
             xytext=(0,-12),
             arrowprops=dict(facecolor="black"),
             fontsize=14)

sns.boxplot(x="Class", y="V10", data=new_df, ax=ax3, palette=colors)
ax3.set_title("V10", fontsize=14)
ax3.annotate("Fewer extreme",   # 注释名称
             xy=(0.98,-16.5), # 位置
             xytext=(0,-12),  # 注释文本的坐标点,二维元组,默认xy
             arrowprops=dict(facecolor="black"), # 箭头颜色
             fontsize=14)

plt.show()
降维和聚类
理解t-SNE
详细地址:https://www.youtube.com/watch?v=NEaUSP4YerM
欠采样数据降维
对3种不同方法实施欠采样:
In [43]:
X = new_df.drop("Class", axis=1)
y = new_df["Class"]

# t-SNE降维
t0 = time.time()
X_reduced_tsne = TSNE(n_components=2,
                      random_state=42).fit_transform(X.values)
t1 = time.time()
print("T-SNE: ", (t1 - t0))
T-SNE:  5.750015020370483
In [44]:
# PCA降维
t0 = time.time()
X_reduced_pca = PCA(n_components=2,
                    random_state=42).fit_transform(X.values)
t1 = time.time()
print("PCA: ", (t1 - t0))
PCA:  0.02214193344116211
In [45]:
# TruncatedSVD降维

t0 = time.time()
X_reduced_svd = TruncatedSVD(n_components=2,
                             algorithm="randomized",
                             random_state=42).fit_transform(X.values)
t1 = time.time()
print("TruncatedSVD: ", (t1 - t0))
TruncatedSVD:  0.01066279411315918
绘图
In [46]:
f, (ax1, ax2, ax3) = plt.subplots(1,3,figsize=(24,6))

# 标题设置
f.suptitle("Clusters using Dimensionality Reduction", fontsize=14)

blue_patch = mpatches.Patch(color="#0A0AFF", label="No Fraud")
red_patch = mpatches.Patch(color="#AF0000", label="Fraud")

# t-SNE
ax1.scatter(X_reduced_tsne[:,0],
            X_reduced_tsne[:,1],
            c=(y==0),
            cmap="coolwarm",
            label="No Fraud",
            linewidths=2
           )
ax1.scatter(X_reduced_tsne[:,0],
            X_reduced_tsne[:,1],
            c=(y==0),
            cmap="coolwarm",
            label="Fraud",
            linewidths=2
           )
ax1.set_title("t-SNE", fontsize=14)  # 子图标题设置
ax1.grid(True)   # 设置网格
ax1.legend(handles=[blue_patch,red_patch])  # 设置图例

# PCA
ax2.scatter(X_reduced_pca[:,0],
            X_reduced_pca[:,1],
            c=(y==0),
            cmap="coolwarm",
            label="No Fraud",
            linewidths=2
           )
ax2.scatter(X_reduced_pca[:,0],
            X_reduced_pca[:,1],
            c=(y==0),
            cmap="coolwarm",
            label="Fraud",
            linewidths=2
           )
ax2.set_title("PCA",  fontsize=14)  # 标题设置
ax2.grid(True)   # 设置网格
ax2.legend(handles=[blue_patch,red_patch])

# TruncatedSVD
ax3.scatter(X_reduced_svd[:,0],
            X_reduced_svd[:,1],
            c=(y==0),
            cmap="coolwarm",
            label="No Fraud",
            linewidths=2
           )
ax3.scatter(X_reduced_svd[:,0],
            X_reduced_svd[:,1],
            c=(y==0),
            cmap="coolwarm",
            label="Fraud",
            linewidths=2
           )
ax3.set_title("TruncatedSVD", fontsize=14)  # 标题设置
ax3.grid(True)   # 设置网格
ax3.legend(handles=[blue_patch,red_patch])

plt.show()
基于欠采样的分类建模
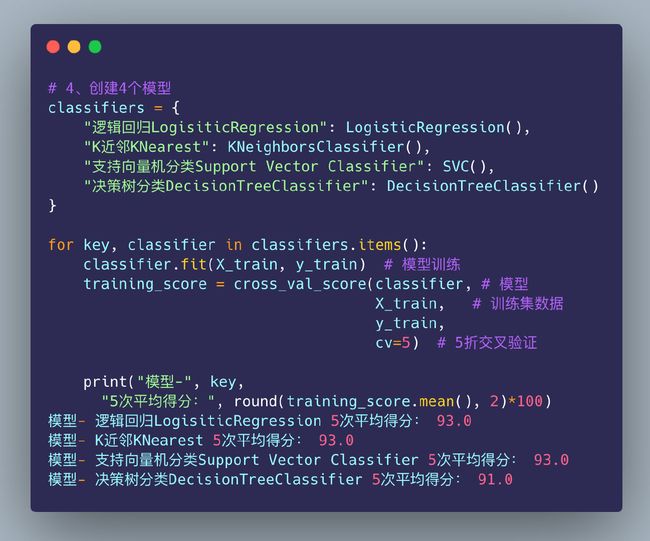
4个分类模型
采用4个不同模型的分类来训练数据,看哪个模型在欺诈数据上表现的更好。首先需要对数据进行划分:训练集和测试集
In [47]:
# 1、特征和标签数据

X = new_df.drop("Class", axis=1)
y = new_df["Class"]
In [48]:
原始数据的划分:
# 2、数据已经归一化,直接切分
from sklearn.model_selection import train_test_split

# 8-2的比例
X_train, X_test, y_train, y_test = train_test_split(X,y,test_size=0.2,random_state=44)
In [49]:
# 3、将数据转成数组,然后传给模型
X_train = X_train.values
X_test = X_test.values

y_train = y_train.values
y_test = y_test.values
In [50]:
对划分的原始数据实施交叉验证和计算得分:
网格搜索
针对不同测模型实施网格搜索,寻找最优参数
In [51]:
from sklearn.model_selection import GridSearchCV

# 逻辑回归
lr_params = {"penalty":["l1", "l2"],
             "C": [0.001, 0.01, 0.1, 1, 10, 100, 1000]
            }
grid_lr = GridSearchCV(LogisticRegression(), lr_params)
grid_lr.fit(X_train, y_train)

# 最好的参数组合
best_para_lr = grid_lr.best_estimator_
best_para_lr
Out[51]:
LogisticRegression(C=0.1)
In [52]:
# k近邻
knn_params = {"n_neighbors": list(range(2,5,1)),
              "algorithm":["auto","ball_tree","kd_tree","brute"]
            }

grid_knn = GridSearchCV(KNeighborsClassifier(), knn_params)
grid_knn.fit(X_train, y_train)

# 最好的参数组合
best_para_knn = grid_knn.best_estimator_
best_para_knn
Out[52]:
KNeighborsClassifier(n_neighbors=2)
In [53]:
# 支持向量机分类

svc_params = {"C":[0.5, 0.7, 0.9, 1],
              "kernel":["rbf","poly","sigmoid","linear"]
            }

grid_svc = GridSearchCV(SVC(), svc_params)
grid_svc.fit(X_train, y_train)

best_para_svc = grid_svc.best_estimator_
best_para_svc
Out[53]:
SVC(C=0.9, kernel='linear')
In [54]:
# 决策树

dt_params = {"criterion":["gini","entropy"],
             "max_depth":list(range(2, 5, 1)),
             "min_samples_leaf": list(range(5,7,1))
            }

grid_dt = GridSearchCV(DecisionTreeClassifier(), dt_params)
grid_dt.fit(X_train, y_train)

best_para_dt = grid_dt.best_estimator_
best_para_dt
Out[54]:
DecisionTreeClassifier(max_depth=3, min_samples_leaf=5)
重新训练并评分
基于最优参数重新计算得分:
In [55]:
lr_score = cross_val_score(best_para_lr, X_train, y_train,cv=5)

print("逻辑回归交叉验证得分:", round(lr_score.mean() * 100, 2).astype(str) + "%")
逻辑回归交叉验证得分: 93.63%
In [56]:
knn_score = cross_val_score(best_para_knn, X_train, y_train,cv=5)

print("KNN交叉验证得分:", round(knn_score.mean() * 100, 2).astype(str) + "%")
KNN交叉验证得分: 93.37%
In [57]:
svc_score = cross_val_score(best_para_svc, X_train, y_train,cv=5)

print("SVC交叉验证得分:", round(svc_score.mean() * 100, 2).astype(str) + "%")
SVC交叉验证得分: 93.5%
In [58]:
dt_score = cross_val_score(best_para_dt, X_train, y_train,cv=5)

print("决策树交叉验证得分:", round(dt_score.mean() * 100, 2).astype(str) + "%")
决策树交叉验证得分: 93.24%
小结:通过不同模型的交叉验证得分我们发现,逻辑回归模型是最高的
基于欠采样数据的交叉验证
主要是基于Near-Miss算法来实现欠采样:
- Near-miss-1:选择到最近的三个样本平均距离最小的多数类样本
- Near-miss-2:选择到最远的三个样本平均距离最小的多数类样本
- Near-miss-3:为每个少数类样本选择给定数目的最近多数类样本
- 最远距离:选择到最近的三个样本平均距离最大的多样类样本
In [59]:
undersample_X = df.drop("Class", axis=1)
undersample_y = df["Class"]


sfk = StratifiedKFold(
    n_splits=5,   # 5次交叉验证
    random_state=None,
    shuffle=False)

for train_index , test_index in sfk.split(undersample_X,undersample_y):
  	# 每次随机生成的验证集和测试集的索引号
    # print("Train: ", train_index)
    # print("Test: ", test_index)

    undersample_Xtrain = undersample_X.iloc[train_index]  # 根据索引号来确定数据
    undersample_Xtest = undersample_X.iloc[test_index]

    undersample_ytrain = undersample_y.iloc[train_index]
    undersample_ytest = undersample_y.iloc[test_index]

# 数据转成numpy数组
undersample_Xtrain = undersample_Xtrain.values
undersample_Xtest = undersample_Xtest.values
undersample_ytrain = undersample_ytrain.values
undersample_ytest = undersample_ytest.values

# 5个评价指标
undersample_accuracy = []
undersample_precision = []
undersample_recall = []
undersample_f1 = []
undersample_auc = []
使用近邻缺失Near-Miss算法来查看数据分布:
In [60]:
undersample_X = df.drop("Class", axis=1)
undersample_y = df["Class"]

X_nearmiss, y_nearmiss = NearMiss().fit_resample(undersample_X.values, undersample_y.values)

print("NearMiss Label Distributions: {}", format(Counter(y_nearmiss)))
NearMiss Label Distributions: {} Counter({0: 492, 1: 492})
以网格搜索过后的逻辑回归模型来实施交叉验证:
In [61]:
for train, test in sfk.split(undersample_Xtrain, undersample_ytrain):
    undersample_pipeline = imbalanced_make_pipeline(NearMiss(sampling_strategy="majority"), best_para_lr)

    # 模型训练:传入训练X-y
    undersample_model = undersample_pipeline.fit(undersample_Xtrain[train], undersample_ytrain[train])

    # 对测试集预测-Xtrain
    undersample_prediction = undersample_model.predict(undersample_Xtrain[test])

    # y_test真实值和预测值的评分
    undersample_accuracy.append(undersample_pipeline.score(original_Xtrain[test], original_ytrain[test]))
    undersample_precision.append(precision_score(original_ytrain[test], undersample_prediction))
    undersample_recall.append(recall_score(original_ytrain[test], undersample_prediction))
    undersample_f1.append(f1_score(original_ytrain[test], undersample_prediction))
    undersample_auc.append(roc_auc_score(original_ytrain[test], undersample_prediction))
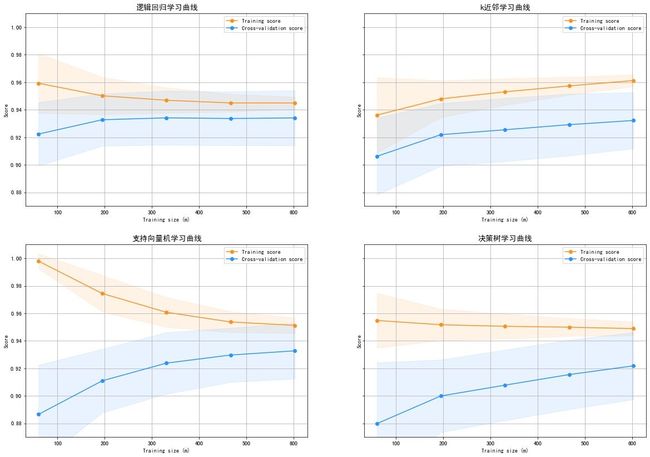
绘制学习曲线
In [62]:
from sklearn.model_selection import ShuffleSplit, learning_curve
In [63]:
def plot_learning_curve(est1,est2,est3,est4,X,y,ylim=None,cv=None,n_jobs=1,train_sizes=np.linspace(0.1, 1, 5)):

    f, ((ax1,ax2), (ax3,ax4)) = plt.subplots(2,2,figsize=(20,14), sharey=True)

    if ylim is not None:
        plt.ylim(*ylim)


    # 模型1
    train_sizes, train_scores, test_scores = learning_curve(
        est1, X, y, cv=cv, n_jobs=n_jobs, train_sizes=train_sizes)
    train_scores_mean = np.mean(train_scores, axis=1)  # 训练集的均值和方差
    train_scores_std = np.std(train_scores, axis=1)
    test_scores_mean = np.mean(test_scores, axis=1)   # 测试集的均值和方差
    test_scores_std = np.std(test_scores, axis=1)
    ax1.fill_between(train_sizes, train_scores_mean - train_scores_std,  # 填充区域的设置
                     train_scores_mean + train_scores_std, alpha=0.1,
                     color="#ff9124")
    ax1.fill_between(train_sizes, test_scores_mean - test_scores_std,
                     test_scores_mean + test_scores_std, alpha=0.1,
                     color="#2492ff")
    ax1.plot(train_sizes, train_scores_mean,
             'o-', color="#ff9124",
             label="Training score")  # 绘制训练集得分
    ax1.plot(train_sizes, test_scores_mean,
             'o-', color="#2492ff",
             label="Cross-validation score")  # 绘制交叉验证得分
    ax1.set_title("逻辑回归学习曲线", fontsize=14)
    ax1.set_xlabel('Training size (m)')  # 两个轴的标题
    ax1.set_ylabel('Score')
    ax1.grid(True)  # 网格显示
    ax1.legend(loc="best")  # 图例位置

    # 模型2-knn
    train_sizes, train_scores, test_scores = learning_curve(
        est2, X, y, cv=cv, n_jobs=n_jobs, train_sizes=train_sizes)
    train_scores_mean = np.mean(train_scores, axis=1)
    train_scores_std = np.std(train_scores, axis=1)
    test_scores_mean = np.mean(test_scores, axis=1)
    test_scores_std = np.std(test_scores, axis=1)
    ax2.fill_between(train_sizes, train_scores_mean - train_scores_std,
                     train_scores_mean + train_scores_std, alpha=0.1,
                     color="#ff9124")
    ax2.fill_between(train_sizes, test_scores_mean - test_scores_std,
                     test_scores_mean + test_scores_std, alpha=0.1, color="#2492ff")
    ax2.plot(train_sizes, train_scores_mean, 'o-', color="#ff9124",
             label="Training score")
    ax2.plot(train_sizes, test_scores_mean, 'o-', color="#2492ff",
             label="Cross-validation score")
    ax2.set_title("k近邻学习曲线", fontsize=14)
    ax2.set_xlabel('Training size (m)')
    ax2.set_ylabel('Score')
    ax2.grid(True)
    ax2.legend(loc="best")

    # 模型3-支持向量机
    train_sizes, train_scores, test_scores = learning_curve(
        est3, X, y, cv=cv, n_jobs=n_jobs, train_sizes=train_sizes)
    train_scores_mean = np.mean(train_scores, axis=1)
    train_scores_std = np.std(train_scores, axis=1)
    test_scores_mean = np.mean(test_scores, axis=1)
    test_scores_std = np.std(test_scores, axis=1)
    ax3.fill_between(train_sizes, train_scores_mean - train_scores_std,
                     train_scores_mean + train_scores_std, alpha=0.1,
                     color="#ff9124")
    ax3.fill_between(train_sizes, test_scores_mean - test_scores_std,
                     test_scores_mean + test_scores_std, alpha=0.1, color="#2492ff")
    ax3.plot(train_sizes, train_scores_mean, 'o-', color="#ff9124",
             label="Training score")
    ax3.plot(train_sizes, test_scores_mean, 'o-', color="#2492ff",
             label="Cross-validation score")
    ax3.set_title("支持向量机学习曲线", fontsize=14)
    ax3.set_xlabel('Training size (m)')
    ax3.set_ylabel('Score')
    ax3.grid(True)
    ax3.legend(loc="best")

    # 模型4-决策树
    train_sizes, train_scores, test_scores = learning_curve(
        est4, X, y, cv=cv, n_jobs=n_jobs, train_sizes=train_sizes)
    train_scores_mean = np.mean(train_scores, axis=1)
    train_scores_std = np.std(train_scores, axis=1)
    test_scores_mean = np.mean(test_scores, axis=1)
    test_scores_std = np.std(test_scores, axis=1)
    ax4.fill_between(train_sizes, train_scores_mean - train_scores_std,
                     train_scores_mean + train_scores_std, alpha=0.1,
                     color="#ff9124")
    ax4.fill_between(train_sizes, test_scores_mean - test_scores_std,
                     test_scores_mean + test_scores_std, alpha=0.1, color="#2492ff")
    ax4.plot(train_sizes, train_scores_mean, 'o-', color="#ff9124",
             label="Training score")
    ax4.plot(train_sizes, test_scores_mean, 'o-', color="#2492ff",
             label="Cross-validation score")
    ax4.set_title("决策树学习曲线", fontsize=14)
    ax4.set_xlabel('Training size (m)')
    ax4.set_ylabel('Score')
    ax4.grid(True)
    ax4.legend(loc="best")

    return plt
In [64]:
cv = ShuffleSplit(n_splits=100,
                  test_size=0.2,
                  random_state=42
                 )

plot_learning_curve(best_para_lr,  # 传入4种模型
                    best_para_knn,
                    best_para_svc,
                    best_para_dt,
                    X_train,
                    y_train,
                    (0.87,1.01),
                    cv=cv,
                    n_jobs=4
                   )

plt.show
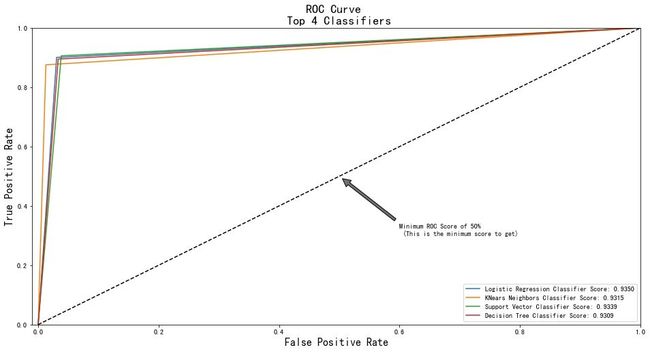
roc曲线
In [65]:
from sklearn.metrics import roc_curve, roc_auc_score
from sklearn.model_selection import cross_val_predict
In [66]:
lr_pred = cross_val_predict(best_para_lr,
                            X_train,
                            y_train,
                            cv=5,
                            # method="decision_function"
                           )

knn_pred = cross_val_predict(best_para_knn,
                            X_train,
                            y_train,
                            cv=5
                           )

svc_pred = cross_val_predict(best_para_svc,
                            X_train,
                            y_train,
                            cv=5
                           )
dt_pred = cross_val_predict(best_para_dt,
                            X_train,
                            y_train,
                            cv=5
                           )
In [67]:
print('Logistic Regression: ', roc_auc_score(y_train, lr_pred))
print('KNears Neighbors: ', roc_auc_score(y_train, knn_pred))
print('Support Vector Classifier: ', roc_auc_score(y_train, svc_pred))
print('Decision Tree Classifier: ', roc_auc_score(y_train, dt_pred))

Logistic Regression:  0.934970120644943
KNears Neighbors:  0.9314677528469951
Support Vector Classifier:  0.9339060209719247
Decision Tree Classifier:  0.930932179501635
In [68]:
log_fpr, log_tpr, log_thresold = roc_curve(y_train, lr_pred)
knear_fpr, knear_tpr, knear_threshold = roc_curve(y_train, knn_pred)
svc_fpr, svc_tpr, svc_threshold = roc_curve(y_train, svc_pred)
tree_fpr, tree_tpr, tree_threshold = roc_curve(y_train, dt_pred)

# 绘制tpr-fpr得分图
def graph_roc_curve_multiple(log_fpr, log_tpr, knear_fpr, knear_tpr, svc_fpr, svc_tpr, tree_fpr, tree_tpr):
    plt.figure(figsize=(16,8))
    plt.title('ROC Curve \n Top 4 Classifiers', fontsize=18)
    plt.plot(log_fpr, log_tpr, label='Logistic Regression Classifier Score: {:.4f}'.format(roc_auc_score(y_train, lr_pred)))
    plt.plot(knear_fpr, knear_tpr, label='KNears Neighbors Classifier Score: {:.4f}'.format(roc_auc_score(y_train, knn_pred)))
    plt.plot(svc_fpr, svc_tpr, label='Support Vector Classifier Score: {:.4f}'.format(roc_auc_score(y_train, svc_pred)))
    plt.plot(tree_fpr, tree_tpr, label='Decision Tree Classifier Score: {:.4f}'.format(roc_auc_score(y_train, dt_pred)))

    plt.plot([0, 1], [0, 1], 'k--')
    plt.axis([-0.01, 1, 0, 1])

    plt.xlabel('False Positive Rate', fontsize=16)
    plt.ylabel('True Positive Rate', fontsize=16)
    plt.annotate('Minimum ROC Score of 50% \n (This is the minimum score to get)',
                 xy=(0.5, 0.5),
                 xytext=(0.6, 0.3),
                arrowprops=dict(facecolor='#6E726D', shrink=0.05),
                )
    plt.legend()

graph_roc_curve_multiple(log_fpr, log_tpr, knear_fpr, knear_tpr, svc_fpr, svc_tpr, tree_fpr, tree_tpr)
plt.show()
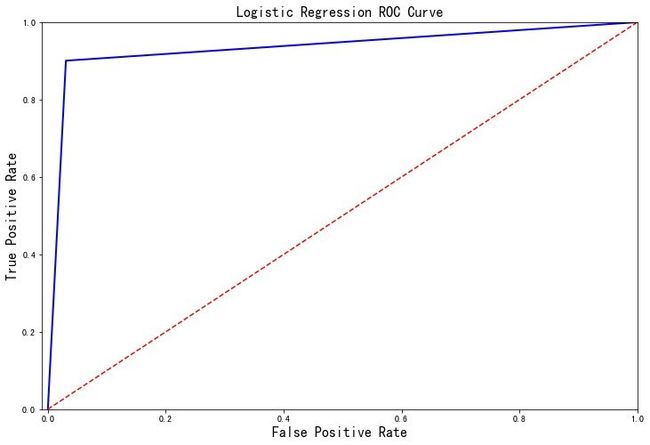
探索逻辑回归评价指标
探索在逻辑回归模型的分类评价指标:
In [69]:
def logistic_roc_curve(log_fpr, log_tpr):
    plt.figure(figsize=(12,8))
    plt.title('Logistic Regression ROC Curve', fontsize=16)
    plt.plot(log_fpr, log_tpr, 'b-', linewidth=2)
    plt.plot([0, 1], [0, 1], 'r--')
    plt.xlabel('False Positive Rate', fontsize=16)
    plt.ylabel('True Positive Rate', fontsize=16)
    plt.axis([-0.01,1,0,1])


logistic_roc_curve(log_fpr, log_tpr)
plt.show()
from sklearn.metrics import precision_recall_curve

precision, recall, threshold = precision_recall_curve(y_train, lr_pred)
In [71]:
from sklearn.metrics import recall_score, precision_score, f1_score, accuracy_score
y_pred = best_para_lr.predict(X_train)

# Overfitting Case
print('---' * 20)
print('Recall Score: {:.2f}'.format(recall_score(y_train, y_pred)))
print('Precision Score: {:.2f}'.format(precision_score(y_train, y_pred)))
print('F1 Score: {:.2f}'.format(f1_score(y_train, y_pred)))
print('Accuracy Score: {:.2f}'.format(accuracy_score(y_train, y_pred)))

print('---' * 20)
print("Accuracy Score: {:.2f}".format(np.mean(undersample_accuracy)))
print("Precision Score: {:.2f}".format(np.mean(undersample_precision)))
print("Recall Score: {:.2f}".format(np.mean(undersample_recall)))
print("F1 Score: {:.2f}".format(np.mean(undersample_f1)))
print('---' * 20)
------------------------------------------------------------
# 基于原数据
Recall Score: 0.92
Precision Score: 0.79
F1 Score: 0.85
Accuracy Score: 0.84

------------------------------------------------------------
 # 基于欠采样的数据
Accuracy Score: 0.75
Precision Score: 0.00
Recall Score: 0.24
F1 Score: 0.00
------------------------------------------------------------

