Spring Session 详解
文章目录
- 1.SpringSession简介
-
- 1.1 Session 会话管理及带来的问题
- 1.2 SpringSession的特性
- 2.入门案例
-
- 2.1 创建项目
- 2.2 代码开发
- 2.3 SpringSession 集成配置
- 3.同域名下不同项目的session共享
-
- 3.1 案例
- 3.同根域名不同二级子域名下的项目实现Session 共享
-
- 3.1案例
1.SpringSession简介
1.1 Session 会话管理及带来的问题
HTTP协议本身是无状态,的为了保存会话信息,浏览器Cookie通过SessionID标识会话请求,服务器以SessionID为key来存储会话信息。 在 Web 项目开发中, Session 会话管理是一个很重要的部分, 用于存储与记录用户的状态或相关的数据。
- 通常情况下 session 交由容器(tomcat) 来负责存储和管理, 但是如果项目部署在多台tomcat 中, 则 session 管理存在很大的问题
- 多台 tomcat 之间无法共享 session, 比如用户在 tomcat A 服务器上已经登录了, 但当负载均衡跳转到 tomcat B 时, 由于 tomcat B 服务器并没有用户的登录信息,session 就失效了, 用户就退出了登录
- 一旦 tomcat 容器关闭或重启也会导致 session 会话失效因此如果项目部署在多台 tomcat 中, 就需要解决 session 共享的问题
1.2 SpringSession的特性
使用框架的会话管理工具,也就是我们要介绍的 Spring session,这个方案既不依赖 tomcat 容器, 又不需要改动代码, 由 Spring session 框架为我们提供, 可以说是目前非常完美的 session 共享解决方案。Spring Session 是 Spring 家族中的一个子项目, 它提供一组 API 和实现, 用于管理用户的 session 信息.它把 servlet 容器实现的 httpSession 替换为 spring-session, 专注于解决 session 管理问题, Session 信息存储在 Redis 中, 可简单快速且无缝的集成到我们的应用中;
Spring Session 的特性:
- 提供用户 session 管理的 API 和实现
- 提供 HttpSession, 以中立的方式取代 web 容器的 session, 比如 tomcat 中的session
- 支持集群的 session 处理, 不必绑定到具体的 web 容器去解决集群下的 session共享问题
2.入门案例
2.1 创建项目
(1)创建一个Maven的web module,名字为01-springsession-web
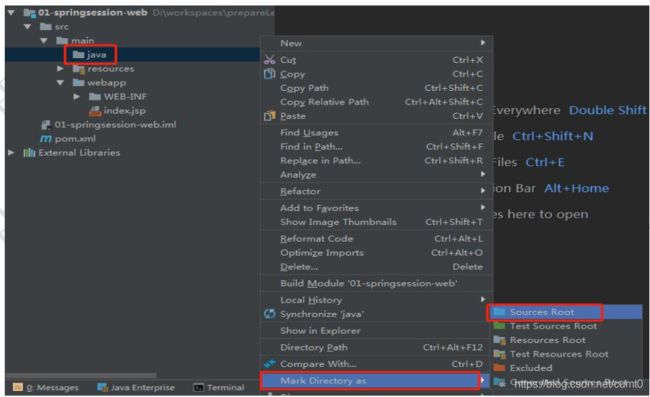
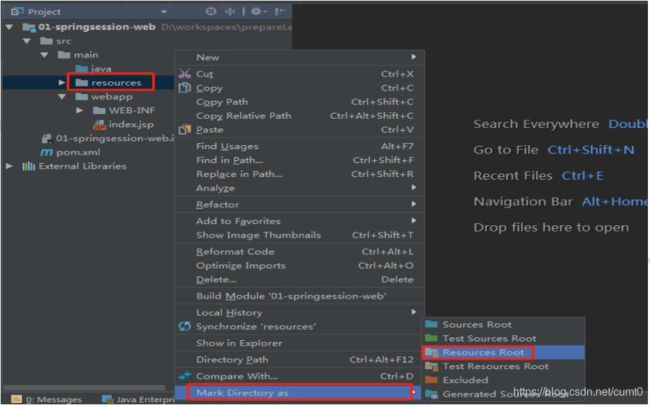
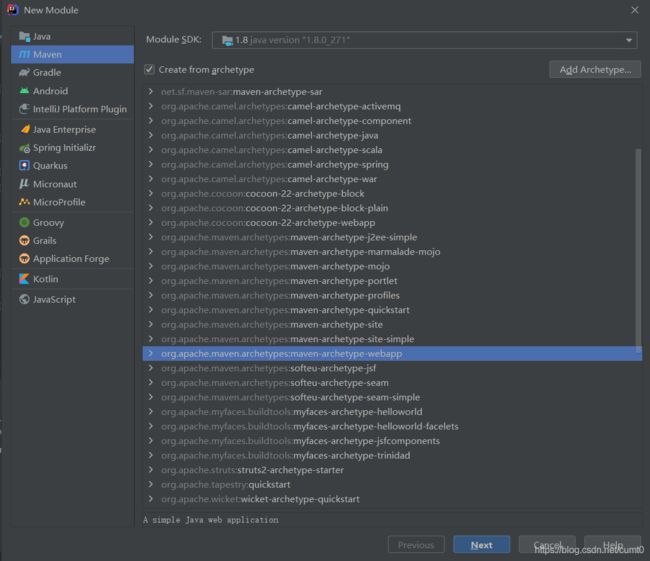 (2)完善Maven项目的结构
    <dependency>
      <groupId>javax.servletgroupId>
      <artifactId>javax.servlet-apiartifactId>
      <version>3.1.0version>
    dependency>

    <dependency>
      <groupId>org.springframework.sessiongroupId>
      <artifactId>spring-session-data-redisartifactId>
      <version>1.3.1.RELEASEversion>
    dependency>

    <dependency>
      <groupId>org.springframeworkgroupId>
      <artifactId>spring-webartifactId>
      <version>5.2.10.RELEASEversion>
    dependency>
2.2 代码开发
(1) 创建向 session 放数据的 servlet
package session.servlet;

import javax.servlet.ServletException;
import javax.servlet.annotation.WebServlet;
import javax.servlet.http.HttpServlet;
import javax.servlet.http.HttpServletRequest;
import javax.servlet.http.HttpServletResponse;
import java.io.IOException;

@WebServlet(urlPatterns = "/setSession")
public class SetSessionServlet extends HttpServlet {
    @Override
    protected void doPost(HttpServletRequest req, HttpServletResponse resp) throws ServletException, IOException {
        doGet(req,resp);
    }

    @Override
    protected void doGet(HttpServletRequest req, HttpServletResponse resp) throws ServletException, IOException {
        req.getSession().setAttribute("url","http://www.baidu.com");
        resp.getWriter().write("OK");
    }
}
(2) 创建从 session 中获取数据的 servlet
package session.servlet;

import javax.servlet.ServletException;
import javax.servlet.annotation.WebServlet;
import javax.servlet.http.HttpServlet;
import javax.servlet.http.HttpServletRequest;
import javax.servlet.http.HttpServletResponse;
import java.io.IOException;

@WebServlet(urlPatterns = "/getSession")
public class GetSessionServlet extends HttpServlet {
    @Override
    protected void doPost(HttpServletRequest req, HttpServletResponse resp) throws ServletException, IOException {
        doGet(req,resp);
    }

    @Override
    protected void doGet(HttpServletRequest req, HttpServletResponse resp) throws ServletException, IOException {
        String url= (String) req.getSession().getAttribute("url");
        resp.getWriter().write(url==null?"NO Session":url);
    }
}
(3)部署访问测试(目前无法实现 session 共享)
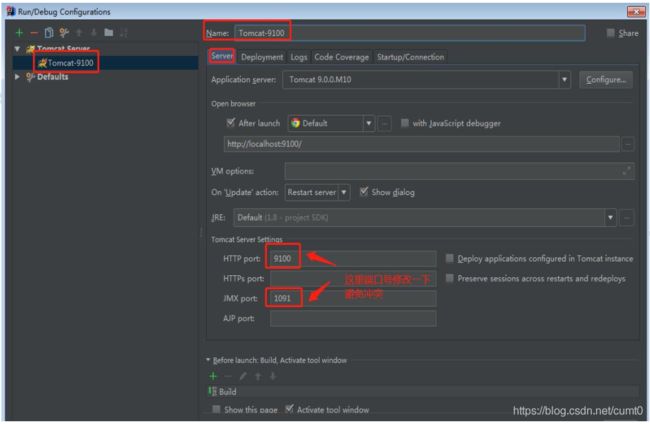
- 配置tomcat9100 服务器,给 tomcat 服务器取名,并修改端口号,并将项目部署到tomcat9100 上
- 配置tomcat9200服务器,操作步骤同上
可以在9100端口的服务器上访问/setSession,再在9200端口的服务器上访问 /getSession
这个时候我们通过测试会发现两个Tomcat服务器之间是无法共享session数据的
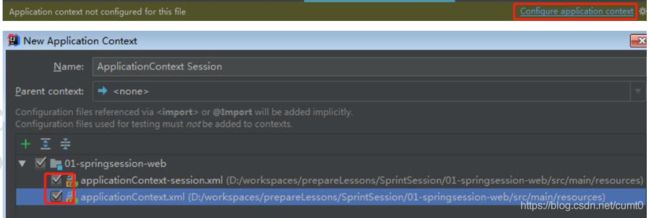
2.3 SpringSession 集成配置
<beans xmlns="http://www.springframework.org/schema/beans"
       xmlns:xsi="http://www.w3.org/2001/XMLSchema-instance"
       xsi:schemaLocation="http://www.springframework.org/schema/beans http://www.springframework.org/schema/beans/spring-beans.xsd">
    <import resource="classpath:springsession.xml"/>
beans>
- springsession.xml文件
<beans xmlns="http://www.springframework.org/schema/beans"
       xmlns:xsi="http://www.w3.org/2001/XMLSchema-instance"
       xmlns:context="http://www.springframework.org/schema/context"
       xsi:schemaLocation="http://www.springframework.org/schema/beans http://www.springframework.org/schema/beans/spring-beans.xsd http://www.springframework.org/schema/context http://www.springframework.org/schema/context/spring-context.xsd">


    <context:annotation-config/>


    <bean id="redisHttpSessionConfiguration" class="org.springframework.session.data.redis.config.annotation.web.http.RedisHttpSessionConfiguration">

        <property name="maxInactiveIntervalInSeconds" value="1800"/>
    bean>


    <bean id="jedisConnectionFactory"
          class="org.springframework.data.redis.connection.jedis.JedisConnectionFactory">

        <property name="hostName" value="127.0.0.1"/>
        <property name="port" value="6379"/>
        <property name="password" value="123456" />
    bean>
beans>
这次通过上面已经介绍过的测试方法,我们可以发现session数据可以在端口号分别为9100和9200的两个不同的Tomcat服务器上实现共享了
- 在浏览器(这里我使用的谷歌浏览器)上检查页面元素会发现两个页面上存储的cookie中存储的Session ID属性值和redis中相同。


- 上面的HASH文本框中便是redis上存储的Session ID值
- lastAccessTime:最后一次访问时间
- sessionAttr:session对象中存储数的属性
- maxIntactiveInterval:session的最大生命周期,默认是30分钟
- creationTime:session的创建时间
3.同域名下不同项目的session共享
3.1 案例
- 在 Deployment 选项卡下,设置本地 tomcat9100的Application context 为/p2p
- 在 Deployment 选 项卡下 ,设置本地 tomcat9200的Application context 为/shop
- 在idea中重新启动本地的两台 tomcat 服务器
- 在浏览器中访问 tomcat9100(p2p), 设置 session

session设置成功
- 在浏览器中访问 tomcat9200(shop),获取 session

获取不到session
- 分析 Session 共享失败原因
- 我们通过浏览器提供的开发人员工具可以发现,这两个请求的 cookie 的路径(path)不一致(如下图),虽然我们已经加了Spring Session共享机制,但是后台服务器认为这是两个不同的会话(session),可以通过 Redis 客户端工具(Redis Destop Mananger) 查看,先清空,然后访问,发现是维护了两个不同的 session,所以不能实现共享。


- 同样redis中也存储了两个不同的session对象,其中一个session对象中没有sessionAttr属性。


- 解决方案:设置Cookie路径为根/上下文在springsession.xml文件中,加如下配置:
<bean id="redisHttpSessionConfiguration" class="org.springframework.session.data.redis.config.annotation.web.http.RedisHttpSessionConfiguration">

        <property name="maxInactiveIntervalInSeconds" value="1800"/>

        <property name="cookieSerializer" ref="defaultCookieSerializer"/>
bean>


<bean id="defaultCookieSerializer" class="org.springframework.session.web.http.DefaultCookieSerializer">

        <property name="cookiePath" value="/" />
bean>
3.同根域名不同二级子域名下的项目实现Session 共享
同一个根域名,不同的二级子域名,比如北京和武汉的58同城域名:


3.1案例
添加域名映射: 找到C:\Windows\System32\drivers\etc路径下的hosts文件,在文件末尾加上:
127.0.0.1 p2p.myweb.com
127.0.0.1 shop.myweb.com
- 通过测试发现这是无法实现两个服务器上session数据的共享
- 原因:我们通过浏览器提供的开发人员工具可以发现,虽然这两个cookie 的路径(path)都设置为了“/”,但是这两个cookie的域名不一致,虽然我们已经加了Spring Session共享机制,但是后台服务器同样认为这是两个不同的会话(session),可以通过 Redis 客户端工具(Redis Destop Mananger)查看,先清空,然后访问,发现是维护了两个不同的session,所以不能实现共享,也就是说后台区分是否同一个 session 和路径和域名有关。


- 解决方案:设置Cookie的域名为根域名 web.com,在 applicationContext-session.xml 文件中, 加如下配置:
注意:域名要和 hosts 文件中配置的域名后面一样
    <bean id="defaultCookieSerializer" class="org.springframework.session.web.http.DefaultCookieSerializer">

        <property name="cookiePath" value="/" />

        <property name="domainName" value="myweb.com"/>
    bean>
