深度学习图像分类(七):DenseNet
深度学习图像分类(七):DenseNet
文章目录
-
- 深度学习图像分类(七):DenseNet
- 前言
- 一、Motivation
- 二、Model Architecture
-
- DenseBlock
- Down-sampling Layer
- Growth rate
- 三、Model Compare
- 四、Model Code
- 总结
前言
作为CVPR2017年的Best Paper, DenseNet脱离了加深网络层数(ResNet)和加宽网络结构(GoogLeNet)来提升网络性能的定式思维,从特征的角度考虑,通过特征重用和旁路(Bypass)设置,既大幅度减少了网络的参数量,又在一定程度上缓解了梯度弥散问题的产生.结合信息流和特征复用的假设,DenseNet当之无愧成为2017年计算机视觉顶会的年度最佳论文.
先列下DenseNet的几个优点,感受下它的强大:
- 1、减轻了vanishing-gradient(梯度消失)
- 2、加强了feature的传递,更有效地利用了feature
- 3、网络更易于训练,并具有一定的正则效果.
- 4、一定程度上较少了参数数量
一、Motivation
卷积神经网络在沉睡了近20年后,如今成为了深度学习方向最主要的网络结构之一.从一开始的只有五层结构的LeNet, 到后来拥有19层结构的VGG, 再到首次跨越100层网络的Highway Networks与ResNet, 网络层数的加深成为CNN发展的主要方向之一; 另一个方向则是以GoogLeNet为代表的加深网络宽度.
随着CNN网络层数的不断增加,gradient vanishing和model degradation问题出现在了人们面前,BatchNormalization的广泛使用在一定程度上缓解了gradient vanishing的问题,而ResNet和Highway Networks通过构造恒等映射设置旁路,进一步减少了gradient vanishing和model degradation的产生.Fractal Nets通过将不同深度的网络并行化,在获得了深度的同时保证了梯度的传播,随机深度网络通过对网络中一些层进行失活,既证明了ResNet深度的冗余性,又缓解了上述问题的产生(失活操作对应网络的影响与DenseNet还挺相似). 虽然这些不同的网络框架通过不同的实现加深的网络层数,但是他们都包含了相同的核心思想,既将feature map进行跨网络层的连接.
何恺明同学在提出ResNet时做出了这样的假设:若某一较深的网络多出另一较浅网络的若干层有能力学习到恒等映射,那么这一较深网络训练得到的模型性能一定不会弱于该浅层网络.通俗的说就是如果对某一网络中增添一些可以学到恒等映射的层组成新的网路,那么最差的结果也是新网络中的这些层在训练后成为恒等映射而不会影响原网络的性能.同样DenseNet在提出时也做过假设:与其多次学习冗余的特征,特征复用是一种更好的特征提取方式.
二、Model Architecture
假设输入为一个图片X0, 经过一个L层的神经网络, 第l层的特征输出记作 Xl.
那么残差连接的公式如下所示:
![]()
对于ResNet而言,l层的输出是l-1层的输出加上对l-1层输出的非线性变换。
对与DensNet而言,I层的输出是之前所有层的输出集合,公司如下所示:
![]()
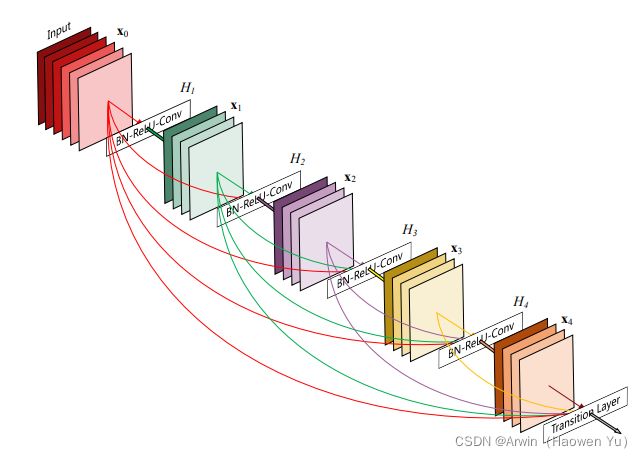
其中[]代表concatenation(拼接),既将 [公式] 到 [公式] 层的所有输出feature map按Channel组合在一起.这里所用到的非线性变换H为BN+ReLU+ Conv(3×3)的组合。所以从这两个公式就能看出DenseNet和ResNet在本质上的区别,下面放一张DenseBlock的图片帮助理解公式:
DenseBlock
Down-sampling Layer
由于在DenseNet中需要对不同层的feature map进行cat操作,所以需要不同层的feature map保持相同的feature size,这就限制了网络中Down sampling的实现.为了使用Down sampling,作者将DenseNet分为多个Denseblock,如下图所示:

在同一个Denseblock中要求feature size保持相同大小,在不同Denseblock之间设置transition layers实现Down sampling, 在作者的实验中transition layer由BN + Conv(1×1) +2×2 average-pooling组成.
注意这里1X1是为了降维;池化才是为了降低特征图的尺寸。
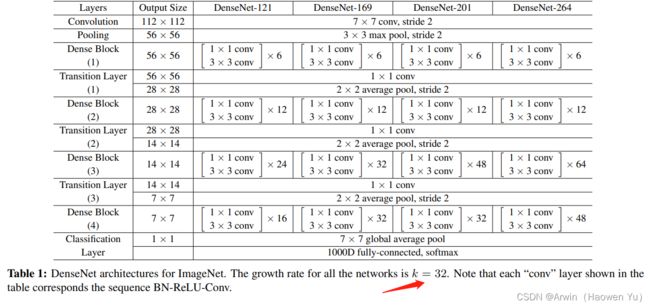
详细解释一下1X1卷积:因为每个Dense Block结束后的输出channel个数很多,需要用11的卷积核来降维。以上图的DenseNet-169的Dense Block(3)为例,包含32个11和33的卷积操作,也就是第32个子结构的输入是前面31层的输出结果,每层输出的channel是32(growth rate),第32层的33卷积操作的输入就是31*32 +(上一个Dense Block的输出channel),近1000了。因此这个transition layer有个参数reduction(范围是0到1),表示将这些输出缩小到原来的多少倍,默认是0.5,这样传给下一个Dense Block的时候channel数量就会减少一半,这就是transition layer的作用。文中还用到dropout操作来随机减少分支,避免过拟合,毕竟这篇文章的连接确实多。
Growth rate
在Denseblock中,假设每一个卷积模块的输出为K个feature map, 那么第i层网络的输入便为K0+(i-1)×K, 这里我们可以看到DenseNet和现有网络的一个主要的不同点:DenseNet可以接受较少的特征图数量作为网络层的输出,具体从网络参数如下图所示:

值得注意的是这里每个dense block的3X3卷积前面都包含了一个1X1的卷积操作,就是所谓的bottleneck layer,目的是减少输入的feature map数量,既能降维减少计算量,又能融合各个通道的特征。
详细说下bottleneck。以上图的DenseNet-169的Dense Block(3)为例,包含32个11和33的卷积操作,也就是第32个子结构的输入是前面31层的输出结果,每层输出的channel是32(growth rate),那么如果不做bottleneck操作,第32层的33卷积操作的输入就是3132 +(上一个Dense Block的输出channel),近1000了。而加上11的卷积,代码中的11卷积的channel是growth rate4,也就是128,然后再作为33卷积的输入。这就大大减少了计算量,这就是bottleneck。
三、Model Compare

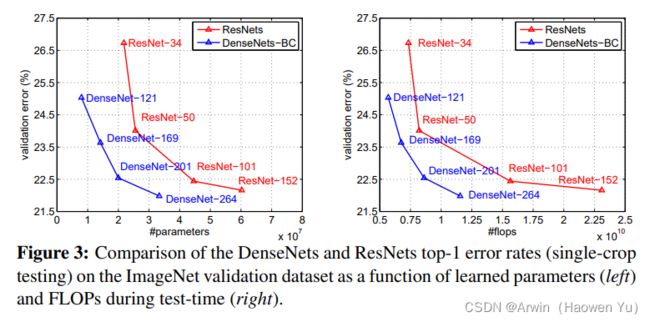
上图是DenseNet与ResNet的对比图,在相同的错误率下,DenseNet的参数更少,计算复杂度也越低。
但是,DenseNet在实际训练中是非常占用内存的!原因是在计算的过程中需要保留浅层的feature map为了与后面的feature map就行拼接。简单说,虽然DenseNet参数量少,但是训练过程中的中间产物(feature map)多;这可能也是为什么DenseNet没有ResNet流行的原因吧。
四、Model Code
这里给出模型搭建的python代码(基于pytorch实现)。完整的代码是基于图像分类问题的(包括训练和推理脚本,自定义层等)详见我的GitHub: 完整代码链接
from collections import OrderedDict

import torch
import torch.nn as nn
import torch.nn.functional as F

class _DenseLayer(nn.Sequential):
    def __init__(self, num_input_features, growth_rate, bn_size, drop_rate):
        super().__init__()
        # 1. Dense layer的结构参照了ResNetV2的结构,BN->ReLU->Conv
        # 2. 与ResNet的bottleneck稍有不同的是,此处仅做两次conv(1*1conv,3*3conv),不需要第三次1*1conv将channel拉升回去
        # 3. 由于Dense block中Tensor的channel数是随着Dense layer不断增加的,所以Dense layer设计的就很”窄“(channel数很小,固定为growth_rate),每层仅学习很少一部分的特征
        # 4. add.module 等效于 self.norm1 = nn.Batchnorm2d(num_input_features)
        self.add_module('relu1', nn.ReLU(inplace=True)),
        self.add_module('conv1', nn.Conv2d(num_input_features, bn_size * growth_rate,  kernel_size=1, stride=1, bias=False)),

        self.add_module('norm2', nn.BatchNorm2d(bn_size * growth_rate)),
        self.add_module('relu2', nn.ReLU(inplace=True)),
        self.add_module('conv2', nn.Conv2d(bn_size * growth_rate, growth_rate, kernel_size=3, stride=1, padding=1, bias=False)),
        # 每一Dense layer结束后dropout丢弃的feature maps的比例
        self.drop_rate = drop_rate

    def forward(self, x):
        # 调用所有add_module方法添加到sequence的模块的forward函数。
        new_features = super(_DenseLayer, self).forward(x)
        # 若设置了dropout丢弃比例,则按比例”丢弃一部分的features“(将该部分features置为0),channel数仍为growth_rate
        if self.drop_rate > 0:
            new_features = F.dropout(new_features, p=self.drop_rate, training=self.training)
        # 最后将新生成的featrue map和输入的feature map在channel维度上concat起来
        # 1.不需要像ResNet一样将x进行变换使得channel数相等, 因为DenseNet 3*3conv stride=1 不会改变Tensor的h,w,并且最后是channel维度上的堆叠而不是相加
        # 2.原文中提到的内存消耗多也是因为这步,在一个block中需要把所有layer生成的feature都保存下来
        return torch.cat([x, new_features], 1)


# Dense block其实就是多个Dense layer的叠加,需要注意的就是两个layer连接处的input_features值是逐渐增加growth_rate
class _DenseBlock(nn.Sequential):
    def __init__(self, num_layers, num_input_features, bn_size, growth_rate, drop_rate):
        super().__init__()
        for i in range(num_layers):
            # 由于一个DenseBlock中,每经过一个layer,宽度(channel)就会堆叠增加growth_rate,所以仅需要改变num_input_features即可
            layer = _DenseLayer(num_input_features + i * growth_rate, growth_rate, bn_size, drop_rate)
            self.add_module('denselayer%d' % (i + 1), layer)

# Transition layer(过渡层), 两个Dense block间加入的Transition层起到了两个作用: 防止features数无限增大,进一步压缩数据; 下采样,降低feature map的分辨率
class _Transition(nn.Sequential):
    def __init__(self, num_input_features, num_output_features):
        super().__init__()
        self.add_module('norm', nn.BatchNorm2d(num_input_features))
        self.add_module('relu', nn.ReLU(inplace=True))
        # 作用1:即使每一层Dense layer都采取了很小的growth_rate,但是堆叠之后channel数难免会越来越大, 所以需要在每一个Dense block之后接transition层用1*1conv将channel再拉回到一个相对较低的值(一般为输入的一半)
        self.add_module('conv', nn.Conv2d(num_input_features, num_output_features, kernel_size=1, stride=1, bias=False))
        # 作用2:用average pooling改变图像分辨率,下采样
        self.add_module('pool', nn.AvgPool2d(kernel_size=2, stride=2))

class DenseNet(nn.Module):
    r"""Densenet-BC model class, based on
    `"Densely Connected Convolutional Networks" `_
    Args:
        growth_rate (int) - how many filters to add each layer (`k` in paper)
        block_config (list of 4 ints) - how many layers in each pooling block
        num_init_features (int) - the number of filters to learn in the first convolution layer
        bn_size (int) - multiplicative factor for number of bottle neck layers
          (i.e. bn_size * k features in the bottleneck layer)
        drop_rate (float) - dropout rate after each dense layer
        num_classes (int) - number of classification classes
    """
    def __init__(self, growth_rate=32, block_config=(6, 12, 24, 16), num_init_features=64, bn_size=4, drop_rate=0, num_classes=1000):

        super(DenseNet, self).__init__()
        # First convolution
        # 和ResNet一样,先通过7*7的卷积,将分辨率从224*224->112*112
        self.features = nn.Sequential(OrderedDict([
            ('conv0', nn.Conv2d(3, num_init_features, kernel_size=7, stride=2, padding=3, bias=False)),
            ('norm0', nn.BatchNorm2d(num_init_features)),
            ('relu0', nn.ReLU(inplace=True)),
            ('pool0', nn.MaxPool2d(kernel_size=3, stride=2, padding=1)),
        ]))

        # Each denseblock
        num_features = num_init_features
        # 读取每个Dense block层数的设定
        for i, num_layers in enumerate(block_config):
            block = _DenseBlock(num_layers=num_layers, num_input_features=num_features, bn_size=bn_size, growth_rate=growth_rate, drop_rate=drop_rate)
            self.features.add_module('denseblock%d' % (i + 1), block)
            num_features = num_features + num_layers * growth_rate
            # 第四个Dense block后不再连接Transition层
            if i != len(block_config) - 1:
                # 此处可以看到,默认过渡层将channel变为原来输入的一半
                trans = _Transition(num_input_features=num_features, num_output_features=num_features // 2)
                self.features.add_module('transition%d' % (i + 1), trans)
                num_features = num_features // 2

        # Final batch norm
        # Final global average pool
        self.features.add_module('norm5', nn.BatchNorm2d(num_features))
        self.features.add_module('relu5', nn.ReLU(inplace=True))
        self.features.add_module('avgpool5', nn.AvgPool2d(kernel_size=7, stride=1))

        # Linear layer
        self.classifier = nn.Linear(num_features, num_classes)

        # Official init from torch repo.
        for m in self.modules():
            if isinstance(m, nn.Conv2d):
                nn.init.kaiming_normal_(m.weight.data)
            elif isinstance(m, nn.BatchNorm2d):
                m.weight.data.fill_(1)
                m.bias.data.zero_()
            elif isinstance(m, nn.Linear):
                m.bias.data.zero_()

    def forward(self, x):
        features = self.features(x)
        out = features.view(features.size(0), -1)
        out = self.classifier(out)
        return out
总结
由于DenseNet对输入进行cat操作,一个直观的影响就是每一层学到的feature map都能被之后所有层直接使用,这使得特征可以在整个网络中重用,也使得模型更加简洁。
