深度学习第四课——SVM(支持向量机)
一、SVM与KNN的区别
支持向量机(support vector machines, SVM)也是一种分类模型,与KNN类似,两者都是比较经典的机器学习分类算法,KNN是通过选取目标点的临近值判断目标点的值,而SVM则是通过划分区域,从而判断目标点属于哪部分。示意图如下图1,图2所示:
 图1.KNN算法
  图2.SVM算法
SVM算法较KNN更复杂,但是能适应更多种情况,在处理大量数据时,进行运算比KNN算法少,更有效,而当数据量小时,用KNN更简便。
二、SVM原理
以两类数据为例,在面临两类数据时,SVM算法通过寻找两类数据之间的几何超平面,将数据分为两部分,当输入所给数据点时,通过判断其与超平面的关系,从而判断出输入数据的类型。如图2所示即为在二维平面上的SVM算法,通过寻找一条直线,将黑白点划分到直线两侧,当有新的点时,判断它与直线的位置关系,从而将点分类。
1.支持向量
样本中距离超平面最近的一些点,叫做支持向量。由于较远的点与不影响超平面的建立,其主要通过支持向量建立而来。如下图3,借用知乎用户@是泽哥啊 的图片进行解释。
通过寻找一个最优的决策边界,即距离两个类别的最近的样本最远,使得间距最大化,从而有更多的缓冲空间,提高判断的准确性。
2.软间隔
在实际情况中,并非所有情况都是完全线性可分(通过一条直线将数据分为两部分)的,当出现个别点差值较大的情况时,若仍按照原方法进行求解,会使间距较小,从而容易产生误判。如下图4,即为二维空间中的一种情况。
此时,我们引入软间隔的概念,在计算过程中,添加常量,使得对类似的差值较大点进行忽略,减少其对超平面建立的影响,从而使得间距增大,改善准确性。
3.核函数
当我们遇到线性不可分的情况时,不能再用原方法对数据进行分割。在数据维度较低时,我们可以通过构建矩阵函数,将坐标系进行变化,从而使得数据线性可分。
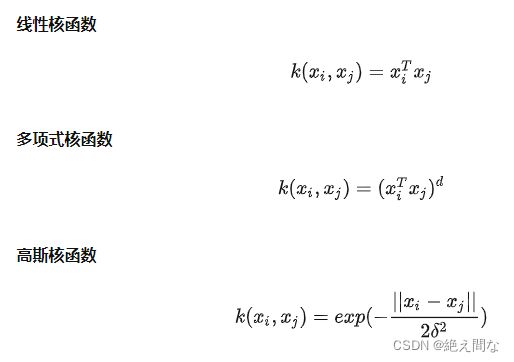
当数据维度较高时,构建矩阵函数将变得十分复杂,我们很难通过这种方法进行求解,这种情况下,我们引入的核函数,利用核函数就可以跳过构建矩阵函数,从而使数据进行升维。这部分的数学计算我还不是很清楚,以下仅列举出几种常见的核函数。
三、实际代码演示
通过百度飞桨调用sklearn库,对SVM算法进行使用。以下为运行代码及注释。
- 导入各种库函数
import numpy as np    # 计算
from matplotlib import colors    # 绘图包
from sklearn import svm     # SVM
from sklearn import model_selection
import matplotlib.pyplot as plt
import matplotlib as mpl- 加载数据,切分数据集
def iris_type(s):    # 将鸢尾花名字转换为数字标号
    it = {b'Iris-setosa':0, b'Iris-versicolor':1,b'Iris-virginica':2}
    return it[s]

# 1 数据准备
# 1.1 加载数据
data = np.loadtxt('/home/aistudio/data/data2301/iris.data',  # 数据文件路径i
                  dtype=float,    # 数据类型
                  delimiter=',',  # 数据分割符
                  converters={4:iris_type}) # 将第五列使用函数iris_type进行转换
# 1.2 数据分割
# 将数据分为x组训练集测试集,y组训练集测试集
# 测试集数量小,测试训练模型后的准确度,训练集数量大,用于训练数据
x, y = np.split(data, (4, ), axis=1) # 数据分组 第五列开始往后为y 代表纵向分割按列分割
x = x[:, :2]
x_train, x_test, y_train, y_test=model_selection.train_test_split(x, y, random_state=1, test_size=0.2)- 构建训练集函数,训练
# SVM分类器构建
def classifier():
    clf = svm.SVC(
        C=0.5,  # 设置噪声容忍参数
        kernel='rbf',  # 调用高斯核
        decision_function_shape='ovr'  # 决策函数
    )
    return clf

# 训练模型
def train(clf, x_train, y_train):  # 将训练集数据导入,进行模型训练
    clf.fit(
        x_train,   # 训练集特征向量
        y_train.ravel()
    )


# 2 定义模型 SVM模型定义
clf = classifier()
# 3 训练模型
train(clf, x_train, y_train)- 显示结果并验证
# ======判断a,b是否相等计算acc的均值
def show_accuracy(a, b, tip):
    acc = a.ravel() == b.ravel()
    print('%s Accuracy:%.3f' %(tip, np.mean(acc)))

# 分别打印训练集和测试集的准确率 score(x_train, y_train)表示输出 x_train,y_train在模型上的准确率
def print_accuracy(clf, x_train, y_train, x_test, y_test):
    print('training prediction:%.3f' %(clf.score(x_train, y_train)))
    print('test data prediction:%.3f' %(clf.score(x_test, y_test)))
    # 原始结果和预测结果进行对比 predict() 表示对x_train样本进行预测,返回样本类别
    show_accuracy(clf.predict(x_train), y_train, 'traing data')
    show_accuracy(clf.predict(x_test), y_test, 'testing data')
    # 计算决策函数的值 表示x到各个分割平面的距离
    print('decision_function:\n', clf.decision_function(x_train))

def draw(clf, x):
    iris_feature = 'sepal length', 'sepal width', 'petal length', 'petal width'
    # 开始画图
    x1_min, x1_max = x[:, 0].min(), x[:, 0].max()
    x2_min, x2_max = x[:, 1].min(), x[:, 1].max()
    # 生成网格采样点
    x1, x2 = np.mgrid[x1_min:x1_max:200j, x2_min:x2_max:200j]
    # 测试点
    grid_test = np.stack((x1.flat, x2.flat), axis = 1)
    print('grid_test:\n', grid_test)
    # 输出样本到决策面的距离
    z = clf.decision_function(grid_test)
    print('the distance to decision plane:\n', z)
    grid_hat = clf.predict(grid_test)
    # 预测分类值 得到[0, 0, ..., 2, 2]
    print('grid_hat:\n', grid_hat)
    # 使得grid_hat 和 x1 形状一致
    grid_hat = grid_hat.reshape(x1.shape)
    cm_light = mpl.colors.ListedColormap(['#A0FFA0', '#FFA0A0', '#A0A0FF'])
    cm_dark = mpl.colors.ListedColormap(['g', 'b', 'r'])

    plt.pcolormesh(x1, x2, grid_hat, cmap = cm_light)
    plt.scatter(x[:, 0], x[:, 1], c=np.squeeze(y), edgecolor='k', s=50, cmap=cm_dark )
    plt.scatter(x_test[:, 0], x_test[:, 1], s=120, facecolor='none', zorder=10 )
    plt.xlabel(iris_feature[0], fontsize=20) # 注意单词的拼写label
    plt.ylabel(iris_feature[1], fontsize=20)
    plt.xlim(x1_min, x1_max)
    plt.ylim(x2_min, x2_max)
    plt.title('Iris data classification via SVM', fontsize=30)
    plt.grid()
    plt.show()

# 4 模型评估
print('-------- eval ----------')
print_accuracy(clf, x_train, y_train, x_test, y_test)
# 5 模型使用
print('-------- show ----------')
draw(clf, x)
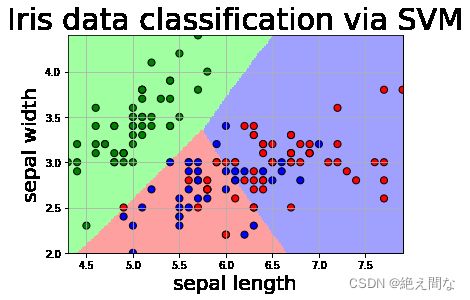
测试结果如下:
-------- eval ----------
training prediction:0.800
test data prediction:0.833
traing data Accuracy:0.800
testing data Accuracy:0.833
decision_function:(数据较多不予展示)
-------- show ----------
grid_test:
 [[4.3       2.       ]
 [4.3       2.0120603]
 [4.3       2.0241206]
 ...
 [7.9       4.3758794]
 [7.9       4.3879397]
 [7.9       4.4      ]]
the distance to decision plane:
 [[ 2.14259429  1.18181824 -0.22024657]
 [ 2.14491871  1.18096339 -0.22059907]
 [ 2.14720399  1.18008532 -0.22094825]
 ...
 [-0.16171563  0.86017064  2.20825136]
 [-0.16055583  0.86010978  2.20766208]
 [-0.15938485  0.86005854  2.20706555]]
grid_hat:
 [0. 0. 0. ... 2. 2. 2.]


