YOLOv5桌面应用开发,手把手教学实操(中)——附源代码
关注并星标
从此不迷路
计算机视觉研究院
公众号ID|ComputerVisionGzq
学习群|扫码在主页获取加入方式
今天分享的内容来自CSDN——成都_小吴,该同学撰写的一篇关于Yolov5桌面应用的开发工作,有兴趣的同学可以关注CSDN!具体文章链接:
https://blog.csdn.net/qq_52859223/article/details/122982212
计算机视觉研究院专栏
作者:Edison_G
上周“计算机视觉研究院”给大家分享了一期yolov5训练干货,今天我们继续,开始说说怎么进行桌面应开发及设计。
如何为YOLOv5设计界面
首先你要学习一下Pyqt5,算了反正看我的文章应该都不想看,先安装三方库吧:
pip install Pyqt5我给大家说一下最基本的可以用到的控件(如果你是真的想要学习必须自己进行设计,千万不要搞别人的源代码跑一下就完事了),首先要搞清楚界面设计我们需要yolov5源码的哪一部分结合界面进行检测;我们需要两部分一部分是模型参数加载:
def model_init(self):
        # 模型相关参数配置
        parser = argparse.ArgumentParser()#best1.pt效果最好
        parser.add_argument('--weights', nargs='+', type=str, default='weights/best1.pt', help='model.pt path(s)')
        parser.add_argument('--source', type=str, default='data/images', help='source')  # file/folder, 0 for webcam
        parser.add_argument('--img-size', type=int, default=640, help='inference size (pixels)')
        parser.add_argument('--conf-thres', type=float, default=0.25, help='object confidence threshold')
        parser.add_argument('--iou-thres', type=float, default=0.45, help='IOU threshold for NMS')
        parser.add_argument('--device', default='0', help='cuda device, i.e. 0 or 0,1,2,3 or cpu')
        parser.add_argument('--view-img', action='store_true', help='display results')
        parser.add_argument('--save-txt', action='store_true', help='save results to *.txt')
        parser.add_argument('--save-conf', action='store_true', help='save confidences in --save-txt labels')
        parser.add_argument('--nosave', action='store_true', help='do not save images/videos')
        parser.add_argument('--classes', nargs='+', type=int, help='filter by class: --class 0, or --class 0 2 3')
        parser.add_argument('--agnostic-nms', action='store_true', help='class-agnostic NMS')
        parser.add_argument('--augment', action='store_true', help='augmented inference')
        parser.add_argument('--update', action='store_true', help='update all models')
        parser.add_argument('--project', default='runs/detect', help='save results to project/name')
        parser.add_argument('--name', default='exp', help='save results to project/name')
        parser.add_argument('--exist-ok', action='store_true', help='existing project/name ok, do not increment')
        self.opt = parser.parse_args()
        print(self.opt)
        # 默认使用opt中的设置(权重等)来对模型进行初始化
        source, weights, view_img, save_txt, imgsz = self.opt.source, self.opt.weights, self.opt.view_img, self.opt.save_txt, self.opt.img_size
        # 若openfile_name_model不为空,则使用此权重进行初始化
        if self.openfile_name_model:
            weights = self.openfile_name_model
            print("Using button choose model")
        # self.device = select_device(self.opt.device)
        self.device = torch.device('cuda:0')
        self.half = self.device.type != 'cpu'  # half precision only supported on CUDA
        cudnn.benchmark = True
        # Load model
        self.model = attempt_load(weights, map_location=self.device)  # load FP32 model
        stride = int(self.model.stride.max())  # model stride
        self.imgsz = check_img_size(imgsz, s=stride)  # check img_size
        if self.half:
          self.model.half()  # to FP16
        # Get names and colors
        self.names = self.model.module.names if hasattr(self.model, 'module') else self.model.names
        self.colors = [[random.randint(0, 255) for _ in range(3)] for _ in self.names]
        print("model initial done")
这里大家可以看到我没有使用self.opt.device,而是直接使用torch.device进行选择GPU,因为大佬说使用上面的进行打包会不成功;另一部分是检测(包括图片归一化、模型加载、绘制):
def detect(self):
    t0 = time.time()
    img = torch.zeros((1, 3, imgsz, imgsz), device=device)  # init img
    _ = model(img.half() if half else img) if device.type != 'cpu' else None  # run once
    for path, img, im0s, vid_cap in dataset:
        img = torch.from_numpy(img).to(device)
        img = img.half() if half else img.float()  # uint8 to fp16/32
        img /= 255.0  # 0 - 255 to 0.0 - 1.0
        if img.ndimension() == 3:
            img = img.unsqueeze(0)

        # Inference
        t1 = time_synchronized()
        pred = model(img, augment=opt.augment)[0]

        # Apply NMS
        pred = non_max_suppression(pred, opt.conf_thres, opt.iou_thres, classes=opt.classes, agnostic=opt.agnostic_nms)
        t2 = time_synchronized()

        # Apply Classifier
        if classify:
            pred = apply_classifier(pred, modelc, img, im0s)

        # Process detections
        for i, det in enumerate(pred):  # detections per image
            if webcam:  # batch_size >= 1
                p, s, im0, frame = path[i], '%g: ' % i, im0s[i].copy(), dataset.count
            else:
                p, s, im0, frame = path, '', im0s, getattr(dataset, 'frame', 0)

            p = Path(p)  # to Path
            save_path = str(save_dir / p.name)  # img.jpg
            txt_path = str(save_dir / 'labels' / p.stem) + ('' if dataset.mode == 'image' else f'_{frame}')  # img.txt
            s += '%gx%g ' % img.shape[2:]  # print string
            gn = torch.tensor(im0.shape)[[1, 0, 1, 0]]  # normalization gain whwh
            if len(det):
                # Rescale boxes from img_size to im0 size
                det[:, :4] = scale_coords(img.shape[2:], det[:, :4], im0.shape).round()

                # Print results
                for c in det[:, -1].unique():
                    n = (det[:, -1] == c).sum()  # detections per class
                    s += f'{n} {names[int(c)]}s, '  # add to string

                # Write results
                for *xyxy, conf, cls in reversed(det):
                    if save_txt:  # Write to file
                        xywh = (xyxy2xywh(torch.tensor(xyxy).view(1, 4)) / gn).view(-1).tolist()  # normalized xywh
                        line = (cls, *xywh, conf) if opt.save_conf else (cls, *xywh)  # label format
                        with open(txt_path + '.txt', 'a') as f:
                            f.write(('%g ' * len(line)).rstrip() % line + '\n')

                    if save_img or view_img:  # Add bbox to image
                        label = f'{names[int(cls)]} {conf:.2f}'
                        plot_one_box(xyxy, im0, label=label, color=colors[int(cls)], line_thickness=3)
有了这两个部分就可以进行检测了,但是要找到检测的结果图片,对检测后的图片进行显示。
这里是对检测到的物体进行绘制,所以你需要想办法将图片传入此函数进行检测,检测完之后再进行传出来显示,比如:
def detect(self,image)
   pass

def show_video(self)
     这里的image可以是摄像头,图片,视频,网络摄像头
     比如使用opencv
     num = 0
     self.cap = cv2.VideoCapture(camera_num)
     image = self.cap.read()
     a = self.detect(image)
     对这里的image进行处理显示
检测完之后可以通过pyqt界面进行显示。
重点来了!
很多小伙伴想要使用网络摄像头进行项目的开发,需要考虑实时的问题,很多作者都没有考虑这个问题,所以我想告诉大家的是要想做项目开发,很多大佬都说python多线程是假的(伪线程),但是亲测多线程可以解决这个网络摄像头延迟问题,如果不使用多线程界面会卡死,因为网络摄像头下载到缓冲区的速度大于你的读取速度或者处理速度,他就会非常卡。
打个比方:
使用opencv的videocapture进行抓取摄像头是没20ms读取一帧到缓冲区,在通过cap.read()从缓冲区读取图片进行处理需要10ms,但是你读取到图片后你还需要进行检测和显示耗时假如在100ms,所以你从读取到一张图片到显示在你的界面上需要110ms,但是此时你的缓冲区已经存储了5,6张图片了,所以你要解决这个问题。(跳帧和多线程可以解决延迟问题)另一个困惑大家的问题就是如何检测到目标进行报警的功能,在网上我是没有搜到相关的代码,所以这一部分是自己写一个吧。
def play_music(self)
   winsound.PlaySound('选择你要播放的WAV音频',winsound.SND_ASYNC)
   time.sleep(休眠时间以s计数,我设置的是0.5)
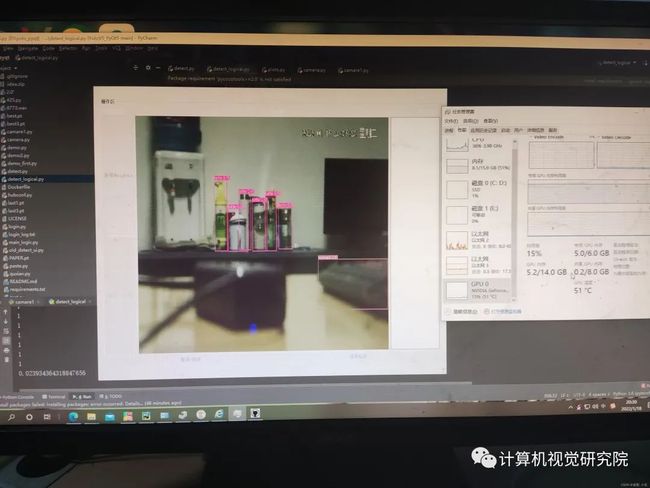
有了报警函数,当检测到物体调用此函数进行报警,但是这样会有延迟出现,所以这里又要用到多线程(cpu已经开始爆炸了)。此时网络摄像头延迟问题、报警问题有一定的解决,但是你会发现你的显存不够用,因为你启动多线程进行检测,假如隔5帧进行图片的抓取进行处理并启动检测的多线程,多线程里面会有一个调用GPU的操作,在GPU上进行操作它会使用显存如下:
pred = model(img, augment=opt.augment)[0]大家可以看到6G的显存已经占了5G,所以看到这里很多大佬已经开始嘲讽我的编程技术了哈哈!
© THE END
转载请联系本公众号获得授权
计算机视觉研究院学习群等你加入!
计算机视觉研究院主要涉及深度学习领域,主要致力于人脸检测、人脸识别,多目标检测、目标跟踪、图像分割等研究方向。研究院接下来会不断分享最新的论文算法新框架,我们这次改革不同点就是,我们要着重”研究“。之后我们会针对相应领域分享实践过程,让大家真正体会摆脱理论的真实场景,培养爱动手编程爱动脑思考的习惯!
扫码关注
计算机视觉研究院
公众号ID|ComputerVisionGzq
学习群|扫码在主页获取加入方式
往期推荐
改进的YOLOv5:AF-FPN替换金字塔模块提升目标检测精度
精度高效率最快存储最小的目标检测模型(附源码下载)
GiraffeDet:对目标检测中对Neck进行优化提升最终精度
深度学习目标检测在实际场景中的应用(附源代码)
Label,Verify,Correct:一种简单的Few Shot 目标检测方法
SPARSE DETR:具有可学习稀疏性的高效端到端目标检测(源代码下载)
自适应特征融合用于Single-Shot目标检测(附源代码下载)
目标检测:SmartDet、Miti-DETR和Few-Shot Object Detection
RestoreDet:低分辨率图像中目标检测
Yolo-Z:改进的YOLOv5用于小目标检测(附原论文下载)


