【Spring Boot2.0笔记】Spring MVC基础特性(1)
开始使用Spring MVC
添加spring-boot-starter-web依赖包
        org.springframework.boot
        spring-boot-starter-web
创建一个RestController
import org.springframework.web.bind.annotation.GetMapping;
import org.springframework.web.bind.annotation.RestController;

@RestController
public class HelloWorldController {

	@GetMapping("/")
	public String hello() {
		return "Hello World, from Spring boot 2!";
	}

}
通过终端访问该接口
curl http://localhost:9090/

Hello World, from Spring boot 2!
测试
使用@WebMvcTest测试Spring Boot的MVC Web Controller
Controller的方法通过@PostMapping的声明来定义需要监听的URL,HTTP方法和content类型。
通过@PathVariable, @RequestBody和@RequestsParam声明的入参
参数可能被声明成@Valid来标明Spring需要对它们进行bean校验
然后controller使用这些参数,调用业务逻辑,得到一个简单Java对象,其会被以JSON的形式默认自动写入到HTTP响应body中。
这里有很多Spring魔法。简单来说,对每一个请求,controller通常经过以下步骤:
| # | 职责 | 描述 |
| 1. | 监听HTTP请求 | controller需要对特定的URL,HTTP方法和content类型做响应 |
| 2. | 反序列化输入 | controller需要解析进入的HTTP请求并从URL,HTTP请求参数和请求body中创建Java对象,这样我们在代码中使用 |
| 3. | 检查输入 | controller是防御不合法输入的第一道防线,所以这是个校验输入的好地方 |
| 4. | 调用业务逻辑 | 得到了解析过的入参,controller需要将入参传给业务逻辑期望的业务模型 |
| 5. | 序列化输出 | controller得到业务逻辑的输出并将其序列化到HTTP响应中 |
| 6. | 翻译异常 | 如果某些地方有异常发生了,controller需要将其翻译成一个合理的错误消息和HTTP状态码 |
@RunWith(SpringRunner.class)
@WebMvcTest
public class HelloWorldControllerTest {
	@Autowired
	private MockMvc mockMvc;

	/**
	* Perform an expectation.
	* Example
	*
	* static imports: MockMvcRequestBuilders.*, MockMvcResultMatchers.*
	* mockMvc.perform(get("/person/1"))
	*   .andExpect(status().isOk())
	*   .andExpect(content().contentType(MediaType.APPLICATION_JSON))
	*   .andExpect(jsonPath("$.person.name").value("Jason"));
	*
	* Or alternatively provide all matchers as a vararg:
	*
	* static imports: MockMvcRequestBuilders.*, MockMvcResultMatchers.*, ResultMatcher.matchAll

	* mockMvc.perform(post("/form"))
	*   .andExpect(matchAll(
	*       status().isOk(),
	*       redirectedUrl("/person/1"),
	*    model().size(1),
	*       model().attributeExists("person"),
	*       flash().attributeCount(1),
	*       flash().attribute("message", "success!"))
	*   );
	*
	*
	* 	ResultActions andExpect(ResultMatcher matcher) throws Exception;
*/
	@Test
	public void test() throws Exception {
		RequestBuilder builder = MockMvcRequestBuilders.get("/");
		mockMvc.perform(builder).andExpect(status().isOk())
		.andExpect(content().contentTypeCompatibleWith(MediaType.TEXT_PLAIN));
	}
}
使用Spring MVC公开REST资源
在Spring Boot中使用Thymeleaf模板
添加依赖
1、新建templates目录在src/main/resources下面index.html作为索引页面。
增加xmlns属性,启用Thymeleaf的命名空间
2、添加控制器和视图
要新增页面,需要准备2点
类:可以处理请求并准备模型的控制器类(数据)
视图:呈现内容的视图(展示)
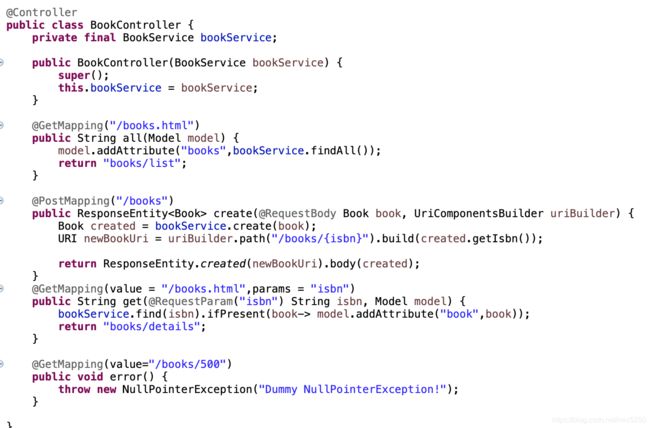
控制器是带有@Controller注解的类,像bean一样注入到spring-mvc
其中通过@RequestMapping、@GetMapping、 @PostMapping注解的处理方法访问资源。
BookController类需要通过BookService类获取要显示的图书列表
@GetMapping("/books.html")
public String all(Model model) {
    model.addAttribute("books",bookService.findAll());
    return "books/list";
}
all方法使用org.springframework.ui.Model作为参数,这样就可以将图书列表放置到模型中。BookService从数据存储中检索所有图书,并使用mode.addAttribute将其添加到模型中。现在在模板中可以通过键值books获取图书列表。最后返回用于呈现book/list的视图的名称。这个名字被传递到ThymeleafViewResolver,并组成一个路径,即classpath:/templates/books/list.html
添加视图books/list.html
Libary - Availble Books


	Available Books


				Title
				Author
				ISBN


				Title
				authors
				isbn
