jenkins使用git
In this article, I will demonstrate Continuous Integration & Continuous Deployment using Jenkins, Git, and Kubernetes. Also before begin let's see a little bit of overview of these three popular technologies.
在本文中,我将演示使用Jenkins,Git和Kubernetes进行持续集成和持续部署。 同样,在开始之前,让我们先对这三种流行技术进行一些概述。
詹金斯: (Jenkins :)
Jenkins logo Jenkins徽标Jenkins is an open-source automation tool written in Java with plugins built for Continuous Integration purposes. Jenkins is used to build and test your software projects continuously making it easier for developers to integrate changes to the project, and making it easier for users to obtain a fresh build.
Jenkins是一个用Java编写的开源自动化工具,带有为持续集成目的而构建的插件。 Jenkins用于持续构建和测试您的软件项目,从而使开发人员更容易将更改集成到项目中,并使用户更容易获得全新的构建。
To know more about Jenkins: https://www.jenkins.io/
要了解有关Jenkins的更多信息: https : //www.jenkins.io/
Git: (Git :)
Git logo Git徽标Git is a distributed version control system for tracking changes in source code during software development. It is designed for coordinating work among programmers, but it can be used to track changes in any set of files. Its goals include speed, data integrity, and support for distributed, non-linear workflows.
Git是一个分布式版本控制系统,用于在软件开发过程中跟踪源代码的更改。 它是为协调程序员之间的工作而设计的,但可用于跟踪任何文件集中的更改。 它的目标包括速度,数据完整性以及对分布式非线性工作流的支持。
To know more about Git: https://git-scm.com/about
要了解有关Git的更多信息: https : //git-scm.com/about
Kubernetes: (Kubernetes :)
Kubernetes logo Kubernetes徽标Kubernetes is an open-source container-orchestration system for automating computer application deployment, scaling, and management. It was originally designed by Google and is now maintained by the Cloud Native Computing Foundation. It aims to provide a “platform for automating deployment, scaling, and operations of application containers across clusters of hosts”. It works with a range of container tools, including Docker.
Kubernetes是一个开放源代码的容器编排系统,用于自动执行计算机应用程序的部署,扩展和管理。 它最初是由Google设计的,现在由Cloud Native Computing Foundation维护。 它的目的是提供一个“跨主机群集自动执行应用程序容器的部署,扩展和操作的平台”。 它可与多种容器工具(包括Docker)一起使用。
To know more about Kubernetes: https://kubernetes.io/docs/concepts/overview/what-is-kubernetes
要了解有关Kubernetes的更多信息: https ://kubernetes.io/docs/concepts/overview/what-is-kubernetes
因此,让我们看看问题陈述: (So, Let's see the Problem Statement :)
1. Create a container image that’s has Jenkins installed using Dockerfile Or You can use the Jenkins Server on RHEL 8/7.2. When we launch this image, it should automatically start the Jenkins service in the container.3. Create a job chain of job1, job2, job3, and job4 using build pipeline plugin in Jenkins.4. Job1: Pull the GitHub repo automatically when some developers push the repo to GitHub.5. Job2 : I) By looking at the code or program file, Jenkins should automatically start the respective language interpreter installed image container to deploy code on top of Kubernetes ( eg. If code is of PHP, then Jenkins should start the container that has PHP already installed )II) Expose your pod so that the testing team could perform the testing on the pod.III) Make the data to remain persistent (If the server collects some data like logs, other user information ).IV) Job 3: Test your app if it is working or not. If the app is not working, then send an email to the developer with error messages and redeploy the application after the code is being edited by the developer.
1.使用Dockerfile创建安装了Jenkins的容器映像,或者您可以在RHEL 8 / 7.2上使用Jenkins Server。 启动此映像时,它将自动在容器中启动Jenkins服务。 使用Jenkins.4中的构建管道插件创建作业1,作业2,作业3和作业4的作业链。 Job1:当一些开发人员将仓库推送到GitHub.5时,自动拉GitHub仓库。 Job2:I)通过查看代码或程序文件,Jenkins应该自动启动相应的语言解释器安装的图像容器,以在Kubernetes之上部署代码(例如,如果代码是PHP,则Jenkins应该启动已经具有PHP的容器II)暴露您的Pod,以便测试团队可以在Pod上进行测试.III)使数据保持持久性(如果服务器收集了日志,其他用户信息等数据)IV)作业3:测试您的Pod应用程序,如果它正在工作或不工作。 如果应用程序无法正常工作,则在开发人员编辑代码后,将包含错误消息的电子邮件发送给开发人员,并重新部署应用程序。
先决条件: (Pre-requisites :)
- I am using RedHat Enterprise Linux 8 as my base operating system in VirtualBox. You can use any Linux OS to perform this task. In my base OS, I installed two main programs, 1st one is Jenkins and 2nd is Kubectl (Kubernetes Client). I will show you how to set both in a few minutes. 我在VirtualBox中将RedHat Enterprise Linux 8用作基本操作系统。 您可以使用任何Linux OS来执行此任务。 在基本操作系统中,我安装了两个主要程序,第一个是Jenkins,第二个是Kubectl(Kubernetes客户端)。 我将在几分钟内告诉您如何设置两者。
- Next, I am using Minikube in VirtualBox as a Kubernetes server. For creating a local connectivity in my system I created one host-only adapter and in my system, Windows10, RHEL8, & Minikube are connected with it. 接下来,我将VirtualBox中的Minikube用作Kubernetes服务器。 为了在系统中创建本地连接,我创建了一个仅主机的适配器,并且在系统中将Windows10,RHEL8和Minikube与之连接。
- Finally, I am using Git in my Windows system to develop the code and to upload it to GitHub. 最后,我在Windows系统中使用Git来开发代码并将其上传到GitHub。
让我们在RHEL8中设置Jenkins和Kubectl: (Let's set up Jenkins and Kubectl in RHEL8 :)
It's very easy to install Jenkins and Kubectl in RHEL8. You just need to run a few commands for each program to setup. I am providing the installation procedure link, just copy those commands and run in terminal. It will install Jenkins and Kubectl program in your system.
在RHEL8中安装Jenkins和Kubectl非常容易。 您只需要为每个程序运行一些命令即可进行设置。 我提供了安装过程链接,只需复制这些命令并在终端中运行即可。 它将在您的系统中安装Jenkins和Kubectl程序。
Link to setup Jenkins: https://www.fosstechnix.com/install-jenkins-on-centos-8/
链接到安装Jenkins: https : //www.fosstechnix.com/install-jenkins-on-centos-8/
Link to install Kubectl: https://kubernetes.io/docs/tasks/tools/install-kubectl/
链接以安装Kubectl: https ://kubernetes.io/docs/tasks/tools/install-kubectl/
Great you have successfully install Jenkins and Kubectl. Next, you need to copy 3 files from your Windows OS to RHEL8 to connect the Kubectl with Minikube. Also before doing that install the Minikube and start it.
太好了,您已经成功安装了Jenkins和Kubectl。 接下来,您需要将3个文件从Windows操作系统复制到RHEL8,以将Kubectl与Minikube连接。 此外,在执行此操作之前,请安装Minikube并启动它。
For reference check out this link: https://kubernetes.io/docs/tasks/tools/install-minikube/
作为参考,请查看以下链接: https : //kubernetes.io/docs/tasks/tools/install-minikube/
In windows go to C:\Users\username\.minikube and copy the “ca.crt” file. Next go to C:\Users\username\.minikube\profiles\minikube and copy the “client.crt & client.key” file. Next paste them in the “/root/” folder in the RHEL8. Finally you need to create the configuration file for Kubectl so that it can connect to Minikube. In below you can see the configuration file. The file name should be “config”, be careful and don't give any extension in the name. Next copy this file in the “/root/.kube/” folder and Done.
在Windows中,转到C:\ Users \ username \ .minikube,然后复制“ ca.crt”文件。 接下来转到C:\ Users \ username \ .minikube \ profiles \ minikube并复制“ client.crt&client.key”文件。 接下来,将它们粘贴到RHEL8的“ / root /”文件夹中。 最后,您需要为Kubectl创建配置文件,以便它可以连接到Minikube。 在下面,您可以看到配置文件。 文件名应为“ config”,请小心,不要在文件名中添加任何扩展名。 接下来,将此文件复制到“ /root/.kube/”文件夹中并完成。
apiVersion: v1
kind: Config
clusters:
- cluster:
   server: https://192.168.99.100:8443
   certificate-authority: /root/ca.crt
  name: rmcluster
contexts:
- context:
   cluster: rmcluster
   user: raktim
users:
- name: raktim
  user:
   client-certificate: /root/client.crt
   client-key: /root/client.key
Great, You are fully set up to jump into the task.
太好了,您已完全准备好开始工作。
创建GitHub存储库以进行代码的持续开发: (Creation of GitHub repository for Continuous Development of Code :)
From GitHub, I created one repository and connect it with my local git command of windows for continuous development of the code and uploading it. Next, I will connect this with Jenkins for Continuous Deployment. Here is the repository I used for this task :
在GitHub上,我创建了一个存储库,并将其与Windows的本地git命令连接起来,以进行代码的连续开发和上传。 接下来,我将其与Jenkins进行持续部署。 这是我用于此任务的存储库:
This is a DevOps task so here main focus is on CI/CD automation. So, I haven't focused much on the code. I simply used one html file just to check if my deployment is working fine or not.
这是一个DevOps任务,因此这里主要关注CI / CD自动化。 因此,我并没有过多地关注代码。 我只是使用一个html文件只是为了检查我的部署是否工作正常。
詹金斯·乔布斯1: (Jenkins Job 1 :)
Go to jenkins and click on “Manage Jenkins => “Manage Plugins” => available => search for “git” and Install the git plugin.
转到jenkins并单击“管理Jenkins =>“管理插件” =>可用=>搜索“ git”并安装git插件。
Next after successful installation click on “New Item” => give name “Job1” => click on Freestyle Project => then ok.
成功安装后,单击“ New Item” =>并命名为“ Job1” =>单击Freestyle Project =>然后确定。
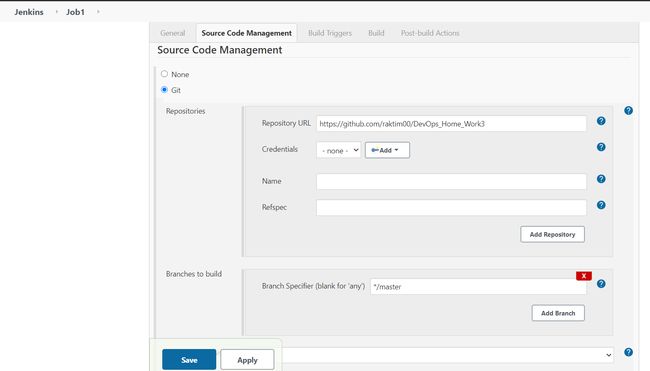
Next, follow the below-mentioned screenshots and put the required information. 1st we are setting up the GitHub repository from where Jenkins will pull the code.
接下来,按照下面提到的屏幕截图并放置所需的信息。 首先,我们要建立GitHub存储库,Jenkins将在该存储库中提取代码。
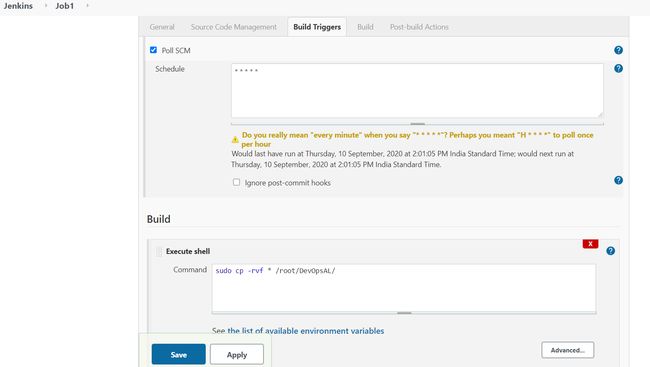
Next I used poll SCM because after I configure it, in each minute Jenkins will check the master branch of the Code and as soon as someone commit then Jenkins will automatically fetch that code.
接下来,我使用poll SCM,因为在配置它之后,Jenkins将在每一分钟检查代码的主分支,一旦有人提交,Jenkins将自动获取该代码。
Also using this Executive shell command I copied all the code which jenkins fetched and store in “/root/DevOpsAL/” location for future use.
同样,使用此Executive Shell命令,我复制了詹金斯获取的所有代码,并将其存储在“ / root / DevOpsAL /”位置中,以备将来使用。
One thing to remember is that you need to provide Jenkins the power of sudo, for that either you can edit the “/etc/sudoers” file. Or you can run the below-mentioned command on the terminal.
要记住的一件事是,您需要为Jenkins提供sudo的功能,因为您可以编辑“ / etc / sudoers”文件。 或者,您可以在终端上运行以下命令。
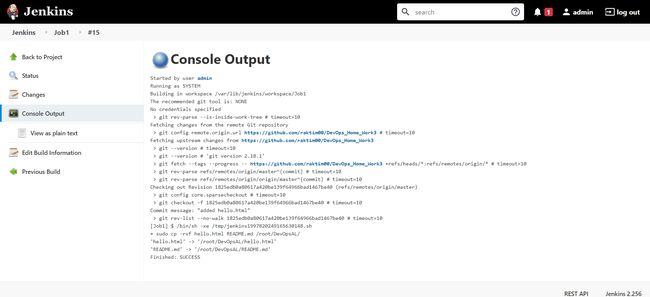
echo ‘jenkins ALL=(ALL) NOPASSWD:ALL’ >> /etc/sudoersClick on save and then click on “build now”. Next after the build runs let's see the output screen. Click on the build no and then click on Console Output. You can see in the below screen shot that the build runs successfully.
单击保存,然后单击“立即构建”。 运行构建后的下一步,让我们看一下输出屏幕。 单击内部版本号,然后单击控制台输出。 您可以在下面的屏幕快照中看到构建成功运行。
詹金斯(Jenkins)Job 2:(Jenkins Job 2 :)
Before starting the Job 2, we need to write one script which will deploy PODs on Kubernetes. As we can see in the problem statement that our data inside PODs needs to be persistent. Also, we need to expose our PODs so that we can do the testing on our code. Now in the below-mentioned YAML file you can find the deployment configuration. If you know how to write Kubernetes deployments configuration then great…, but if you don't know then I suggest
在开始作业2之前,我们需要编写一个脚本,该脚本将在Kubernetes上部署POD。 正如我们在问题陈述中看到的那样,POD中的数据必须是持久的。 另外,我们需要公开POD,以便可以对代码进行测试。 现在,在下面提到的YAML文件中,您可以找到部署配置。 如果您知道如何编写Kubernetes部署配置,那就太好了……但是,如果您不知道,那么我建议
please go through this link: https://kubernetes.io/docs/concepts/workloads/controllers/deployment/
请通过以下链接访问: https : //kubernetes.io/docs/concepts/workloads/controllers/deployment/
Also this YAML file you have to upload to the same repository where you are developing your code, so that in the future if you want to update the configuration of your deployment then you can easily do that. In the below GitHub repository, you can find that YAML file.
此外,您还必须将此YAML文件上载到开发代码的同一存储库中,以便将来如果您要更新部署的配置,则可以轻松地做到这一点。 在下面的GitHub存储库中,您可以找到该YAML文件。
For reference here is the YAML code :
供参考的是YAML代码:
apiVersion: v1
kind: Service
metadata:
  name: webdeploy
  labels:
    app: webdeploy
spec:
  ports:
  - port: 80
    nodePort: 30050
  selector:
    app: webdeploy
  type: NodePort
---
apiVersion: v1
kind: PersistentVolumeClaim
metadata:
  name: web-pvc
  labels:
    app: webdeploy
spec:
  accessModes:
  - ReadWriteOnce
  resources:
    requests:
      storage: 1Gi
---
apiVersion: apps/v1
kind: Deployment
metadata:
   name: webdeploy
   labels:
     app: webdeploy
spec:
   selector:
     matchLabels:
         app: webdeploy
   replicas: 1
   template:
     metadata:
         labels:
            app: webdeploy
     spec:
         containers:
         -  image: vimal13/apache-webserver-php
            name: webdeploy
            ports:
            -  containerPort: 80
               name: webdeploy
            volumeMounts:
            -  name: web-pv
               mountPath: /var/www/html
         volumes:
         -  name: web-pv
            persistentVolumeClaim:
               claimName: web-pvc
Great, now we are ready to dig into Job 2.
太好了,现在我们准备深入研究工作2。
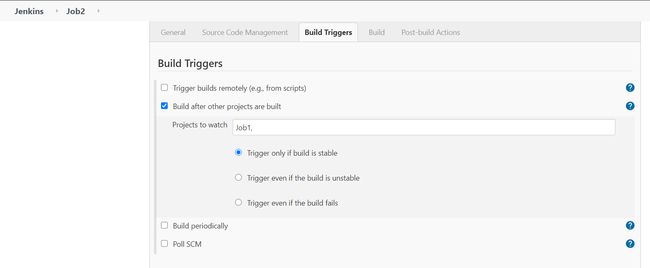
In Job 2, go to “Build Triggers” option and select “Build after other projects are built” and mention Job 1. That means after Job 1 runs successfully, Job 2 will start building automatically. Also check the box, “Trigger only if build is stable”.
在作业2中,转到“构建触发器”选项,然后选择“在其他项目构建后进行构建”,然后提及作业1。这意味着在作业1成功运行之后,作业2将自动开始构建。 还要选中“仅在构建稳定时才触发”框。
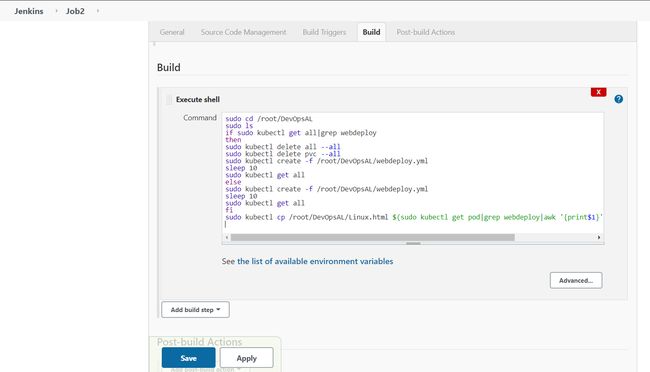
Next, we are going to run the kubectl commands to deploy our code. In the code below, you can see the code along with the screenshot.
接下来,我们将运行kubectl命令来部署我们的代码。 在下面的代码中,您可以看到代码以及屏幕截图。
sudo cd /root/DevOpsAL
sudo ls
if sudo kubectl get all|grep webdeploy
then
sudo kubectl delete all — all
sudo kubectl delete pvc — all
sudo kubectl create -f /root/DevOpsAL/webdeploy.yml
sleep 10
sudo kubectl get all
else
sudo kubectl create -f /root/DevOpsAL/webdeploy.yml
sleep 10
sudo kubectl get all
fi
sudo kubectl cp /root/DevOpsAL/hello.html $(sudo kubectl get pod|grep webdeploy|awk ‘{print$1}’):/var/www/html/hello.html
Go to Build => Execute shell , and use these commands, remember one thing in your base OS (RHEL8 for me), the folder “/root/DevOpsAL” should be there, otherwise it will fail.
转至Build => Execute shell,并使用以下命令,请记住基本操作系统中的一件事(对我而言是RHEL8),文件夹“ / root / DevOpsAL”应该在其中,否则将失败。
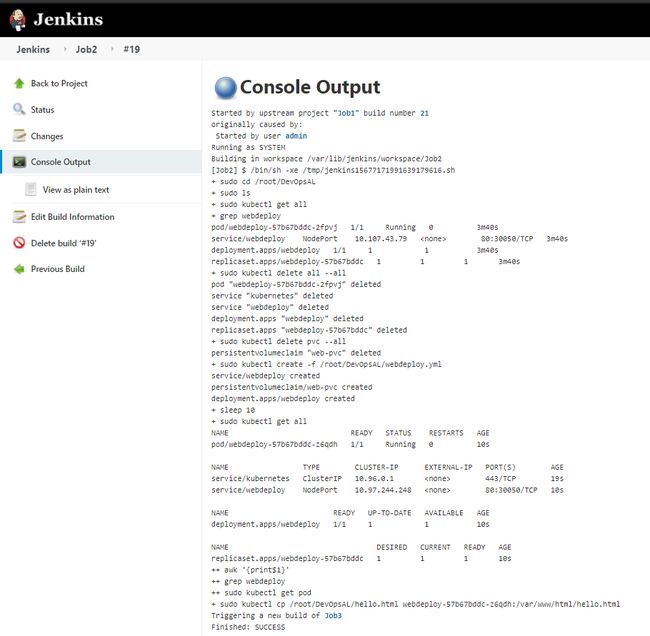
Job 2 output screenshot 作业2输出屏幕截图Click on save and then click on “build now”. Next after the build runs let’s see the output screen. You can see in the below screen shot that the build runs successfully.
单击保存,然后单击“立即构建”。 运行构建后的下一步,让我们看一下输出屏幕。 您可以在下面的屏幕快照中看到构建成功运行。
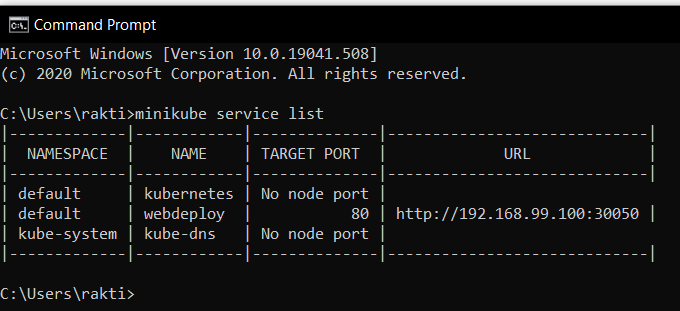
Great, our deployment is successful. Now just for checking if your website is working fine or not let's go to the Windows Command Prompt to check the IP address of the minikube. In Windows Command Prompt run
太好了,我们的部署成功了。 现在,仅用于检查您的网站是否正常运行,让我们进入Windows命令提示符以检查minikube的IP地址。 在Windows命令提示符下运行
minikube service listNow go to the browser and check if your website is working or not.
现在转到浏览器,检查您的网站是否正常运行。
詹金斯(Jenkins)Job 3: (Jenkins Job 3 :)
So, finally, this is the last Job and this Job will automatically check if the code is running successfully or not. If the code is not running successfully then it will send the developer Email.
因此,最后,这是最后一个作业,该作业将自动检查代码是否成功运行。 如果代码未成功运行,则它将发送给开发人员电子邮件。
To configure the Email Plugin I suggest go through this below-mentioned article
要配置电子邮件插件,建议您阅读下面提到的这篇文章
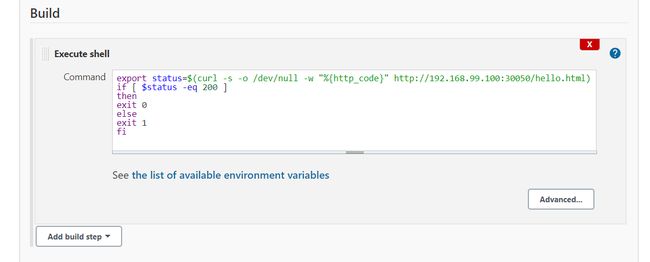
In, Job 3 again select that “Build Trigger” like we did previously and set Job 2 as up stream. In the “Build” select “Execute Shell” and provide these commands mentioned in the below screen shot. This command will check it the website is working fine or not.
在其中,作业3再次像以前一样选择“生成触发器”,并将作业2设置为上游。 在“构建”中,选择“执行Shell”,并提供以下屏幕截图中提到的这些命令。 此命令将检查网站是否正常运行。
Click on save and then click on “build now”. Next after the build runs let’s see the output screen.
单击保存,然后单击“立即构建”。 运行构建后的下一步,让我们看一下输出屏幕。
最后工作:(Final Work :)
Last work is to give this pipeline a beautiful visual UI using Build Pipeline Plugin. So Install the below mentioned plugin.
最后的工作是使用“构建管道插件”为该管道提供漂亮的可视化UI。 因此,安装以下提到的插件。
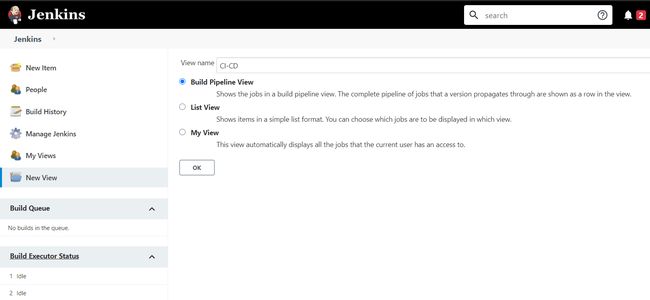
After Installing the build pipeline plugin, go to the Main Home Page of Jenkins you will find one plus symbol on the top bar of your Job lists. Click on that and then give one View Name, and select Build Pipeline View. Then click on Ok.
安装构建管道插件后,转到Jenkins的主页,您将在作业列表的顶部栏中找到一个加号。 单击该名称,然后指定一个视图名称,然后选择“构建管道视图”。 然后单击确定。
Next a page will automatically open, Just check the “Select Initial Job” to your 1st job of your pipeline under “Pipeline Flow”. Next select Ok.
下一步将自动打开页面,只需在“管道流”下选中“选择初始作业”到管道的第一个作业即可。 接下来选择确定。
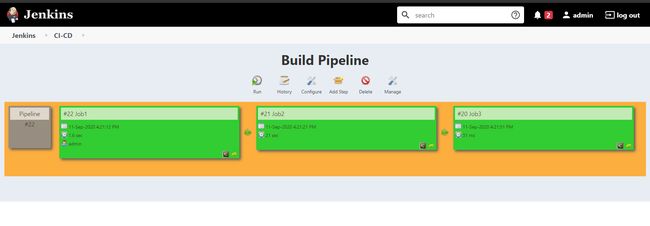
Click on “Run” and you will see your pipeline is working smoothly.
单击“运行”,您将看到管道运行正常。
So, that's it, Finally it has been successfully implemented.
就是这样,终于成功实现了。
最后的话: (Final Words :)
- There are lots of Future Possibilities like to do more precise testing using Jenkins, or to deploy more PODs by writing big deployment scripts. 有很多未来可能性,例如使用Jenkins进行更精确的测试,或者通过编写大型部署脚本来部署更多POD。
您可以在下面提到的链接中找到此Blog的下一部分。 这是完成这项工作的更高级的方法。 (The next part of this Blog You can find in below mentioned link. It's a more advanced way of doing this work.)
- I tried to make it as simple as possible. Hope You learned Something from here. Feel free to check out my LinkedIn profile and obviously feel free to comment. 我试图使其尽可能简单。 希望您从这里学到了一些东西。 随时查看我的LinkedIn个人资料,显然可以发表评论。
- I write DevOps, Cloud Computing, Machine Learning etc. blogs so feel free to follow me on Medium. And Last but not least if you have any queries DM me on LinkedIn. 我写了DevOps,云计算,机器学习等博客,因此请随时关注Medium。 最后但并非最不重要的一点是,如果您有任何疑问,请在LinkedIn上向我发送DM。
Subscribe to FAUN topics and get your weekly curated email of the must-read tech stories, news, and tutorials ️
订阅FAUN主题,并每周收到必须阅读的技术故事,新闻和教程的精选电子邮件️
Follow us on Twitter and Facebook and Instagram and join our Facebook and Linkedin Groups
在Twitter上关注我们 和Facebook 和Instagram 并加入我们的Facebook和Linkedin组
如果此帖子有帮助,请单击下面的拍手按钮几次,以表示对作者的支持! ⬇ (If this post was helpful, please click the clap button below a few times to show your support for the author! ⬇)
翻译自: https://medium.com/faun/ci-cd-pipeline-using-git-jenkins-kubernetes-ee06da43c5b0
jenkins使用git

