scrapy爬虫框架
scrapy爬虫框架
- 一 scrapy架构介绍
- 二 安装指南
- 三 创建项目
-
- 3.1 创建爬虫项目
- 3.2 创建爬虫
- 3.3 启动爬虫
- 3.4 pycharm中运行
- 四 scrapy解析数据
- 五 settings相关配置
- 六 持久化方案
- 七 全站爬取cnblogs文章
- 八 中间件
一 scrapy架构介绍
Scrapy一个开源和协作的框架,其最初是为了页面抓取 (更确切来说, 网络抓取 )所设计的,使用它可以以快速、简单、可扩展的方式从网站中提取所需的数据。但目前Scrapy的用途十分广泛,可用于如数据挖掘、监测和自动化测试等领域,也可以应用在获取API所返回的数据(例如 Amazon Associates Web Services ) 或者通用的网络爬虫。
Scrapy 是基于twisted框架开发而来,twisted是一个流行的事件驱动的python网络框架。因此Scrapy使用了一种非阻塞(又名异步)的代码来实现并发。整体架构大致如下。

The data flow in Scrapy is controlled by the execution engine, and goes like this:
数据流:
-
The Engine gets the initial Requests to crawl from the Spider.
引擎从爬行器获取要爬取的初始请求。 -
The Engine schedules the Requests in the Scheduler and asks for the next Requests to crawl.
引擎在调度器中调度请求,并请求抓取下一个请求。 -
The Scheduler returns the next Requests to the Engine.
调度器将下一个请求返回给引擎。 -
The Engine sends the Requests to the Downloader, passing through the Downloader Middlewares (see process_request()).
引擎将请求发送给下载程序,通过下载程序中间件(参见process_request())。 -
Once the page finishes downloading the Downloader generates a Response (with that page) and sends it to the Engine, passing through the Downloader Middlewares (see process_response()).
一旦页面完成下载,下载器将生成一个响应(使用该页面)并将其发送给引擎,通过下载器中间件(参见process_response())。 -
The Engine receives the Response from the Downloader and sends it to the Spider for processing, passing through the Spider Middleware (see process_spider_input()).
引擎接收来自下载程序的响应,并通过Spider中间件将其发送给Spider进行处理(请参见process_spider_input())。 -
The Spider processes the Response and returns scraped items and new Requests (to follow) to the Engine, passing through the Spider Middleware (see process_spider_output()).
爬行器处理响应,并通过爬行器中间件(参见process_spider_output())将抓取的项目和新请求返回给引擎。 -
The Engine sends processed items to Item Pipelines, then send processed Requests to the Scheduler and asks for possible next Requests to crawl.
引擎将处理过的项目发送到项目管道,然后将处理过的请求发送给调度器,并请求可能的下一个请求进行抓取。 -
The process repeats (from step 1) until there are no more requests from the Scheduler.
该过程重复(从步骤1开始),直到没有来自调度器的请求为止。
组件:
引擎(EGINE)
引擎负责控制系统所有组件之间的数据流,并在某些动作发生时触发事件。有关详细信息,请参见上面的数据流部分。
调度器(SCHEDULER)
用来接受引擎发过来的请求, 压入队列中, 并在引擎再次请求的时候返回. 可以想像成一个URL的优先级队列, 由它来决定下一个要抓取的网址是什么, 同时去除重复的网址。
下载器(DOWLOADER)
用于下载网页内容, 并将网页内容返回给EGINE,下载器是建立在twisted这个高效的异步模型上的。
爬虫(SPIDERS)
SPIDERS是开发人员自定义的类,用来解析responses,并且提取items,或者发送新的请求。
项目管道(ITEM PIPLINES)
在items被提取后负责处理它们,主要包括清理、验证、持久化(比如存到数据库)等操作。
下载器中间件(Downloader Middlewares)
位于Scrapy引擎和下载器之间,主要用来处理从EGINE传到DOWLOADER的请求request,已经从DOWNLOADER传到EGINE的响应response,你可用该中间件做以下几件事。
- process a request just before it is sent to the Downloader (i.e. right before Scrapy sends the request to the website);
在请求发送给下载程序之前处理请求(即在Scrapy将请求发送给网站之前); - change received response before passing it to a spider;
在传递给爬行器之前更改接收到的响应; - send a new Request instead of passing received response to a spider;
发送新请求,而不是将接收到的响应传递给爬行器; - pass response to a spider without fetching a web page;
将响应传递给爬行器,而不获取网页; - silently drop some requests.
悄悄删除一些请求。
爬虫中间件(Spider Middlewares)
位于EGINE和SPIDERS之间,主要工作是处理SPIDERS的输入(即responses)和输出(即requests)。
中文文档:https://www.w3cschool.cn/scrapy2_3/scrapy2_3-31uw3fn1.html
官网:https://docs.scrapy.org/en/latest/topics/architecture.html
二 安装指南
安装 Scrapy
pip install scrapy
在Windows下安装可能会安装失败,也可以使用wheel文件安装。
wheel文件的安装及使用
-
使用pip安装wheel这个库。
pip install whell -
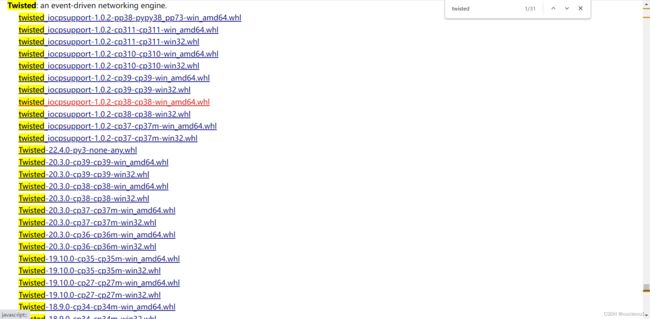
打开网址 https://www.lfd.uci.edu/~gohlke/pythonlibs/
选择要下载的whl文件。
-
使用whl文件安装。
pip install whl文件路径
已经安装了twisted模块,下变安装一个pygame,先下载whl文件。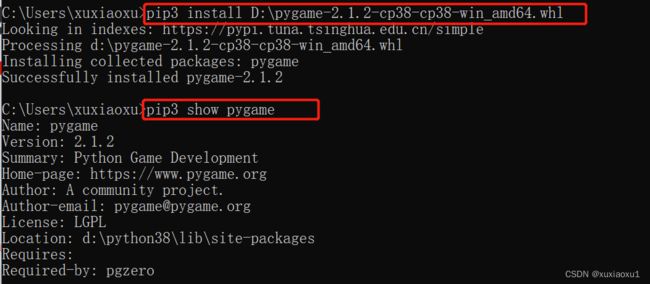
三 创建项目
在安装了scrapy框架后,会在python解释器路径下的Script文件夹下产生一个scrapy.exe可执行文件。(相当于django框架的django-admin.exe)

3.1 创建爬虫项目
# cd到要创建的目录下
# scrapy startproject 项目名

scrapy startproject tutorial

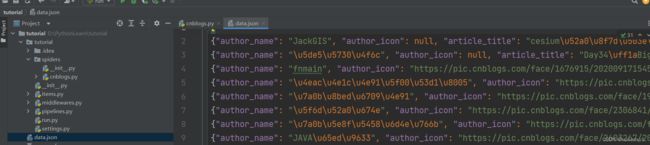
目录包含以下内容
tutorial/
    scrapy.cfg            # deploy configuration file

    tutorial/             # project's Python module, you'll import your code from here
        __init__.py

        items.py          # project items definition file

        middlewares.py    # project middlewares file

        pipelines.py      # project pipelines file

        settings.py       # project settings file

        spiders/          # a directory where you'll later put your spiders
            __init__.py
3.2 创建爬虫
# cd到爬虫项目里
# scrapy genspider 爬虫名 url

scrapy genspider cnblogs www.cnblogs.com


3.3 启动爬虫
# scrapy crawl 爬虫名--nolog(不输出日志)

scrapy crawl cnblogs --nolog

3.4 pycharm中运行
新建run.py
from scrapy.cmdline import execute

execute(['scrapy', 'crawl', 'cnblogs', '--nolog'])
# execute(['scrapy', 'crawl', 'cnblogs'])
四 scrapy解析数据
当你抓取网页时,你需要执行的最常见的任务是从HTML源代码中提取数据。有几个库可以实现这一点,例如:
BeautifulSoup 在Python程序员中是一个非常流行的Web抓取库,它基于HTML代码的结构构造了一个Python对象,并且能够很好地处理错误的标记,但是它有一个缺点:速度慢。lxml 是一个XML解析库(它也解析HTML),使用基于 ElementTree . (LXML不是Python标准库的一部分。)
Scrapy有自己的数据提取机制。它们被称为选择器,因为它们“选择”HTML文档的某些部分 XPath 或 CSS 表达。
XPath 是一种在XML文档中选择节点的语言,也可以与HTML一起使用。 CSS 是用于将样式应用于HTML文档的语言。它定义选择器,将这些样式与特定的HTML元素相关联。
response对象有css方法和xpath方法
重点1:
	-xpath取文本内容
	'.//a[contains(@class,"link-title")]/text()'
	-xpath取属性
	'.//a[contains(@class,"link-title")]/@href'

	-css取文本
	'a.link-title::text'
    -css取属性
    'img.image-scale::attr(src)'

重点2:
	.extract_first()  取一个
    .extract()        取所有
import scrapy


class CnblogsSpider(scrapy.Spider):
    name = 'cnblogs'
    allowed_domains = ['www.cnblogs.com']
    start_urls = ['http://www.cnblogs.com/']

    def parse(self, response):
        # article_list = response.css('article.post-item')
        # for article in article_list:
            # # css选择器
            # article_title = article.css('section>div>a::text').extract_first()
            # author_icon = article.css('section>div>p>a>img::attr(src)').extract_first()
            # article_desc_list = article.css('section>div>p::text').extract()
            # author_name = article.css('section>footer>a>span::text').extract_first()
            # date = article.css('section>footer>span>span::text').extract_first()
            # article_desc = article_desc_list[0].replace('\n', '').replace(' ', '')
            # if not article_desc:
            #     article_desc = article_desc_list[1].replace('\n', '').replace(' ', '')
            # print(f"""
            # 作者名:{author_name}
            # 作者头像:{author_icon}
            # 文章标题:{article_title}
            # 文章描述:{article_desc}
            # 发布时间:{date}
            # """)
        article_list = response.xpath('//article[contains(@class,"post-item")]')
        for article in article_list:
            # xpath选择器
            article_title = article.xpath('./section/div/a/text()').extract_first()
            author_icon = article.xpath('./section/div/p/a/img/@src').extract_first()
            article_desc_list = article.xpath('./section/div/p/text()').extract()
            author_name = article.xpath('./section/footer/a/span/text()').extract_first()
            date = article.xpath('./section/footer/span/span/text()').extract_first()
            article_desc = article_desc_list[0].replace('\n', '').replace(' ', '')
            if not article_desc:
                article_desc = article_desc_list[1].replace('\n', '').replace(' ', '')
            print(f"""
                        作者名:{author_name}
                        作者头像:{author_icon}
                        文章标题:{article_title}
                        文章描述:{article_desc}
                        发布时间:{date}
                        """)
五 settings相关配置
基础:
ROBOTSTXT_OBEY = False 是否遵循爬虫协议
LOG_LEVEL = 'ERROR' 日志级别(报错如果不打印日志,在控制台看不到错误)
USER_AGENT 用户代理
USER_AGENT = 'Mozilla/5.0 (Windows NT 10.0; Win64; x64) AppleWebKit/537.36 (KHTML, like Gecko) Chrome/103.0.0.0 Safari/537.36'
DEFAULT_REQUEST_HEADERS 默认请求头
DEFAULT_REQUEST_HEADERS = {
  'Accept': 'text/html,application/xhtml+xml,application/xml;q=0.9,*/*;q=0.8',
  'Accept-Language': 'en',
}
SPIDER_MIDDLEWARES 爬虫中间件
# 爬虫中间件
SPIDER_MIDDLEWARES = {
   'tutorial.middlewares.TutorialSpiderMiddleware': 543,
}

# 下载器中间件
DOWNLOADER_MIDDLEWARES = {
   'tutorial.middlewares.TutorialDownloaderMiddleware': 543,
}
ITEM_PIPELINES 持久化配置
ITEM_PIPELINES = {
   'tutorial.pipelines.TutorialPipeline': 300,
}
BOT_NAME = 'tutorial' 项目名
SPIDER_MODULES = ['myfirstscrapy.spiders']
NEWSPIDER_MODULE = 'myfirstscrapy.spiders' 指定爬虫类的py文件的位置
增加爬虫的爬取效率
-
增加并发:
CONCURRENT_REQUESTS = 32
增加并发,默认16。scrapy开启的并发线程为32个,可以适当进行增加。在settings配置文件中修改CONCURRENT_REQUESTS参数。 -
降低日志级别:
LOG_LEVEL = 'INFO'
在运行scrapy时,会有大量日志信息的输出,为了减少CPU的使用率。可以设置log输出信息为INFO或者ERROR即可。 -
禁止cookie:
COOKIES_ENABLED = False
如果不是真的需要cookie,则在scrapy爬取数据时可以禁止cookie从而减少CPU的使用率,提升爬取效率。 -
禁止重试:
RETRY_ENABLED = False
对失败的HTTP进行重新请求(重试)会减慢爬取速度,因此可以禁止重试。 -
减少下载超时:
DOWNLOAD_TIMEOUT = 10超时时间为10s
如果对一个非常慢的链接进行爬取,减少下载超时可以能让卡住的链接快速被放弃,从而提升效率。
六 持久化方案
方案一:
import scrapy


class CnblogsSpider(scrapy.Spider):
    name = 'cnblogs'
    allowed_domains = ['www.cnblogs.com']
    start_urls = ['http://www.cnblogs.com/']

    def parse(self, response):
        data_list = []
        article_list = response.xpath('//article[contains(@class,"post-item")]')
        for article in article_list:
            # xpath选择器
            article_title = article.xpath('./section/div/a/text()').extract_first()
            author_icon = article.xpath('./section/div/p/a/img/@src').extract_first()
            article_desc_list = article.xpath('./section/div/p/text()').extract()
            author_name = article.xpath('./section/footer/a/span/text()').extract_first()
            date = article.xpath('./section/footer/span/span/text()').extract_first()
            article_desc = article_desc_list[0].replace('\n', '').replace(' ', '')
            if not article_desc:
                article_desc = article_desc_list[1].replace('\n', '').replace(' ', '')
            data_list.append({
                'author_name': author_name,
                'author_icon': author_icon,
                'article_title': article_title,
                'article_desc': article_desc,
                'date': date,

            })
        return data_list

方案二:使用pipline,管道形式,可以同时存到多个位置。
1.在items.py中写一个类[相当于写django的表模型],继承scrapy.Item。
2.在类中写属性,写字段,所有字段都是scrapy.Field类型.
name = scrapy.Field()
3.在爬虫中导入类,实例化得到对象,把要保存的数据放到对象中。
# 使用[]给对象添加属性,不能使用.
item['name'] = name
4.修改配置文件,指定pipline,数字表示优先级,越小越大。
ITEM_PIPELINES = {
   'tutorial.pipelines.TutorialPipeline': 300,
}
5.写一个pipline:TutorialPipeline。
- open_spider:数据初始化,打开文件,打开数据库链接
- process_item:真正存储的地方
- 一定不要忘了return item,交给后续的pipline继续使用
- close_spider:销毁资源,关闭文件,关闭数据库链接
七 全站爬取cnblogs文章
spiders/cnblogs.py
import scrapy
from tutorial.items import TutorialItem
from scrapy import Request


class CnblogsSpider(scrapy.Spider):
    name = 'cnblogs'
    allowed_domains = ['www.cnblogs.com']
    start_urls = ['http://www.cnblogs.com/']

    def detail_parse(self, response):
        item = response.meta.get('item')
        # 解析出文章详情
        article_content = response.css('div.post').extract_first()
        item['article_content'] = str(article_content)
        yield item

    def parse(self, response):
        article_list = response.xpath('//article[contains(@class,"post-item")]')
        for article in article_list:
            item = TutorialItem()
            # xpath选择器
            article_title = article.xpath('./section/div/a/text()').extract_first()
            author_icon = article.xpath('./section/div/p/a/img/@src').extract_first()
            article_desc_list = article.xpath('./section/div/p/text()').extract()
            author_name = article.xpath('./section/footer/a/span/text()').extract_first()
            date = article.xpath('./section/footer/span/span/text()').extract_first()
            article_desc = article_desc_list[0].replace('\n', '').replace(' ', '')
            # 文章详情
            url = article.xpath('./section/div/a/@href').extract_first()
            if not article_desc:
                article_desc = article_desc_list[1].replace('\n', '').replace(' ', '')
            item['article_title'] = article_title
            item['author_icon'] = author_icon
            item['author_name'] = author_name
            item['date'] = date
            item['article_desc'] = article_desc
            item['url'] = url
            yield Request(url=url, callback=self.detail_parse, meta={'item': item})

        # 获取下一页
        next_url = 'https://www.cnblogs.com/' + response.css('div.pager>a:last-child::attr(href)').extract_first()
        yield Request(url=next_url)
tutorial/items.py
# Define here the models for your scraped items
#
# See documentation in:
# https://docs.scrapy.org/en/latest/topics/items.html

import scrapy


class TutorialItem(scrapy.Item):
    # define the fields for your item here like:
    # name = scrapy.Field()
    article_title = scrapy.Field()
    author_icon = scrapy.Field()
    author_name = scrapy.Field()
    date = scrapy.Field()
    article_desc = scrapy.Field()
    url = scrapy.Field()
    article_content = scrapy.Field()
tutorial/pipelines.py
import pymysql


class TutorialPipeline:
    def open_spider(self, spider):
        self.conn = pymysql.connect(
            user='root',
            password='',
            host='127.0.0.1',
            database='tutorial',
            port=3306,
            autocommit=True,
        )
        self.course = self.conn.cursor()

    def process_item(self, item, spider):
        self.course.execute(
            "insert into article (`article_title`,`author_icon`,`author_name`,`date`,`article_desc`,`url`, `article_content`) values(%s,%s,%s,%s,%s,%s,%s)",
            args=[
                item['article_title'],
                item['author_icon'],
                item['author_name'],
                item['date'],
                item['article_desc'],
                item['url'],
                item['article_content'],
            ])
        return item

    def close_spider(self, spider):
        self.course.close()
        self.conn.close()
八 中间件
SpiderMiddleware
def process_spider_input(self, response, spider):  # 进入爬虫会执行它

def process_spider_output(self, response, result, spider):  # 从爬虫出来会执行它

def process_spider_exception(self, response, exception, spider):  # 出了异常会执行

def process_start_requests(self, start_requests, spider):  # 第一次爬取执行

def spider_opened(self, spider):  # 爬虫开启执行
# 下载中间件
DownloaderMiddleware
def process_request(self, request, spider):  # request对象从引擎进入到下载器会执行

def process_response(self, request, response, spider):  # response对象从下载器进入到引擎会执行

def process_exception(self, request, exception, spider):  # 出异常执行它

def spider_opened(self, spider):  # 爬虫开启执行它
class TutorialDownloaderMiddleware:
    # Not all methods need to be defined. If a method is not defined,
    # scrapy acts as if the downloader middleware does not modify the
    # passed objects.

    @classmethod
    def from_crawler(cls, crawler):
        # This method is used by Scrapy to create your spiders.
        s = cls()
        crawler.signals.connect(s.spider_opened, signal=signals.spider_opened)
        return s

    def process_request(self, request, spider):
        # Called for each request that goes through the downloader
        # middleware.

        # Must either:
        # - return None: continue processing this request
        # - or return a Response object
        # - or return a Request object
        # - or raise IgnoreRequest: process_exception() methods of
        #   installed downloader middleware will be called
        return None

    def process_response(self, request, response, spider):
        # Called with the response returned from the downloader.

        # Must either;
        # - return a Response object
        # - return a Request object
        # - or raise IgnoreRequest
        return response

    def process_exception(self, request, exception, spider):
        # Called when a download handler or a process_request()
        # (from other downloader middleware) raises an exception.

        # Must either:
        # - return None: continue processing this exception
        # - return a Response object: stops process_exception() chain
        # - return a Request object: stops process_exception() chain
        pass

    def spider_opened(self, spider):
        spider.logger.info('Spider opened: %s' % spider.name)
DownloaderMiddleware的process_request
返回值:
	- return None: 继续执行下面的中间件的process_request
	- return a Response object: 不进入下载中间件了,直接返回给引擎,引擎在返回给爬虫
	- return a Request object:不进入中间件了,直接返回给引擎,引擎把它放到调度器中
DownloaderMiddleware的process_response
返回值:
	- return a Response object:正常,会进入到引擎,引擎把它给爬虫
	- return a Request object: 会进入到引擎,引擎把它放到调度器中,等待下次爬取
	- raise IgnoreRequest :    会执行process_exception