Yolov3 CPU推理性能比较-Onnx、OpenCV、Darknet
为实时目标检测应用程序选择正确的推理框架变得非常具有挑战性,尤其是当模型应该在低功耗设备上运行时。在本文中,你将了解如何根据你的需要选择最佳的推理检测器,并发现它可以给你带来巨大的性能提升。
通常,当我们将模型部署到CPU或移动设备上时,往往只关注于轻量级的模型体系结构,而忽略了对快速推理机的研究。
在研究CPU设备上的快速推理时,我测试了提供稳定python API的各种框架。今天将重点介绍Onnxruntime、opencvdnn和Darknet框架,并从性能(运行时间)和准确性方面对它们进行度量。
Onnxruntime
-
https://github.com/microsoft/onnxruntime
opencvdnn
-
https://docs.opencv.org/master/d2/d58/tutorial_table_of_content_dnn.html
Darknet
-
https://github.com/AlexeyAB/darknet
我们将使用两种常见的目标检测模型进行性能测量:
Yolov3架构:
image_size = 480*480
classes = 98
BFLOPS =87.892
Tiny-Yolov3_3layers 体系结构:
image_size= 1024*1024
classes =98
BFLOPS= 46.448
这两个模型都是使用AlexeyAB的Darknet框架对自定义数据进行训练的。
现在,让我们用我们要测试的探测器来运行推理。
Darknet探测器
Darknet是训练 YOLO 目标检测模型的官方框架。
此外,它还提供了对*.weights文件格式的模型进行推理的能力,该文件格式与训练输出的格式相同。
推理有两种方法:
不同数量的图像:
darknet detector test cfg/coco.data cfg/yolov3.cfg yolov3.weights -thresh 0.25
一个图像
darknet detector demo cfg/coco.data cfg/yolov3.cfg yolov3.weights dog.png
OpenCV DNN探测器
Opencv-DNN是计算机视觉领域常用的Opencv库的扩展。Darknet声称OpenCV-DNN是“CPU设备上YOLV4/V3最快的推理实现”,因为它高效的C&C++实现。
由于其方便的Python API,直接将darknet权重加载到opencv-dnn即可。
这是E2E推理的代码片段:
import cv2
import numpy as np

# 指定模型的网络大小
network_size = (480,480)
# Darknet cfg文件路径
cfg_path = 'yolov3.cfg'
# Darknet 权重路径
weights_path = 'yolov3.weights'

# 定义推理引擎
net = cv2.dnn.readNetFromDarknet(cfg_path, weights_path)
net.setPreferableBackend(cv2.dnn.DNN_BACKEND_OPENCV)
net.setPreferableTarget(cv2.dnn.DNN_TARGET_CPU)
_layer_names = net.getLayerNames()
_output_layers = [_layer_names[i[0] - 1] for i in net.getUnconnectedOutLayers()]

# 读取图像作为输入
img_path = 'dog.png'
img = cv2.imread(img_path)
image_blob = cv2.dnn.blobFromImage(img, 1 / 255.0, network_size, swapRB=True, crop=False)
net.setInput(image_blob, "data")

# 运行推理
layers_result = net.forward(_output_layers)

# 将layers_result转换为bbox,conf和类
def get_final_predictions(outputs, img, threshold, nms_threshold):
    height, width = img.shape[0], img.shape[1]
    boxes, confs, class_ids = [], [], []
    for output in outputs:
        for detect in output:
            scores = detect[5:]
            class_id = np.argmax(scores)
            conf = scores[class_id]
            if conf > threshold:
                center_x = int(detect[0] * width)
                center_y = int(detect[1] * height)
                w = int(detect[2] * width)
                h = int(detect[3] * height)
                x = int(center_x - w/2)
                y = int(center_y - h / 2)
                boxes.append([x, y, w, h])
                confs.append(float(conf))
                class_ids.append(class_id)

    merge_boxes_ids = cv2.dnn.NMSBoxes(boxes, confs, threshold, nms_threshold)

    # 仅过滤nms之后剩余的框
    boxes = [boxes[int(i)] for i in merge_boxes_ids]
    confs = [confs[int(i)] for i in merge_boxes_ids]
    class_ids = [class_ids[int(i)] for i in merge_boxes_ids]
    return boxes, confs, class_ids

boxes, confs, class_ids = get_final_predictions(layers_result, img, 0.3, 0.3)
Onnxruntime检测器
Onnxruntime是由微软维护的,由于其内置的优化和独特的ONNX权重格式文件,它声称可以显著加快推理速度。
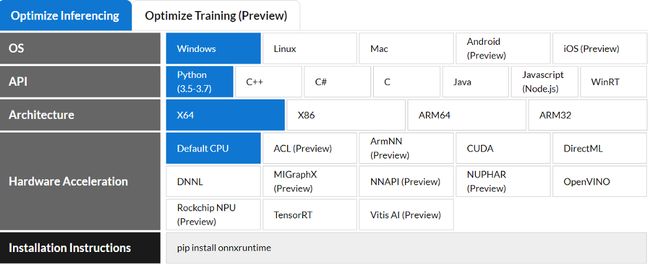
正如你在下一张图片中看到的,它支持各种风格和技术。
在我们的比较中,我们将使用Python\x64\CPU风格。
ONNX格式定义了一组通用的操作符(机器学习和深度学习模型的构建块)和一种通用的文件格式,使AI开发人员能够将模型与各种框架、工具、运行时和编译器一起使用。
转换Darknet权重> Onnx权重
为了使用Onnxruntime运行推理,我们必须将*.weights格式转换为*.onnx fomrat。
我们将使用专门为将darknet*.weights格式转换为*.pt(PyTorch)和*.onnx(onnx格式)而创建的存储库。
https://github.com/matankley/Yolov3_Darknet_PyTorch_Onnx_Converter
克隆repo并安装需求。
用cfg和weights和img_size参数运行converter.py。
python converter.py yolov3.cfg yolov3.weights 1024 1024
将在yolov3.weights目录中创建一个yolov3.onnx文件。
请记住,在使用ONNX格式进行推理时,由于转换过程的原因,精度会降低约0.1 mAP%。转换器模仿PyTorch中的Darknet功能,但并非完美无缺
为了支持除yolov3之外的其他darknet架构的转换,可以随意创建issues/PR
在我们成功地将模型转换为ONNX格式之后,我们可以使用Onnxruntime运行推理。
下面是E2E推理的代码片段:
import onnxruntime
import cv2
import numpy as np


# 转换后的onnx权重
onnx_weights_path = 'yolov3.onnx'
# 指定模型的网络大小
network_size = (480, 480)

# 声明onnxruntime会话
session = onnxruntime.InferenceSession(onnx_weights_path)
session.get_modelmeta()
input_name = session.get_inputs()[0].name
output_name_1 = session.get_outputs()[0].name
output_name_2 = session.get_outputs()[1].name

# 阅读图片
img_path = 'dog.png'
img = cv2.imread(img_path)
image_blob = cv2.dnn.blobFromImage(img, 1 / 255.0, network_size, swapRB=True, crop=False)

# 运行推理
layers_result = session.run([output_name_1, output_name_2],
                                         {input_name: image_blob})
layers_result = np.concatenate([layers_result[1], layers_result[0]], axis=1)

# 将layers_result转换为bbox,conf和类
def get_final_predictions(outputs, img, threshold, nms_threshold):
    height, width = img.shape[0], img.shape[1]
    boxes, confs, class_ids = [], [], []
    matches = outputs[np.where(np.max(outputs[:, 4:], axis=1) > threshold)]
    for detect in matches:
        scores = detect[4:]
        class_id = np.argmax(scores)
        conf = scores[class_id]
        center_x = int(detect[0] * width)
        center_y = int(detect[1] * height)
        w = int(detect[2] * width)
        h = int(detect[3] * height)
        x = int(center_x - w/2)
        y = int(center_y - h / 2)
        boxes.append([x, y, w, h])
        confs.append(float(conf))
        class_ids.append(class_id)

    merge_boxes_ids = cv2.dnn.NMSBoxes(boxes, confs, threshold, nms_threshold)

    #将layers_result转换为bbox,conf和类
    boxes = [boxes[int(i)] for i in merge_boxes_ids]
    confs = [confs[int(i)] for i in merge_boxes_ids]
    class_ids = [class_ids[int(i)] for i in merge_boxes_ids]
    return boxes, confs, class_ids

boxes, confs, class_ids = get_final_predictions(layers_result, img, 0.3, 0.3)
性能比较
祝贺你,我们已经完成了所有的技术细节,你现在应该有足够的知识来推理每一个探测器。
现在让我们来讨论我们的主要目标——性能比较。
在PC cpu(英特尔i7第9代)上,分别针对上述每个型号(Yolov3,Tiny-Yolov3)分别测量了性能**。**
对于opencv和onnxruntime,我们只测量前向传播的执行时间,以便将其与前/后进程隔离开来。
概要分析:
opencv
layers_result = self.net.forward(_output_layers)
Onnxruntime
layers_result = session.run([output_name_1, output_name_2], {input_name: image_blob})
layers_result = np.concatenate([layers_result[1], layers_result[0]], axis=1)
Darknet
darknet detector test cfg/coco.data cfg/yolov3.cfg yolov3.weights -thresh 0.25
判断
Yolov3
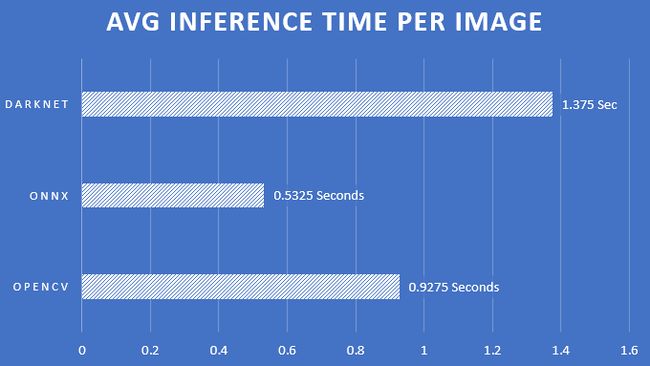
Yolov3在400张独特的图片上进行了测试。
ONNX Detector是推断我们的Yolov3模型的最快方法。确切地说,它比opencv-dnn快43%,后者被认为是可用的最快的检测器之一。
每个图像的平均时间:
Tiny-Yolov3
Tiny-Yolov3在600张独特的图像上进行了测试。
在我们的Tiny-Yolov3模型上,ONNX探测器比opencv-dnn快33%。
每个图像的平均时间:
结论
我们已经看到 onnxruntime 比 opencvdnn 运行的速度要快得多。
即使Yolvo3更大,我们也可以用比Tiny-Yolov3更少的时间运行Yolov3。
我们拥有必要的工具,可以将在darknet中训练的模型转换为*.onnx格式。
☆ END ☆
如果看到这里,说明你喜欢这篇文章,请转发、点赞。微信搜索「uncle_pn」,欢迎添加小编微信「 mthler」,每日朋友圈更新一篇高质量博文。
↓扫描二维码添加小编↓
![]()


