mask rcnn model.py 总结
这个作者代码长度差不多3000,666.jpg。我们先看下他的网络代码。
目录
类MaskRCNN
__init__方法
build方法
train方法
set_trainable方法
类MaskRCNN
这里有个比较重要的类就是Mask RCNN类,该类包含了很多种方法,简单的看一下:
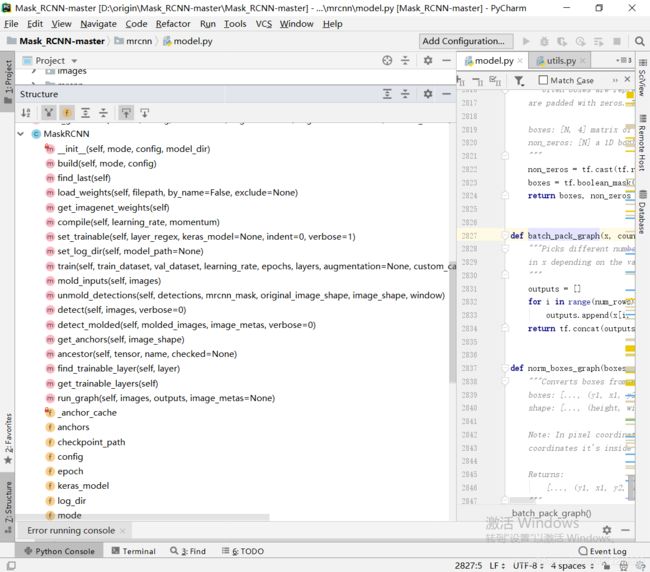
总览MaskRCNN类的工作原理。建立清晰的框架。方便抓住重点。
init方法初始化模型配置参数,比如说学习率等。调用的build方法。
build方法负责建立模型,并且返回。
此时如果不调用MaskRCNN中的train方法,那么模型是不会训练的。所以在coco.py中,先建立了MaskRCNN的实例,然后调用了train方法。
init接受了config而train接受了训练数据,
__init__方法
被coco.py调用
就是把一个类实体化,这样他才真实存在,有数据。c++,java都这样。可以去学一下类object class。
那么需要传入的参数。config我们之前在coco.py见过,是config.py的子类。
小提醒一下,在coco.py中:
#引入config.py
from mrcnn.config import Config
#CocoConfig继承config类,内容此处因为是提示所以就省略了。
class CocoConfig(Config):
#实例化CocoConfig成为对象,改变attribute
# Configurations
if args.command == "train":
    config = CocoConfig()
else:
    #看到这里又继承了,因为inference和train的参数不太一样
    class InferenceConfig(CocoConfig):
        # Set batch size to 1 since we'll be running inference on
        # one image at a time. Batch size = GPU_COUNT * IMAGES_PER_GPU
        GPU_COUNT = 1
        IMAGES_PER_GPU = 1
        DETECTION_MIN_CONFIDENCE = 0
    #对应的,也会实例化InferenceConfig,而不是CocoConfig
    config = InferenceConfig()
config.display()
#将CocoConfig对象当做参数传入MaskRCNN类的实例化,也就是__init__方法
if args.command == "train":
    model = modellib.MaskRCNN(mode="training", config=config,
                                  model_dir=args.logs)
else:
    model = modellib.MaskRCNN(mode="inference", config=config,
                                  model_dir=args.logs)
下面可以看下inference里面的config具体内容


这下就清楚的知道MaskRCNN怎么被实例化的了。也知道实例化的参数都来源于哪里了。__init__方法除了接收参数之外,还调用了两个方法。其中build能够返回创建的Keras.Model方法创建的model实例。所以这个self.keras_model记住了,这是我们这个类当中最重要的属性。
 def __init__(self, mode, config, model_dir):
        """
        mode: Either "training" or "inference"
        config: A Sub-class of the Config class
        这里的model_dir就是训练过程中的日志以及参数储存的位置。
        model_dir: Directory to save training logs and trained weights
        """
#判断mode是不是合法的,如果输入的不是['training', 'inference']里面的值,会报错
        assert mode in ['training', 'inference']
#给类MaskRCNN的attribute赋值
        self.mode = mode
        self.config = config
        self.model_dir = model_dir
#调用了两个方法
        #名字起得很好,设置日志路径
        self.set_log_dir()
        #调用自己的build方法。build会建立MaskRCNN的模型结构,只传入了选项(训练还是validation)
        #以及config参数。
        self.keras_model = self.build(mode=mode, config=config)
下面就看一下build方法
build方法
被__init__方法调用,传入参数。
 def build(self, mode, config):
        """Build Mask R-CNN architecture.
            #这里作者说明一下,他所谓的input_shape什么意思。因为他下面会用到
            input_shape: The shape of the input image.
            #区分training还是validation主要是因为模型会有不同的输入输出
            mode: Either "training" or "inference". The inputs and
                outputs of the model differ accordingly.
        """
        assert mode in ['training', 'inference']
检测图片的尺寸是否符合网络的需求,必须至少能被64整除。
 # Image size must be dividable by 2 multiple times
        h, w = config.IMAGE_SHAPE[:2]
        if h / 2**6 != int(h / 2**6) or w / 2**6 != int(w / 2**6):
            raise Exception("Image size must be dividable by 2 at least 6 times "
                            "to avoid fractions when downscaling and upscaling."
                            "For example, use 256, 320, 384, 448, 512, ... etc. ")
输入数据的建立,这里用到了keras.layer的input,注意这里只知道了tensor的大小,还没有真实的数据,通俗来讲就是先占个楼,等以后数据来了,在更新。IMAGE_SHAPE[2]的值是3.根据config。config.IMAGE_META_SIZE是93,inference里面,估计训练也是这样的,因为inference语句里面没有单独声明这两个参数。
# Inputs
        input_image = KL.Input(
            shape=[None, None, config.IMAGE_SHAPE[2]], name="input_image")
        input_image_meta = KL.Input(shape=[config.IMAGE_META_SIZE],
                                    name="input_image_meta")
下面构建RPN的结构。以及物体检测groundtruth包含的class id,一般是个整数。 boxes位置一般是个长度为4的向量,左上角,右下角的坐标就可以确定一个box,还有物体的mask。
如果是inference模式,那么显然,前面声明的这些groundtruth都不能用了。但是还是需要有anchor才能够生成bbox,从而ROI,从而得到最终的mask
        if mode == "training":
            # RPN GT
            input_rpn_match = KL.Input(
                shape=[None, 1], name="input_rpn_match", dtype=tf.int32)
            input_rpn_bbox = KL.Input(
                shape=[None, 4], name="input_rpn_bbox", dtype=tf.float32)

            # Detection GT (class IDs, bounding boxes, and masks)
            # 1. GT Class IDs (zero padded)
            input_gt_class_ids = KL.Input(
                shape=[None], name="input_gt_class_ids", dtype=tf.int32)
            # 2. GT Boxes in pixels (zero padded)
            # [batch, MAX_GT_INSTANCES, (y1, x1, y2, x2)] in image coordinates
            input_gt_boxes = KL.Input(
                shape=[None, 4], name="input_gt_boxes", dtype=tf.float32)
            # Normalize coordinates
            gt_boxes = KL.Lambda(lambda x: norm_boxes_graph(
                x, K.shape(input_image)[1:3]))(input_gt_boxes)
            # 3. GT Masks (zero padded)
            # [batch, height, width, MAX_GT_INSTANCES]
            if config.USE_MINI_MASK:
                #这里的minimask是和论文不一样的为了节省资源的操作,下面有链接.
                input_gt_masks = KL.Input(
                    shape=[config.MINI_MASK_SHAPE[0],
                           config.MINI_MASK_SHAPE[1], None],
                    name="input_gt_masks", dtype=bool)
            else:
                input_gt_masks = KL.Input(
                    shape=[config.IMAGE_SHAPE[0], config.IMAGE_SHAPE[1], None],
                    name="input_gt_masks", dtype=bool)
        elif mode == "inference":
            # Anchors in normalized coordinates
            input_anchors = KL.Input(shape=[None, 4], name="input_anchors")
这里的MINI_Mask可以看作者写的jupyter notebook上面看。
下面就是网络结构的构造:由于在FPN中要使用每个stage最后一层的feature map,所以这里要返回最后一层,并且FPN不使用第一层的Feature map,所以不要C1。
 # Build the shared convolutional layers.
        # Bottom-up Layers
        # Returns a list of the last layers of each stage, 5 in total.
        # Don't create the thead (stage 5), so we pick the 4th item in the list.
        if callable(config.BACKBONE):
            #这里由于我们并没有额外定义其他的主干网络,所以不会进入
            _, C2, C3, C4, C5 = config.BACKBONE(input_image, stage5=True,
                                                train_bn=config.TRAIN_BN)
        else:
            #调用model.py 里面的resnet_graph 这个方法。后面再说
            _, C2, C3, C4, C5 = resnet_graph(input_image, config.BACKBONE,
                                             stage5=True, train_bn=config.TRAIN_BN)
tip: 这里调用了callable函数去获取backbone,backbone在.../mrcnn/Config.py中
    # Backbone network architecture
    # Supported values are: resnet50, resnet101.
    # You can also provide a callable that should have the signature
    # of model.resnet_graph. If you do so, you need to supply a callable
    # to COMPUTE_BACKBONE_SHAPE as well
    BACKBONE = "resnet101"

    # Only useful if you supply a callable to BACKBONE. Should compute
    # the shape of each layer of the FPN Pyramid.
    # See model.compute_backbone_shapes
    COMPUTE_BACKBONE_SHAPE = None
自上而下的FPN结构会得到P2,P3,P4,P5.
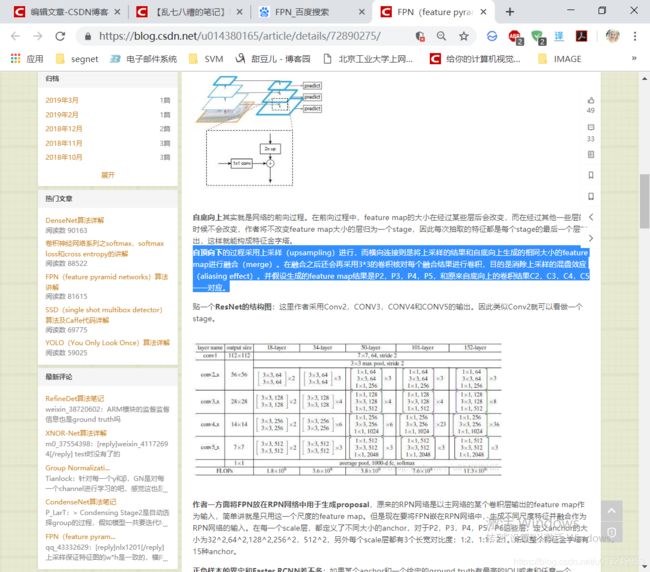
可以看到,先进行加法得到最上层的P4,然后再上采样用于更大feature map C3(C3被1*1卷积)的相加。等所有的P层全得到后,采用3*3的卷积得到最后的feature map,而不是加完了马上卷积.这也就意味着有如下公式:
P5 = conv1(C5)
P4 = up2(P5)+conv1(C4)
P3 = up2(P4)+conv1(C3)
= up2[ up2(P5) +conv1(C4) ]+conv1(C3)
= up4(P5)+up2[ conv1(C4) ]+conv1(c3)
我在github上问了,等有回复在确定是不是真的等同于布顿的上采样相加。
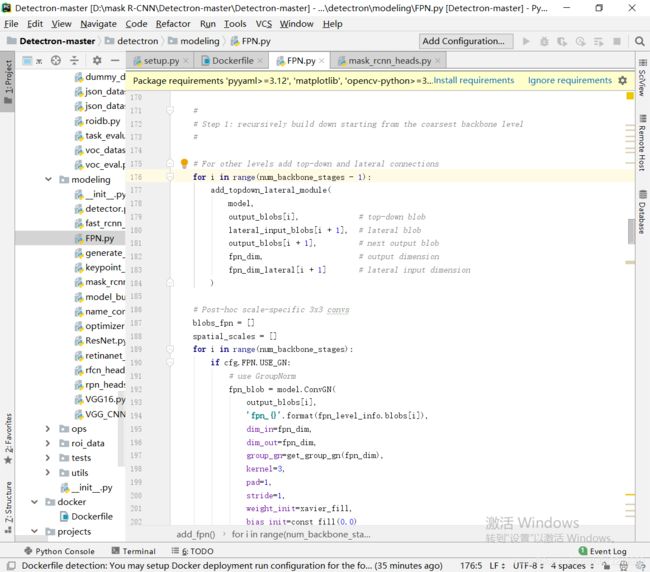
同时我在facebook的detectron上也下载了代码。看到他在自上而下时循环的调用了一个函数,等自上而下内容都结束皇后再加上3*3的卷积,所以感觉基本符合我的猜测。
最上层比如C5 到P2的信息传递是通过八倍上采样,C4到P2是四倍上采样,由于不对任何P层(P2,P3,P4,P5)施加卷积操作,所以 应该就是上采样。
对C的卷积操作:conv2D这里使用的卷积是1*1的,一共有config.TOP_DOWN_PYRAMID_SIZE个数256个。会对边界进行补0.所以会保持原始特征图的长宽。
之后对P进行卷积操作:使用卷积核3*3同时也是256个。所以最终P的通道数是256。会对边界进行补0.所以会保持原始特征图的长宽。
# Top-down Layers
        # TODO: add assert to varify feature map sizes match what's in config
        P5 = KL.Conv2D(config.TOP_DOWN_PYRAMID_SIZE, (1, 1), name='fpn_c5p5')(C5)
        P4 = KL.Add(name="fpn_p4add")([
            KL.UpSampling2D(size=(2, 2), name="fpn_p5upsampled")(P5),
            KL.Conv2D(config.TOP_DOWN_PYRAMID_SIZE, (1, 1), name='fpn_c4p4')(C4)])
        P3 = KL.Add(name="fpn_p3add")([
            KL.UpSampling2D(size=(2, 2), name="fpn_p4upsampled")(P4),
            KL.Conv2D(config.TOP_DOWN_PYRAMID_SIZE, (1, 1), name='fpn_c3p3')(C3)])
        P2 = KL.Add(name="fpn_p2add")([
            KL.UpSampling2D(size=(2, 2), name="fpn_p3upsampled")(P3),
            KL.Conv2D(config.TOP_DOWN_PYRAMID_SIZE, (1, 1), name='fpn_c2p2')(C2)])
        # Attach 3x3 conv to all P layers to get the final feature maps.
        P2 = KL.Conv2D(config.TOP_DOWN_PYRAMID_SIZE, (3, 3), padding="SAME", name="fpn_p2")(P2)
        P3 = KL.Conv2D(config.TOP_DOWN_PYRAMID_SIZE, (3, 3), padding="SAME", name="fpn_p3")(P3)
        P4 = KL.Conv2D(config.TOP_DOWN_PYRAMID_SIZE, (3, 3), padding="SAME", name="fpn_p4")(P4)
        P5 = KL.Conv2D(config.TOP_DOWN_PYRAMID_SIZE, (3, 3), padding="SAME", name="fpn_p5")(P5)
        # P6 is used for the 5th anchor scale in RPN. Generated by
        # subsampling from P5 with stride of 2.
        P6 = KL.MaxPooling2D(pool_size=(1, 1), strides=2, name="fpn_p6")(P5)
将最终的feature map总结起来:P6是将P5进行最大池化得到的更高级特征。只在rpn时使用得到proposal。
# Note that P6 is used in RPN, but not in the classifier heads.
        rpn_feature_maps = [P2, P3, P4, P5, P6]
        mrcnn_feature_maps = [P2, P3, P4, P5]
上面我们提到过inference过程中的anchor,那么在训练过程中anchor是这样的,这几行代码并没有实际的用anchor,一直是在给出anchors
IMAGE_SHAPE声明的时1024*1024*3的,调用的get_anchors方法能够直接给出:
"""Returns anchor pyramid for the given image size."""# Anchors
if mode == "training":
anchors = self.get_anchors(config.IMAGE_SHAPE)
# Duplicate across the batch dimension because Keras requires it
# TODO: can this be optimized to avoid duplicating the anchors?
anchors = np.broadcast_to(anchors, (config.BATCH_SIZE,) + anchors.shape)
# A hack to get around Keras's bad support for constants
anchors = KL.Lambda(lambda x: tf.Variable(anchors), name="anchors")(input_image)
else:
anchors = input_anchors第一句是rpn的模型建立,使用了config中的参数,希望你们看了anchor。此处用到了我们上面收集到的RPN的list,rpn_feature_maps = [P2,P3,P4,P5,P6].
 # RPN Model
        rpn = build_rpn_model(config.RPN_ANCHOR_STRIDE,
                              len(config.RPN_ANCHOR_RATIOS), config.TOP_DOWN_PYRAMID_SIZE)
        # Loop through pyramid layers
        layer_outputs = []  # list of lists
        for p in rpn_feature_maps:
            layer_outputs.append(rpn([p]))
        # Concatenate layer outputs
        # Convert from list of lists of level outputs to list of lists
        # of outputs across levels.
        # e.g. [[a1, b1, c1], [a2, b2, c2]] => [[a1, a2], [b1, b2], [c1, c2]]
        output_names = ["rpn_class_logits", "rpn_class", "rpn_bbox"]
        outputs = list(zip(*layer_outputs))
        outputs = [KL.Concatenate(axis=1, name=n)(list(o))
                   for o, n in zip(outputs, output_names)]

        rpn_class_logits, rpn_class, rpn_bbox = outputs
train方法
其中的train方法是承接coco.py输入的,我们之前提到了coco.py中的MaskRCNN实例化,以及模型训练方法的调用。
在coco.py中第400多行有如下代码:
 # Create model
    if args.command == "train":
        model = modellib.MaskRCNN(mode="training", config=config,
                                  model_dir=args.logs)
    else:
        model = modellib.MaskRCNN(mode="inference", config=config,
                                  model_dir=args.logs)

 # Training - Stage 1
        print("Training network heads")
        model.train(dataset_train, dataset_val,
                    learning_rate=config.LEARNING_RATE,
                    epochs=40,
                    layers='heads',
                    augmentation=augmentation)

        # Training - Stage 2
        # Finetune layers from ResNet stage 4 and up
        print("Fine tune Resnet stage 4 and up")
        model.train(dataset_train, dataset_val,
                    learning_rate=config.LEARNING_RATE,
                    epochs=120,
                    layers='4+',
                    augmentation=augmentation)

        # Training - Stage 3
        # Fine tune all layers
        print("Fine tune all layers")
        model.train(dataset_train, dataset_val,
                    learning_rate=config.LEARNING_RATE / 10,
                    epochs=160,
                    layers='all',
                    augmentation=augmentation)
那么在model.train()这个方法中到底做了什么,我们看一下代码
值得一提的是这里的layer,可以指定你的训练层数。比如第三层往上,比如只训练头部,比如全部训练。自己看一下注释。
然后用layer_regex regex这正则表达式的意思。做一个正则表达式字典。layer将会根据你输入的层数,从该字典中取正则表达式。
比如head指的是只有头部,所以诸如res3,4,5这样的resnet主干网络,以及bn3,4,5就不训练,所以head这个关键字对应的是:
r"(mrcnn\_.*)|(rpn\_.*)|(fpn\_.*)",这个正则表达式。所以实际上训练了rpn和fpn,classifier以及mask的头部。
而其它选项也至少训练了这些。比如5+,除了以上部分,还额外训练了res5,bn5
 def train(self, train_dataset, val_dataset, learning_rate, epochs, layers,
              augmentation=None, custom_callbacks=None, no_augmentation_sources=None):
        """Train the model.
        train_dataset, val_dataset: Training and validation Dataset objects.
        learning_rate: The learning rate to train with
        epochs: Number of training epochs. Note that previous training epochs
                are considered to be done alreay, so this actually determines
                the epochs to train in total rather than in this particaular
                call.
        layers: Allows selecting wich layers to train. It can be:
            - A regular expression to match layer names to train
            - One of these predefined values:
              heads: The RPN, classifier and mask heads of the network
              all: All the layers
              3+: Train Resnet stage 3 and up
              4+: Train Resnet stage 4 and up
              5+: Train Resnet stage 5 and up
        """
  layer_regex = {
            # all layers but the backbone
            "heads": r"(mrcnn\_.*)|(rpn\_.*)|(fpn\_.*)",
            # From a specific Resnet stage and up
            "3+": r"(res3.*)|(bn3.*)|(res4.*)|(bn4.*)|(res5.*)|(bn5.*)|(mrcnn\_.*)|(rpn\_.*)|(fpn\_.*)",
            "4+": r"(res4.*)|(bn4.*)|(res5.*)|(bn5.*)|(mrcnn\_.*)|(rpn\_.*)|(fpn\_.*)",
            "5+": r"(res5.*)|(bn5.*)|(mrcnn\_.*)|(rpn\_.*)|(fpn\_.*)",
            # All layers
            "all": ".*",
        }
        if layers in layer_regex.keys():
            layers = layer_regex[layers]
同时train这个方法中,还有恢复上次训练的代码:
 # Create log_dir if it does not exist
        if not os.path.exists(self.log_dir):
            os.makedirs(self.log_dir)

        # Callbacks
        callbacks = [
            keras.callbacks.TensorBoard(log_dir=self.log_dir,
                                        histogram_freq=0, write_graph=True, write_images=False),
            keras.callbacks.ModelCheckpoint(self.checkpoint_path,
                                            verbose=0, save_weights_only=True),
        ]

        # Add custom callbacks to the list
        if custom_callbacks:
            callbacks += custom_callbacks
既然训练肯定要获取数据,
实际上,训练使用了keras的fit_generator,那么就需要遵守这个类的入口,使用fit_generator主要是因为该类能够不一次性的将所有的图片加载到内存中,而是源源不断的产生,然后加进去。可以看下data_generator这个方法,也在MaskRCNN这个类里面
 # Data generators
        #这是fit_generator的典型用法,需要利用一个数据产生器来生成训练数据和标注。
        #这里根据data_generator 的方法生成了训练数据以及bbox和他们的标签还有mask
train_generator = data_generator(train_dataset, self.config, shuffle=True,
                                         augmentation=augmentation,
                                         batch_size=self.config.BATCH_SIZE,
                                         no_augmentation_sources=no_augmentation_sources)
        val_generator = data_generator(val_dataset, self.config, shuffle=True,
                                       batch_size=self.config.BATCH_SIZE)
self.keras_model.fit_generator(
            train_generator,
            initial_epoch=self.epoch,
            epochs=epochs,
            steps_per_epoch=self.config.STEPS_PER_EPOCH,
            callbacks=callbacks,
            validation_data=val_generator,
            validation_steps=self.config.VALIDATION_STEPS,
            max_queue_size=100,
            workers=workers,
            use_multiprocessing=True,
        )
train.py中使用data_generator源源不断获取数据,这样不用一次性读入图片,不会浪费内存。
train_generator = data_generator(train_dataset, self.config, shuffle=True,
                                         augmentation=augmentation,
                                         batch_size=self.config.BATCH_SIZE,
                                         no_augmentation_sources=no_augmentation_sources)
        val_generator = data_generator(val_dataset, self.config, shuffle=True,
                                       batch_size=self.config.BATCH_SIZE)
def data_generator(dataset, config, shuffle=True, augment=False, augmentation=None,
random_rois=0, batch_size=1, detection_targets=False,
no_augmentation_sources=None):
"""A generator that returns images and corresponding target class ids,
bounding box deltas, and masks.
最终返回的是该数据库的训练用的东西,一共四个:图片,以及相应的ids ,bbox和masks。是一个总的数据生成器,
好,下面是训练代码,前面做了很多准备工作:
# Train
        log("\nStarting at epoch {}. LR={}\n".format(self.epoch, learning_rate))
        log("Checkpoint Path: {}".format(self.checkpoint_path))
        self.set_trainable(layers)
        self.compile(learning_rate, self.config.LEARNING_MOMENTUM)
log是他自己写的方法。为了方便自己一次性的打印出numpy数组的shape,min,max三个属性。
def log(text, array=None):
    """Prints a text message. And, optionally, if a Numpy array is provided it
    prints it's shape, min, and max values.
    """
    if array is not None:
        text = text.ljust(25)
        text += ("shape: {:20}  ".format(str(array.shape)))
        if array.size:
            text += ("min: {:10.5f}  max: {:10.5f}".format(array.min(),array.max()))
        else:
            text += ("min: {:10}  max: {:10}".format("",""))
        text += "  {}".format(array.dtype)
print(text)至于set_trainable,以及compile,之后马上讲。因为train这个方法就剩一点了。我们看完。
为了windows用户好使,所以特意停用了windows用户的多CPU。具体的为什么keras不让windows使用CPU: https://github.com/matterport/Mask_RCNN/issues/13#issuecomment-353124009
 # Work-around for Windows: Keras fails on Windows when using
        # multiprocessing workers. See discussion here:
        # https://github.com/matterport/Mask_RCNN/issues/13#issuecomment-353124009
        if os.name is 'nt':
            workers = 0
        else:
            workers = multiprocessing.cpu_count()

        self.keras_model.fit_generator(
            train_generator,
            initial_epoch=self.epoch,
            epochs=epochs,
            steps_per_epoch=self.config.STEPS_PER_EPOCH,
            callbacks=callbacks,
            validation_data=val_generator,
            validation_steps=self.config.VALIDATION_STEPS,
            max_queue_size=100,
            workers=workers,
            use_multiprocessing=True,
        )
        self.epoch = max(self.epoch, epochs)
至此,train这个方法我们看完了。主要的作用是做一些准备工作。不过更具体了,他准备了数据,调用训练,同时能够恢复上次训练。
set_trainable方法
上面的train方法能够指定训练层数。那么,主要是通过set_trainable这个方法做到的。
    def set_trainable(self, layer_regex, keras_model=None, indent=0, verbose=1):
        """Sets model layers as trainable if their names match
        the given regular expression.
        """