使用 MySQL、Thymeleaf 和 Spring Boot Framework 上传、存储和查看图像
在本文中,我们将使用 Spring Boot 框架从头开始构建映像库应用程序,用户可以在其中列出其映像。
以下是我们将在应用程序中实现的功能。
- 用户可以列出他们的图像以及详细信息,例如,
- 名字
- 描述
- 图像
- 价格。(如果他们想卖)。
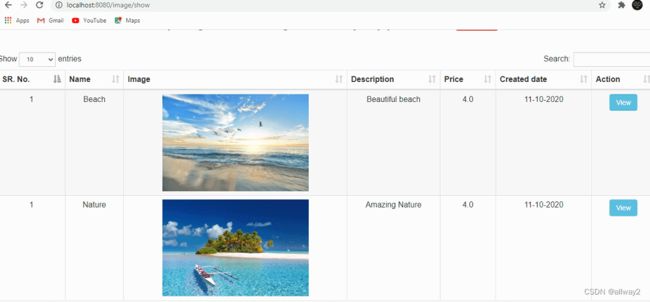
- 任何人都可以查看列出的图像以及所有详细信息。
注意:我们将使用 MySQL 数据库来存储所有图像详细信息。
最终应用
注意:视频教程可在底部找到。
您可以在本文的底部找到源代码。
请严格按照以下提及的步骤从头开始构建应用程序。
第 1 步:从 Spring Initializr 创建一个项目。
- 转到 Spring 初始化器。
- 输入组名称 com.pixeltrice。
- 提及工件 ID,spring-boot-image-gallery-app
- 添加以下依赖项。
- 春网
- 春季数据 JPA
- MySQL 驱动程序
- 百里香叶
第 2 步:按“生成”按钮,该项目将下载到您的本地系统上。
第 3 步:现在解压缩项目并将其解压缩到本地系统。
第 4 步:之后,将项目导入 IDE 中,例如 Eclipse。
选择文件 -> 导入 -> 现有 Maven 项目 -> 浏览 -> 选择文件夹 spring-boot-image-gallery-app-> 完成。
第 5 步:在应用程序中配置属性。属性
应用程序属性
# Set here configurations for the database connection
spring.datasource.url=jdbc:mysql://localhost:3306/imageGalleryApp?autoReconnect=true&useSSL=false
spring.datasource.driver-class-name=com.mysql.jdbc.Driver
spring.datasource.username=root
spring.datasource.password=your MySQL Password

# Specify the DBMS
spring.jpa.database = MYSQL
# Show or not log for each sql query
spring.jpa.show-sql = true
#create-drop| update | validate | none
spring.jpa.hibernate.ddl-auto = update

# SQL dialect for generating optimized queries
spring.jpa.properties.hibernate.dialect = org.hibernate.dialect.MySQL5Dialect

uploadDir=/resources

#Enable multipart uploads
spring.servlet.multipart.enabled=true
# Threshold after which files are written to disk.
spring.servlet.multipart.file-size-threshold=2KB
# Max file size.
spring.servlet.multipart.max-file-size=200MB
# Max Request Size
spring.servlet.multipart.max-request-size=215MB
所有属性都是不言自明的,您通过查看它很容易理解。
第 6 步:为图像创建实体类。
在此步骤中,我们将定义实体类,该实体类将与数据库中存在的表进行映射。
ImageGallery.java
package com.pixeltrice.springbootimagegalleryapp.entity;

import java.util.Arrays;
import java.util.Date;
import javax.persistence.Column;
import javax.persistence.Entity;
import javax.persistence.GeneratedValue;
import javax.persistence.GenerationType;
import javax.persistence.Id;
import javax.persistence.Lob;
import javax.persistence.Table;
import javax.persistence.Temporal;
import javax.persistence.TemporalType;

@Entity
@Table(name = "image_gallery")
public class ImageGallery {

	@Id @GeneratedValue(strategy = GenerationType.IDENTITY)
	@Column(name = "id", nullable = false, unique = true)
	private Long id;

	@Column(name = "name", nullable = false)
	private String name;

	@Column(name = "description", nullable = false)
	private String description;

	@Column(name = "price",nullable = false, precision = 10, scale = 2)
    private double price;

	@Lob
    @Column(name = "Image", length = Integer.MAX_VALUE, nullable = true)
    private byte[] image;

    @Temporal(TemporalType.TIMESTAMP)
    @Column(name = "create_date", nullable = false)
    private Date createDate;

	public ImageGallery() {}

	public Long getId() {
		return id;
	}

	public void setId(Long id) {
		this.id = id;
	}

		public String getName() {
		return name;
	}

	public void setName(String name) {
		this.name = name;
	}

	public String getDescription() {
		return description;
	}

	public void setDescription(String description) {
		this.description = description;
	}

	public double getPrice() {
		return price;
	}

	public void setPrice(double price) {
		this.price = price;
	}

	public byte[] getImage() {
		return image;
	}

	public void setImage(byte[] image) {
		this.image = image;
	}

	public Date getCreateDate() {
		return createDate;
	}

	public void setCreateDate(Date createDate) {
		this.createDate = createDate;
	}

	@Override
	public String toString() {
		return "Product [id=" + id + ", name=" + name + ", description=" + description + ", price=" + price + ", image="
				+ Arrays.toString(image) + ", createDate=" + createDate + "]";
	}

}
在实体上方,该类将与 MySQL 数据库中名为“image_gallery”的表进行映射。由于该类带有@Entity注释标记,因此它是一个持久 Java 类。
@Table注解指示与上述实体类映射的数据库表名。 @Id注解用于将变量表示为表中的主键。
@Column注释用于表示与上述变量或字段映射的列的名称。
@Lob注释用于将大型对象存储到数据库中,例如字节数组或大型字符串。在我们的例子中,我们以字节数组的形式存储图像。
此注释用于指定使用 Lob 标记或批注的字段应在数据库表中以 BLOB(二进制大对象)数据类型的形式表示。
第 7 步:为 ImageGallery 实体类创建存储库接口
在这里,我们将创建存储库,该存储库将与我们的数据库通信并执行所有类型的 CRUD 操作。在此步骤中,我们将扩展一个名为 JpaRepository 的预定义类,该类提供了创建、删除、更新和从数据库表中获取数据所需的所有可能方法。
ImageGalleryRepository.java
package com.pixeltrice.springbootimagegalleryapp.repository;

import org.springframework.data.jpa.repository.JpaRepository;
import org.springframework.stereotype.Repository;

import com.pixeltrice.springbootimagegalleryapp.entity.ImageGallery;


@Repository
public interface ImageGalleryRepository extends JpaRepository{

}
JpaRepository
@Repository:此注释指示类或接口完全专用于执行各种 CRUD 操作,例如创建、更新、读取或删除数据库中的数据。
第 8 步:创建图像库服务类
ImageGalleryService.java
package com.pixeltrice.springbootimagegalleryapp.service;

import java.util.List;
import java.util.Optional;

import org.springframework.beans.factory.annotation.Autowired;
import org.springframework.stereotype.Service;

import com.pixeltrice.springbootimagegalleryapp.entity.ImageGallery;
import com.pixeltrice.springbootimagegalleryapp.repository.ImageGalleryRepository;


@Service
public class ImageGalleryService {

	@Autowired
	private ImageGalleryRepository imageGalleryRepository;

	public void saveImage(ImageGallery imageGallery) {
		imageGalleryRepository.save(imageGallery);
	}

	public List getAllActiveImages() {
		return imageGalleryRepository.findAll();
	}

	public Optional getImageById(Long id) {
		return imageGalleryRepository.findById(id);
	}
}
第 9 步:创建控制器类
在控制器类中,我们将创建 API,以存储和获取来自 MySQL 数据库的图像。
ImageGalleryController.java
package com.pixeltrice.springbootimagegalleryapp.controller;

import java.io.BufferedOutputStream;
import java.io.File;
import java.io.FileOutputStream;
import java.io.IOException;
import java.nio.file.Paths;
import java.util.Date;
import java.util.List;
import java.util.Optional;

import javax.servlet.ServletException;
import javax.servlet.http.HttpServletRequest;
import javax.servlet.http.HttpServletResponse;

import org.slf4j.Logger;
import org.slf4j.LoggerFactory;
import org.springframework.beans.factory.annotation.Autowired;
import org.springframework.beans.factory.annotation.Value;
import org.springframework.http.HttpStatus;
import org.springframework.http.ResponseEntity;
import org.springframework.stereotype.Controller;
import org.springframework.ui.Model;
import org.springframework.web.bind.annotation.GetMapping;
import org.springframework.web.bind.annotation.PathVariable;
import org.springframework.web.bind.annotation.PostMapping;
import org.springframework.web.bind.annotation.RequestParam;
import org.springframework.web.bind.annotation.ResponseBody;
import org.springframework.web.multipart.MultipartFile;

import com.pixeltrice.springbootimagegalleryapp.entity.ImageGallery;
import com.pixeltrice.springbootimagegalleryapp.service.ImageGalleryService;


@Controller
public class ImageGalleryController {

	@Value("${uploadDir}")
	private String uploadFolder;

	@Autowired
	private ImageGalleryService imageGalleryService;

	private final Logger log = LoggerFactory.getLogger(this.getClass());

	@GetMapping(value = {"/", "/home"})
	public String addProductPage() {
		return "index";
	}

	@PostMapping("/image/saveImageDetails")
	public @ResponseBody ResponseEntity createProduct(@RequestParam("name") String name,
			@RequestParam("price") double price, @RequestParam("description") String description, Model model, HttpServletRequest request
			,final @RequestParam("image") MultipartFile file) {
		try {
			//String uploadDirectory = System.getProperty("user.dir") + uploadFolder;
			String uploadDirectory = request.getServletContext().getRealPath(uploadFolder);
			log.info("uploadDirectory:: " + uploadDirectory);
			String fileName = file.getOriginalFilename();
			String filePath = Paths.get(uploadDirectory, fileName).toString();
			log.info("FileName: " + file.getOriginalFilename());
			if (fileName == null || fileName.contains("..")) {
				model.addAttribute("invalid", "Sorry! Filename contains invalid path sequence \" + fileName");
				return new ResponseEntity<>("Sorry! Filename contains invalid path sequence " + fileName, HttpStatus.BAD_REQUEST);
			}
			String[] names = name.split(",");
			String[] descriptions = description.split(",");
			Date createDate = new Date();
			log.info("Name: " + names[0]+" "+filePath);
			log.info("description: " + descriptions[0]);
			log.info("price: " + price);
			try {
				File dir = new File(uploadDirectory);
				if (!dir.exists()) {
					log.info("Folder Created");
					dir.mkdirs();
				}
				// Save the file locally
				BufferedOutputStream stream = new BufferedOutputStream(new FileOutputStream(new File(filePath)));
				stream.write(file.getBytes());
				stream.close();
			} catch (Exception e) {
				log.info("in catch");
				e.printStackTrace();
			}
			byte[] imageData = file.getBytes();
			ImageGallery imageGallery = new ImageGallery();
			imageGallery.setName(names[0]);
			imageGallery.setImage(imageData);
			imageGallery.setPrice(price);
			imageGallery.setDescription(descriptions[0]);
			imageGallery.setCreateDate(createDate);
			imageGalleryService.saveImage(imageGallery);
			log.info("HttpStatus===" + new ResponseEntity<>(HttpStatus.OK));
			return new ResponseEntity<>("Product Saved With File - " + fileName, HttpStatus.OK);
		} catch (Exception e) {
			e.printStackTrace();
			log.info("Exception: " + e);
			return new ResponseEntity<>(HttpStatus.BAD_REQUEST);
		}
	}

	@GetMapping("/image/display/{id}")
	@ResponseBody
	void showImage(@PathVariable("id") Long id, HttpServletResponse response, Optional imageGallery)
			throws ServletException, IOException {
		log.info("Id :: " + id);
		imageGallery = imageGalleryService.getImageById(id);
		response.setContentType("image/jpeg, image/jpg, image/png, image/gif");
		response.getOutputStream().write(imageGallery.get().getImage());
		response.getOutputStream().close();
	}

	@GetMapping("/image/imageDetails")
	String showProductDetails(@RequestParam("id") Long id, Optional imageGallery, Model model) {
		try {
			log.info("Id :: " + id);
			if (id != 0) {
				imageGallery = imageGalleryService.getImageById(id);

				log.info("products :: " + imageGallery);
				if (imageGallery.isPresent()) {
					model.addAttribute("id", imageGallery.get().getId());
					model.addAttribute("description", imageGallery.get().getDescription());
					model.addAttribute("name", imageGallery.get().getName());
					model.addAttribute("price", imageGallery.get().getPrice());
					return "imagedetails";
				}
				return "redirect:/home";
			}
		return "redirect:/home";
		} catch (Exception e) {
			e.printStackTrace();
			return "redirect:/home";
		}
	}

	@GetMapping("/image/show")
	String show(Model map) {
		List images = imageGalleryService.getAllActiveImages();
		map.addAttribute("images", images);
		return "images";
	}
}
控制器类中存在的每个 API 的说明。
- @GetMapping(value = {“/”, “/home”}):每当请求到达此 API 时,它都会返回索引,由于我们已经在应用程序中实现了百里香叶,因此它将返回 index.html 页面。
2. @PostMapping(“/image/saveImageDetails”):用于将新的图像详细信息存储到MySQL数据库中。
request.getServletContext().getRealPath(uploadFolder):如您所见,我们已经通过从 application.properties 文件中分配值 /resources 来初始化变量 uploadFolder。
我们将参数传递给 getRealPath(),因此它将返回您在本地系统中创建工作区的完整路径。因此对我来说
file.getOriginal文件名():它将返回产品图片的实际名称,例如image.png,这取决于您上传的产品名称。
Paths.get(uploadDirectory, fileName).toString():它将返回系统上保存上传图像的确切位置。
之后,我们将图像转换为字节数组,并将所有与图像相关的详细信息(例如名称,描述,图像等)存储到MySQL数据库中。
如您所见,我们将图像以 byte[] 形式存储在数据库表中,这就是为什么在实体类中我们必须使用注释@Lob。
3. @GetMapping(“/image/display/{id}”):该接口用于从数据库中获取特定图像的 byte[] 形式,并将其转换为 jpeg、png、jpg 或 gif 格式以显示在浏览器中。
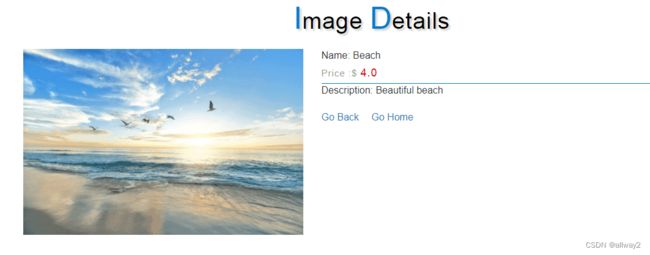
4. @GetMapping(“/image/imageDetails”):它根据镜像 ID 从数据库中获取镜像详情,并显示在镜像详情中.html
5. @GetMapping(“/image/show”):这是控制器类中的最后一个API,用于在images.html页面中显示产品列表及其详细信息。
第 10 步:创建 HTML 页面
在最后一步中,我们看到我们的应用程序需要三个 HTML 页面。让我们创建它。
注意:确保你应该在\src\main\resources\templates中创建所有HTML页面
index.html
PixelTrice
Spring Boot Image Gallery Application

images.html
PixelTrice
Spring Boot Image Gallery Application
Go Home
SR. No.
Name
Image
Description
Price
Created date
Action
![]()
View
imagedetails.html
PixelTrice
第 11 步:创建 css 和 javascript 文件
在此步骤中,我们将为我们的应用程序创建样式.css和产品.js。还在图像文件夹中放置了一个加载图像。
确保你应该在 src\main\resources\static\css 和 product.js 在路径 src\main\resources\static\js 中创建 style.css
注意我们需要在路径 src\main\resources 上再创建一个包含命名图像的文件夹,我们必须在其中存储加载图像。 您可以从我的 GitHub 帐户上提供的源代码下载它。
product.js
   $(document).ready(function() {
    $('#loader').hide();
    $("#submit").on("click", function() {
    	$("#submit").prop("disabled", true);
    	var name = $("#name").val();
        var file = $("#image").val();
        var price = $("#price").val();
        var description = $("#description").val();
        var form = $("#form").serialize();
    	var data = new FormData($("#form")[0]);
    	data.append('name', name);
    	data.append('price', price);
    	data.append('description', description);
    	//alert(data);
        $('#loader').show();
        if (name === "" || file === "" || price === "" || description === "") {
        	$("#submit").prop("disabled", false);
            $('#loader').hide();
            $("#name").css("border-color", "red");
            $("#image").css("border-color", "red");
            $("#price").css("border-color", "red");
            $("#description").css("border-color", "red");
            $("#error_name").html("Please fill the required field.");
            $("#error_file").html("Please fill the required field.");
            $("#error_price").html("Please fill the required field.");
            $("#error_description").html("Please fill the required field.");
        } else {
            $("#name").css("border-color", "");
            $("#image").css("border-color", "");
            $("#price").css("border-color", "");
            $("#description").css("border-color", "");
            $('#error_name').css('opacity', 0);
            $('#error_file').css('opacity', 0);
            $('#error_price').css('opacity', 0);
            $('#error_description').css('opacity', 0);
                    $.ajax({
                        type: 'POST',
                        enctype: 'multipart/form-data',
                        data: data,
                        url: "/image/saveImageDetails",
                        processData: false,
                        contentType: false,
                        cache: false,
                        success: function(data, statusText, xhr) {
                        console.log(xhr.status);
                        if(xhr.status == "200") {
                        	$('#loader').hide();
                        	$("#form")[0].reset();
                        	$('#success').css('display','block');
                            $("#error").text("");
                            $("#success").html("Product Inserted Succsessfully.");
                            $('#success').delay(2000).fadeOut('slow');
                         }
                        },
                        error: function(e) {
                        	$('#loader').hide();
                        	$('#error').css('display','block');
                            $("#error").html("Oops! something went wrong.");
                            $('#error').delay(5000).fadeOut('slow');
                            location.reload();
                        }
                    });
        }
            });
});注意:请参考我的Github帐户了解样式.css代码。
现在我们可以运行应用程序了,但在此之前,请确保您提供了正确的 MySQL 用户名、密码和架构名称。
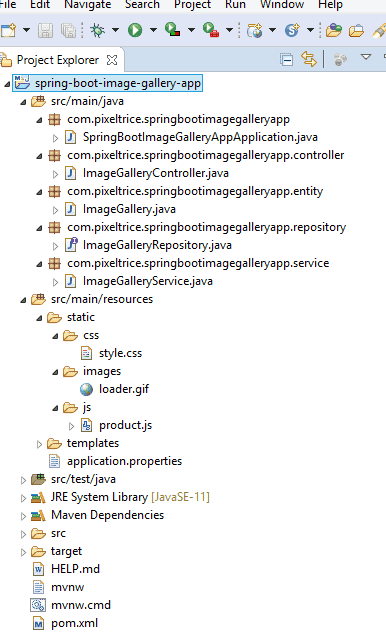
还要验证文件夹结构,如图所示。
第 12 步:运行应用程序
运行应用程序后,添加图像详细信息和视图,如图所示。
进入本地主机:8080上传图片,如图所示。
按提交按钮将图像详细信息存储在MySQL数据库中。点击 全部显示 按钮查看图像。
单击“查看”按钮以查看图像的详细信息。
下载源代码
总结
在本教程中,我们学习并构建了使用 MySQL、Thymeleaf 和 Spring Boot Framework 上传、存储和查看图像的应用程序。源代码在我的 Github 帐户上可用,如果卡在任何地方或遇到一些错误,请通过它。您也可以在下面的评论部分提出任何疑问。


