语义分割系列11-DAnet(pytorch实现)
DAnet:Dual Attention Network for Scene Segmentation
发布于CVPR2019,本文将进行DAnet的论文讲解和复现工作。
论文部分
主要思想
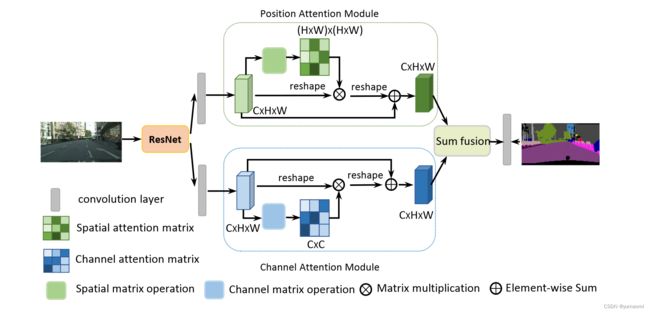
DAnet的思想并没有之前提到的DFAnet那么花里胡哨,需要各种多层次的连接,DAnet的主要思想就是——同时引入了空间注意力和通道注意力,也就是Dual Attention = Channel Attention + Position Attention。
其中,Position Attention可以在位置上,捕捉任意两个位置之间的上下文信息,而Channel Attention可以捕捉通道维度上的上下文信息
关于Position Attention:较为通俗的解释是,所有的位置,两两之间都有一个权重γ,这个γ的值由两个位置之间的相似性来决定,而不是由两个位置的距离来决定,这就提供了一个好处,也就是——无论两个位置距离多远,只要他们相似度高,空间注意力机制就可以锁定这两个位置。
关于Channel Attention:在高级语义特征中,每一个通道都可以被认为是对于某一个类的特殊响应,增强拥有这种响应的特征通道可以有效的提高分割效果。而通道注意力在EncNet和DFAnet中都有应用,通过计算一个权重因子,对每个通道进行加权,突出重要的通道,增强特征表示。
作者的一些观点
- 关于为什么需要Attention机制,作者认为,在卷积的过程中,导致感受野局限在某一范围,而这种操作导致相同类别的像素之间产生一定的差异,这会导致识别上准确率降低的问题。
- 与大部分作者相同,在文中作者也对ResNet的最后几层做了一些改动,加入空洞卷积,将原先ResNet下采样速率从32倍降低到8倍,也就是ResNet最后一层输出的特征图大小为原始输入的1/8。这样子做的好处就是保留了更多的细节信息,毕竟下采样过多倍速以后细节容易丢失。
模型部分
DAnet主要的部分是通道注意力和空间注意力的实现,模型如图1。
Position attention module
对于空间注意力的实现,首先将特征图A(C×H×W)输入到卷积模块中,生成B(C×H×W)和C(C×H×W),将B和C reshape成(C×N)维度,其中N=H×W,N就是像素点的个数。随后,将B矩阵转置后和C矩阵相乘,将结果输入到softmax中,得到一个空间注意力图S(N×N)。矩阵的乘法相当于让每一个像素点之间都产生了联系,也就是上文提到的两个位置之间的相似度γ。其中,两个位置相似度越高,Sji这个值就越大。
同样,A输入到另一个卷积层生成新的特征映射D(C×H×W),reshape成C×N后与上述的空间注意力图S的转置进行相乘,这样就得到了C×N大小的矩阵,再将这个矩阵reshape成原来的C×H×W大小。将这个矩阵乘以一个系数α(与前文提到的α不是同一个值),然后加上原始的特征图A。这样就实现了一个空间注意力机制(Position Attention)。需要注意的是,这个α值是可学习参数,初始化为0。
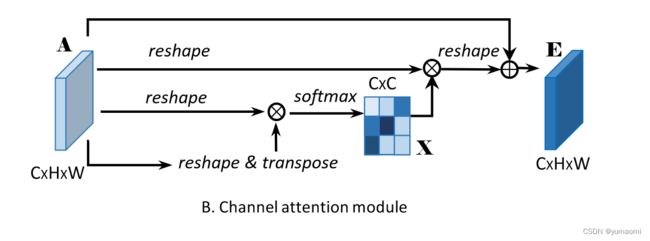
Channel Attention
Channel Attention机制的实现与Position Attention类似,但与DFAnet和EncNet中使用fc attention来实现Channel Attention的方式略微不同。
同样,特征图A(C×H×W)reshape成C×N的矩阵,分别经过转置、矩阵乘法、softmax到注意力图X(C×C)。
随后这个注意力图X与reshape成C×N的A矩阵进行矩阵乘法,得到的输出(C×N)再reshape成C×H×W和原始特征图A进行加权。
这里的β是一个可学习参数,初始化为0。
需要注意的是计算通道注意力时没有通过任何卷积层来嵌入特征,与Position attention实现上有一定差异。作者的解释是,这样可以保留原始通道之间的关系。
结果部分
作者在Cityscapes、PASCAL VOC等数据集上都做了一些测试,来证明DAnet的优越性。同时呢,作者也对Attention的两个模块做了一个可视化,见图4。
可以看到,Attention模块确实能够看到一些重要的信息,比如车、树等。效果也确实很好。
模型复现
DAnet网络
主干网络resnet50
from torchvision.models import resnet50, resnet101
from torchvision.models._utils import IntermediateLayerGetter
import torch
import torch.nn as nn

backbone=IntermediateLayerGetter(
            resnet50(pretrained=False, replace_stride_with_dilation=[False, True, True]),
            return_layers={'layer4': 'stage4'}
        )

# test
x = torch.randn(3, 3, 224, 224).cpu()
result = backbone(x)
for k, v in result.items():
    print(k, v.shape)
DAHead
class PositionAttention(nn.Module):
    def __init__(self, in_channels):
        super(PositionAttention, self).__init__()
        self.convB = nn.Conv2d(in_channels, in_channels, kernel_size=1, padding=0, bias=False)
        self.convC = nn.Conv2d(in_channels, in_channels, kernel_size=1, padding=0, bias=False)
        self.convD = nn.Conv2d(in_channels, in_channels, kernel_size=1, padding=0, bias=False)
        #创建一个可学习参数a作为权重,并初始化为0.
        self.gamma = torch.nn.Parameter(torch.FloatTensor(1), requires_grad=True)
        self.gamma.data.fill_(0.)
        self.softmax = nn.Softmax(dim=2)

    def forward(self, x):
        b,c,h,w = x.size()
        B = self.convB(x)
        C = self.convB(x)
        D = self.convB(x)
        S = self.softmax(torch.matmul(B.view(b, c, h*w).transpose(1, 2), C.view(b, c, h*w)))
        E = torch.matmul(D.view(b, c, h*w), S.transpose(1, 2)).view(b,c,h,w)
        #gamma is a parameter which can be training and iter
        E = self.gamma * E + x

        return E

class ChannelAttention(nn.Module):
    def __init__(self):
        super(ChannelAttention, self).__init__()
        self.beta = torch.nn.Parameter(torch.FloatTensor(1), requires_grad=True)
        self.beta.data.fill_(0.)
        self.softmax = nn.Softmax(dim=2)

    def forward(self, x):
        b,c,h,w = x.size()
        X = self.softmax(torch.matmul(x.view(b, c, h*w), x.view(b, c, h*w).transpose(1, 2)))
        X = torch.matmul(X.transpose(1, 2), x.view(b, c, h*w)).view(b, c, h, w)
        X = self.beta * X + x
        return X

class DAHead(nn.Module):
    def __init__(self, in_channels, num_classes):
        super(DAHead, self).__init__()
        self.conv1 = nn.Sequential(
            nn.Conv2d(in_channels, in_channels//4, kernel_size=3, padding=1, bias=False),
            nn.BatchNorm2d(in_channels//4),
            nn.ReLU(),
        )
        self.conv2 = nn.Sequential(
            nn.Conv2d(in_channels, in_channels//4, kernel_size=3, padding=1, bias=False),
            nn.BatchNorm2d(in_channels//4),
            nn.ReLU(),
        )

        self.conv3 = nn.Sequential(
            nn.Conv2d(in_channels//4, in_channels//4, kernel_size=3, padding=1, bias=False),
            nn.BatchNorm2d(in_channels//4),
            nn.ReLU(),
        )

        self.conv4 = nn.Sequential(
            nn.Conv2d(in_channels//4, in_channels//8, kernel_size=3, padding=1, bias=False),
            nn.BatchNorm2d(in_channels//8),
            nn.ReLU(),
            nn.Conv2d(in_channels//8, num_classes, kernel_size=3, padding=1, bias=False),
        )

        self.PositionAttention = PositionAttention(in_channels//4)
        self.ChannelAttention = ChannelAttention()

    def forward(self, x):
        x_PA = self.conv1(x)
        x_CA = self.conv2(x)
        PosionAttentionMap = self.PositionAttention(x_PA)
        ChannelAttentionMap = self.ChannelAttention(x_CA)
        #这里可以额外分别做PAM和CAM的卷积输出,分别对两个分支做一个上采样和预测,
        #可以生成一个cam loss和pam loss以及最终融合后的结果的loss.以及做一些可视化工作
        #这里只输出了最终的融合结果.与原文有一些出入.
        output = self.conv3(PosionAttentionMap + ChannelAttentionMap)
        output = nn.functional.interpolate(output, scale_factor=8, mode="bilinear",align_corners=True)
        output = self.conv4(output)
        return output
DAnet
class DAnet(nn.Module):
    def __init__(self, num_classes):
        super(DAnet, self).__init__()
        self.ResNet50 = IntermediateLayerGetter(
            resnet50(pretrained=False, replace_stride_with_dilation=[False, True, True]),
            return_layers={'layer4': 'stage4'}
        )
        self.decoder = DAHead(in_channels=2048, num_classes=num_classes)

    def forward(self, x):
        feats = self.ResNet50(x)
        # self.ResNet50返回的是一个字典类型的数据.
        x = self.decoder(feats["stage4"])
        return x

if __name__ == "__main__":
    x = torch.randn(3, 3, 224, 224).cpu()
    model = DAnet(num_classes=3)
    result = model(x)
    print(result.shape)
数据集-Camvid
数据集的创建和使用见教程:CamVid数据集的创建和使用
# 导入库
import os
os.environ['CUDA_VISIBLE_DEVICES'] = '0'

import torch
import torch.nn as nn
import torch.optim as optim
import torch.nn.functional as F
from torch import optim
from torch.utils.data import Dataset, DataLoader, random_split
from tqdm import tqdm
import warnings
warnings.filterwarnings("ignore")
import os.path as osp
import matplotlib.pyplot as plt
from PIL import Image
import numpy as np
import albumentations as A
from albumentations.pytorch.transforms import ToTensorV2

torch.manual_seed(17)
# 自定义数据集CamVidDataset
class CamVidDataset(torch.utils.data.Dataset):
    """CamVid Dataset. Read images, apply augmentation and preprocessing transformations.

    Args:
        images_dir (str): path to images folder
        masks_dir (str): path to segmentation masks folder
        class_values (list): values of classes to extract from segmentation mask
        augmentation (albumentations.Compose): data transfromation pipeline
            (e.g. flip, scale, etc.)
        preprocessing (albumentations.Compose): data preprocessing
            (e.g. noralization, shape manipulation, etc.)
    """

    def __init__(self, images_dir, masks_dir):
        self.transform = A.Compose([
            A.Resize(224, 224),
            A.HorizontalFlip(),
            A.VerticalFlip(),
            A.Normalize(),
            ToTensorV2(),
        ])
        self.ids = os.listdir(images_dir)
        self.images_fps = [os.path.join(images_dir, image_id) for image_id in self.ids]
        self.masks_fps = [os.path.join(masks_dir, image_id) for image_id in self.ids]


    def __getitem__(self, i):
        # read data
        image = np.array(Image.open(self.images_fps[i]).convert('RGB'))
        mask = np.array( Image.open(self.masks_fps[i]).convert('RGB'))
        image = self.transform(image=image,mask=mask)

        return image['image'], image['mask'][:,:,0]

    def __len__(self):
        return len(self.ids)


# 设置数据集路径
DATA_DIR = r'dataset\camvid' # 根据自己的路径来设置
x_train_dir = os.path.join(DATA_DIR, 'train_images')
y_train_dir = os.path.join(DATA_DIR, 'train_labels')
x_valid_dir = os.path.join(DATA_DIR, 'valid_images')
y_valid_dir = os.path.join(DATA_DIR, 'valid_labels')

train_dataset = CamVidDataset(
    x_train_dir,
    y_train_dir,
)
val_dataset = CamVidDataset(
    x_valid_dir,
    y_valid_dir,
)

train_loader = DataLoader(train_dataset, batch_size=8, shuffle=True,drop_last=True)
val_loader = DataLoader(val_dataset, batch_size=8, shuffle=True,drop_last=True)
模型训练
model = DAnet(num_classes=33).cuda()
#model.load_state_dict(torch.load(r"checkpoints/resnet101-5d3b4d8f.pth"),strict=False)
from d2l import torch as d2l
from tqdm import tqdm
import pandas as pd
#损失函数选用多分类交叉熵损失函数
lossf = nn.CrossEntropyLoss(ignore_index=255)
#选用adam优化器来训练
optimizer = optim.SGD(model.parameters(),lr=0.1)
scheduler = torch.optim.lr_scheduler.StepLR(optimizer, step_size=50, gamma=0.1, last_epoch=-1)
#训练50轮
epochs_num = 50
def train_ch13(net, train_iter, test_iter, loss, trainer, num_epochs,scheduler,
devices=d2l.try_all_gpus()):
timer, num_batches = d2l.Timer(), len(train_iter)
animator = d2l.Animator(xlabel='epoch', xlim=[1, num_epochs], ylim=[0, 1],
legend=['train loss', 'train acc', 'test acc'])
net = nn.DataParallel(net, device_ids=devices).to(devices[0])
loss_list = []
train_acc_list = []
test_acc_list = []
epochs_list = []
time_list = []
for epoch in range(num_epochs):
# Sum of training loss, sum of training accuracy, no. of examples,
# no. of predictions
metric = d2l.Accumulator(4)
for i, (features, labels) in enumerate(train_iter):
timer.start()
l, acc = d2l.train_batch_ch13(
net, features, labels.long(), loss, trainer, devices)
metric.add(l, acc, labels.shape[0], labels.numel())
timer.stop()
if (i + 1) % (num_batches // 5) == 0 or i == num_batches - 1:
animator.add(epoch + (i + 1) / num_batches,
(metric[0] / metric[2], metric[1] / metric[3],
None))
test_acc = d2l.evaluate_accuracy_gpu(net, test_iter)
animator.add(epoch + 1, (None, None, test_acc))
scheduler.step()
print(f"epoch {epoch+1} --- loss {metric[0] / metric[2]:.3f} --- train acc {metric[1] / metric[3]:.3f} --- test acc {test_acc:.3f} --- cost time {timer.sum()}")
#---------保存训练数据---------------
df = pd.DataFrame()
loss_list.append(metric[0] / metric[2])
train_acc_list.append(metric[1] / metric[3])
test_acc_list.append(test_acc)
epochs_list.append(epoch+1)
time_list.append(timer.sum())
df['epoch'] = epochs_list
df['loss'] = loss_list
df['train_acc'] = train_acc_list
df['test_acc'] = test_acc_list
df['time'] = time_list
df.to_excel("savefile/DAnet_camvid.xlsx")
#----------------保存模型-------------------
if np.mod(epoch+1, 5) == 0:
torch.save(model.state_dict(), f'checkpoints/DAnet_{epoch+1}.pth')
开始训练
train_ch13(model, train_loader, val_loader, lossf, optimizer, epochs_num,scheduler)


