CompletableFuture运行流程源码详解
1. 背景
CompletableFuture用起来着实舒服,代码一写,异步跑起来,时间缩短了不少(一个IO任务单线程40多分钟,用上多线程CompletableFuture,直接变成7分钟了)。代码是用起来了, 很舒服,但是里面的原理,想必有些大兄弟还不怎么清楚。今天就来一步步分析一下运行流程。
2. 上代码
CompletableFuture可以通过构造函数或者提供的方法构造一个CompletableFuture对象。我们今天就以CompletableFuture#supplyAsync方法来讲解。直接传值构造或者CompletableFuture#runAsync都少了一些步骤。一个少了通过方法构造,少了异步执行过程,另一个没有返回值。(最终运行逻辑都是一样的)
2.1 创建CompletableFuture
    public static void testCompletableFuture() {
        CompletableFuture<String> future = CompletableFuture.supplyAsync(() -> "test CompletableFuture.");
    }
我们直接通过类提供的方法来创建一个CompletableFuture。我们直接点进CompletableFuture#supplyAsync,看看方法里面到底有什么东西。
    static <U> CompletableFuture<U> asyncSupplyStage(Executor e,
                                                     Supplier<U> f) {
        if (f == null) throw new NullPointerException();
      	// 创建了一个CompletableFuture, 丢尽了AsyncSupply中
        CompletableFuture<U> d = new CompletableFuture<U>();
      	// 把新创建的CompletableFuture和Supplier丢到构建AsyncSupply,构建AsyncSupply任务
        e.execute(new AsyncSupply<U>(d, f));
      	// 直接将CompletableFuture对象返回了。
        // 在线程池中执行AsyncSupply任务
        return d;
    }
看代码有两个点需要我们注意,1. 任务丢进线程池,核心运行代码肯定在AsuncSupply#run中。2. CompletableFuture丢进线程池后直接返回,这是一个异步任务。
接下来我们直接看AsyncSupply是什么
2.1.1 AsyncSupply是什么
屁话不多说,直接上代码。
    // 继承ForkJoinTask,也就是说AsyncSupply是ForkJoinTask。
		// 个人理解:这继承ForkJoinTask,完全是为了兼容,用上forkJoinPool
		static final class AsyncSupply<T> extends ForkJoinTask<Void>
            implements Runnable, AsynchronousCompletionTask {
        CompletableFuture<T> dep; Supplier<T> fn;
        AsyncSupply(CompletableFuture<T> dep, Supplier<T> fn) {
            this.dep = dep; this.fn = fn;
        }

        public final Void getRawResult() { return null; }
        public final void setRawResult(Void v) {}
        public final boolean exec() { run(); return true; }

        public void run() {
            CompletableFuture<T> d; Supplier<T> f;
            if ((d = dep) != null && (f = fn) != null) {
                dep = null; fn = null;
              	// 传递进来的是一个new CompletableFuture,
                // d.result == null 说明当前这个Future还未运行或者未运行完
                if (d.result == null) {
                    try {
                      	// 运行Supplier
                        d.completeValue(f.get());
                    } catch (Throwable ex) {
                        d.completeThrowable(ex);
                    }
                }
              	// 看名字,结束后运行什么。得分析分析
                d.postComplete();
            }
        }
    }
我们看到这个逻辑没有什么复杂的,把AsyncSupply封装成了ForkJoinTask。(个人认为是为了用上ForkJoinPool,毕竟ForkJoinPool有任务窃取,又能快上不少,速度才是硬道理。哈哈!)。
2.1.1.1 d.completeValue(f.get())
屁话少说,看代码。
    final boolean completeValue(T t) {
        return UNSAFE.compareAndSwapObject(this, RESULT, null,
                                           (t == null) ? NIL : t);
    }
代码很简单,没有罗里吧嗦,就是通过CAS把supplier结果设置给Result。
2.1.1.2 d.postComplete()
    final void postComplete() {
        /*
         * On each step, variable f holds current dependents to pop
         * and run.  It is extended along only one path at a time,
         * pushing others to avoid unbounded recursion.
         */
      	// this指的就是运行完supplier后的CompletableFuture
        CompletableFuture<?> f = this; Completion h;
        while ((h = f.stack) != null ||
               (f != this && (h = (f = this).stack) != null)) {
            CompletableFuture<?> d; Completion t;
          	// 通过cas, 把当前运行的CompletableFuture的stack中的下一个Completion赋值给t
            if (f.casStack(h, t = h.next)) {
                if (t != null) {
                    if (f != this) {
                        pushStack(h);
                        continue;
                    }
                    h.next = null;    // detach
                }
              	// 执行Completion中的tryFire方法。如果结果不为空,则返回
                f = (d = h.tryFire(NESTED)) == null ? this : d;
            }
        }
    }
看到这,目前对我们来说就可以了。留下了2个悬念。分别是:
Completion是什么?Completion#tryFire是干嘛的?
这两个问题,看似两个,实则一个,弄懂Completion是什么,就可以知道Completion#tryFire是什么。
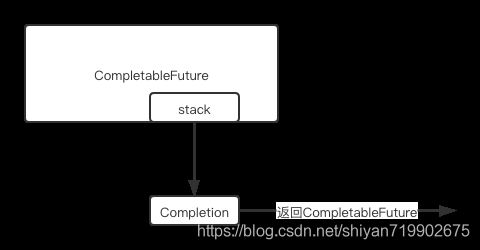
看到现在, 我们则对CompletableFuture的流程有一个大概了解,砍起来是这样的。如下图。

2.2 CompletableFuture call
我们创建了CompletableFuture,接下来有两种使用方式,分别是:
代码1:
CompletableFuture<Void> futureChain = CompletableFuture.supplyAsync(() -> "test CompletableFuture.")
  .thenAccept(System.out::println)
  .thenRun(() -> {});
代码2:
CompletableFuture<String> future = CompletableFuture.supplyAsync(() -> "test CompletableFuture.");
future.thenAccept(System.out::println);
future.thenRun(() -> {});
代码3:
CompletableFuture<Void> futureChain = CompletableFuture.supplyAsync(() -> "test CompletableFuture.")
  .thenAccept(System.out::println)
  .thenRun(() -> {});

futureChain.thenRun(() -> { });
代码1和代码2两种方式看着相似,但意义完全不一样。代码1是基于每次返回的CompletableFuture在调用,而代码2则是基于创建的future在调用。而这两种方式合起来则构成了代码3。为了弄懂代码3,我们则从1,2开始分析。
2.2.1 代码1
进入thenAccept方法看看具体的代码逻辑。
private CompletableFuture<Void> uniAcceptStage(Executor e,
                                               Consumer<? super T> f) {
  if (f == null) throw new NullPointerException();
  // 新创建了一个CompletableFuture
  CompletableFuture<Void> d = new CompletableFuture<Void>();
  // executor 传入的是null, d.uniaccept判断驱动thenAccept的CompletableFuture是否运行完/是否运行
  if (e != null || !d.uniAccept(this, f, null)) {
    // 用新创建的CompletableFuture和驱动thenAccept的CompletableFuture构建一个UniAccept
    UniAccept<T> c = new UniAccept<T>(e, d, this, f);
    // 放入栈中
    // 注意: 此栈是第一步执行完,返回的CompletableFuture
    push(c);
    c.tryFire(SYNC);
  }
  return d;
}
此方法就是判断当前CompletableFuture是否已经运行,如果美云销,则放入栈中。(此栈是supplyAsync返回的CompletableFuture)
c.tryFire(SYNC),从这个我们大概可以看出,c应该是Completion类型,否则怎么会有tryFire方法呢? 我们进入UniAccept,看看这个方法是什么东西。
2.2.1.1 UniAccept
// 继承UniCompletion,点进去发现是继承CompletableFuture
// 我们可以看得出来,具体逻辑是把每个操作都封装成了Completion,放入了栈中
static final class UniAccept<T> extends UniCompletion<T,Void> {
  Consumer<? super T> fn;
  // dep: 新创建的CompletableFuture
  // src: 驱动thenAccept的CompletableFuture
  UniAccept(Executor executor, CompletableFuture<Void> dep,
            CompletableFuture<T> src, Consumer<? super T> fn) {

    super(executor, dep, src); this.fn = fn;
  }
  final CompletableFuture<Void> tryFire(int mode) {
    CompletableFuture<Void> d; CompletableFuture<T> a;
    if ((d = dep) == null ||
        !d.uniAccept(a = src, fn, mode > 0 ? null : this))
      return null;
    dep = null; src = null; fn = null;
    // 尝试驱动下一个Completion。代码合前面相似
    return d.postFire(a, mode);
  }
}
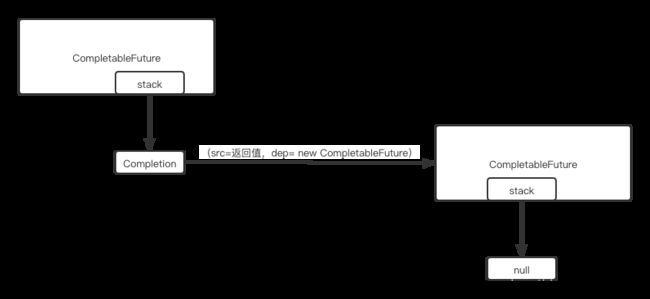
从这,我们可以大概看懂什么是Completion了。即把每个Operation都封装成了Completion,然后放入到栈中,然后执行。但是这个栈还是有点不同的。
看完代码1部分,我们对CompletableFuture的认知应该是这样的,如下图:
[外链图片转存失败,源站可能有防盗链机制,建议将图片保存下来直接上传(img-
我们暂且认知就是这的,接下来我们看代码2,看代码2是如何实现的。
2.2.2 代码2
private CompletableFuture<Void> uniAcceptStage(Executor e,
                                               Consumer<? super T> f) {
  if (f == null) throw new NullPointerException();
  CompletableFuture<Void> d = new CompletableFuture<Void>();
  if (e != null || !d.uniAccept(this, f, null)) {
    UniAccept<T> c = new UniAccept<T>(e, d, this, f);
    push(c);
    c.tryFire(SYNC);
  }
  return d;
}
代码同上面一样,但是此时有一个注意点是:this现在指的是supplyAsync生成的CompletableFuture对象,多次调用,都是使用的同一个对象。然后在放进栈中。 所以此时我们有一个结构图是这样的,如下图。

偷懒,画了一个完整的流程图。
大概的流程图就是这样的, 通过分析代码我们已经弄出了完整的流程图。
2.2.3 代码3
这个就是代码1和代码2的结合,具体看上面分析即可。
3 总结
我们通过上图,看出来CompletableFuture的完整运行流程图,虽然只是分析了其中一个方法,但所有的方法都是一样的,大同小异。