09:Rust中结构体
Rust中结构体定义和举例说明
- 首先是结构体的定义和实例化
- 这个是结构体的定义
struct User
{
	active: bool,
	username: String,
	email: String,
	sign_in_count: u64,
}
- 接着是实例化
- 使用
key: value进行实例化,
struct User {
    active: bool,
    username: String,
    email: String,
    sign_in_count: u64,
}

fn main() {
    let user1 = User {
        email: String::from("[email protected]"),
        username: String::from("someusername123"),
        active: true,
        sign_in_count: 1,
    };
}
- 创建可变实例可以改变字段值(字段指类似
email之类的)
struct User {
    active: bool,
    username: String,
    email: String,
    sign_in_count: u64,
}

fn main() {
    let mut user1 = User {
        email: String::from("[email protected]"),
        username: String::from("someusername123"),
        active: true,
        sign_in_count: 1,
    };

    user1.email = String::from("[email protected]");
}
接着是使用函数返回结构体中字段值:
struct User {
    active: bool,
    username: String,
    email: String,
    sign_in_count: u64,
}

fn build_user(email: String, username: String) -> User {
    User {
        email: email,
        username: username,
        active: true,
        sign_in_count: 1,
    }
}

fn main() {
    let user1 = build_user(
        String::from("[email protected]"),
        String::from("someusername123"),
    );
}
- 在变量和字段同名时,可以简写为:
struct User {
    active: bool,
    username: String,
    email: String,
    sign_in_count: u64,
}

fn build_user(email: String, username: String) -> User {
    User {
        email,
        username,
        active: true,
        sign_in_count: 1,
    }
}

fn main() {
    let user1 = build_user(
        String::from("[email protected]"),
        String::from("someusername123"),
    );
}
- 接着是使用结构体实例创建新的实例。
struct User {
    active: bool,
    username: String,
    email: String,
    sign_in_count: u64,
}

fn main() {
    // --snip--

    let user1 = User {
        email: String::from("[email protected]"),
        username: String::from("someusername123"),
        active: true,
        sign_in_count: 1,
    };

    let user2 = User {
        active: user1.active,
        username: user1.username,
        email: String::from("[email protected]"),
        sign_in_count: user1.sign_in_count,
    };
}
- 这种代码可以使用语法糖优化,优化过后为:
struct User {
    active: bool,
    username: String,
    email: String,
    sign_in_count: u64,
}

fn main() {
    // --snip--

    let user1 = User {
        email: String::from("[email protected]"),
        username: String::from("someusername123"),
        active: true,
        sign_in_count: 1,
    };

    let user2 = User {
        email: String::from("[email protected]"),
        ..user1
    };
}
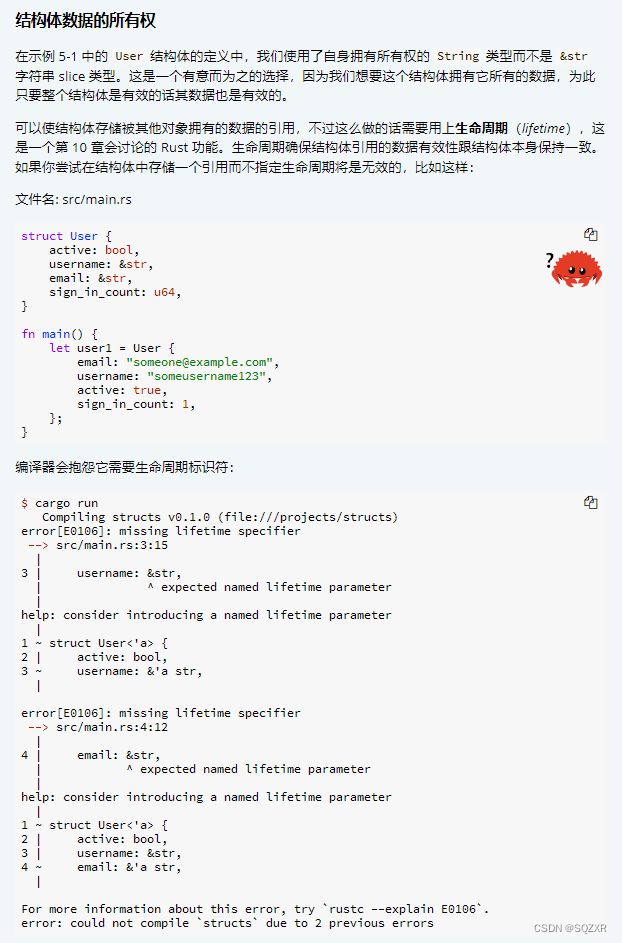
结构体更新语法像是带有’='的赋值,他会移动数据,user1中的username,email中的String字段会被移动到user2中,如果只是用user1中的active、sign_in_count值而不使用username、email值,则user1仍然可用,因为active、sign_in_count值是copy trait变量。
使用无命名字段的元组结构体创建不同的类型
struct Color(i32, i32, i32);
struct Point(i32, i32, i32);

fn main() {
    let black = Color(0, 0, 0);
    let origin = Point(0, 0, 0);
}
fn main() {
    struct Color(u8, u8, u8);
    struct Point(f64, f64);

    let black = Color(0, 0, 0);
    let origin = Point(0.0, 0.0);

    println!("black = ({}, {}, {})", black.0, black.1, black.2);
    println!("origin = ({}, {})", origin.0, origin.1);
}
- 无命名字段的元组结构体如上段代码所示。对于不同的元组结构体不能混用,可以将元组结构体解构为单独部分(
目前没找到相关描述),也可以使用.加索引访问单独值。 - 元组结构体与普通结构体在定义时存在是否使用
";"的区别
没有任何字段的类单元结构体
struct AlwaysEqual;

fn main() {
    let subject = AlwaysEqual;
}
- 要定义
AlwaysEqual,我们使用struct关键字,我们想要的名称,然后是一个分号。不需要花括号或圆括号!然后,我们可以以类似的方式在subject变量中获得AlwaysEqual的实例:使用我们定义的名称,不需要任何花括号或圆括号。想象一下,我们将实现这个类型的行为,即每个实例始终等于每一个其他类型的实例,也许是为了获得一个已知的结果以便进行测试。我们不需要任何数据来实现这种行为,你将在第十章中,看到如何定义特性并在任何类型上实现它们,包括类单元结构体。
接下来是一段官方文档:

示例程序(使用结构体)
- 使用不变值进行计算
fn main() {
    let width1 = 30;
    let height1 = 50;

    println!(
        "The area of the rectangle is {} square pixels.",
        area(width1, height1)
    );
}

fn area(width: u32, height: u32) -> u32 {
    width * height
}
- 但是此时没有将width和height进行关联
- 使用元组重构
fn main() {
    let rect1 = (30, 50);

    println!(
        "The area of the rectangle is {} square pixels.",
        area(rect1)
    );
}

fn area(dimensions: (u32, u32)) -> u32 {
    dimensions.0 * dimensions.1
}
- 使用结构体重构
struct Rectangle {
    width: u32,
    height: u32,
}

fn main() {
    let rect1 = Rectangle {
        width: 30,
        height: 50,
    };

    println!(
        "The area of the rectangle is {} square pixels.",
        area(&rect1)
    );
}

fn area(rectangle: &Rectangle) -> u32 {
    rectangle.width * rectangle.height
}
使用了结构体的引用,没有得到结构体的所有权。
4. 通过派生trait增加实用功能
println!默认使用display的方式打印,对于结构体,display应该使用{:?}或者{:#?}来表达,同时需要添加Debug输出格式,debug是一个trait,以一种方式打印结构体。- 所以同时需要添加显示选择功能,即外部属性
#[derive(Debug)](注意derive(Debug)只能使用在struct、enum等之前,如果直接在文档开头填写,会报错)
#[derive(Debug)]
struct Rectangle {
    width: u32,
    height: u32,
}

fn main() {
    let rect1 = Rectangle {
        width: 30,
        height: 50,
    };

    println!("rect1 is {:?}", rect1);
}
- 另外使用
dbg!宏也可以,dbg!宏会接收一个表达式所有权。这回打印到标准错误控制台流(stderr)而不是(stdout),这个是println!()的输出位置。
#[derive(Debug)]
struct Rectangle {
    width: u32,
    height: u32,
}

fn main() {
    let scale = 2;
    let rect1 = Rectangle {
    //dbg!返回表达式的值
        width: dbg!(30 * scale),
        height: 50,
    };

    dbg!(&rect1);
}
这里应该使用dbg(&rect1),因为这样dbg!不会获得rect1的所有权。
方法语法
- 方法和函数调用方式相同,使用fn关键字,具有参数和返回值,但是他们只会在结构体上下文中定义,是枚举或者trait对象的上下文,并且第一个参数总是self,代表调用该方法的结构体实例。
- 定义方法
#[derive(Debug)]
struct Rectangle {
    width: u32,
    height: u32,
}

impl Rectangle {
    fn area(&self) -> u32 {
        self.width * self.height
    }
}

fn main() {
    let rect1 = Rectangle {
        width: 30,
        height: 50,
    };

    println!(
        "The area of the rectangle is {} square pixels.",
        rect1.area()
    );
}
- Self类型是impl块类型的别名,方法的第一个参数必须有名为self的Self类型的参数,仍然需要使用&表示方法借用了Self实例,方法可以选择self、&self、& mut self等。
#[derive(Debug)]
struct Rectangle {
    width: u32,
    height: u32,
}

impl Rectangle {
    fn width(&self) -> bool {
        self.width > 0
    }
}

fn main() {
    let rect1 = Rectangle {
        width: 30,
        height: 50,
    };

    if rect1.width() {
        println!("The rectangle has a nonzero width; it is {}", rect1.width);
    }
}
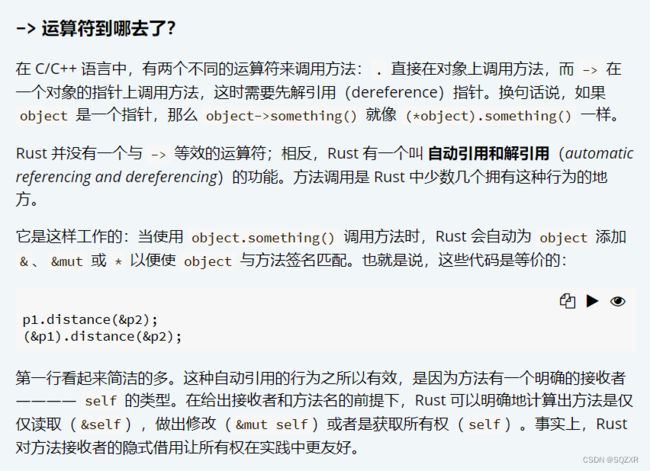
Rust中正确使用self类型会自动将object.something()对应起来。

#[derive(Debug)]
struct Rectangle {
    width: u32,
    height: u32,
}

impl Rectangle {
    fn area(&self) -> u32 {
        self.width * self.height
    }

    fn can_hold(&self, other: &Rectangle) -> bool {
        self.width > other.width && self.height > other.height
    }
}

fn main() {
    let rect1 = Rectangle {
        width: 30,
        height: 50,
    };
    let rect2 = Rectangle {
        width: 10,
        height: 40,
    };
    let rect3 = Rectangle {
        width: 60,
        height: 45,
    };

    println!("Can rect1 hold rect2? {}", rect1.can_hold(&rect2));
    println!("Can rect1 hold rect3? {}", rect1.can_hold(&rect3));
}
- 方法签名中可以在self之后添加多个参数。
关联函数
- 关联函数中不以self作为第一参数,但是仍然使用impl块定义,所以它不是方法。String::from就是这样一个函数。
下面是创建正方形的构造函数:
#[derive(Debug)]
struct Rectangle {
    width: u32,
    height: u32,
}

impl Rectangle {
    fn square(size: u32) -> Rectangle {
        Rectangle {
            width: size,
            height: size,
        }
    }
}

fn main() {
    let sq = Rectangle::square(3);
}
多个impl块
- 每个结构体允许使用多个
impl块。
#[derive(Debug)]
struct Rectangle {
    width: u32,
    height: u32,
}

impl Rectangle {
    fn area(&self) -> u32 {
        self.width * self.height
    }
}

impl Rectangle {
    fn can_hold(&self, other: &Rectangle) -> bool {
        self.width > other.width && self.height > other.height
    }
}

fn main() {
    let rect1 = Rectangle {
        width: 30,
        height: 50,
    };
    let rect2 = Rectangle {
        width: 10,
        height: 40,
    };
    let rect3 = Rectangle {
        width: 60,
        height: 45,
    };

    println!("Can rect1 hold rect2? {}", rect1.can_hold(&rect2));
    println!("Can rect1 hold rect3? {}", rect1.can_hold(&rect3));
}
- 这里每个方法有其自己的
impl块。