Android 二维码/条形码的识别或生成
序言
二维码/条形码是生活中非常常见的技术,只要通过手机或者扫码枪扫描一下就能读取到里面的信息,给我们的生活带来了很多的便利。在Android开发当中,这也是很常用的技术。本文主要简单的介绍所用到的工具及用法。
1.导入包
最通用的条码识别库应该是zxing,但是由于该库过于复杂,对于刚接触的人来说无异于杀鸡用牛刀。因此我们使用zxing-android-embedded这个封装过的库用作这次开发。
因为该库有很多东西需要我们自己更改源码,所以直接下载 zxing-android-embedded 并import 该module,具体过程不详叙。
2.常规用法
1.在application里增加硬件加速
2.通过该命令打开扫码的界面
new IntentIntegrator(this)
        .setDesiredBarcodeFormats(IntentIntegrator.ONE_D_CODE_TYPES)
        .setPrompt("提示")
        .setCameraId(0)
        .setBeepEnabled(false)
        .setBarcodeImageEnabled(true)
        .initiateScan();
分别解释各参数的意义
setDesiredBarcodeFormats : 设置扫码类型 条形码或二维码
setPrompt : 设置下方提示文字
setCameraId:设置前置还是后置摄像头
setBeepEnabled:扫码成功是否发出提示音
setBarcodeImageEnabled:是否生成扫描后的二维码
然后可以在该Activity的onActivityResult里面接收到返回的数据
@Override
protected void onActivityResult(int requestCode, int resultCode, Intent data) {
    IntentResult result = IntentIntegrator.parseActivityResult(requestCode, resultCode, data);
    if(result != null) {
        if(result.getContents() == null) {
            Toast.makeText(this, "Cancelled", Toast.LENGTH_LONG).show();
        } else {
            Toast.makeText(this, "Scanned: " + result.getContents(), Toast.LENGTH_LONG).show();
        }
    } else {
        super.onActivityResult(requestCode, resultCode, data);
    }
}
3.进阶
基本的使用是没问题了,可是直接使用的话会发现如果扫码成功,会回退到当前界面而无法继续扫码。
因此我们需要修改CaptureManager里面的returnResult方法,注释掉
//        barcodeView.pause();
//        inactivityTimer.cancel();
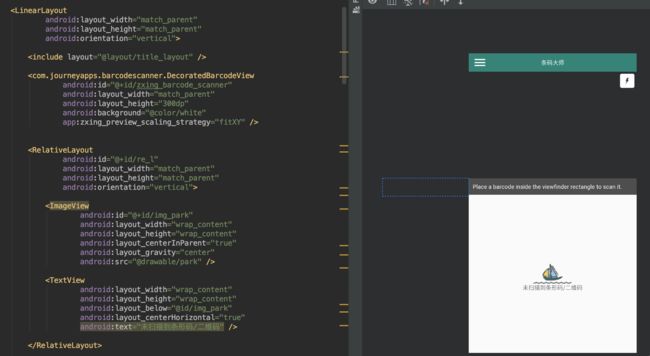
4.自定义布局
实际工程时界面肯定是千奇百怪的,使用默认界面的话肯定无法完成要求。
我们可以直接修改module里面的默认布局 zxing_barcode_scanner.xml
我这里给他增加了一个闪光灯的开关,

直接在DecoratedBarcodeView里面添加相应点击事件就可以了

 imgFlash.setOnClickListener(new OnClickListener() {
            @Override
            public void onClick(View view) {
                isTorch = !isTorch;
                try {
                    barcodeView.getCameraInstance().setTorch(isTorch);
                } catch (Exception e){

                }
            }
        });
5.使用建议
我封装了一个BaseScanActivity抽象类,任何继承该类的Layout都必须带一个名为zxing_barcode_scanner的 DecoratedBarcodeView
abstract class BaseScanActivity : BaseActivity() {

    private var captureManager: CaptureManager? = null
    var decoratedBarcodeView: DecoratedBarcodeView? = null

    override fun initSetting() {
        decoratedBarcodeView = findViewById(R.id.zxing_barcode_scanner)
        initDecode()
    }

    fun initDecode() {
        captureManager = CaptureManager(this, decoratedBarcodeView)
        captureManager!!.initializeFromIntent(getIntent(), null)
    }

    override fun onResume() {
        super.onResume()
        captureManager!!.onResume()
        captureManager!!.setResultCallBack { requestCode: Int, resultCode: Int, intent: Intent ->
            val result = IntentIntegrator.parseActivityResult(requestCode, resultCode, intent)
            scanResultCallBack(result.contents)
        }
        captureManager!!.decode()
        decoratedBarcodeView?.refresh()
    }

    fun reScan(){
        captureManager!!.onResume()
        captureManager!!.decode()
    }

    fun playWrongBeef() {
        captureManager?.playWrongBeef()
    }

    fun playBeef(){
        captureManager?.playBeef()
    }

    abstract fun scanResultCallBack(content: String)

}
使用时复写scanResultCallBack方法
class MainActivity : BaseScanActivity(),AdapterView.OnItemClickListener{

    override fun scanResultCallBack(content: String) {

    }
7.二维码/条形码生成
直接贴工具类就好了
/**
 *   生成条形码和二维码的工具
 */
public class ZxingUtils {
    /**
     * 生成二维码 要转换的地址或字符串,可以是中文
     *
     * @param url
     * @param width
     * @param height
     * @return
     */
    public static Bitmap createQRImage(String url, final int width, final int height) {
        try {
            // 判断URL合法性
            if (url == null || "".equals(url) || url.length() < 1) {
                Log.e("WriterException","equals" + url);
                return null;
            }
            Hashtable hints = new Hashtable();
            hints.put(EncodeHintType.CHARACTER_SET, "utf-8");
            // 图像数据转换,使用了矩阵转换
            BitMatrix bitMatrix = new QRCodeWriter().encode(url,
                    BarcodeFormat.QR_CODE, width, height, hints);
            int[] pixels = new int[width * height];
            // 下面这里按照二维码的算法,逐个生成二维码的图片,
            // 两个for循环是图片横列扫描的结果
            for (int y = 0; y < height; y++) {
                for (int x = 0; x < width; x++) {
                    if (bitMatrix.get(x, y)) {
                        pixels[y * width + x] = 0xff000000;
                    } else {
                        pixels[y * width + x] = 0xffffffff;
                    }
                }
            }
            // 生成二维码图片的格式,使用ARGB_8888
            Bitmap bitmap = Bitmap.createBitmap(width, height,
                    Bitmap.Config.ARGB_8888);
            bitmap.setPixels(pixels, 0, width, 0, 0, width, height);
            return bitmap;
        } catch (WriterException e) {
            e.printStackTrace();
            Log.e("WriterException",""+e.getLocalizedMessage());
    }
        return null;
    }

    /**
     * 生成条形码
     *
     * @param context
     * @param contents
     *            需要生成的内容
     * @param desiredWidth
     *            生成条形码的宽带
     * @param desiredHeight
     *            生成条形码的高度
     * @param displayCode
     *            是否在条形码下方显示内容
     * @return
     */
    public static Bitmap creatBarcode(Context context, String contents,
                                      int desiredWidth, int desiredHeight, boolean displayCode) {
        Bitmap ruseltBitmap = null;
        /**
         * 图片两端所保留的空白的宽度
         */
        int marginW = 20;
        /**
         * 条形码的编码类型
         */
        BarcodeFormat barcodeFormat = BarcodeFormat.CODE_128;

        if (displayCode) {
            Bitmap barcodeBitmap = encodeAsBitmap(contents, barcodeFormat,
                    desiredWidth, desiredHeight);
            Bitmap codeBitmap = creatCodeBitmap(contents, desiredWidth + 2
                    * marginW, desiredHeight, context);
            ruseltBitmap = mixtureBitmap(barcodeBitmap, codeBitmap, new PointF(
                    0, desiredHeight));
        } else {
            ruseltBitmap = encodeAsBitmap(contents, barcodeFormat,
                    desiredWidth, desiredHeight);
        }

        return ruseltBitmap;
    }

    /**
     * 生成条形码的Bitmap
     *
     * @param contents
     *            需要生成的内容
     * @param format
     *            编码格式
     * @param desiredWidth
     * @param desiredHeight
     * @return
     * @throws WriterException
     */
    protected static Bitmap encodeAsBitmap(String contents,
                                           BarcodeFormat format, int desiredWidth, int desiredHeight) {
        final int WHITE = 0xFFFFFFFF;
        final int BLACK = 0xFF000000;

        MultiFormatWriter writer = new MultiFormatWriter();
        BitMatrix result = null;
        try {
            result = writer.encode(contents, format, desiredWidth,
                    desiredHeight, null);
        } catch (WriterException e) {
            // TODO Auto-generated catch block
            e.printStackTrace();
        }

        int width = result.getWidth();
        int height = result.getHeight();
        int[] pixels = new int[width * height];
        // All are 0, or black, by default
        for (int y = 0; y < height; y++) {
            int offset = y * width;
            for (int x = 0; x < width; x++) {
                pixels[offset + x] = result.get(x, y) ? BLACK : WHITE;
            }
        }

        Bitmap bitmap = Bitmap.createBitmap(width, height,
                Bitmap.Config.ARGB_8888);
        bitmap.setPixels(pixels, 0, width, 0, 0, width, height);
        return bitmap;
    }

    /**
     * 生成显示编码的Bitmap
     *
     * @param contents
     * @param width
     * @param height
     * @param context
     * @return
     */
    protected static Bitmap creatCodeBitmap(String contents, int width,
                                            int height, Context context) {
        TextView tv = new TextView(context);
        ViewGroup.LayoutParams layoutParams = new ViewGroup.LayoutParams(
                ViewGroup.LayoutParams.MATCH_PARENT, ViewGroup.LayoutParams.WRAP_CONTENT);
        tv.setLayoutParams(layoutParams);
        tv.setText(contents);
        tv.setHeight(height);
        tv.setGravity(Gravity.CENTER_HORIZONTAL);
        tv.setWidth(width);
        tv.setDrawingCacheEnabled(true);
        tv.setTextColor(Color.BLACK);
        tv.measure(View.MeasureSpec.makeMeasureSpec(0, View.MeasureSpec.UNSPECIFIED),
                View.MeasureSpec.makeMeasureSpec(0, View.MeasureSpec.UNSPECIFIED));
        tv.layout(0, 0, tv.getMeasuredWidth(), tv.getMeasuredHeight());

        tv.buildDrawingCache();
        Bitmap bitmapCode = tv.getDrawingCache();
        return bitmapCode;
    }

    /**
     * 将两个Bitmap合并成一个
     *
     * @param first
     * @param second
     * @param fromPoint
     *            第二个Bitmap开始绘制的起始位置(相对于第一个Bitmap)
     * @return
     */
    protected static Bitmap mixtureBitmap(Bitmap first, Bitmap second,
                                          PointF fromPoint) {
        if (first == null || second == null || fromPoint == null) {
            return null;
        }
        int marginW = 20;
        Bitmap newBitmap = Bitmap.createBitmap(
                first.getWidth() + second.getWidth() + marginW,
                first.getHeight() + second.getHeight(), Bitmap.Config.ARGB_4444);
        Canvas cv = new Canvas(newBitmap);
        cv.drawBitmap(first, marginW, 0, null);
        cv.drawBitmap(second, fromPoint.x, fromPoint.y, null);
        cv.save();
        cv.restore();

        return newBitmap;
    }

}
6.尾语
基于这篇文章的内容,我写了一个叫条码大师的App,这里是下载地址。希望这篇文章能让你学会二维码识别基本的使用与生成~
Demo APP下载地址
GIthub地址
我的个人blog


