相机标定中的坐标系变换及参数详解(附标定程序)
一、原理
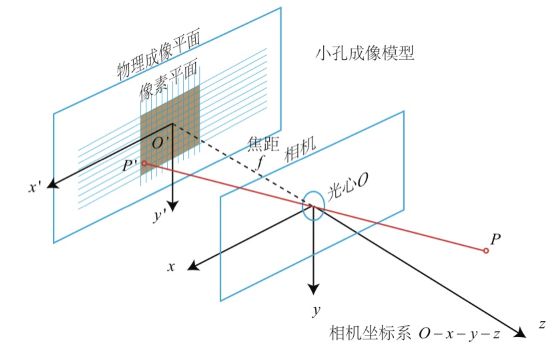
如上图所示,视觉系统中有像素坐标系o0-uv,原点在图像的左上角;图像坐标系o1-xy,成像平面中点是原点;相机坐标系O-XYZ,光心为原点;世界坐标系Ow-XwYwZw。其中P为物理世界中的一点,p为点P在图像中的成像点。P点在图像平面坐标系中的坐标为(x,y),p点在像素坐标系中坐标为(u,v)。
(1)像素坐标和图像坐标转换
像素坐标系和图像坐标系之间的转换关系可以通过单个像素的物理尺寸来关联:
其中,dx和dy表示沿x轴和y轴方向上单个像素点的实际物理尺寸,与感光芯片有关,(u0,v0)为原点o1在像素坐标系下的坐标值。将式(1)用齐次坐标系表示:
(2)相机坐标和世界坐标的转换
通过相机的外参标定,世界坐标系下的坐标可以通过旋转矩阵R和平移向量T转换到相机坐标系下:
式中矩阵R为3x3的正交单位矩阵,向量T表示3x1的三维平移量。
(3)相机坐标和图像坐标转换
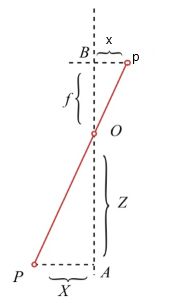
对于三维空间中的一点P,其对应在图像平面上的成像点为P与光心O的连线与图像平面的交点 p,O与o1之间的距离为焦距f 。根据三角形相似定理可以推出相机坐标系与图像坐标的关系满足以下关系:
将上式用其次坐标系表示:
(4)像素坐标与世界坐标转换
世界坐标系的一点P(Xw,Yw,Zw)在像素坐标系下的成像点p(u,v),结合2、3、5式,可得:
(5)像素坐标与相机坐标转换
相机坐标系的一点P(X,Y,Z)在像素坐标系下的成像点p(u,v),结合2和5式,可得:
其中K为相机标定所得的内参矩阵。
二、方法(张正友标定法)
matlab和opencv中均有集成张正友标定法可获得亚像素精度点坐标,但也引入了误差,当镜头畸变较大时,误差也会增大(matlab工具箱比opencv更好用一些)。
基本操作流程:
1.拍摄 20 张左右带有标定板的图片
2.然后输入标定板的几何参数,用来确定标定板角点在标定板上的坐标 [X, Y, Z]
3.然后利用人工标记或者角点提取算法找到图像中每个角点的像素坐标 [u, v]
4.之后,OpenCV 或者 Matlab 就会根据张老师的方法,帮我们计算得到相机的内参矩阵。
5.而在实际机器人标定过程中,就可以载入之前标定好的内参矩阵,来计算外参 C (OpenCV 里也有相应函数实现)
三、程序
1.opencv-python
import cv2
import numpy as np
import glob

# 设置寻找亚像素角点的参数,采用的停止准则是最大循环次数30和最大误差容限0.001
criteria = (cv2.TERM_CRITERIA_MAX_ITER | cv2.TERM_CRITERIA_EPS, 30, 0.001)

# 获取标定板角点的位置
objp = np.zeros((5 * 5, 3), np.float32) #角点数根据自己的棋盘格大小进行更改
objp[:, :2] = np.mgrid[0:5, 0:5].T.reshape(-1, 2)  # 将世界坐标系建在标定板上,所有点的Z坐标全部为0,所以只需要赋值x和y  角点数根据自己的棋盘格大小进行更改

obj_points = []  # 存储3D点
img_points = []  # 存储2D点

images = glob.glob("images/*.png")
i=0
for fname in images:
    img = cv2.imread(fname)
    gray = cv2.cvtColor(img, cv2.COLOR_BGR2GRAY)
    size = gray.shape[::-1]
    ret, corners = cv2.findChessboardCorners(gray, (5, 5), None)     #角点数根据自己的棋盘格大小进行更改   (5,5)棋盘格的横纵内角点个数
    #print(corners)

    if ret:

        obj_points.append(objp)

        corners2 = cv2.cornerSubPix(gray, corners, (5, 5), (-1, -1), criteria)  # 在原角点的基础上寻找亚像素角点
        #print(corners2)
        if [corners2]:
            img_points.append(corners2)
        else:
            img_points.append(corners)

        cv2.drawChessboardCorners(img, (5, 5), corners, ret)  # 记住,OpenCV的绘制函数一般无返回值 角点数根据自己的棋盘格大小进行更改
        i+=1;
        cv2.imwrite('conimg'+str(i)+'.jpg', img)
        cv2.waitKey(1500)

print(len(img_points))
cv2.destroyAllWindows()

# 标定
ret, mtx, dist, rvecs, tvecs = cv2.calibrateCamera(obj_points, img_points, size, None, None)

print("ret:", ret)
print("mtx:\n", mtx) # 内参数矩阵
print("dist:\n", dist)  # 畸变系数   distortion cofficients = (k_1,k_2,p_1,p_2,k_3)
print("rvecs:\n", rvecs)  # 旋转向量  # 外参数
print("tvecs:\n", tvecs ) # 平移向量  # 外参数

print("-----------------------------------------------------")

# img = cv2.imread(images[2])
# h, w = img.shape[:2]
# newcameramtx, roi = cv2.getOptimalNewCameraMatrix(mtx,dist,(w,h),1,(w,h))#显示更大范围的图片(正常重映射之后会删掉一部分图像)
# print (newcameramtx)
# print("------------------使用undistort函数-------------------")
# dst = cv2.undistort(img,mtx,dist,None,newcameramtx)
# x,y,w,h = roi
# dst1 = dst[y:y+h,x:x+w]
# cv2.imwrite('calibresult3.jpg', dst1)
# print ("方法一:dst的大小为:", dst1.shape)

# undistort方法二
# print("-------------------使用重映射的方式-----------------------")
# mapx, mapy = cv2.initUndistortRectifyMap(mtx, dist, None, newcameramtx, (w, h), 5)  # 获取映射方程
# #dst = cv2.remap(img,mapx,mapy,cv2.INTER_LINEAR)      # 重映射
# dst = cv2.remap(img, mapx, mapy, cv2.INTER_CUBIC)  # 重映射后,图像变小了
# x, y, w, h = roi
# dst2 = dst[y:y + h, x:x + w]
# cv2.imwrite('calibresult11_2.jpg', dst2)
# print("方法二:dst的大小为:", dst2.shape) # 图像比方法一的小

# print("-------------------计算反向投影误差-----------------------")
# tot_error = 0
# for i in xrange(len(obj_points)):
#     img_points2, _ = cv2.projectPoints(obj_points[i], rvecs[i], tvecs[i], mtx, dist)
#     error = cv2.norm(img_points[i], img_points2, cv2.NORM_L2) / len(img_points2)
#     tot_error += error
#
# mean_error = tot_error / len(obj_points)
# print("total error: ", tot_error)
# print("mean error: ", mean_error)
2.matlab
直接使用matlab-app中相机标定工具箱,操作简单方便,这里不再展开。
3.获取realsense相机内参
import pyrealsense2 as rs
import numpy as np
import cv2
import json

pipeline = rs.pipeline()  # 定义流程pipeline
config = rs.config()  # 定义配置config
config.enable_stream(rs.stream.depth, 640, 480, rs.format.z16, 30)  # 配置depth流
config.enable_stream(rs.stream.color, 640, 480, rs.format.bgr8, 30)  # 配置color流
profile = pipeline.start(config)  # 流程开始

align = rs.align(rs.stream.color)


def get_aligned_images():
    frames = pipeline.wait_for_frames()  # 等待获取图像帧
    aligned_frames = align.process(frames)  # 获取对齐帧

    aligned_depth_frame = aligned_frames.get_depth_frame()  # 获取对齐帧中的depth帧
    color_frame = aligned_frames.get_color_frame()  # 获取对齐帧中的color帧

    intr = color_frame.profile.as_video_stream_profile().intrinsics  # 获取相机内参
    depth_intrin = aligned_depth_frame.profile.as_video_stream_profile().intrinsics  # 获取深度参数(像素坐标系转相机坐标系会用到)

    camera_parameters = {'fx': intr.fx, 'fy': intr.fy,
                         'ppx': intr.ppx, 'ppy': intr.ppy,
                         'height': intr.height, 'width': intr.width,
                         'depth_scale': profile.get_device().first_depth_sensor().get_depth_scale()
                         }
    # 保存内参到本地
    with open('./intrinsics.json', 'w') as fp:
        json.dump(camera_parameters, fp)

    depth_image = np.asanyarray(aligned_depth_frame.get_data())  # 深度图(默认16位)
    depth_image_8bit = cv2.convertScaleAbs(depth_image, alpha=0.03)  # 深度图(8位)
    depth_image_3d = np.dstack((depth_image_8bit, depth_image_8bit, depth_image_8bit))  # 3通道深度图
    color_image = np.asanyarray(color_frame.get_data())  # RGB图

    # 返回相机内参、深度参数、彩色图、深度图、齐帧中的depth帧
    return intr, depth_intrin, color_image, depth_image, aligned_depth_frame


if __name__ == "__main__":
    while 1:
        intr, depth_intrin, rgb, depth, aligned_depth_frame = get_aligned_images()  # 获取对齐的图像与相机内参
        # 定义需要得到真实三维信息的像素点(x, y),本例程以中心点为例
        x = 320
        y = 240
        dis = aligned_depth_frame.get_distance(x, y)  # (x, y)点的真实深度值
        camera_coordinate = rs.rs2_deproject_pixel_to_point(depth_intrin, [x, y], dis)
        # (x, y)点在相机坐标系下的真实值,为一个三维向量。
        # 其中camera_coordinate[2]仍为dis,camera_coordinate[0]和camera_coordinate[1]为相机坐标系下的xy真实距离。
        print(camera_coordinate)

        cv2.imshow('RGB image', rgb)  # 显示彩色图像

        key = cv2.waitKey(1)
        # Press esc or 'q' to close the image window
        if key & 0xFF == ord('q') or key == 27:
            pipeline.stop()
            break
    cv2.destroyAllWindows()


