ubuntu问题总结
提示:文章写完后,目录可以自动生成,如何生成可参考右边的帮助文档
文章目录
- 前言
- 一、sudo apt install ***无法安装问题
- 二、磁盘未挂载
- 三、ubuntu修改镜像源
- 四、ubuntu图像界面安装
- 五、ubuntu安装显卡驱动
- 六、ubuntu终端无法输入中文
- 六、ubuntu改变鼠标滑轮的速度
- 七、ubuntu安装显卡
-
- 在安装新显卡前需要关闭securt boot选项:
- END OF SCRIPT FILE
- 8nvidia显卡驱动--老版本下载网址:
- 9、ubuntu之alias功能使用
- 10 docker中的pycharm无法打开图形界面
- 11 Qt的Gui问题
- 12 ubuntu简体繁体转换快捷键
- 13 ubuntu其他人无法通过 scp向自己传输文件
- 14 ubuntu录屏快捷键及时长修改
- 15 dpkg 被中断,您必须手工运行 sudo dpkg –configure -a解决此问题
- 16 E: 无法获得锁 /var/lib/dpkg/lock-frontend - open (11: 资源暂时不可用)
- 17 VNC安装命令
- 18 网卡驱动安装
- 总结
前言
提示:这里可以添加本文要记录的大概内容:
ubuntu问题及解决方案汇总
提示:以下是本篇文章正文内容,下面案例可供参考
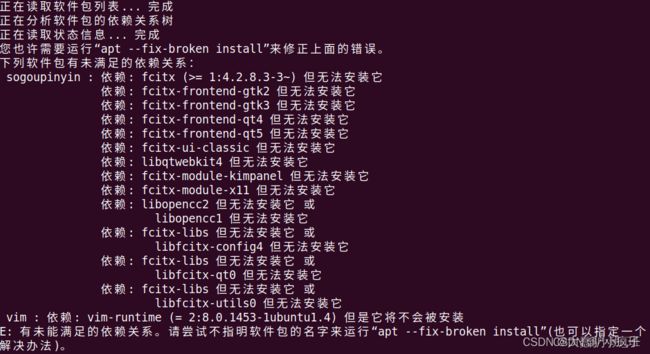
一、sudo apt install ***无法安装问题
解决方案1:
sudo apt --fix-broken install
参考博客1:
https://blog.csdn.net/lylg_ban/article/details/121890308
解决方案2:
sudo apt-get install aptitude
sudo aptitude install XXX
参考博客2:
https://blog.csdn.net/qq_31985307/article/details/118163462
二、磁盘未挂载
- 硬盘挂载情况
df -lh
- 挂载磁盘(此时只是临时有效、重启后仍然未挂载)
sudo mount -t ext4 /dev/sdb /devdata
- 永久挂载(使用uuid,不要使用盘符)
http://t.zoukankan.com/douzhanshen-p-6098301.html
三、ubuntu修改镜像源
参考网址:https://blog.csdn.net/qq_57171795/article/details/123109463
四、ubuntu图像界面安装
显示问题:ubuntu系统升级后提示 job for lightdm.service failed because the control process exited with error code或者ubuntu图像界面打开失败,只能进入命令行模式
解决方法
1、删除lighdm:sudo apt-get remove lightdm
2、重新下载:sudo apt-get intsall lightdm
解决!
五、ubuntu安装显卡驱动
策略较多,可一一尝试,安装显卡可能会导致图像界面模式失效
英伟达显卡驱动安装方式1:从ubuntu软件和更新部分直接安装显卡驱动,安装完后需要重启,重启可能出现蓝屏选项如下:这时需要特别注意,选择第二个,具体操作见链接:
https://blog.csdn.net/weixin_53099559/article/details/122764717
 英伟达显卡驱动安装方式2:参考链接
https://blog.csdn.net/m0_37605642/article/details/119651996
六、ubuntu终端无法输入中文
- 查看系统支持的编码方式:
locale -a - 看看输出内容中是否包含 zh_CN.utf-8,如果不包含的话,可以先安装下语言包
sudo apt-get -y install language-pack-zh-hans - 永久修改环境变量
所有用户(永久) :修改/etc/profile
当前用户(永久) :修改~/.bashrc
在上述文件最后输入:export LC_CTYPE=‘zh_CN.UTF-8’
六、ubuntu改变鼠标滑轮的速度
- 安装imwheel
sudo apt-get install imwheel -y
- 创建脚本
# 创建自定义脚本目录
mkdir ~/.bin/
# 创建并编辑脚本文件
vim ~/.bin/setwheel
- 写入代码
#!/bin/bash
# Version 0.1 Tuesday, 07 May 2013
# Comments and complaints http://www.nicknorton.net
# GUI for mouse wheel speed using imwheel in Gnome
# imwheel needs to be installed for this script to work
# sudo apt-get install imwheel
# Pretty much hard wired to only use a mouse with
# left, right and wheel in the middle.
# If you have a mouse with complications or special needs,
# use the command xev to find what your wheel does.
#
### see if imwheel config exists, if not create it ###
if [ ! -f ~/.imwheelrc ]
then
cat >~/.imwheelrc<- 运行软件,调整滑轮速度
# 给运行权限
chmod +x ~/.bin/setwheel
# 将 ~/.bin/ 目录加入系统程序执行目录并立即生效
echo 'export PATH="$PATH:~/.bin"' >> ~/.bash_profile && . ~/.bash_profile
# 运行脚本
setwheel
七、ubuntu安装显卡
# 保证图形显示界面正常
  423  sudo apt-get lightdm-gtk-greeter
  424  sudo apt-get install lightdm-gtk-greeter
  425  sudo apt-get install lightdm
  426  sudo dpkg-reconfigure lightdm
#   弹出的界面选择lightddm
# 卸载原有显卡驱动,
  489  nvidia-smi
  490  sudo apt-get install lightdm
  491  sudo apt-get remove nvidia*
  492  sudo apt0-get autoremove
  493  sudo apt-get autoremove
  494  nvidia-smi
  495  sudo ./NVIDIA-Linux-x86_64-470.86.run --uninstall
  496  sudo service lightdm stop
  497  ls
在安装新显卡前需要关闭securt boot选项:
操作步骤:
重启计算机—>狂按F12—>出现以下界面–>此时鼠标可以使用,选择BIOS SETUP
进入新界面后左侧选中Boot Configuration选项,右侧下拉找到enable securaty boot选项,关掉下方的选项,关掉后的结果如下图:
#  安装新显卡驱动
  498  sudo chmod a+x NVIDIA-Linux-x86_64-470.86.run
  499  sudo bash NVIDIA-Linux-x86_64-470.86.run -no-x-check -no-nouveau-check -no-opengl-files
  500  sudo service lightdm start
  501  nvidia-smi
  502  reboot
安装显卡驱动时显示的问题:
he distribution-provided pre-install script failed! Are you sure you want to continue?
Yes
Would you like to register the kernel module souces with DKMS? This will allow DKMS to automatically build a new module, if you install a different kernel later?
No
Would you like to run the nvidia-xconfigutility to automatically update your x configuration so that the NVIDIA x driver will be used when you restart x? Any pre-existing x confile will be backed up.
Yes
Nvidia’s 32-bit compatibility libraries?
Yes
install without signing 出现这个貌似是因为security boot模式没有关闭
END OF SCRIPT FILE
8nvidia显卡驱动–老版本下载网址:
https://www.nvidia.cn/Download/Find.aspx?lang=cn
参考连接:
https://blog.csdn.net/weixin_43095939/article/details/122246388
9、ubuntu之alias功能使用
- 说明:alias :快捷方式+别名
alias wj_start='sudo docker start wj'
alias wj='sudo docker exec -it wj env LANG=C.UTF-8 bash'
- 修改方式
在~/.bashrc文件中增加上述两行即可在任意终端中直接打开指定docker
10 docker中的pycharm无法打开图形界面
可能原因1:xhost未共享
解决方案:
# 在终端输入:(也可加入环境变量中,开机启动启动该服务)
xhost +
# 打印:
access control disabled, clients can connect from any host
11 Qt的Gui问题
问题描述:
X Error: BadAccess (attempt to access private resource denied) 10
  Extension:    130 (MIT-SHM)
  Minor opcode: 1 (X_ShmAttach)
  Resource id:  0x220001b
X Error: BadShmSeg (invalid shared segment parameter) 128
  Extension:    130 (MIT-SHM)
  Minor opcode: 3 (X_ShmPutImage)
  Resource id:  0x2200013
X Error: BadShmSeg (invalid shared segment parameter) 128
  Extension:    130 (MIT-SHM)
  Minor opcode: 3 (X_ShmPutImage)
  Resource id:  0x2200013
X Error: BadShmSeg (invalid shared segment parameter) 128
解决方案:(可加入环境变量中永久修改)
export QT_X11_NO_MITSHM=1
12 ubuntu简体繁体转换快捷键
ctrl+shift+f
13 ubuntu其他人无法通过 scp向自己传输文件
报错:
ssh: connect to host 192.168.36.15 port 22: Connection refused
原因:ssh服务没有安装
解决方案:
sudo apt-get remove --purge openssh-server
sudo apt-get update
sudo apt-get install openssh-server
14 ubuntu录屏快捷键及时长修改
# 开始录屏
CTRL+ALT+SHIFT+R
# 结束录屏
CTRL+ALT+SHIFT+R
#修改默认录屏最大时间---更改为无限时间录屏
gsettings set org.gnome.settings-daemon.plugins.media-keys max-screencast-length 0
15 dpkg 被中断,您必须手工运行 sudo dpkg –configure -a解决此问题
其实导致这个问题的主要原因是因为/var/lib/dpkg/updates文件下的文件有问题,可能是其他软件安装过程或是其他原因导致的,这里删除掉然后重建即可。
sudo rm /var/lib/dpkg/updates/*
sudo apt-get update
sudo apt-get upgrade
[*]sudo apt-get update指令会重新建立这些资料,所以不必担心删除后会出问题;
[*]sudo apt-get upgrade会更新你的电脑里面已安装的软件的明细,根据软件的明细更新软件到最新版。
16 E: 无法获得锁 /var/lib/dpkg/lock-frontend - open (11: 资源暂时不可用)
sudo systemctl --force reboot
17 VNC安装命令
wget https://downloads.realvnc.com/download/file/viewer.files/VNC-Viewer-6.22.515-Linux-x64.deb

sudo dpkg -i VNC-Viewer-6.22.515-Linux-x64.deb
18 网卡驱动安装
下载网卡驱动,下载地址:https://www.intel.com/content/www/us/en/download/14611/intel-network-adapter-driver-for-pcie-intel-gigabit-ethernet-network-connections-under-linux-final-release.html?wapkw=e1000e
安装过程如下:
tar zxf e1000e-
给安装文件加权限:
chmod -R 777 e1000e-
sudo apt install make gcc
cd e1000e-
make install
modinfo e1000e
重启电脑即可联网
总结
提示:这里对文章进行总结:
例如:以上就是今天要讲的内容,本文仅仅简单介绍了pandas的使用,而pandas提供了大量能使我们快速便捷地处理数据的函数和方法。

