ffmpeg cv:Mat编码成H265数据流
流程
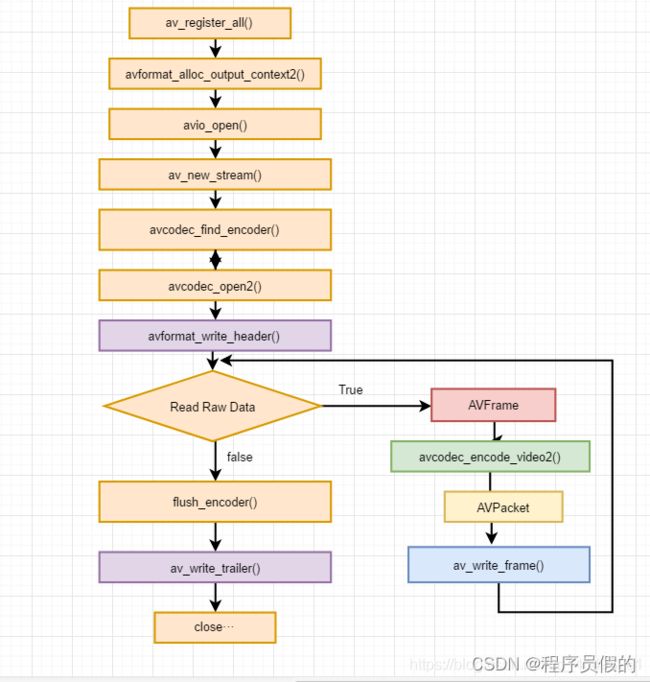
下面附一张使用FFmpeg编码视频的流程图。使用该流程,不仅可以编码H.264的视频,而且可以编码MPEG4/MPEG2/VP8等等各种
简单介绍一下流程中各个函数的意义:
av_register_all():注册FFmpeg所有编解码器。
avformat_alloc_output_context2():初始化输出码流的AVFormatContext。
avio_open():打开输出文件。
av_new_stream():创建输出码流的AVStream。
avcodec_find_encoder():查找编码器。
avcodec_open2():打开编码器。
avformat_write_header():写文件头(对于某些没有文件头的封装格式,不需要此函数。比如说MPEG2TS)。
avcodec_encode_video2():编码一帧视频。即将AVFrame(存储YUV像素数据)编码为AVPacket(存储H.264等格式的码流数据)。
av_write_frame():将编码后的视频码流写入文件。
flush_encoder():输入的像素数据读取完成后调用此函数。用于输出编码器中剩余的AVPacket。
av_write_trailer():写文件尾(对于某些没有文件头的封装格式,不需要此函数。比如说MPEG2TS)。
代码
#include
#include
#include

extern "C"
{
#include
#include
#include
}


//H.265码流与YUV输入的帧数不同。经过观察对比其他程序后发现需要调用flush_encoder()将编码器中剩余的视频帧输出。当av_read_frame()循环退出的时候,实际上解码器中可能还包含剩余的几帧数据。
//因此需要通过“flush_decoder”将这几帧数据输出。“flush_decoder”功能简而言之即直接调用avcodec_decode_video2()获得AVFrame,而不再向解码器传递AVPacket
int flush_encoder(AVFormatContext *fmt_ctx,unsigned int stream_index){
    int ret;
    int got_frame;
    AVPacket enc_pkt;
//    if (!(fmt_ctx->streams[stream_index]->codec->codec->capabilities & CODEC_CAP_DELAY))
//        return 0;
    while (1) {
        enc_pkt.data = NULL;
        enc_pkt.size = 0;
        av_init_packet(&enc_pkt);
        ret = avcodec_encode_video2 (fmt_ctx->streams[stream_index]->codec, &enc_pkt, NULL, &got_frame);
        av_frame_free(NULL);
        if (ret < 0)
            break;
        if (!got_frame){
            ret=0;
            break;
        }
        printf("Flush Encoder: Succeed to encode 1 frame!\tsize:%5d\n",enc_pkt.size);
        /* mux encoded frame */
        ret = av_write_frame(fmt_ctx, &enc_pkt);
        if (ret < 0)
            break;
      //ret = avcodec_send_frame (fmt_ctx->streams[stream_index]->codec, &enc_pkt, NULL, &got_frame);
    }
    return ret;
}

int main(int argc, char* argv[])
{
    AVFormatContext* pFormatCtx;
    AVOutputFormat* fmt;
    AVStream* video_st;
    AVCodecContext* pCodecCtx;
    AVCodec* pCodec;
    AVPacket pkt;
    uint8_t* picture_buf;
    AVFrame* pFrame;
    int picture_size;
    int y_size;
    int framecnt=0;
    cv::VideoCapture cap(cv::String("/home/zhy/Documents/remote_driving/encoder_YUV_H264-h265/test.mp4"));

    if (!cap.isOpened())
         return -1;

       int frmCount = cap.get(CV_CAP_PROP_FRAME_COUNT);

       printf("frmCount: %d ", frmCount);

       int w =  cap.get(CV_CAP_PROP_FRAME_WIDTH);
       int h =  cap.get(CV_CAP_PROP_FRAME_HEIGHT);
       int bufLen = w*h*3/2;

       int framenum=frmCount;                                   //Frames to encode

    //const char* out_file = "src01.h264";              //Output Filepath
    //const char* out_file = "src01.ts";
    const char* out_file = "/home/zhy/Documents/remote_driving/encoder_YUV_H264-h265/untitled2/src01.hevc";
    //const char* out_file = "ds.h264";
    //const char* out_file = "ds.h264";

    av_register_all();//注册FFmpeg所有编解码器。
    //Method1.
    pFormatCtx = avformat_alloc_context(); //初始化输出码流的AVFormatContext,释放avformat_free_context
    //Guess Format
    fmt = av_guess_format(NULL, out_file, NULL);   //决定视频输出时封装方式的函数
    pFormatCtx->oformat = fmt;

    //Method 2.
    //avformat_alloc_output_context2(&pFormatCtx, NULL, NULL, out_file);
    //fmt = pFormatCtx->oformat;


    //Open output URL
    //打开文件的缓冲区输入输出,flags 标识为  AVIO_FLAG_READ_WRITE ,可读写;将输出文件中的数据读入到程序的 buffer 当中,方便之后的数据写入fwrite
    if (avio_open(&pFormatCtx->pb,out_file, AVIO_FLAG_READ_WRITE) < 0){  //打开输出文件
        printf("Failed to open output file! \n");
        return -1;
    }

    video_st = avformat_new_stream(pFormatCtx, 0);//创建输出码流的AVStream。
        // 设置 码率25 帧每秒(fps=25)
    //video_st->time_base.num = 1;
    //video_st->time_base.den = 25;

    if (video_st==NULL){
        return -1;
    }
        //为输出文件设置编码的参数和格式
    //Param that must set
    pCodecCtx = video_st->codec; // 从媒体流中获取到编码结构体,一个 AVStream 对应一个  AVCodecContext
    pCodecCtx->codec_id =AV_CODEC_ID_HEVC;// 设置编码器的 id,例如 h265 的编码 id 就是 AV_CODEC_ID_H265
    //pCodecCtx->codec_id = fmt->video_codec;
    pCodecCtx->codec_type = AVMEDIA_TYPE_VIDEO;//编码器视频编码的类型
    pCodecCtx->pix_fmt = AV_PIX_FMT_YUV420P;//设置像素格式为 yuv 格式
    pCodecCtx->width = w;  //设置视频的宽高
    pCodecCtx->height = h;
    pCodecCtx->bit_rate = 400000;   //采样的码率;采样码率越大,视频大小越大
    pCodecCtx->gop_size=250;  //每250帧插入1个I帧,I帧越少,视频越小

    pCodecCtx->time_base.num = 1;
    pCodecCtx->time_base.den = 25;

    //H264
    //pCodecCtx->me_range = 16;
    //pCodecCtx->max_qdiff = 4;
    //pCodecCtx->qcompress = 0.6;
    pCodecCtx->qmin = 10; //最大和最小量化系数
    pCodecCtx->qmax = 51;

    //Optional Param
    pCodecCtx->max_b_frames=3; // 设置 B 帧最大的数量,B帧为视频图片空间的前后预测帧, B 帧相对于 I、P 帧来说,压缩率比较大,采用多编码 B 帧提高清晰度

    // Set Option //设置编码速度
    AVDictionary *param = 0;
        //preset的参数调节编码速度和质量的平衡。
    //tune的参数值指定片子的类型,是和视觉优化的参数,
    //zerolatency: 零延迟,用在需要非常低的延迟的情况下,比如电视电话会议的编码
    //H.264
    if(pCodecCtx->codec_id == AV_CODEC_ID_H264) {
        av_dict_set(¶m, "preset", "slow", 0);
        av_dict_set(¶m, "tune", "zerolatency", 0);
        //av_dict_set(¶m, "profile", "main", 0);
    }
    //H.265
    if(pCodecCtx->codec_id == AV_CODEC_ID_H265){
        av_dict_set(¶m, "preset", "ultrafast", 0);
        av_dict_set(¶m, "tune", "zero-latency", 0);
    }
    //Show some Information //输出格式的信息,例如时间,比特率,数据流,容器,元数据,辅助数据,编码,时间戳
    //av_dump_format(pFormatCtx, 0, out_file, 1);

    pCodec = avcodec_find_encoder(pCodecCtx->codec_id);//查找编码器
    if (!pCodec){
        printf("Can not find encoder! \n");
        return -1;
    }
       // 打开编码器,并设置参数 param
    if (avcodec_open2(pCodecCtx, pCodec,¶m) < 0){
        printf("Failed to open encoder! \n");
        return -1;
    }


    pFrame = av_frame_alloc();//设置原始数据 AVFrame 非压缩数据
    picture_size = avpicture_get_size(pCodecCtx->pix_fmt, pCodecCtx->width, pCodecCtx->height);  // 获取YUV像素格式图片的大小
    picture_buf = (uint8_t *)av_malloc(picture_size);// 将 picture_size 转换成字节数据
    avpicture_fill((AVPicture *)pFrame, picture_buf, pCodecCtx->pix_fmt, pCodecCtx->width, pCodecCtx->height); // 设置原始数据 AVFrame 的每一个frame 的图片大小,AVFrame 这里存储着 YUV 非压缩数据


    avformat_write_header(pFormatCtx,NULL); //Write File Header 写封装格式文件头
    av_new_packet(&pkt,picture_size);   //创建编码后的数据 AVPacket 结构体来存储 AVFrame 编码后生成的数据  //编码前:AVFrame  //编码后:AVPacket

        // 设置 yuv 数据中Y亮度图片的宽高,写入数据到 AVFrame 结构体中
    y_size = pCodecCtx->width * pCodecCtx->height;

    for (int i=0; i>srcImg;

       cv::Mat yuvImg;
       cv::cvtColor(srcImg, yuvImg, cv::COLOR_BGR2YUV_I420);
       memcpy(picture_buf, yuvImg.data, bufLen*sizeof(unsigned char));

        pFrame->data[0] = picture_buf;              // Y
        pFrame->data[1] = picture_buf+ y_size;      // U
        pFrame->data[2] = picture_buf+ y_size*5/4;  // V
        //PTS //顺序显示解码后的视频帧
        //pFrame->pts=i;
        //设置这一帧的显示时间
        pFrame->pts=i*(video_st->time_base.den)/((video_st->time_base.num)*25);
        int got_picture=0;
        //Encode //编码一帧视频。即将AVFrame(存储YUV像素数据)编码为AVPacket(存储H.264等格式的码流数据)
        int ret = avcodec_encode_video2(pCodecCtx, &pkt,pFrame, &got_picture); //成功时返回0,失败时返回负错误代码
        if(ret < 0){
            printf("Failed to encode! \n");
            return -1;
        }
        if (got_picture==1){
            printf("Succeed to encode frame: %5d\tsize:%5d\n",framecnt,pkt.size);
            framecnt++;
            pkt.stream_index = video_st->index;
            ret = av_write_frame(pFormatCtx, &pkt);//将编码后的视频码流写入文件(fwrite)
            av_free_packet(&pkt);//释放内存
        }
    }
    //Flush Encoder //输出编码器中剩余的AVPacket
    int ret = flush_encoder(pFormatCtx,0);
    if (ret < 0) {
        printf("Flushing encoder failed\n");
        return -1;
    }

    //Write file trailer // 写入数据流尾部到输出文件当中,表示结束并释放文件的私有数据
    av_write_trailer(pFormatCtx);

    //Clean
    if (video_st){
                // 关闭编码器
        avcodec_close(video_st->codec);
                // 释放 AVFrame
        av_free(pFrame);
                // 释放图片 buf
        av_free(picture_buf);
    }
    avio_close(pFormatCtx->pb);
    avformat_free_context(pFormatCtx);

    //fclose(in_file);

    return 0;
}
编译 Makefile
CC = g++
LD = g++

SRCS = $(wildcard *.cpp)
OBJS = $(patsubst %c, %o, $(SRCS))

TARGET = main

.PHONY:all clean

all: $(TARGET)

$(TARGET): $(OBJS)
	$(LD) $^ -g -o $@ `pkg-config --cflags --libs opencv` -std=c++11 -I/usr/local/include -L/usr/local/lib  -lavformat -lavcodec -lavutil


%o:%c
	$(CC) -cpp $^

clean:
	rm -f $(OBJS) $(TARGET)
