三种邻近搜索
一、Annoy
1. 介绍
Approximate Nearest Neighbor Oh Yeah,是一个带有Python bindings的C ++库。
- 用于在海量文本中快速搜索相似的用户/物品(适合向量维度小于1000,向量数在百万级别)
- Annoy是Spotify开源的高维空间求近似最近邻的库,在Spotify使用它进行音乐推荐
- Annoy通过将海量数据建立成一个二叉树,使得每个数据查找时间复杂度是O(logn)
2. 原理
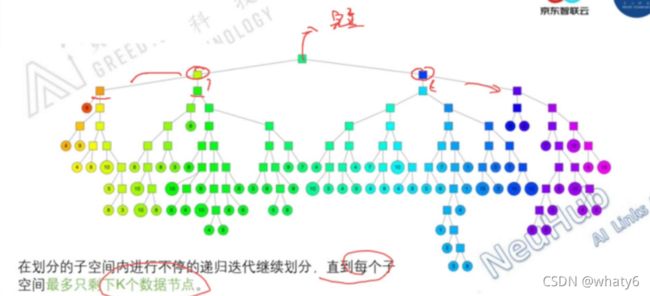
随机选择两点进行超平面划分,在划分的子空间内不停递归划分,直至每个子空间最多只剩下k个数据结束。(必须通过精度和性能之间的权衡来调整k)


4. 问题和解决
问题:
- 查询过程中最终落到叶子节点的数据节点数 < TopN相似节点数怎么办?
- 两个相近的数据节点划分到二叉树不同分支怎么办?
解决:
- 方法一:两边都遍历
找到最近的切面,判断是否分割超平面的两边相似,对于相似的都进行遍历。
- 方法二:多棵树
建立多棵二叉树,构建一个森林,将多棵树的返回的近邻点插入到优先队列中,求并集(融合成一张图),对该图中的所有节点进行相似计算返回TopN近邻点集合。

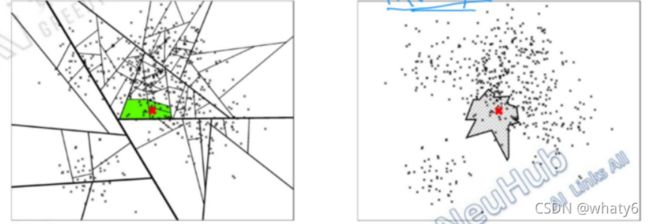
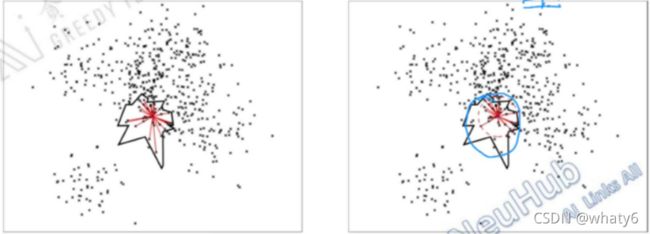
5. annoy算法的效果对比图

6. 源码重点解释
https://blog.csdn.net/hero_fantao/article/details/70245387
Python代码示例:
from annoy import AnnoyIndex
import random

f = 20
t = AnnoyIndex(f, 'angular')  # Length of item vector that will be indexed
for i in range(1000):
	# 返回具有高斯分布的随机浮点数 random. gauss (mu, sigma) 参数:. mu:平均. sigma:标准偏差.
    v = [random.gauss(0, 1) for z in range(f)]
    t.add_item(i, v)

t.build(10) # 10 trees
t.save('test.ann')
print(t.get_nns_by_item(0, 10))
# [0,45,16,17,61,24,48,20,29,84]
# ...

u = AnnoyIndex(f, 'angular')
u.load('test.ann') # super fast, will just mmap the file
print(u.get_nns_by_item(0, 10)) # will find the 1000 nearest neighbors
# [0,45,16,17,61,24,48,20,29,84]
7. 完整的Python API
- AnnoyIndex(f, metric) 返回可读写的新索引,用于存储f维度向量。
metric可以是"angular",“euclidean”,“manhattan”,“hamming”,或"dot"。 - a.add_item(i,v) 用于给索引添加向量v,i(任何非负整数)是给向量v的表示。
- a.build(n_trees) 用于构建 n_trees的森林。查询时,树越多,精度越高。在调用build后,无法再添加任何向量。
- a.save(fn, prefault=False) 将索引保存到磁盘。保存后,不能再添加任何向量。
- a.load(fn, prefault=False) 从磁盘加载索引。如果prefault设置为True,它将把整个文件预读到内存中。默认值为False。
- a.unload() 释放索引。
- a.get_nns_by_item(i, n, search_k=-1, include_distances=False)返回第i 个item的n个最近邻的item。在查询期间,它将检索 多达search_k(默认n_trees * n)个点。search_k为您提供了更好的准确性和速度之间权衡。如果设置include_distances为 True,它将返回一个包含两个列表的2元素元组:第二个包含所有对应的距离。
- a.get_nns_by_vector(v, n, search_k=-1, include_distances=False) 与上面的相同,但按向量v查询。
- a.get_item_vector(i) 返回第i个向量前添加的向量。
- a.get_distance(i, j) 返回向量i和向量j之间的距离。注意:此函数用于返回平方距离。
- a.get_n_items() 返回索引中的向量数。
- a.get_n_trees() 返回索引中的树的数量。
- a.on_disk_build(fn) 用以在指定文件而不是RAM中建立索引(在添加向量之前执行,在建立之后无需保存)。
Notes:
Annoy使用归一化向量的欧式距离作为其角距离,对于两个向量u,v,其等于 sqrt(2(1-cos(u,v)))
C ++ API非常相似:调用annoy只需使用#include “annoylib.h”。
二、HNSW
参考:
https://www.cnblogs.com/dangui/p/14675121.html#2-nsw%E7%AE%97%E6%B3%95%E5%8E%9F%E7%90%86
1. 近邻图
近邻图(Proximity Graph): 最朴素的图算法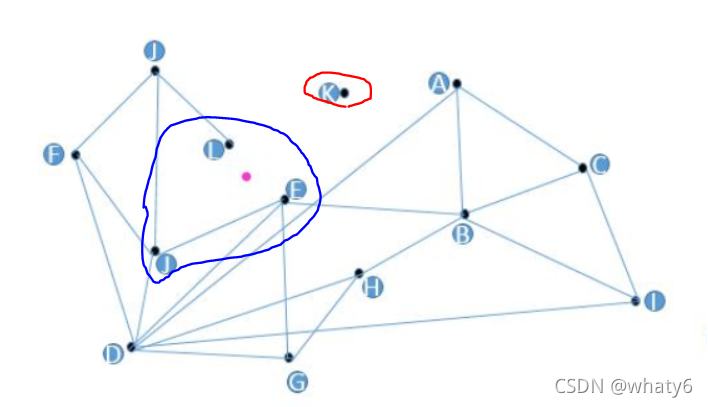
思路(Target(红点)是待查询的向量):
构建图:每一个顶点连接着最近N个顶点。
搜索: 选择任一个顶点出发,首先遍历它的友节点,找到距离与Target最近的某一节点;
将此节点设为起始节点,再从它的友节点进行遍历;
反复迭代,不断逼近;
最后找到与Target距离最近的节点时搜索结束。
存在的问题:
1)孤立节点无法跟踪友节点(图中的K点)
2)若找TopN个,但点之间无连线,将影响查找效率(图中J\E\L点,由于L和J无连线,通过J找L需要多走一步)
3)友节点过多,增加了构造复杂度(D点)
4)若初始点选择较远,将进行多步查找
2. NSW
NSW (Navigable Small World graphs): 没有分层的可导航小世界的结构图
针对近邻图问题的解决:

	1)孤立节点 -> 规定构图时所有节点必须有友节点
	2)相似点不相邻 -> 距离相近到一定程度的节点必须互为友节点
	3)友节点过多 -> 限制每个节点的友节点数量
	4)初始点过远 -> 增加高速公路机制 (HNSW的最大优化点)

构建图(规定最多m个节点):

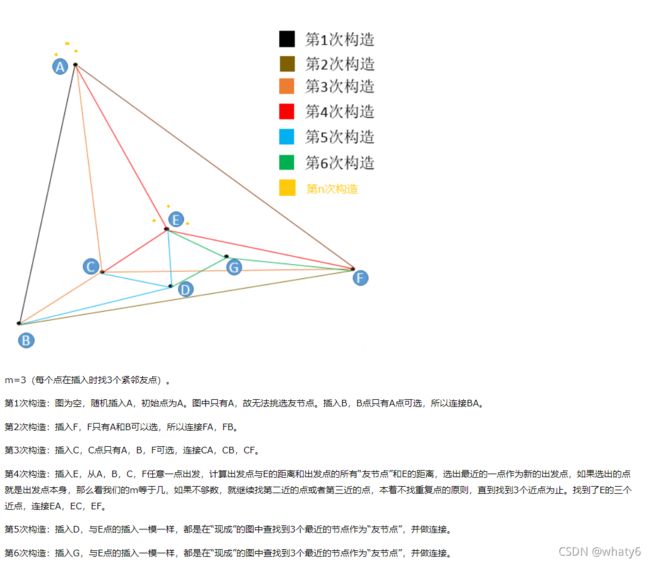
	1)加入一个新节点,随机出发查找距离新节点最近的m个点,成为友节点;
	2)更新 新节点 友节点的友节点,保证友节点个数最多是m。

构图实例:
第n次构造:在这个图的基础上再插入6个点,这6个点有3个和E很近,有3个和A很近,那么距离E最近的3个点中没有A,
距离A最近的3个点中也没有E,但因为A和E是构图早期添加的点,A和E有了连线,我们管这种连线叫“高速公路”,在查找
时可以提高查找效率(当进入点为E,待查找距离A很近时,我们可以通过AE连线从E直接到达A,而不是一小步一小步分
多次跳转到A)。
结论:
一个点,越早插入就越容易形成与之相关的“高速公路”连接,越晚插入就越难形成与之相关的“高速公路”连接。
HSW设计的妙处就在于扔掉德劳内(Delaunay)三角构图法,改用“无脑添加”(NSW朴素插入算法),降低了构图算法时间复杂度的同时还带来了数量有限的“高速公路”,加速了查找。
Delaunay 三角构图解释:
> https://zhuanlan.zhihu.com/p/264832755
算法:
设立三个点集合:Candidates(候选节点列表)、visitedSet(废弃节点列表)、result(保留topk个节点列表)
伪代码:
K-NNSearch(object q, integer: m, k)
TreeSet [object] candidates, visitedSet, result
/*
输入:
q: 新查询点
m: number of multi-searches, 多次搜索的数量
k: number of nearest neighbors, 最近邻的数量
*/
// 进行m次循环,避免随机性
for (i←0; i < m; i++) do:
put random entry point in candidates
repeat:
// 从candidates中找到距离q最近的点c
get element c closest from candidates to q
remove c from candidates
// 判断结束条件
if c is further than k-th element from result then
break repeat
// 更新后选择列表
for every element e from friends of c do:
if e is not in visitedSet then
add e to visitedSet
if distance e to q is smaller f to q:
add e to candidates、result
end repeat
end for
return best k elements from result
3. Skip-List 跳表结构
详解:
https://blog.csdn.net/weixin_41462047/article/details/81253106
- 跳表结构:有序链表+分层连接指针构成的跳表,用空间换时间。
- Skip list是一个分层结构多级链表,最下层是原始的链表,每个层级都是下一层级的“高速跑道”。
- 采用抛硬币的方式决定原链表的节点进入上一次链表,每个节点有50%的概率进入上一层有序链表。对于sorted_link链表中的每个节点进行抛硬币,如抛正,则该节点进入上一层有序链 表,每个sorted_link中的节点有50%的概率进入上一层有序链表。将上一层有序链表中和sorted_link链表中相同的元素做一一对应的指针链接。再从sorted_link上一层链表中再抛硬币,sorted_link上一层链表中的节点有50%的可能进入最表层,相当于sorted_link中的每个节点有25%的概率进入最表层。以此类推。
- 跳表时间复杂度:
查询:若原始链表有n个节点,每一层都需要遍历 k 个结点,那么跳表的时间复杂度就为 O(k*log(n))
插入:抛硬币的随机决定新节点是否提升为上一级索引,结果为“正”则提升并继续抛硬币,“负”则停止。O(log(n))
这种数据结构所占空间是2n,既空间复杂度是 O(n)。
删除:自上而下,查找第一次出现节点的索引,并逐层找到每一层对应的节点。O(log(n))
删除每一层查找到的节点,如果该层只剩下1个节点,删除整个一层(原链表除外)。O(log(n))
【链表查找的时间复杂度O(n),插入与删除的时间复杂度O(1)】
4. HNSW
HNSW(Hierachral Navigable Small World graphs):NSW的改进,具有分层的可导航小世界的结构图;根据连接的长度(距离)将连接划分为不同的层,然后在**多层图中进行搜索**。

建图:
-
插入新点时,先计算这个点可以深入到第几层,在每层的NSW图中查找t个最近邻点,分别连接它们,对每层图都进行如此操作。
-
对于每个插入的元素,将以指数衰减概率分布(通过mL参数归一化)随机选择一个最大层 L= ⌊−ln(uniform(0,1)) ⋅ mL⌋
查找:
1)从顶层任意点开始查找,选择一个进入点enter point,将进入点最邻近的一些友节点储在定长的动态列表result中,并把它们也同样在废弃列表visitedSet中存一份,以防后面走冤枉路。
2)一般地,在第x次查找时,先计算动态列表result中所有点的友节点距离待查找点q的距离,在废弃列表visitedSet中记录过的友节点不要计算,计算完后更新废弃列表visitedSet,不走冤枉路,再把这些计算完的友节点存入动态列表result,去重排序,保留前k个点,看看这k个点和更新前的k个点是不是一样的,如果不是一样的,继续查找,如果是一样的,返回前m个结果。算法:
1)插入算法
INSERT(hnsw,q,M,Mmax,efConstruction,mL) :新元素q插入算法。
 INSERT(hnsw, q, M, Mmax, efConstruction, mL)
 /**
  * 输入
  * hnsw:q插入的目标图
  * q:插入的新元素
  * M:每个点需要与图中其他的点建立的连接数
  * Mmax:最大的连接数,超过则需要进行缩减(shrink)
  * efConstruction:动态候选元素集合大小
  * mL:选择q的层数时用到的标准化因子
  */
 Input:
 	multilayer graph hnsw,
 	new element q,
 	number of established connections M,
 	maximum number of connections for each element per layer Mmax,
 	size of the dynamic candidate list efConstruction,
 	normalization factor for level generation mL
 /**
  * 输出:新的hnsw图
  */
 Output: update hnsw inserting element q

 W ← ∅  // W:现在发现的最近邻元素集合
 ep ← get enter point for hnsw
 L ← level of ep
 /**
  * unif(0..1)是取0到1之中的随机数
  * 根据mL获取新元素q的层数l
  */
 l ← ⌊-ln(unif(0..1))∙mL⌋
 /**
  * 自顶层向q的层数l逼近搜索,一直到l+1,每层寻找当前层q最近邻的1个点
  * 找到所有层中最近的一个点作为q插入到l层的入口点
  */
 for lc ← L … l+1
 	W ← SEARCH_LAYER(q, ep, ef=1, lc)
 	ep ← get the nearest element from W to q
 	// 自l层向底层逼近搜索,每层寻找当前层q最近邻的efConstruction个点赋值到集合W
 for lc ← min(L, l) … 0
 	W ← SEARCH_LAYER(q, ep, efConstruction, lc)
 	// 在W中选择q最近邻的M个点作为neighbors双向连接起来
 	neighbors ← SELECT_NEIGHBORS(q, W, M, lc)
 	add bidirectional connectionts from neighbors to q at layer lc
 	// 检查每个neighbors的连接数,如果大于Mmax,则需要缩减连接到最近邻的Mmax个
 	for each e ∈ neighbors
 		eConn ← neighbourhood(e) at layer lc
			if │eConn│ > Mmax
     		eNewConn ← SELECT_NEIGHBORS(e, eConn, Mmax, lc)
     		set neighbourhood(e) at layer lc to eNewConn
 	ep ← W
 if l > L
 	set enter point for hnsw to q
2)搜索当前层的最近邻
**SEARCH_LAYER(q,ep,ef,lc)** :在第lc层查找距离q最近邻的ef个元素。

		SEARCH_LAYER(q, ep, ef, lc)
		/**
		 * 输入
		 * q:插入的新元素
		 * ep:进入点 enter point
	 	 * ef:需要返回的近邻数量
		 * lc:层数
		 */
		Input:
			query element q,
			enter point ep,
			number of nearest to q elements to return ef,
			layer number lc
		/**
		 * 输出:q的ef个最近邻
		 */
		Output: ef closest neighbors to q

		v ← ep  // v:设置访问过的元素 visited elements
		C ← ep  // C:设置候选元素 candidates
		W ← ep  // W:现在发现的最近邻元素集合
		// 遍历每一个候选元素,包括遍历过程中不断加入的元素
		while │C│ > 0
	  		// 取出C中q的最近邻c
		    c ← extract nearest element from C to q
		    // 取出W中q的最远点f
		    f ← get furthest element from W to q
		    if distance(c, q) > distance(f, q)
		        break
	   	/**
 		 	 * 当c比f距离q更近时,则将c的每一个邻居e都进行遍历
		  	 * 如果e比w中距离q最远的f要更接近q,那就把e加入到W和候选元素C中
		  	 * 由此会不断地遍历图,直至达到局部最佳状态,c的所有邻居没有距离更近的了或者所有邻居都已经被遍历了
 		     */
    		for each e ∈ neighbourhood(c) at layer lc
		        if e ∉ v
        			v ← v ⋃ e
		            f ← get furthest element from W to q
		            if distance(e, q) < distance(f, q) or │W│ < ef
        			    C ← C ⋃ e
		                W ← W ⋃ e
        			    // 保证返回的数目不大于ef
		                if │W│ > ef
        			        remove furthest element from W to q
		return W

在 HNSW 中,SEARCH-LAYER(q, ep, ef, lc) 返回 efConstruction 个最近邻点,我们知道 efConstruction 的值是大于 M 的,那么怎么在这些点中选择 M 个来进行双向连接呢?这时候就有一个选择算法了。论文中提出了两种选择算法:


- 简单选择算法 SELECT-NEIGHBORS-SIMPLE(q, C, M),到最接近的elements的简单连接。
 - 启发式选择算法 SELECT-NEIGHBORS-HEURISTIC(q, C, M, lc, extendCandidates, keepPrunedConnections),会考虑上candidate elements间距离,用来创建不同方向(diverse directions)的连接。
3)截取集合中最近邻的M个结果
选择算法(简单选择或是启发式选择)的作用就是:**在集合 W 中选择 M(M4)启发式搜索最近邻
	**SELECT_NEIGHBORS_HEURISTIC(q,C,M,lc,extendCandidates,keepPrunedConnections)** :启发式寻找最近邻。
	启发式搜索:
	启发式选择:**当目标点到插入点的距离 比 目标点到插入点的友节点 近,就把目标点和插入点连接起来**。
两个额外参数:
extendCandidates:(缺省为false),它会扩展candidate set,只对极度聚集的数据有用
keepPrunedConnections:允许每个element具有固定数目的connection,当被插入的elements的connections在zero layer被确立时,插入过程终止。
	SELECT_NEIGHBORS_HEURISTIC(q, C, M, lc, extendCandidates, keepPrunedConnections)
	/**
	 * 输入
	 * q:查询的点
	 * C:候选元素集合
	 * M:需要返回的数目
	 * lc:层数
	 * extendCandidates:指示是否扩展候选列表的标志
	 * keepPrunedConnections:指示是否添加丢弃元素的标志
	 */
	Input:
		base element q,
		candidate elements C,
		number of neighbors to return M,
		layer number lc,
		flag indicating whether or not to extend candidate list extendCandidates,
		flag indicating whether or not to add discarded elements keepPrunedConnections
	/**
	 * 输出:探索得到M个元素
	 */
	Output: M elements selected by the heuristic

	R ← ∅ // 记录结果
	W ← C  // W:候选元素的队列
	if extendCandidates  // 通过邻居来扩充候选元素
    	for each e ∈ C
	    	for each e_adj ∈ neighbourhood(e) at layer lc
    	    	if e_adj ∉ W
    	    		W ← W ⋃ e_adj
					Wd ← ∅  // 丢弃的候选元素的队列
	/**
	 * 这里是关键,他的意思就是:
	 * 候选元素队列不为空且结果数量少于M时,在W中选择q最近邻e
	 * 如果e和q的距离比e和R中的其中一个元素的距离更小,就把e加入到R中,否则就把e加入Wd(丢弃)
	 * 可以理解成:如果R中存在点r,使distance(q,e) < distance(q,r),则加入点e到R
	 */
	while │W│ > 0 and │R│ < M
		e ← extract nearest element from W to q
    	if e is closer to q compared to any element from R
    		R ← R ⋃ e
		else
    		Wd ← Wd ⋃ e
	/**
	 * 如果设置keepPrunedConnections为true,且R不满足M个,那就在丢弃队列中挑选最近邻填满R为M个
	 */
	if keepPrunedConnections
		while │Wd│ > 0 and │R│ < M
    		R ← R ⋃ extract nearest element from Wd to q
	return R

5)KNN查询
K−NN−SEARCH(hnsw,q,K,ef) :在 hnsw 索引中查询距离 q 最近邻的 K 个元素。

	K-NN-SEARCH(hnsw, q, K, ef)
	/**
	 * 输入
	 * hnsw:q插入的目标图
	 * q:查询元素
	 * K:返回的近邻数量
	 * ef:动态候选元素集合大小
	 */
	Input:
		multilayer graph hnsw, query element q,
		number of nearest neighbors to return K,
		size of the dynamic candidate list ef
	/**
	 * 输出:q的K个最近邻元素
	 */
	Output: K nearest elements to q

	W ← ∅  // W:现在发现的最近邻元素集合
	ep ← get enter point for hnsw
	L ← level of ep
	/**
	 * 自顶层向倒数第2层逼近搜索,每层寻找当前层q最近邻的1个点赋值到集合W
	 * 取W中最接近q的点作为底层的入口点,以便使搜索的时间成本最低
	 */
	for lc ← L … 1
	    W ← SEARCH_LAYER(q, ep, ef=1, lc)
	    ep ← get nearest element from W to q
	// 从上一层得到的ep点开始搜索底层获得ef个q的最近邻
	W ← SEARCH_LAYER(q, ep, ef, lc=0)
	return K nearest elements from W to q
算法复杂度分析:
- 查找时间复杂度:O(log(n))
- 构图时间复杂度(插入所有元素):O(n⋅log(n))
- 内存占用:每个元素的平均内存消耗为(Mmax0+mL⋅Mmax)⋅bytes_per_link
(Mmax0是原始链表(第0层)每个元素的最大连接数,Mmax是其他层每个元素的最大连接数。)
5.HNSW应用工具
实现HNSW主要有两个package可选用:
Faiss (Facebook AI Similarity Search):
源码:
https://github.com/facebookresearch/faiss
介绍:
https://engineering.fb.com/2017/03/29/data-infrastructure/faiss-a-library-for-efficient-similarity-search/
HNSE demos:
https://github.com/facebookresearch/faiss/blob/13a2d4ef8fcb4aa8b92718ef4b9cc211033e7318/benchs/bench_hnsw.py
demo:
"Build Index"
	# Dim: Embedding demension
	# M, ef_construction: defined in the paper "Efficient and robust approximate
	# nearest neighbor search using Hierarchical Navigable Small World graphs"
	index = faiss.IndexHNSWFlat(dim, M)
	index.hnsw.efConstruction = ef_construction
	index.verbose = True # to see progress
	index.add(vecs) # vecs: a n2-by-d matrix with query vectors

"Save index to file and load index from file"
	# save index
	faiss.write_index(index, file)
	# load index
	index = faiss.read_index(file)

"Search in the index"
	# vecs: a n2-by-d matrix with query vectors
	# D: distance
	# I: Indexes of returned candidates
	# k: number of nearest candidates
	D, I = index.search(vecs, k)

"Evaluate the index"
	nq, d = vecs.shape
	t0 = time.time()
	D, I = index.search(vecs, k)
	t1 = time.time()
	missing_rate = (I == -1).sum() / float(nq*k)
	recall_at_1 = (I == np.arange(nq)).sum() / float(nq*k)
	print("\t %7.3f ms per query, R@1 %.4f, missing rate %.4f" % (
	(t1 - t0) * 1000.0 / nq, recall_at_1, missing_rate))
hnswlib
https://github.com/nmslib/hnswlib
demo:
import hnswlib
import numpy as np

dim = 16
num_elements = 10000

# Generating sample data
data = np.float32(np.random.random((num_elements, dim)))

# We split the data in two batches:
data1 = data[:num_elements // 2]
data2 = data[num_elements // 2:]

# Declaring index
p = hnswlib.Index(space='l2', dim=dim)  # possible options are l2, cosine or ip

# Initializing index
# max_elements - the maximum number of elements (capacity). Will throw an exception if exceeded
# during insertion of an element.
# The capacity can be increased by saving/loading the index, see below.
#
# ef_construction - controls index search speed/build speed tradeoff
#
# M - is tightly connected with internal dimensionality of the data. Strongly affects memory consumption (~M)
# Higher M leads to higher accuracy/run_time at fixed ef/efConstruction

p.init_index(max_elements=num_elements//2, ef_construction=100, M=16)

# Controlling the recall by setting ef:
# higher ef leads to better accuracy, but slower search
p.set_ef(10)

# Set number of threads used during batch search/construction
# By default using all available cores
p.set_num_threads(4)


print("Adding first batch of %d elements" % (len(data1)))
p.add_items(data1)

# Query the elements for themselves and measure recall:
labels, distances = p.knn_query(data1, k=1)
print("Recall for the first batch:", np.mean(labels.reshape(-1) == np.arange(len(data1))), "\n")

# Serializing and deleting the index:
index_path='first_half.bin'
print("Saving index to '%s'" % index_path)
p.save_index("first_half.bin")
del p

# Re-initializing, loading the index
p = hnswlib.Index(space='l2', dim=dim)  # the space can be changed - keeps the data, alters the distance function.

print("\nLoading index from 'first_half.bin'\n")

# Increase the total capacity (max_elements), so that it will handle the new data
p.load_index("first_half.bin", max_elements = num_elements)

print("Adding the second batch of %d elements" % (len(data2)))
p.add_items(data2)

# Query the elements for themselves and measure recall:
labels, distances = p.knn_query(data, k=1)
print("Recall for two batches:", np.mean(labels.reshape(-1) == np.arange(len(data))), "\n")
三、KD Tree
Kd-tress(K dimensional Tree):平衡二叉树(AVL树)
- k(k邻近查询中的k)维空间中的实例点进行存储以便对其进行快速检索(近邻搜索)的 树形数据结构
- 左子树的所有节点都比根节点的值小;右子树的所有节点都比根节点的值大;且左子树和右子树的高度差最大为1
- 查找一个值,可根据当前遍历到的节点的值 确定搜索方向
算法:
K-D Tree建立:
不断分裂空间;
分裂点:计算每个点的坐标的每一个维度上的方差,取方差最大的那一维对应的中间值。
直到每个空间中最多有一个点。
Input:  无序化的点云,维度k
Output:点云对应的kd-tree
Algorithm:
1、初始化分割轴:对每个维度的数据进行方差的计算, **取最大方差的维度作为分割轴**,标记为r;
2、确定节点:对当前数据按分割轴维度进行检索,找到**中位数数据,并将其放入到当前节点上**;
3、划分双支:
	划分左支:在当前分割轴维度,所有**小于中位数的值划分到左支**中;
    划分右支:在当前分割轴维度,所有**大于等于中位数的值划分到右支**中。
4、更新分割轴:r = (r + 1) % k;
5、确定子节点:
	确定左节点:在左支的数据中进行步骤2;
    确定右节点:在右支的数据中进行步骤2;
例子:
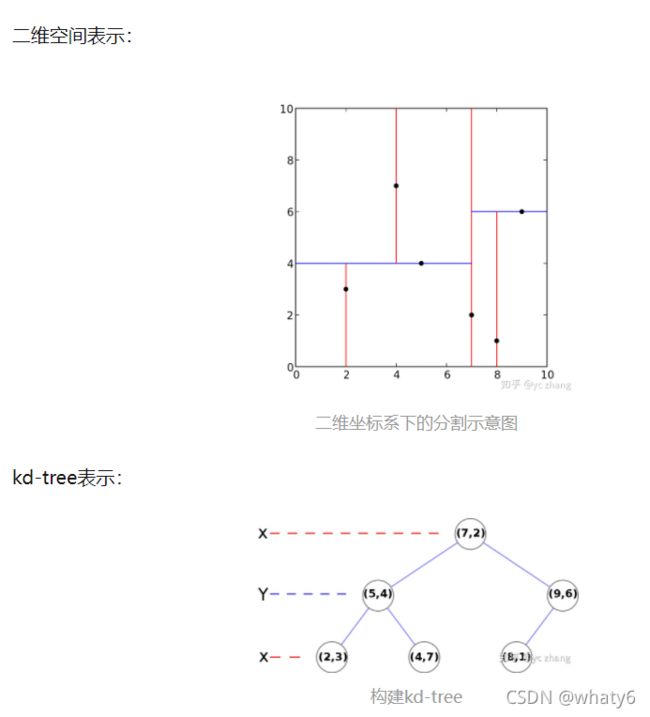
二维样例:{(2,3),(5,4),(9,6),(4,7),(8,1),(7,2)}
构建步骤:
1、确定 方差大 的为开始分割轴:
发现x轴的方差较大,所以,最开始的分割轴为x轴。

2、该轴的 中位数 确定为当前节点:
对{2,5,9,4,8,7}找中位数,发现{5,7}都可以,这里我们选择7,也就是(7,2);

3、确定左右子树节点:
在x轴维度上,比较和7的大小,进行划分:
左支:{(2,3),(5,4),(4,7)}
右支:{(9,6),(8,1)}

4、更新 另一个分割轴 继续划分:
一共就两个维度,所以,下一个维度是y轴。

5、换新轴 确定左右子树 子节点:
左节点:在左支中找到y轴的中位数(5,4),左支数据更新为{(2,3)},右支数据更新为{(4,7)}
右节点:在右支中找到y轴的中位数(9,6),左支数据更新为{(8,1)},右支数据为null。

6、更新分割轴:
下一个维度为x轴。

7、确定(5,4)的子节点:
左节点:由于只有一个数据,所以,左节点为(2,3)
右节点:由于只有一个数据,所以,右节点为(4,7)

8、确定(9,6)的子节点:
左节点:由于只有一个数据,所以,左节点为(8,1)
右节点:右节点为空。

最终,就可以构建整个的kd-tree了。
搜索一个最近邻:定位到对应的分支上,找到最接近的点。

举个例子:查找(2.1,3.1)的最近邻。
计算当前节点(7,2)的距离,为6.23,并且暂定为(7,2),根据当前分割轴的维度(2.1 < 7),选取左支。
计算当前节点(5,4)的距离,为3.03,由于3.03 < 6.23,暂定为(5,4),根据当前分割轴维度(3.1 < 4),选取左支。
计算当前节点(2,3)的距离,为0.14,由于0.14 < 3.03,暂定为(2,3),根据当前分割轴维度(2.1 > 2),选取右支,而右支为空,回溯上一个节点。
计算(2.1,3.1)与(5,4)的分割轴{y = 4}的距离,如果0.14小于距离值,说明就是最近值。如果大于距离值,说明,还有可能存在值与(2.1,3.1)最近,需要往右支检索。
由于0.14 < 0.9,我们找到了最近邻的值为(2,3),最近距离为0.14。

多个最近邻:多个近邻其实和一个最近邻类似,不过是存储区间变为了多个,判定方法还是完全一样。
详细介绍:
https://www.joinquant.com/view/community/detail/c2c41c79657cebf8cd871b44ce4f5d97
