vscode搭建opencv4.5.5+opencv_contrib4.5.5开发环境
我就没见过这么坑的安装环境,各种问题,折腾了无数次, 终于运行起来了
一开始还以为在windows上编译必须要用vs2015来编译,其他的帖子都介绍要用到visual studio来编译,一个visual studio就好几个G,我也不会用,其实直接用CMake编译就行了
不带opencv_contrib, 基础的opencv编译过程看这个帖子,流程以这个为主
VScode搭建Opencv(C++开发环境)_河旬的博客-CSDN博客_vscode配置opencv环境
我的环境
vscode最新版
opencv4.5.5
opencv_contrib4.5.5
CMake3.20.3
java 1.8, python 3.10
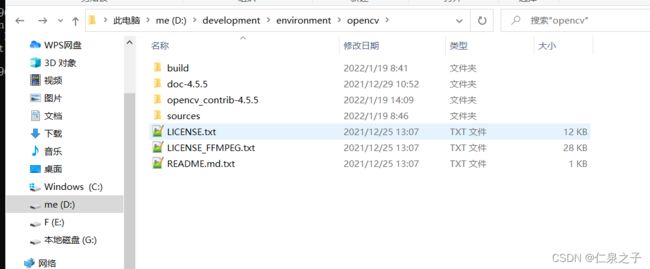
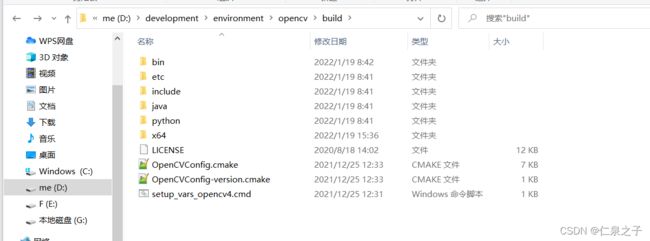
我下载来的相关文件的目录
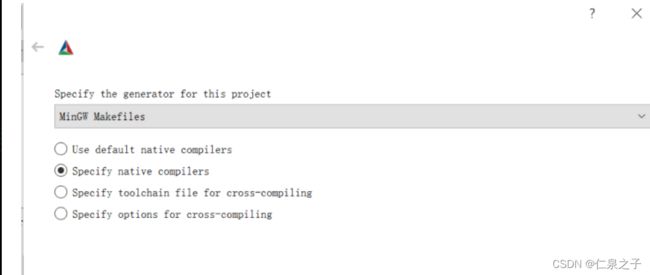
在CMake第一次点击Configure编译配置时,选择这个就不用visual studio编译了
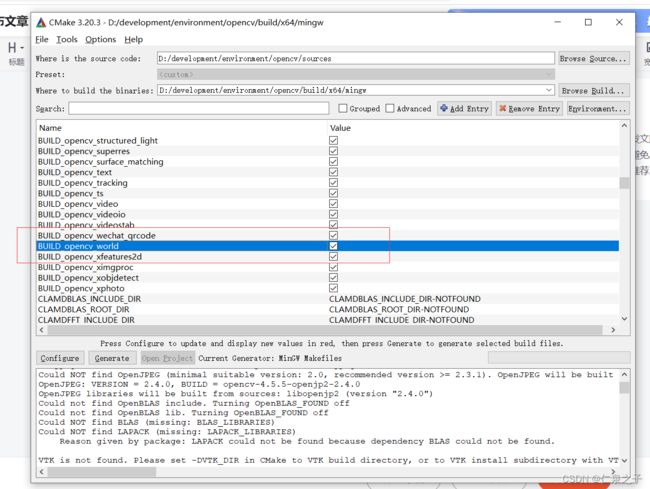
带opencv_contrib安装就在基础安装的cmake配置选上这两个配置,把contrib贡献包引入进去一起编译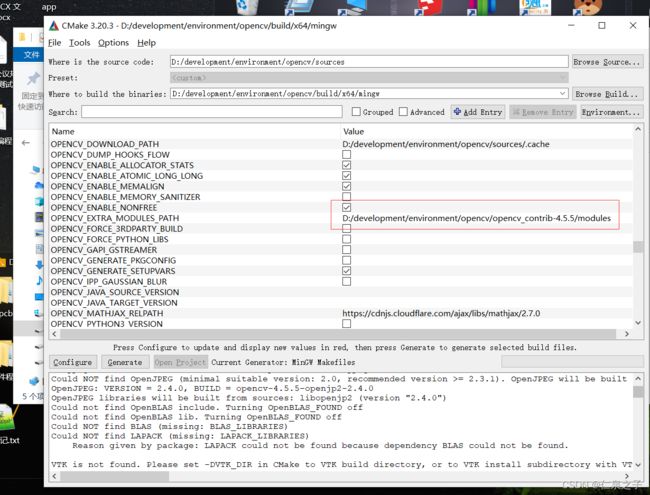 另外我选上了BUILD_opencv_world, 大概意思就是把其他所有的模块打包进一个文件中, 到时候直接链接一个就行了,不用一个一个的链接了
CMake的 Configure要多点几次, 一直点到上面的配置项没有红色才行,
之间又是科学上网, 又是改host,又是手动下载文件的, 总之把这里弄的没有红色就行了
我遇到opencv_contrib/modules下的文件报错时,我直接哪个模块报错移除哪个模块,
大概有这几个模块下载不了模型, 就是这个网址导致的 https://raw.githubusercontent.com,可以手动下载下来放到指定位置上,我这还没试
接下来就是点击Generate,
cmd进入D:\development\environment\opencv\build\x64\mingw
执行minGW32-make -j 4,等半小时,
编译完成100%, 再执行minGW32-make install
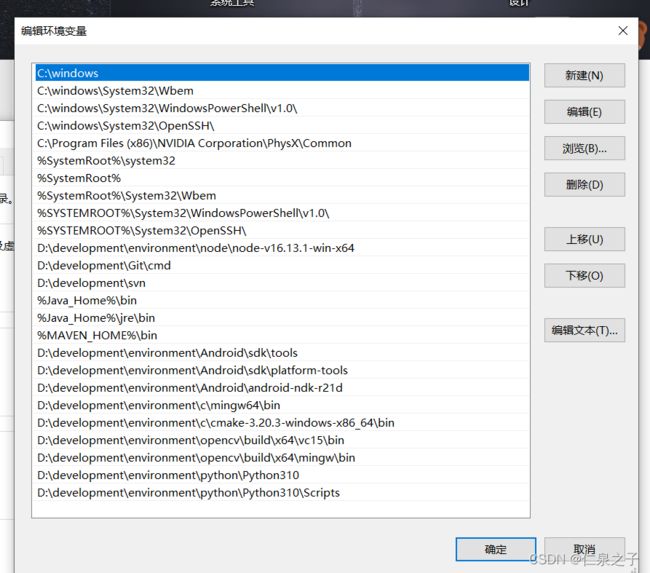
最后把环境变量配上, 这部分参考其他的帖子就行了
这是我弄完之后的全部的环境变量
vscode配置参考
c_cpp_properties.json
{
    "configurations": [
        {
            "name": "Win",
            "includePath": [
                "${workspaceFolder}/**",
                "D:/development/environment/opencv/build/x64/mingw/install/include",
                "D:/development/environment/opencv/build/x64/mingw/install/include/opencv2"
            ],
            "defines": [
                "_DEBUG",
                "UNICODE",
                "_UNICODE"
            ],
            "compilerPath": "D:/development/environment/c/mingw64/bin/gcc.exe",
            "cStandard": "c11",
            "cppStandard": "c++17",
            "intelliSenseMode": "clang-x64"
        }
    ],
    "version": 4
}
launch.json
{
  "version": "0.2.0",
  "configurations": [
      {
          "name": "(gdb) Launch", // 配置名称,将会在启动配置的下拉菜单中显示
          "type": "cppdbg", // 配置类型,这里只能为cppdbg
          "request": "launch", // 请求配置类型,可以为launch(启动)或attach(附加)
          "program": "${workspaceFolder}/${fileBasenameNoExtension}.o", // 将要进行调试的程序的路径
          "args": [], // 程序调试时传递给程序的命令行参数,一般设为空即可
          "stopAtEntry": false, // 设为true时程序将暂停在程序入口处,一般设置为false
          "cwd": "${workspaceFolder}", // 调试程序时的工作目录,一般为${workspaceRoot}即代码所在目录 workspaceRoot已被弃用,现改为workspaceFolder
          "environment": [],
          "externalConsole": true, // 调试时是否显示控制台窗口,一般设置为true显示控制台
          "MIMode": "gdb",
          "miDebuggerPath": "D:/development/environment/c/mingw64/bin/gdb.exe", // miDebugger的路径,注意这里要与MinGw的路径对应
          "preLaunchTask": "g++", // 调试会话开始前执行的任务,一般为编译程序,c++为g++, c为gcc
          "setupCommands": [
              {
                  "description": "Enable pretty-printing for gdb",
                  "text": "-enable-pretty-printing",
                  "ignoreFailures": true
              }
          ]
      }
  ]
}
tasks.json
{
  "version": "2.0.0",
  "command": "g++",
  "args": [
      "-g",
      "-std=c++11",
      "${file}",
      "-o",
      "${fileBasenameNoExtension}.o",
      "-I", "D:/development/environment/opencv/build/x64/mingw/install/include",
      "-I", "D:/development/environment/opencv/build/x64/mingw/install/include/opencv2",
      "-L", "D:/development/environment/opencv/build/x64/mingw/install/x64/mingw/lib",
      // "-l", "libopencv_calib3d455",
      // "-l", "libopencv_core455",
      // "-l", "libopencv_dnn455",
      // "-l", "libopencv_features2d455",
      // "-l", "libopencv_flann455",
      // "-l", "libopencv_gapi455",
      // "-l", "libopencv_highgui455",
      // "-l", "libopencv_imgcodecs455",
      // "-l", "libopencv_imgproc455",
      // "-l", "libopencv_ml455",
      // "-l", "libopencv_objdetect455",
      // "-l", "libopencv_photo455",
      // "-l", "libopencv_stitching455",
      // "-l", "libopencv_video455",
      // "-l", "libopencv_videoio455",
      //这里CMake编译时选择了BUILD_opencv_world选项,只引入这个就可以了
      "-l", "libopencv_img_hash455",
      "-l", "libopencv_world455"
  ],// 编译命令参数
  "problemMatcher":{
      "owner": "cpp",
      "fileLocation":[
          "relative",
          "${workspaceFolder}"
      ],
      "pattern":[
        {
          "regexp": "^([^\\\\s].*)\\\\((\\\\d+,\\\\d+)\\\\):\\\\s*(.*)$",
          "file": 1,
          "location": 2,
          "message": 3
        }
      ]
  },
  "group": {
    "kind": "build",
    "isDefault": true
  }
}
最后测试代码traking.cpp
#include
#include
#include
#include
#include
#include

using namespace std;
using namespace cv;

int main() {
  Rect roi;
  Mat frame;
  // TrackerCSRT,TrackerKCF TrackerGOTURN
  Ptr tracker = TrackerKCF::create(); //高版本一般是这样创建KCF的
  // string video = ".\KCFTestData\NBA.mov";         //视频流
  // VideoCapture cap(video);
  VideoCapture cap(0); //启用摄像头
  if (!cap.isOpened()) {
    return 0;
  }
  cout << "press c to leap current Image" << endl;
  cout << "press q to slect current Image" << endl;
  cout << "press empty key to start track RIO Object" << endl;

  cap >> frame;
  while (1) {
    char key = waitKey(1);
    if (key == 'c') // 按c键跳帧
    {
      cap >> frame;
    }
    if (key == 'q') // 按q键退出跳帧
    {
      break;
    }
    imshow("first", frame);
  }

  cv::destroyWindow("first");

  roi = selectROI("tracker", frame);

  if (roi.width == 0 || roi.height == 0)
    return 0;

  tracker->init(frame, roi);

  // perform the tracking process
  printf("Start the tracking process\n");
  for (;;) {
    // get frame from the video
    cap >> frame;
    // stop the program if no more images
    if (frame.rows == 0 || frame.cols == 0) {
      cv::destroyWindow("tracker");
      break;
    }
    // update the tracking result
    tracker->update(frame, roi);
    // draw the tracked object
    rectangle(frame, roi, Scalar(255, 0, 0), 2, 1);
    // show image with the tracked object
    imshow("tracker", frame);
    // quit on ESC button
    if (char(waitKey(1)) == 'q') {
      cv::destroyWindow("tracker");
      break;
    }
  }
  return 0;
} 