文章目录
- 一、软件开发整体介绍
- 二、 瑞吉外卖项目整体介绍
- 三、开发环境搭建
-
- 1、数据库环境的搭建
-
- (一)启动Navicat
- (二)数据库设计
-
- 1、概念设计
- 2、逻辑设计
-
- (1)用户信息表(user)
- (2)购物车(shopping_cart)
- (3)套餐菜品关系(setmeal_dish)
- (4)套餐(setmeal)
- (5)订单明细表(orders_detail)
- (6)订单表(orders)
- (7)员工信息(employee)
- (8)菜品口味关系表(dish_flavor)
- (9)菜品管理(dish)
- (10)菜品及套餐分类(category)
- (11)address_book(地址管理)
- (三)创建数据库
- (四)导入数据库脚本
- (五)查看数据库中的表
- 2、Maven项目搭建
-
- (一)创建Maven项目
- (二)检查项目编码、maven仓库配置以及jdk配置
- (三)在pom.xml文件添加项目依赖
- (四)创建应用属性文件
- (五)创建启动的主类
- (六)拷贝静态资源和模板资源
- (七)配置静态资源映射
- 四、后台登录功能开发
-
- 1、需求分析
-
- (一)页面原型展示
- (二)登录页面展示
- (三)查看登录请求信息
- (四)数据模型 - 雇员表
- 2、代码开发
-
- (一)创建雇员实体类
- (二)创建雇员映射器接口
- (三)创建雇员服务
-
- (四)创建返回结果类
- (五)创建雇员控制器
- 3、功能测试
-
- (一)修改超时配置
- (二)设置断点
- (四)测试登录 - [成功]
- (五)测试登录 - [失败]
- 五、后台退出功能开发
-
- 1、需求分析
- 2、代码开发
-
- (一)清理Session中的用户id
- (二)返回结果
- 3、功能测试
-
- 六、完善登录功能
-
- 1、问题分析
- 2、代码实现
-
- (一)创建自定义过滤器
- (二)在启动类上加入注解@ServletComponentScan
- (三)完善过滤器的处理逻辑
- 3、功能测试
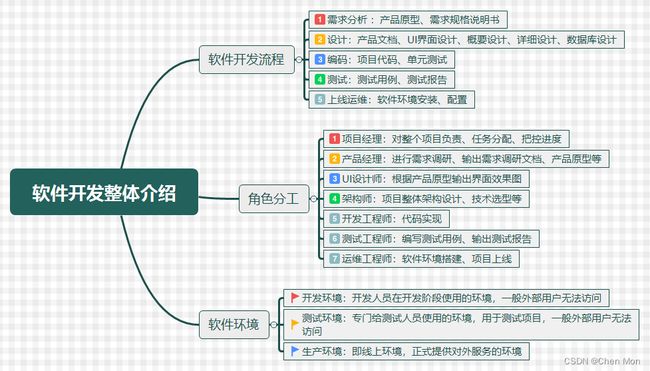
一、软件开发整体介绍
二、 瑞吉外卖项目整体介绍

三、开发环境搭建
1、数据库环境的搭建
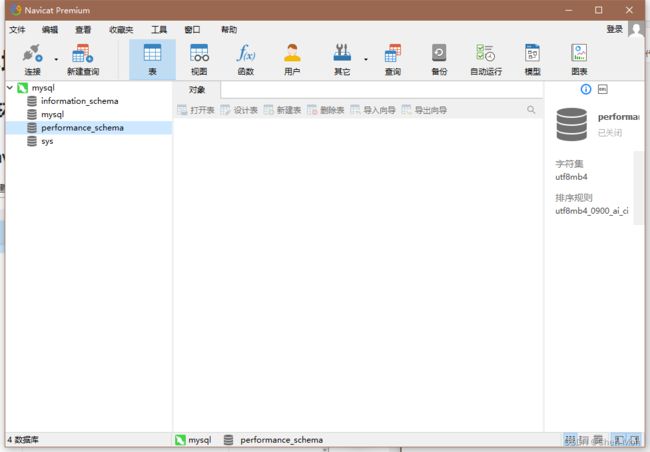
(一)启动Navicat
- 启动Navicat ,创建mysql连接
(二)数据库设计
- 数据库设计:概念设计(E-R图)、逻辑设计、物理设计
1、概念设计
- 概念设计是数据库设计的核心环节。通过对用户需求进行综合、归纳与抽象,形成一个独立于具体DBMS的概念模型。
(1)明确建模目标(模型覆盖范围)
(2)定义实体集(自底向上标识和定义实体集)
(3) 定义联系(实体间关联关系)
(4) 建立信息模型(构造ER模型)
(5)确定实体集属性(属性描述一个实体集的特征或性质)
(6)对信息模型进行集成与优化(检查和消除命名不一致、结构不一致等)
- 概念设计目前采用最广泛的是ER建模方法。将现实世界抽象为具有属性的实体及联系。1976年,Peter.Chen提出E-R模型(Entity- Relationship Model),即实体联系模型,用E-R图来描述数据库的概念模型。
- 观点:世界是由一组称作实体的基本对象和这些对象之间的联系构成的。
- 实体间的联系有三类:一对一联系(1:1)、一对多联系(1:n )、多对多联系(m:n)
- E-R图实例
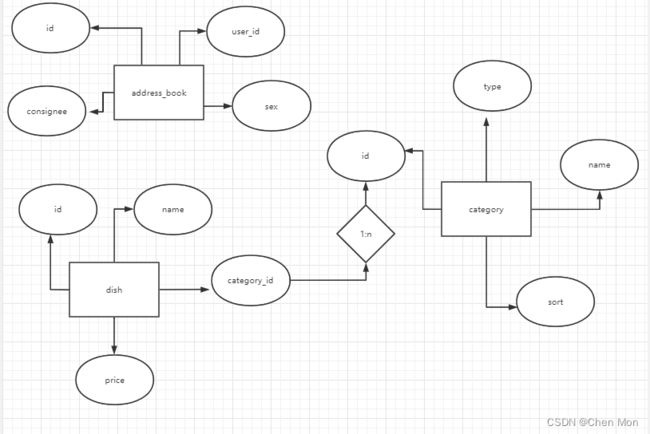
- 思维导图只管呈现

2、逻辑设计
- 将概念模型(如ER图)转化为DBMS支持的数据模型(如关系模型),并对其进行优化

(1)用户信息表(user)
| 字段名 |
类型 |
宽度 |
小数位数 |
是否主键 |
备注 |
| id |
bigint |
20 |
0 |
是 |
主键 |
| name |
varchar |
50 |
0 |
否 |
姓名 |
| phone |
varchar |
100 |
0 |
否 |
主键 |
| sex |
varchar |
2 |
0 |
否 |
主键 |
| id_number |
varchar |
18 |
0 |
否 |
主键 |
| avatar |
varchar |
500 |
0 |
否 |
主键 |
| status |
int |
11 |
0 |
否 |
状态 0:停用 1:启用 |
(2)购物车(shopping_cart)
| 字段名 |
类型 |
宽度 |
小数位数 |
是否主键 |
备注 |
| id |
bigint |
0 |
0 |
是 |
主键 |
| name |
varchar |
50 |
0 |
否 |
名称 |
| image |
varchar |
100 |
0 |
否 |
图片 |
| user_id |
bigint |
0 |
0 |
否 |
主键 |
| dish_id |
bigint |
0 |
0 |
否 |
菜品id |
| setmeal_id |
bigint |
0 |
0 |
否 |
套餐id |
| dish_flavor |
varchar |
50 |
0 |
否 |
口味 |
| number |
int |
0 |
0 |
否 |
数量 |
| amount |
decimal |
10 |
2 |
否 |
金额 |
| create_time |
datetime |
0 |
0 |
否 |
创建时间 |
(3)套餐菜品关系(setmeal_dish)
| 字段名 |
类型 |
宽度 |
小数位数 |
是否主键 |
备注 |
| id |
bigint |
0 |
0 |
是 |
主键 |
| setmeal_id |
varchar |
32 |
0 |
否 |
套餐id |
| dish_id |
varchar |
32 |
0 |
否 |
菜品id |
| name |
varchar |
32 |
0 |
否 |
菜品名称 |
| price |
decimal |
10 |
2 |
否 |
菜品原价 |
| copies |
int |
0 |
0 |
否 |
份数 |
| sort |
int |
0 |
0 |
否 |
排序 |
| create_time |
datetime |
0 |
0 |
否 |
创建时间 |
| update_time |
datetime |
0 |
0 |
否 |
更新时间 |
| create_user |
bigint |
0 |
0 |
否 |
创建人 |
| update_user |
bigint |
0 |
0 |
否 |
修改人 |
| is_deleted |
int |
0 |
0 |
否 |
是否删除 |
(4)套餐(setmeal)
| 字段名 |
类型 |
宽度 |
小数位数 |
是否主键 |
备注 |
| id |
bigint |
0 |
0 |
是 |
主键 |
| category_id |
bigint |
0 |
0 |
否 |
菜品分类 |
| name |
varchar |
64 |
0 |
否 |
套餐名称 |
| price |
decimal |
10 |
2 |
否 |
套餐价格 |
| status |
int |
18 |
0 |
否 |
状态 0:停用 1:启用 |
| code |
varchar |
32 |
0 |
否 |
编码 |
| description |
varchar |
512 |
0 |
否 |
描述信息 |
| image |
varchar |
255 |
0 |
是 |
图片 |
| create_time |
datetime |
0 |
0 |
否 |
创建时间 |
| update_time |
datetime |
0 |
0 |
否 |
更新时间 |
| create_user |
bigint |
0 |
0 |
否 |
创建人 |
| update_user |
bigint |
0 |
0 |
否 |
修改人 |
| is_deleted |
int |
0 |
0 |
否 |
是否删除 |
(5)订单明细表(orders_detail)
| 字段名 |
类型 |
宽度 |
小数位数 |
是否主键 |
备注 |
| id |
bigint |
0 |
0 |
是 |
主键 |
| name |
varchar |
50 |
0 |
否 |
名字 |
| image |
varchar |
100 |
0 |
否 |
图片 |
| order_id |
bigint |
0 |
0 |
否 |
订单id |
| dish_id |
bigint |
0 |
0 |
否 |
菜品id |
| setmeal_id |
bigint |
0 |
0 |
否 |
套餐id |
| dish_flavor |
varchar |
50 |
0 |
否 |
口味 |
| number |
int |
0 |
0 |
否 |
数量 |
| amount |
decimal |
10 |
2 |
否 |
金额 |
(6)订单表(orders)
| 字段名 |
类型 |
宽度 |
小数位数 |
是否主键 |
备注 |
| id |
bigint |
0 |
0 |
是 |
主键 |
| name |
varchar |
50 |
0 |
是否 |
订单号 |
| status |
int |
0 |
0 |
否 |
订单状态 1待付款,2待派送,3已派送,4已完成,5已取消 |
| user_id |
bigint |
0 |
0 |
否 |
下单用户 |
| address_book_id |
bigint |
0 |
0 |
否 |
地址id |
| order_time |
datetime |
0 |
0 |
否 |
下单时间 |
| checkout_time |
datetime |
0 |
0 |
否 |
结账时间 |
| pay_method |
int |
0 |
0 |
否 |
支付方式 1微信,2支付宝 |
| amount |
decimal |
10 |
2 |
否 |
实收金额 |
| remark |
varchar |
100 |
0 |
否 |
备注 |
| phone |
varchar |
255 |
0 |
否 |
手机号 |
| address |
varchar |
255 |
0 |
否 |
地址 |
| user_name |
varchar |
255 |
0 |
否 |
用户名 |
| consignee |
varchar |
255 |
0 |
否 |
接收人 |
(7)员工信息(employee)
| 字段名 |
类型 |
宽度 |
小数位数 |
是否主键 |
备注 |
| id |
bigint |
0 |
0 |
是 |
主键 |
| name |
varchar |
32 |
0 |
否 |
姓名 |
| username |
varchar |
32 |
0 |
否 |
用户名 |
| password |
varchar |
64 |
0 |
否 |
密码 |
| phone |
varchar |
11 |
0 |
否 |
手机号 |
| sex |
varchar |
2 |
0 |
否 |
性别 |
| id_number |
varchar |
18 |
0 |
否 |
身份证号 |
| status |
int |
0 |
0 |
否 |
状态 0:禁用,1:正常 |
| create_time |
datetime |
0 |
0 |
否 |
创建时间 |
| update_time |
datetime |
0 |
0 |
否 |
更新时间 |
| create_user |
bigint |
0 |
0 |
否 |
创建人 |
| update_user |
bigint |
0 |
0 |
否 |
修改人 |
(8)菜品口味关系表(dish_flavor)
| 字段名 |
类型 |
宽度 |
小数位数 |
是否主键 |
备注 |
| id |
bigint |
0 |
0 |
是 |
主键 |
| dish_id |
varchar |
0 |
0 |
否 |
菜品 |
| name |
varchar |
64 |
0 |
否 |
口味名称 |
| value |
varchar |
500 |
0 |
否 |
口味数据 |
| create_time |
datetime |
0 |
0 |
否 |
创建时间 |
| update_time |
datetime |
0 |
0 |
否 |
更新时间 |
| create_user |
bigint |
0 |
0 |
否 |
创建人 |
| update_user |
bigint |
0 |
0 |
否 |
修改人 |
| is_deleted |
int |
0 |
0 |
否 |
是否删除 |
(9)菜品管理(dish)
| 字段名 |
类型 |
宽度 |
小数位数 |
是否主键 |
备注 |
| id |
bigint |
0 |
0 |
是 |
主键 |
| name |
varchar |
64 |
0 |
否 |
菜品名称 |
| category_id |
bigint |
0 |
0 |
否 |
菜品分类id |
| price |
decimal |
10 |
2 |
否 |
菜品价格 |
| code |
varchar |
64 |
0 |
否 |
商品码 |
| image |
varchar |
200 |
0 |
否 |
图片 |
| description |
varchar |
400 |
0 |
否 |
描述信息 |
| status |
int |
0 |
0 |
否 |
0 停售 1 起售 |
| sort |
int |
0 |
0 |
否 |
顺序 |
| create_time |
datetime |
0 |
0 |
否 |
创建时间 |
| update_time |
datetime |
0 |
0 |
否 |
更新时间 |
| create_user |
bigint |
0 |
0 |
否 |
创建人 |
| update_user |
bigint |
0 |
0 |
否 |
修改人 |
| is_deleted |
int |
0 |
0 |
否 |
是否删除 |
(10)菜品及套餐分类(category)
| 字段名 |
类型 |
宽度 |
小数位数 |
是否主键 |
备注 |
| id |
bigint |
0 |
0 |
是 |
主键 |
| type |
varchar |
0 |
0 |
否 |
类型 1 菜品分类 2 套餐分类 |
| name |
varchar |
|
0 |
否 |
分类名称 |
| sort |
int |
0 |
0 |
否 |
顺序 |
| create_time |
datetime |
0 |
0 |
否 |
创建时间 |
| update_time |
datetime |
0 |
0 |
否 |
更新时间 |
| create_user |
bigint |
0 |
0 |
否 |
创建人 |
| update_user |
bigint |
0 |
0 |
否 |
修改人 |
(11)address_book(地址管理)
| 字段名 |
类型 |
宽度 |
小数位数 |
是否主键 |
备注 |
| id |
bigint |
0 |
0 |
是 |
主键 |
| user_id |
bigint |
0 |
0 |
是否 |
用户id |
| consignee |
varchar |
50 |
0 |
否 |
收货人 |
| sex |
tinyint |
0 |
0 |
否 |
性别 0 女 1 男 |
| phone |
varchar |
11 |
0 |
否 |
手机号 |
| province_code |
varchar |
12 |
0 |
否 |
省级区划编号 |
| province_name |
varchar |
32 |
0 |
否 |
省级名称 |
| city_code |
varchar |
12 |
0 |
否 |
市级区划编号 |
| city_name |
varchar |
32 |
0 |
否 |
市级名称 |
| district_code |
varchar |
12 |
0 |
否 |
区级区划编号 |
| district_name |
varchar |
32 |
0 |
否 |
区级名称 |
| detail |
varchar |
200 |
0 |
否 |
详细地址 |
| label |
varchar |
100 |
0 |
否 |
标签 |
| label |
tinyint |
1 |
0 |
否 |
默认 0 否 1是 |
| create_time |
datetime |
0 |
0 |
否 |
创建时间 |
| update_time |
datetime |
0 |
0 |
否 |
更新时间 |
| create_user |
bigint |
0 |
0 |
否 |
创建人 |
| update_user |
bigint |
0 |
0 |
否 |
修改人 |
| is_deleted |
int |
0 |
0 |
否 |
是否删除 |
(三)创建数据库
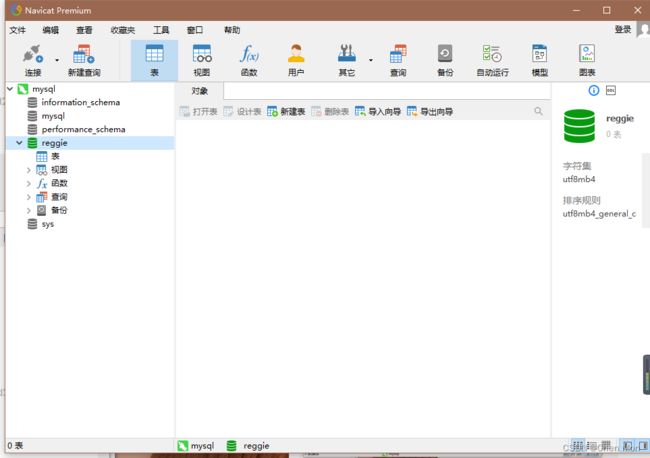
- 创建项目需要的数据库 - reggie,字符集采用utf8mb4

- 单击[确定]按钮

- 打开reggie数据库
(四)导入数据库脚本
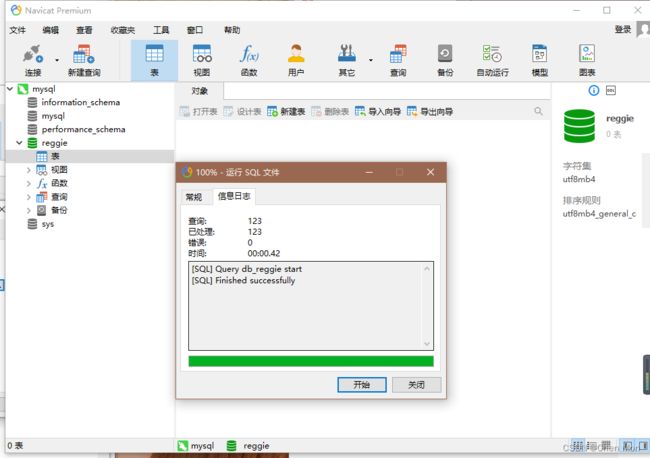
- 导入数据库脚本:db_reggie.sql

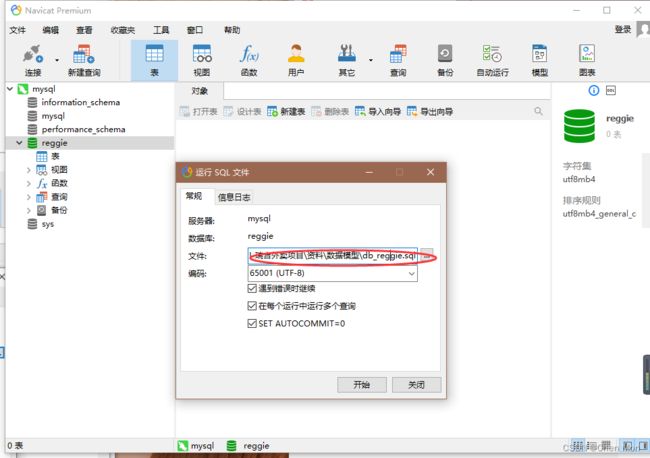
- 单击开始按钮
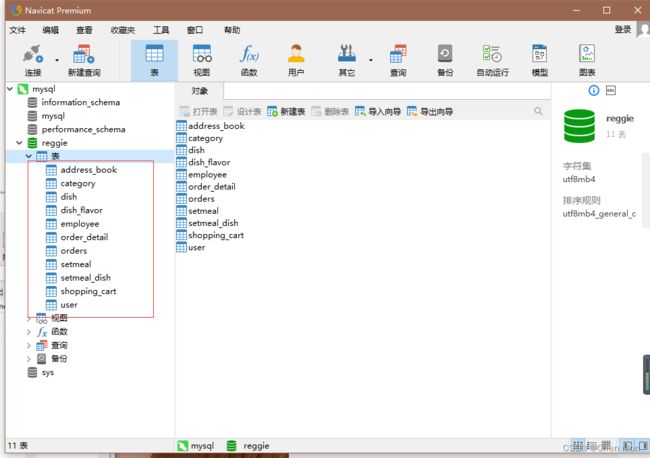
(五)查看数据库中的表
- 数据库reggie包含11张表
2、Maven项目搭建
- 两种常用项目构建工具

(一)创建Maven项目
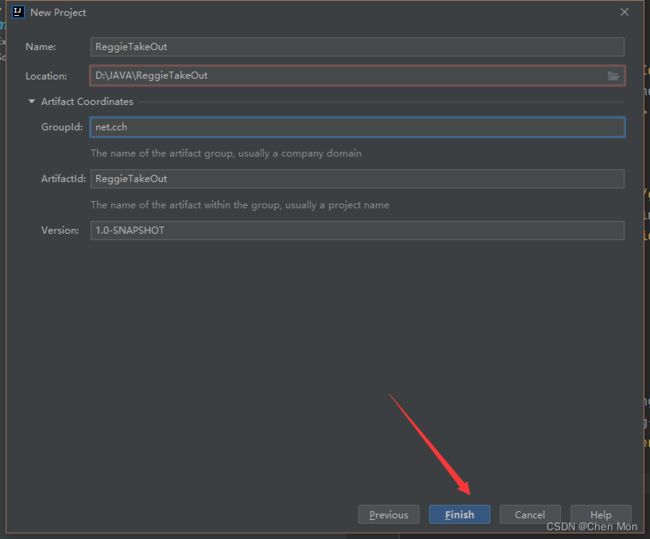
- 创建Maven项目,配置信息
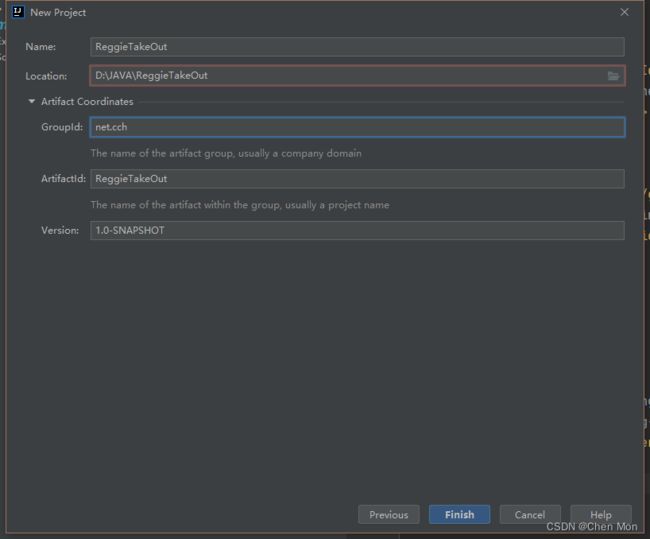
- 单击【Finish】按钮

(二)检查项目编码、maven仓库配置以及jdk配置
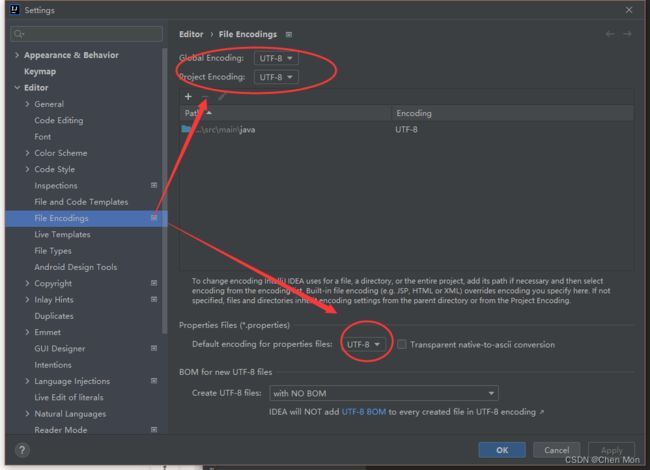
- 对项目编码、maven仓库配置以及jdk配置进行更改
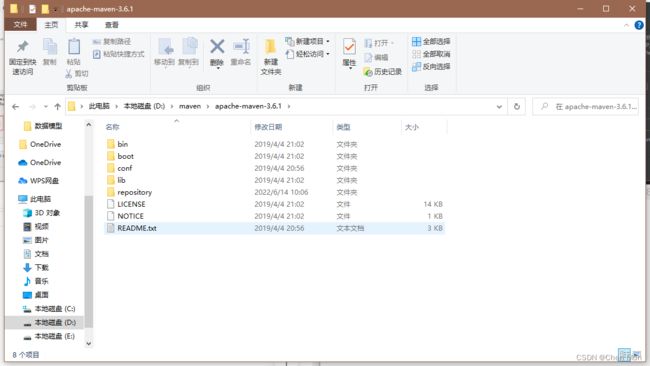
- 安装maven软件
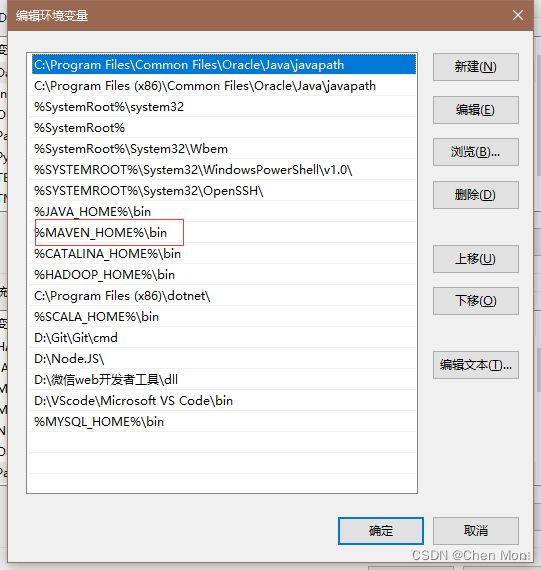
- 配置maven的环境变量

 -
-
- 检查maven环境是否配置成功
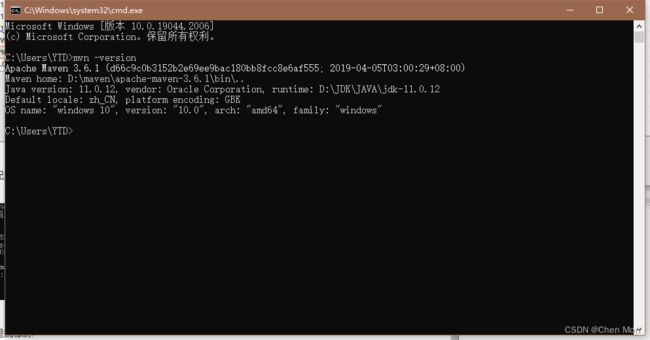
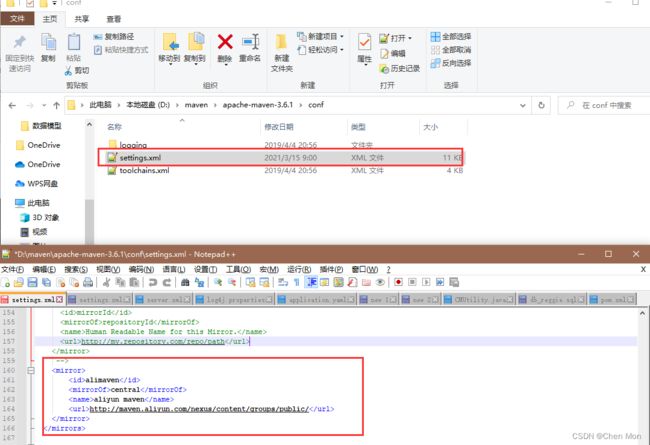
- 在maven配置文件添加阿里镜像源
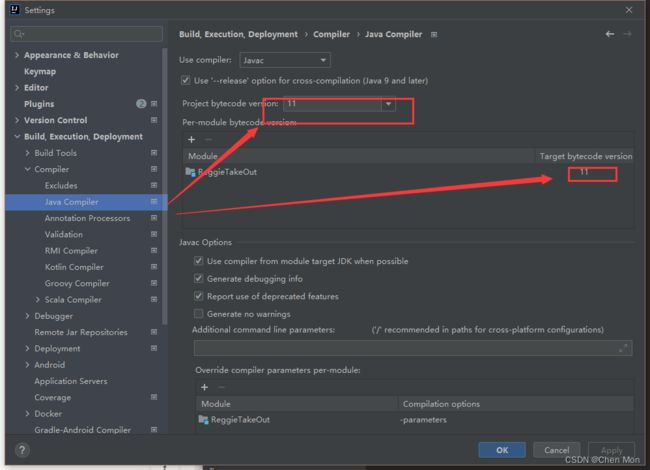
- 检查IntelliJ IDEA 2021.3里maven仓库的配置

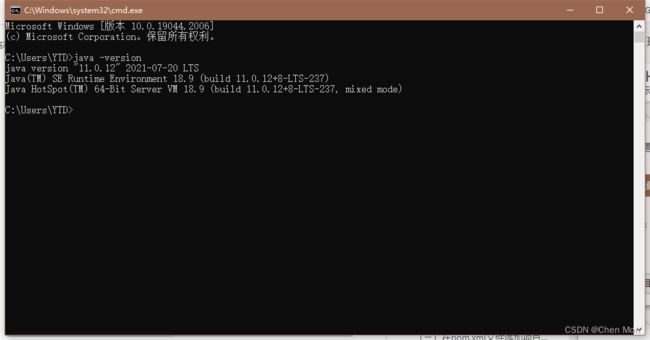
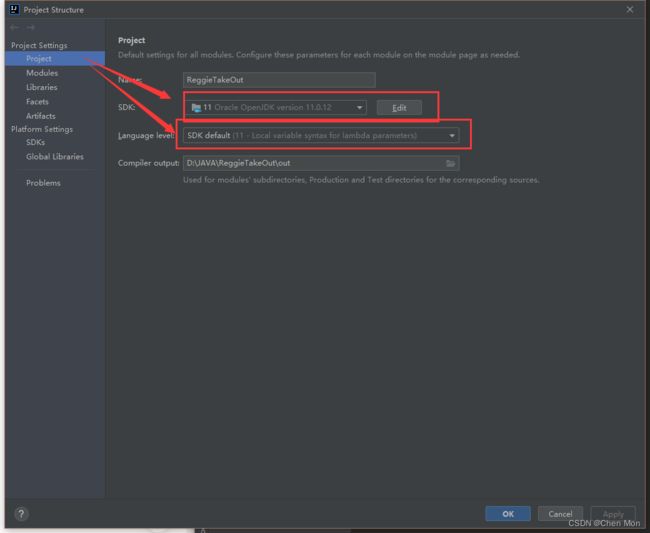
- 检查jdk配置情况


- 查看java版本
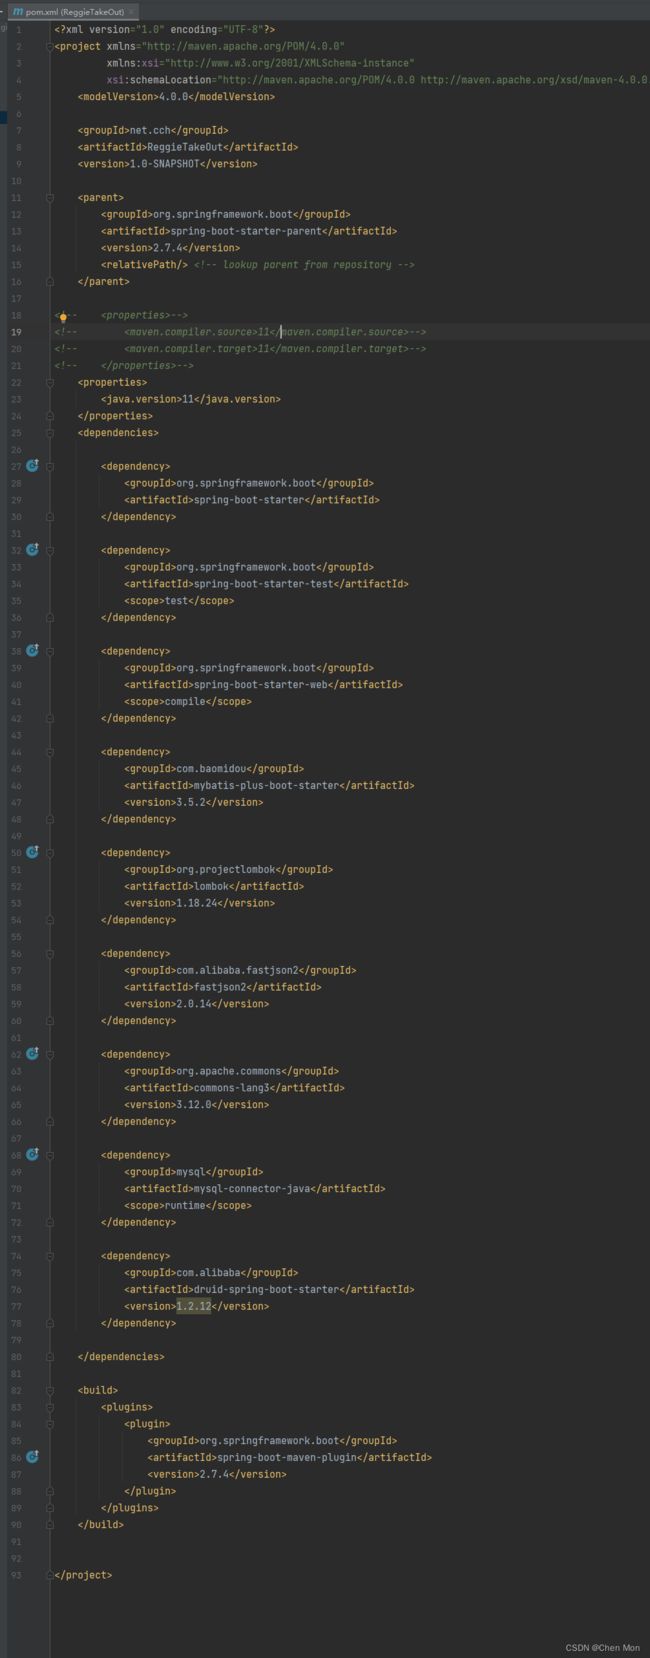
(三)在pom.xml文件添加项目依赖
- 在pom.xml文件里添加相关依赖和构建插件
<?xml version="1.0" encoding="UTF-8"?>
<project xmlns="http://maven.apache.org/POM/4.0.0"
         xmlns:xsi="http://www.w3.org/2001/XMLSchema-instance"
         xsi:schemaLocation="http://maven.apache.org/POM/4.0.0 http://maven.apache.org/xsd/maven-4.0.0.xsd">
    <modelVersion>4.0.0</modelVersion>

    <groupId>net.cch</groupId>
    <artifactId>ReggieTakeOut</artifactId>
    <version>1.0-SNAPSHOT</version>

    <parent>
        <groupId>org.springframework.boot</groupId>
        <artifactId>spring-boot-starter-parent</artifactId>
        <version>2.7.4</version>
        <relativePath/> <!-- lookup parent from repository -->
    </parent>

<!--    <properties>-->
<!--        <maven.compiler.source>11</maven.compiler.source>-->
<!--        <maven.compiler.target>11</maven.compiler.target>-->
<!--    </properties>-->
    <properties>
        <java.version>11</java.version>
    </properties>
    <dependencies>

        <dependency>
            <groupId>org.springframework.boot</groupId>
            <artifactId>spring-boot-starter</artifactId>
        </dependency>

        <dependency>
            <groupId>org.springframework.boot</groupId>
            <artifactId>spring-boot-starter-test</artifactId>
            <scope>test</scope>
        </dependency>

        <dependency>
            <groupId>org.springframework.boot</groupId>
            <artifactId>spring-boot-starter-web</artifactId>
            <scope>compile</scope>
        </dependency>

        <dependency>
            <groupId>com.baomidou</groupId>
            <artifactId>mybatis-plus-boot-starter</artifactId>
            <version>3.5.2</version>
        </dependency>

        <dependency>
            <groupId>org.projectlombok</groupId>
            <artifactId>lombok</artifactId>
            <version>1.18.24</version>
        </dependency>

        <dependency>
            <groupId>com.alibaba.fastjson2</groupId>
            <artifactId>fastjson2</artifactId>
            <version>2.0.14</version>
        </dependency>

        <dependency>
            <groupId>org.apache.commons</groupId>
            <artifactId>commons-lang3</artifactId>
            <version>3.12.0</version>
        </dependency>

        <dependency>
            <groupId>mysql</groupId>
            <artifactId>mysql-connector-java</artifactId>
            <scope>runtime</scope>
        </dependency>

        <dependency>
            <groupId>com.alibaba</groupId>
            <artifactId>druid-spring-boot-starter</artifactId>
            <version>1.2.12</version>
        </dependency>

    </dependencies>

    <build>
        <plugins>
            <plugin>
                <groupId>org.springframework.boot</groupId>
                <artifactId>spring-boot-maven-plugin</artifactId>
                <version>2.7.4</version>
            </plugin>
        </plugins>
    </build>


</project>
(四)创建应用属性文件
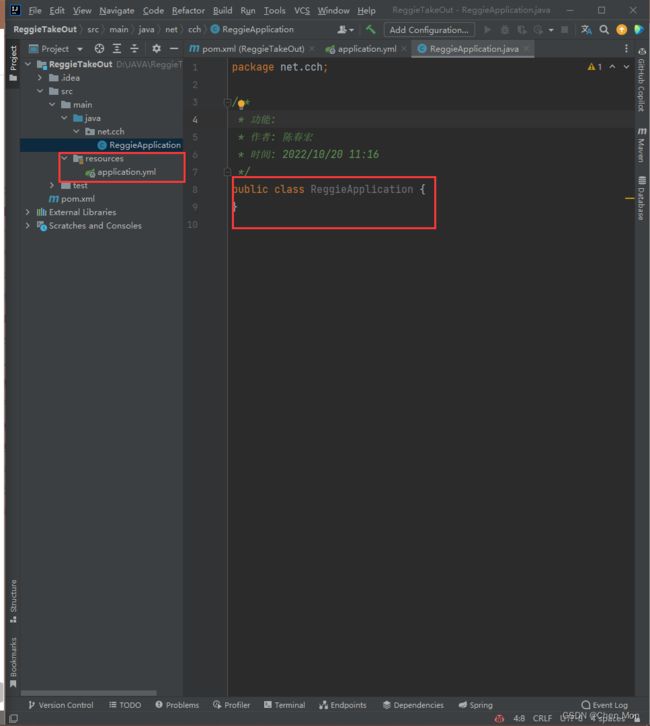
- 在resources目录下创建应用属性文件 - application.yml

- 配置application.yml
server:
port: 8080
spring:
application:
name: ReggieTakeOut
datasource:
druid:
driver-class-name: com.mysql.cj.jdbc.Driver
url: jdbc:mysql://localhost:3306/reggie?serverTimezone=Asia/Shanghai&useUnicode=true&characterEncoding=utf-8&zeroDateTimeBehavior=convertToNull&useSSL=false&allowPublicKeyRetrieval=true
username: root
password: 123
mybatis-plus:
configuration:
map-underscore-to-camel-case: true
log-impl: org.apache.ibatis.logging.stdout.StdOutImpl
global-config:
db-config:
id-type: ASSIGN_ID

(五)创建启动的主类
- 在java创建net.cch包,然后创建ReggieApplication类
package net.cch;
import lombok.extern.slf4j.Slf4j;
import org.springframework.boot.SpringApplication;
import org.springframework.boot.autoconfigure.SpringBootApplication;
@Slf4j
@SpringBootApplication
public class ReggieApplication {
public static void main(String[] args) {
SpringApplication.run(ReggieApplication.class,args);
log.info("项目启动成功!");
}
}

-
查看项目启动页面

-
log对象的五个方法
| 方法名 |
作用 |
| info() |
输出普通信息 |
| debug() |
输出调试信息 |
| error() |
输出错误信息 |
| warn() |
输出调试信息 |
(六)拷贝静态资源和模板资源
- 将backend、frontend拷贝到ReggieTakeOut项目下的resource下面


- 启动项目
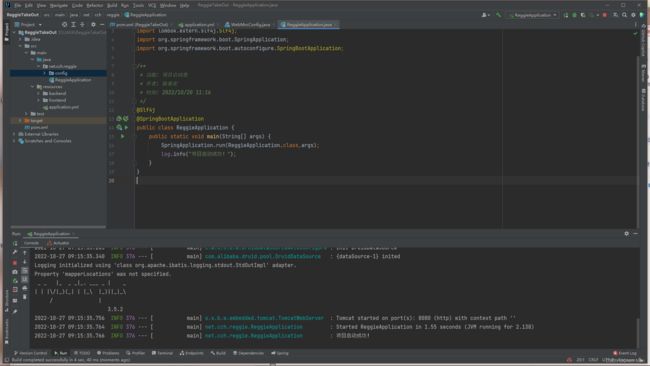
- 启动应用在浏览器输入localhost:8080/backend/index.html

(七)配置静态资源映射
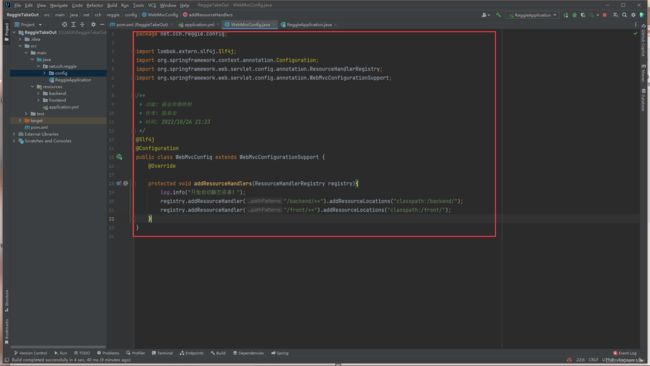
- 在ReggieTakeOut.src.main.java.net.cch.reggie创建config子包,在config里创建WebMvcConfig配置类

package net.cch.reggie.config;
import lombok.extern.slf4j.Slf4j;
import org.springframework.context.annotation.Configuration;
import org.springframework.web.servlet.config.annotation.ResourceHandlerRegistry;
import org.springframework.web.servlet.config.annotation.WebMvcConfigurationSupport;
@Slf4j
@Configuration
public class WebMvcConfig extends WebMvcConfigurationSupport {
@Override
protected void addResourceHandlers(ResourceHandlerRegistry registry){
log.info("开始启动静态资源!");
registry.addResourceHandler("/backend/**").addResourceLocations("classpath:/backend/");
registry.addResourceHandler("/front/**").addResourceLocations("classpath:/front/");
}
}
- WebMvcConfig继承WebMvcConfigurationSupport类重写addResourceHandlers方法

- 打印静态资源映射
- 测试项目查看静态资源映射

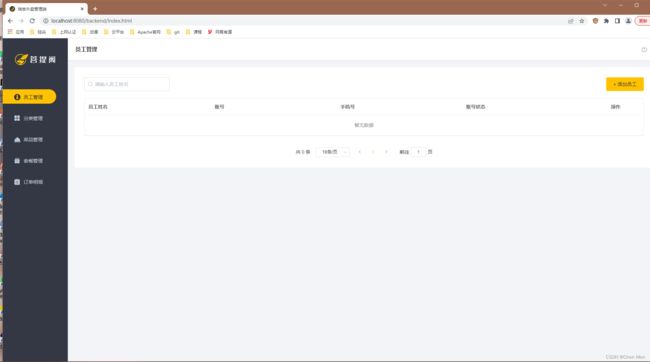
- 启动应用在浏览器输入localhost:8080/backend/index.html,访问后端首页
- 访问前端图片资源

四、后台登录功能开发
1、需求分析
(一)页面原型展示
- 找到项目资源 - 产品原型 > 瑞吉外卖后台(管理端)- 登录.html

- 单击 登录.html 页面

- 登录页面前端页面在输入用户名和密码后点登录时调用ajax函数并将用户名和密码传至后台,后台控制器要编写相应的处理函数,对提交的数据进行业务处理,然后将处理结果返回给前端。
- 查看login.html 页面代码
DOCTYPE html>
<html lang="en">

<head>
  <meta charset="UTF-8">
  <meta http-equiv="X-UA-Compatible" content="IE=edge">
  <meta name="viewport" content="width=device-width, initial-scale=1.0">
  <title>瑞吉外卖管理端title>
  <link rel="shortcut icon" href="../../favicon.ico">

  <link rel="stylesheet" href="../../plugins/element-ui/index.css" />
  <link rel="stylesheet" href="../../styles/common.css">
  <link rel="stylesheet" href="../../styles/login.css">
  <link rel="stylesheet" href="../../styles/icon/iconfont.css" />
  <style>
    .body{
      min-width: 1366px;
    }
  style>
head>

<body>
  <div class="login" id="login-app">
    <div class="login-box">
      <img src="../../images/login/login-l.png" alt="">
      <div class="login-form">
        <el-form ref="loginForm" :model="loginForm" :rules="loginRules" >
          <div class="login-form-title">
            <img src="../../images/login/logo.png" style="width:139px;height:42px;" alt="" />
          div>
          <el-form-item prop="username">
            <el-input v-model="loginForm.username" type="text" auto-complete="off" placeholder="账号" maxlength="20"
              prefix-icon="iconfont icon-user" />
          el-form-item>
          <el-form-item prop="password">
            <el-input v-model="loginForm.password" type="password" placeholder="密码" prefix-icon="iconfont icon-lock" maxlength="20"
              @keyup.enter.native="handleLogin" />
          el-form-item>
          <el-form-item style="width:100%;">
            <el-button :loading="loading" class="login-btn" size="medium" type="primary" style="width:100%;"
              @click.native.prevent="handleLogin">
              <span v-if="!loading">登录span>
              <span v-else>登录中...span>
            el-button>
          el-form-item>
        el-form>
      div>
    div>
  div>


  <script src="../../plugins/vue/vue.js">script>

  <script src="../../plugins/element-ui/index.js">script>

  <script src="../../plugins/axios/axios.min.js">script>
  <script src="../../js/request.js">script>
  <script src="../../js/validate.js">script>
  <script src="../../api/login.js">script>

  <script>
    new Vue({
      el: '#login-app',
      data() {
        return {
          loginForm:{
            username: 'admin',
            password: '123456'
          },
          loading: false
        }
      },
      computed: {
        loginRules() {
          const validateUsername = (rule, value, callback) => {
            if (value.length < 1 ) {
              callback(new Error('请输入用户名'))
            } else {
              callback()
            }
          }
          const validatePassword = (rule, value, callback) => {
            if (value.length < 6) {
              callback(new Error('密码必须在6位以上'))
            } else {
              callback()
            }
          }
          return {
            'username': [{ 'validator': validateUsername, 'trigger': 'blur' }],
            'password': [{ 'validator': validatePassword, 'trigger': 'blur' }]
          }
        }
      },
      created() {
      },
      methods: {
        async handleLogin() {
          this.$refs.loginForm.validate(async (valid) => {
            if (valid) {
              this.loading = true
              let res = await loginApi(this.loginForm)
              if (String(res.code) === '1') {
                localStorage.setItem('userInfo',JSON.stringify(res.data))
                window.location.href= '/backend/index.html'
              } else {
                this.$message.error(res.msg)
                this.loading = false
              }
            }
          })
        }
      }
    })
  script>
body>

html>
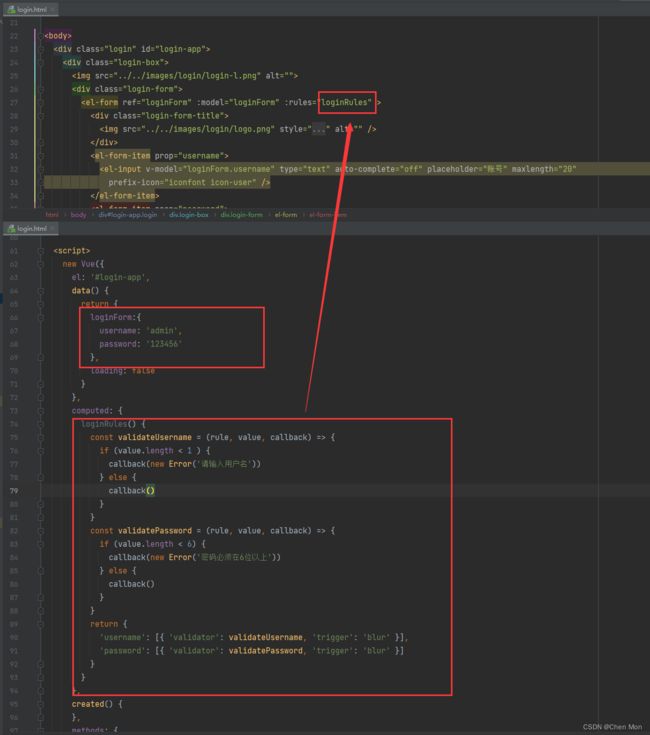
- Vue对象通过el属性绑定了id属性为login-app的div元素

- Vue对象通过data() 方法绑定JSON数据loginForm,通过computed绑定校验规则 loginRules
- Vue对象通过methods绑定对登录表单数据进行处理的一步方法handleLogin
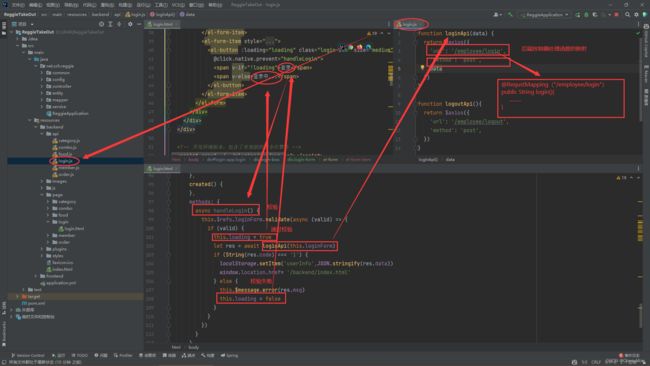
- 在前端处理函数里,有后端处理函数返回的结果,保存在
res变量里,里面有三个数据:res.code、res.data、res.msg,这就要求后端处理函数返回JSON数据必须要包含这三项内容
(二)登录页面展示
- 页面位置:在resource/backend/page/login/login.html
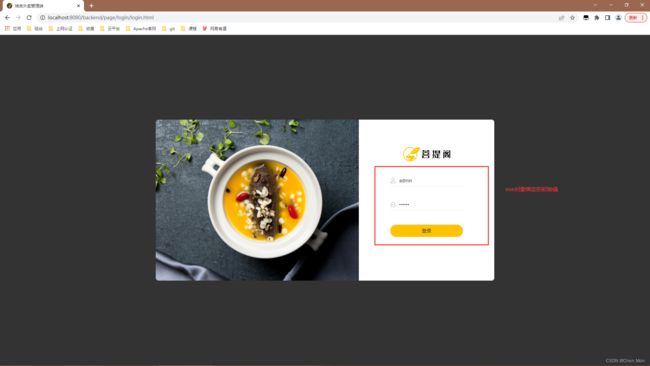
- 为什么Vue对象里要绑定这个用户登录数据呢?
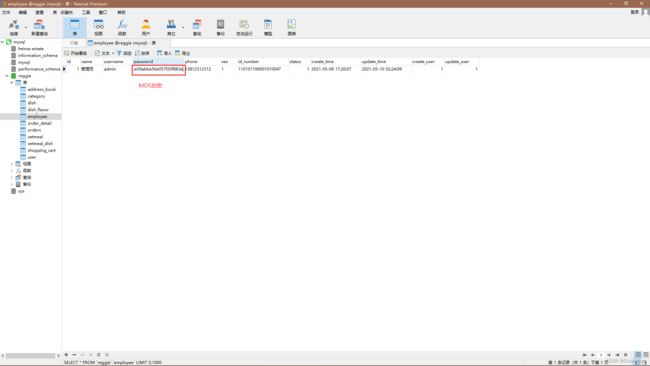
- 因为员工表employee里有一条数据:
admin与123456(MD5加密之后就成了e10adc3949ba59abbe56e057f20f883e)
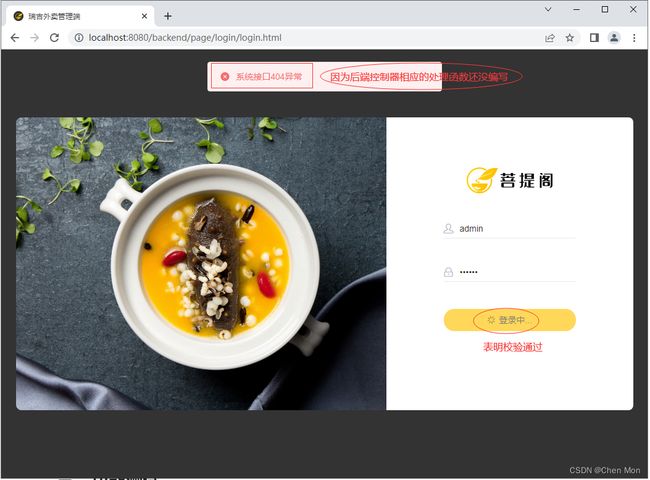
- 单击【登录】按钮,首先进行校验,如果校验通过,按钮标题就会变成登录中……,如果校验失败,按钮标题就依然是登录
(三)查看登录请求信息
- 按
F12键进入浏览器的调试模式
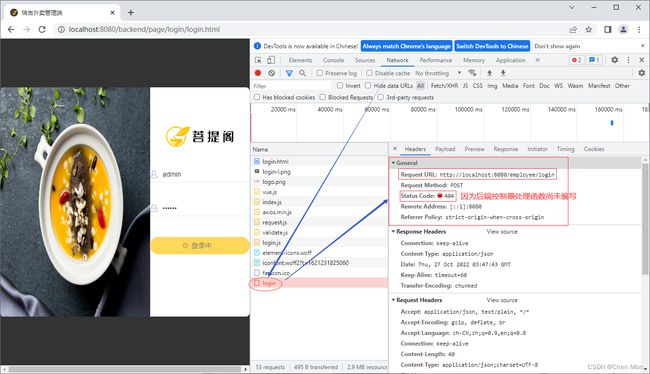
- 说明单击登录按钮通过客户端校验之后,请求的URL:
http://localhost:8080/employee/login
- 后面我们会在雇员控制器里编写相应的处理函数login()
@RestController
@RequestMapping("/employee")
public class EmployeeController {
@PostMapping("/login")
public R<Employee> login(HttpRequest request, @RequestBody Employee employee) {
return null;
}
}
(四)数据模型 - 雇员表
- 查看雇员表结构

2、代码开发
- 开发流程图

(一)创建雇员实体类
- ORM(Object Relation Mapping)对象关系映射
- 雇员实体类(Employee)— 雇员表(employee)
| 序号 |
实体属性名 |
关系字段名 |
| 1 |
id |
id |
| 2 |
name |
name |
| 3 |
username |
username |
| 4 |
password |
password |
| 5 |
phone |
phone |
| 6 |
sex |
sex |
| 7 |
idNumber |
id_number |
| 8 |
status |
satus |
| 9 |
createTime |
create_time |
| 10 |
status |
status |
| 11 |
createUser |
create_user |
| 12 |
updateUser |
update_user |
- 创建
entity子包在里面创建雇员实体类 - Employee
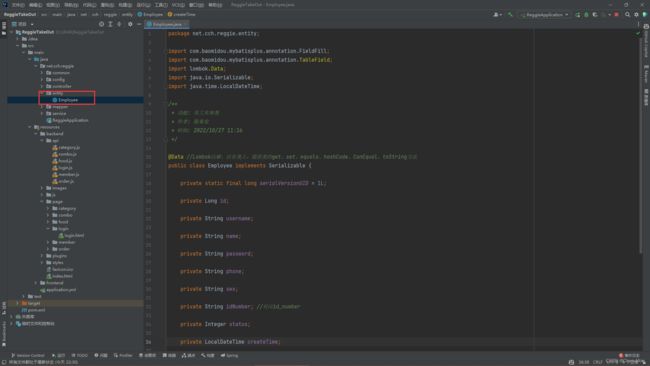
package net.cch.reggie.entity;
import com.baomidou.mybatisplus.annotation.FieldFill;
import com.baomidou.mybatisplus.annotation.TableField;
import lombok.Data;
import java.io.Serializable;
import java.time.LocalDateTime;
@Data
public class Employee implements Serializable {
private static final long serialVersionUID = 1L;
private Long id;
private String username;
private String name;
private String password;
private String phone;
private String sex;
private String idNumber;
private Integer status;
private LocalDateTime createTime;
private LocalDateTime updateTime;
@TableField(fill = FieldFill.INSERT)
private Long createUser;
@TableField(fill = FieldFill.INSERT_UPDATE)
private Long updateUser;
}
(二)创建雇员映射器接口
- 创建mapper子包 ,在mapper子包里创建雇员映射器接口 - EmployeeMapper

- 采用了mybatis-plus插件,就不用再去创建对应的映射器配置文件(EmployeeMapper.xml)
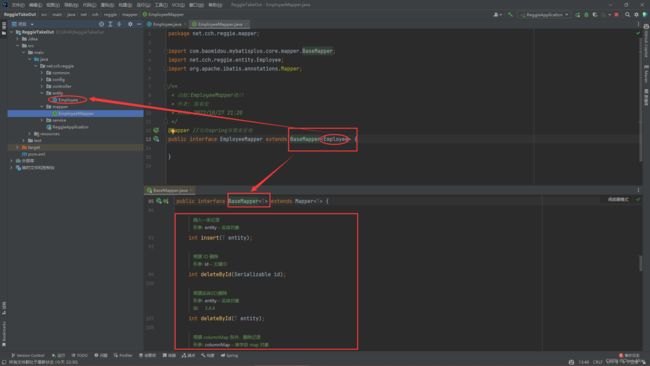
package net.cch.reggie.mapper;
import com.baomidou.mybatisplus.core.mapper.BaseMapper;
import net.cch.reggie.entity.Employee;
import org.apache.ibatis.annotations.Mapper;
@Mapper
public interface EmployeeMapper extends BaseMapper<Employee> {
}
(三)创建雇员服务
1、创建雇员服务接口
- 创建
service子包 ,在service包里创建雇员服务接口 - EmployeeService
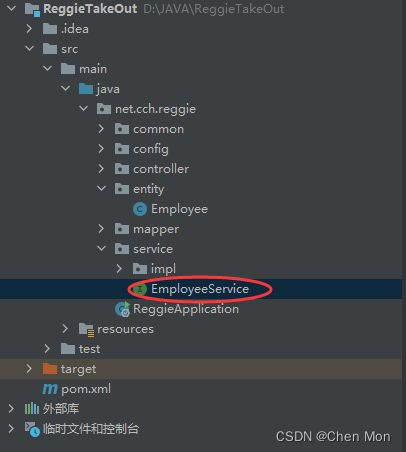
- 采用mybatis-plus插件,代码及其简单,只需要继承
IService接口
package net.cch.reggie.service;
import com.baomidou.mybatisplus.extension.service.IService;
import net.cch.reggie.entity.Employee;
public interface EmployeeService extends IService<Employee> {
}
2、创建雇员服务接口实体类
在net.cch.service包里创建impl子包,在子包里创建雇员服务接口实体类 - EmployeeServiceImpl

package net.cch.reggie.service.impl;
import com.baomidou.mybatisplus.extension.service.impl.ServiceImpl;
import net.cch.reggie.entity.Employee;
import net.cch.reggie.mapper.EmployeeMapper;
import net.cch.reggie.service.EmployeeService;
import org.springframework.stereotype.Service;
@Service
public class EmployeeServiceImpl extends ServiceImpl<EmployeeMapper, Employee> implements EmployeeService {
}
(四)创建返回结果类
- 服务器端所有处理方法返回结果都封装到这个通用类里
- 创建common子包 ,里创建返回结果类 -
R

package net.cch.reggie.common;
import lombok.Data;
import java.util.HashMap;
import java.util.Map;
@Data
public class R<T> {
private Integer code;
private String msg;
private T data;
private Map map = new HashMap();
public static <T> R<T> success(T object) {
R<T> r = new R<T>();
r.data = object;
r.code = 1;
return r;
}
public static <T> R<T> error(String msg) {
R r = new R();
r.msg = msg;
r.code = 0;
return r;
}
public R<T> add(String key, Object value) {
this.map.put(key, value);
return this;
}
}
(五)创建雇员控制器
- 创建controller子包 ,在子包下创建 -
EmployeeController

package net.cch.reggie.controller;
import
import lombok.extern.slf4j.Slf4j;
import net.cch.reggie.common.R;
import net.cch.reggie.entity.Employee;
import net.cch.reggie.service.EmployeeService;
import org.springframework.beans.factory.annotation.Autowired;
import org.springframework.util.DigestUtils;
import org.springframework.web.bind.annotation.PostMapping;
import org.springframework.web.bind.annotation.RequestBody;
import org.springframework.web.bind.annotation.RequestMapping;
import org.springframework.web.bind.annotation.RestController;
import javax.servlet.http.HttpServletRequest;
@Slf4j
@RestController
@RequestMapping("/employee")
public class EmployeeController {
@Autowired
private EmployeeService employeeService;
@PostMapping("/login")
public R<Employee> login(HttpServletRequest request, @RequestBody Employee employee) {
return null;
}
}
1、将页面提交的密码password进行md5加密处理
2、根据页面提交的用户名username查询数据库
3、如果没有查询到则返回登录失败结果
4、密码比对,如果不一致则返回登录失败结果
5、查看员工状态,如果为已禁用状态,则返回员工已禁用结果
6、登录成功,将员工id存入Session并返回登录成功结果
- 登录方法流程图
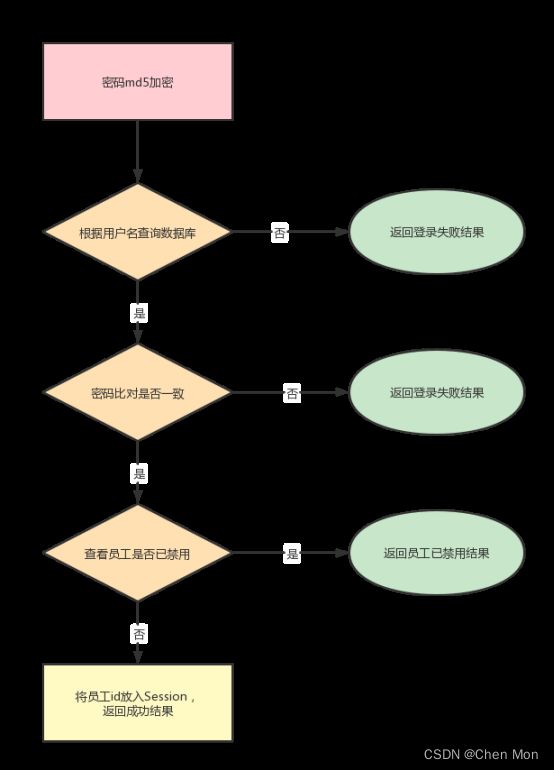
- 将页面提交的密码password进行md5处理

String password = employee.getPassword();
password = DigestUtils.md5DigestAsHex(password.getBytes());
- 根据页面提交的用户名username查询数据库
- 一般情况下,按用户名查询,返回的是一个记录集,但是雇员表对用户名字短做了唯一约束。所以按用户名查询雇员表,只有两种情况:要么没找到,要么找到一条。

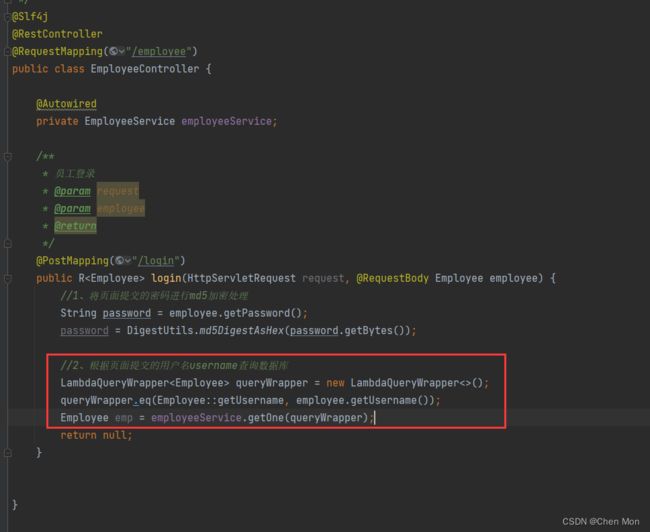
LambdaQueryWrapper<Employee> queryWrapper = new LambdaQueryWrapper<>();
queryWrapper.eq(Employee::getUsername,employee.getUsername());
Employee emp = employeeService.getOne(queryWrapper);
- 如果没有查询到则返回登录失败的结果

if(emp == null){
return R.error("登录失败[用户名错误]");
}
- 密码比对,如果不一致则返回密码错误的结果

if(!emp.getPassword().equals(password)){
return R.error("登录失败[密码错误]");
}
- 查看员工状态,如果为禁用状态,则返回员工已禁用结果

if(emp.getStatus() == 0){
return R.error("账号已禁用!");
}
- 登录成功,将员工id存入到Session并返回登录结果
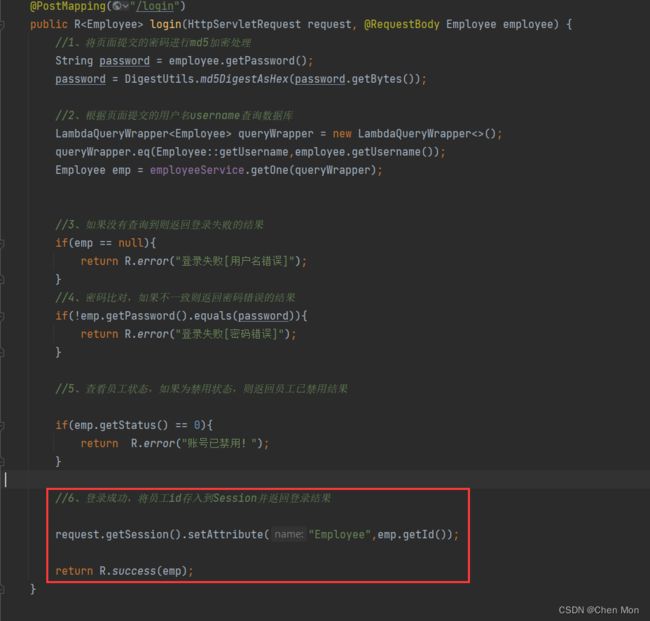
request.getSession().setAttribute("Employee",emp.getId());
return R.success(emp);
3、功能测试
(一)修改超时配置
- 在
resources/backend/js/request.js文件里设置超时为1000000毫秒,便于后面做断点调试
(二)设置断点
- 在
EmployeeController里设置断点
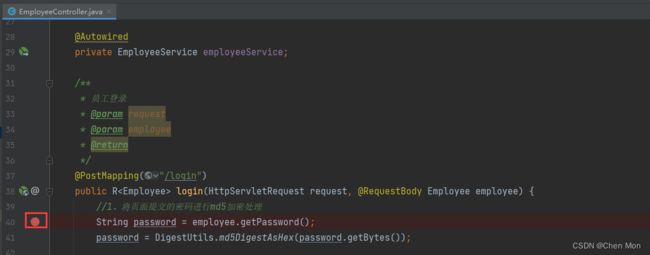
- 查看控制台信息

(四)测试登录 - [成功]
-
浏览器访问 http://localhost:8080/backend/page/login/login.html

-
按F12键,打开开发者工具
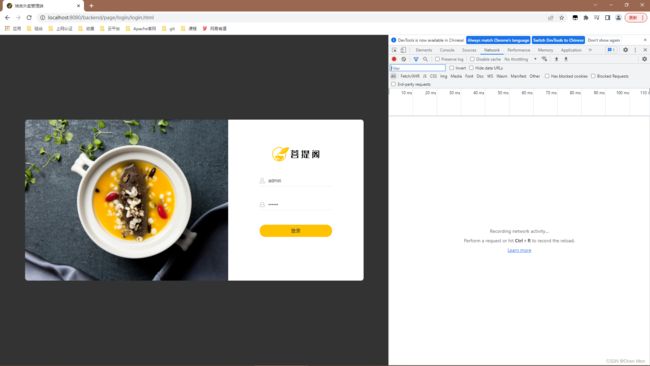
-
使用用户名和密码登录,admin : 123456 ,单击登录按钮
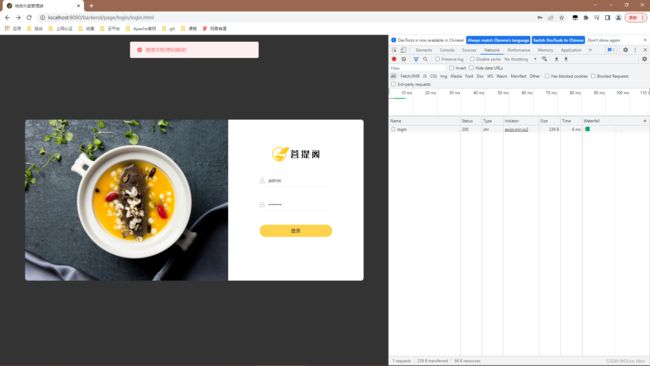
-
查看断点调试信息

-
单击[Step Over] 按钮3次,判断用户是否错误

-
单击【Step Over】按钮,判断密码是否错误

-
单击【Step Over】按钮,判断雇员状态是否已禁用

-
单击【Step Over】按钮3次,返回登录成功结果
-
此时,查看登录页面,登录成功,会本地存储用户信息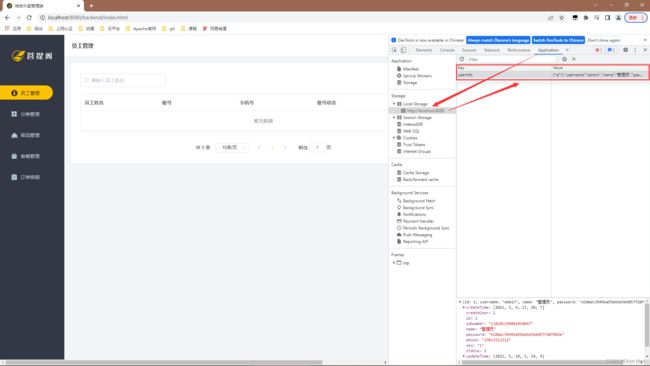
(五)测试登录 - [失败]
- 浏览器访问
http://localhost:8080/backend/page/login/login.html

- 测试用户名登录失败
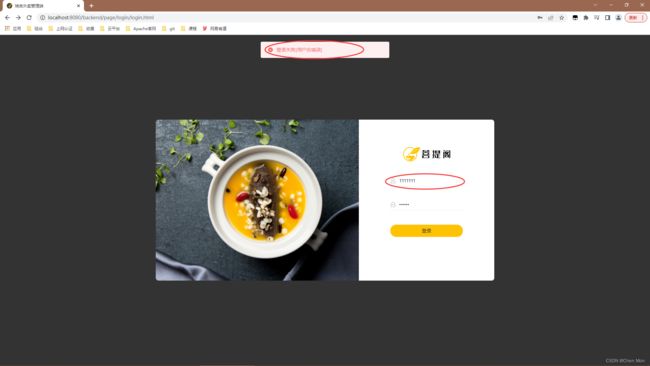

- 测试密码比对失败
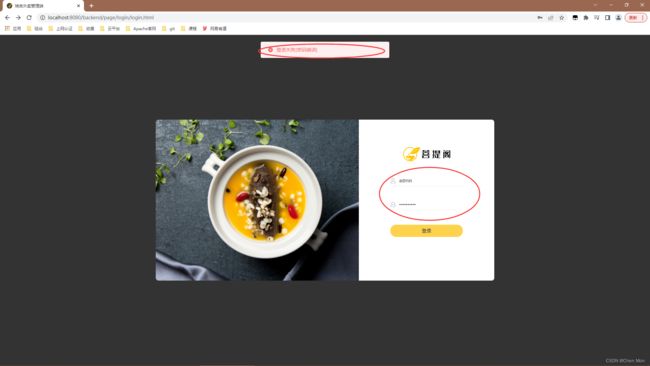
- 测试员工状态禁用,修该
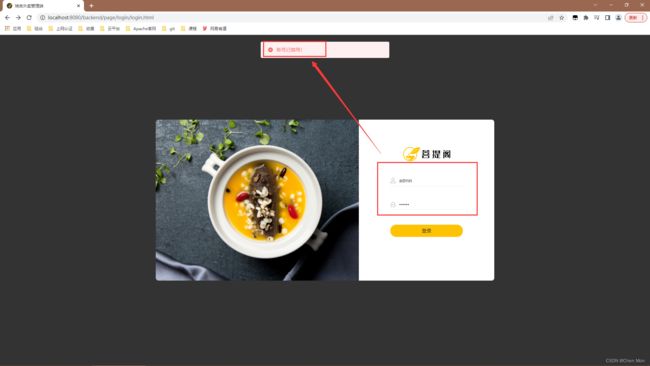
employee表的status字段改为0

五、后台退出功能开发
1、需求分析
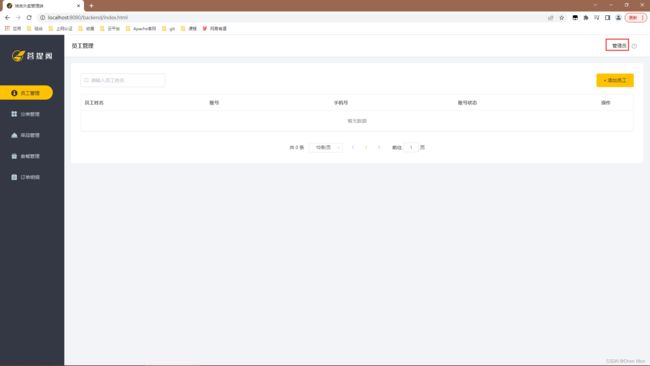
- 员工登录成功后,页面跳转到后台系统首页(backend/index.html),此时会显示当前登录用户的姓名,如果员工需要退出系系统,直接点击右侧的退出按钮即可退出系统,退出系统后页面应跳转回登录页面。

- 员工登录成功后跳转到系统首页

- 显示当前用户登录
- 通过localStorage方法得到用户登录信息
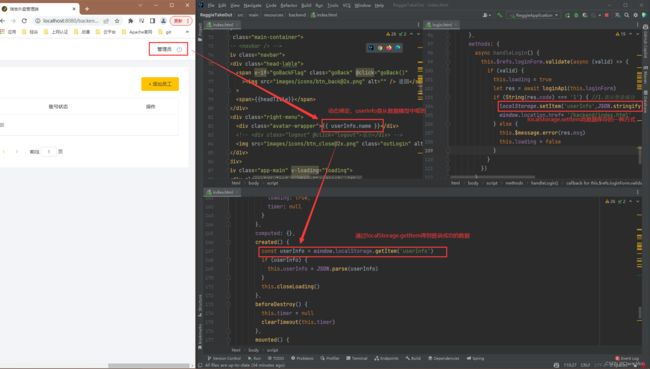
- 查看存储好的userinfo信息

2、代码开发
- 用户点击页面中退出按钮,发送请求,请求地址为/employee/logout,请求方式为POST.

(一)清理Session中的用户id
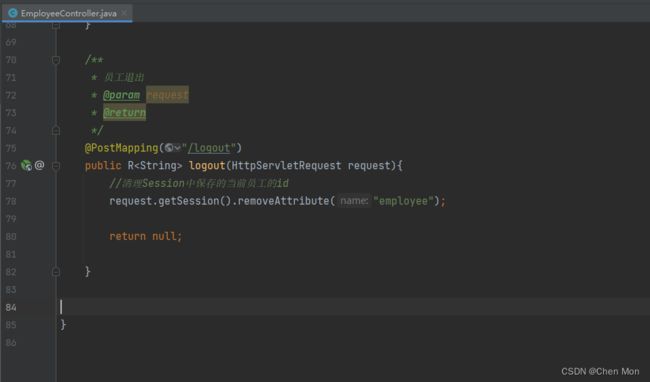
@PostMapping("/logout")
public R<String> logout(HttpServletRequest request){
request.getSession().removeAttribute("employee");
return null;
}
(二)返回结果

@PostMapping("/logout")
public R<String> logout(HttpServletRequest request){
request.getSession().removeAttribute("employee");
return R.success("退出成功");
}
3、功能测试
(一)重启服务

(二)测试退出
- 按住F12进入调试页面

- 点击退出跳回了登录页面,LocalStorage的userinfo没有了

六、完善登录功能
1、问题分析
- 前面我们已经完成了后台系统员工登录功能的开发,但是还是存在一个问题:如果用户不登录,可以直接访问系统首页面。
- 这种设计不合理,我们系统看到的效果应该是,只有在登录成功后才能访问系统的首页。没有登录则跳转到登录页面
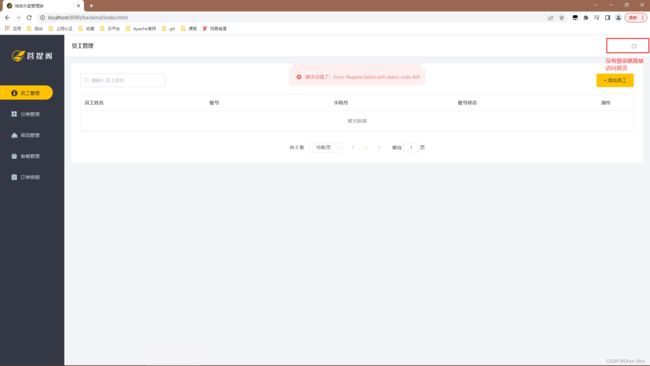
- 使用过滤器判断用户是否已经完成登录,如果没有登录跳转到登录页面。
2、代码实现
(一)创建自定义过滤器
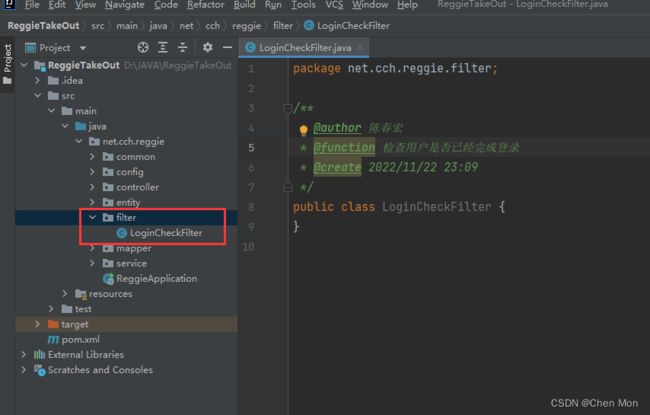
- 创建
filter子包,在filter子包里创建LoginCheckFilter过滤器
package net.cch.reggie.filter;
import lombok.extern.slf4j.Slf4j;
import javax.servlet.*;
import javax.servlet.annotation.WebFilter;
import javax.servlet.http.HttpServletRequest;
import javax.servlet.http.HttpServletResponse;
import java.io.IOException;
@WebFilter(filterName = "loginCheckFilter",urlPatterns = "/*")
@Slf4j
public class LoginCheckFilter implements Filter {
@Override
public void doFilter(ServletRequest servletRequest, ServletResponse servletResponse, FilterChain filterChain) throws IOException, ServletException {
HttpServletResponse response = (HttpServletResponse) servletResponse;
HttpServletRequest request = (HttpServletRequest) servletRequest;
log.info("拦截到请求:{}",request.getRequestURI());
filterChain.doFilter(request,response);
}
}
(二)在启动类上加入注解@ServletComponentScan
- 查看过滤器是否生效,在启动类上加上注解@ServletComponentScan,这样才会扫描WebFilter注解从而过滤器创建出来
package net.cch.reggie;
import lombok.extern.slf4j.Slf4j;
import org.springframework.boot.SpringApplication;
import org.springframework.boot.autoconfigure.SpringBootApplication;
import org.springframework.boot.web.servlet.ServletComponentScan;
@Slf4j
@SpringBootApplication
@ServletComponentScan
public class ReggieApplication {
public static void main(String[] args) {
SpringApplication.run(ReggieApplication.class,args);
log.info("项目启动成功!");
}
}

- 测试过滤器是否生效,如果能生效在具体编写处理的细节问题
- 启动项目
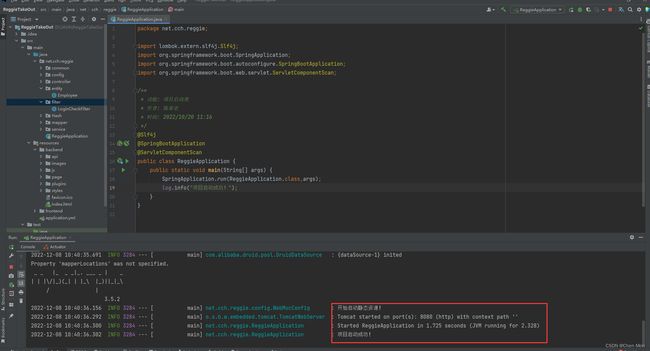
- 在首页上刷新页面

- 查看控制台,请求的是
/backend/index.html

(三)完善过滤器的处理逻辑
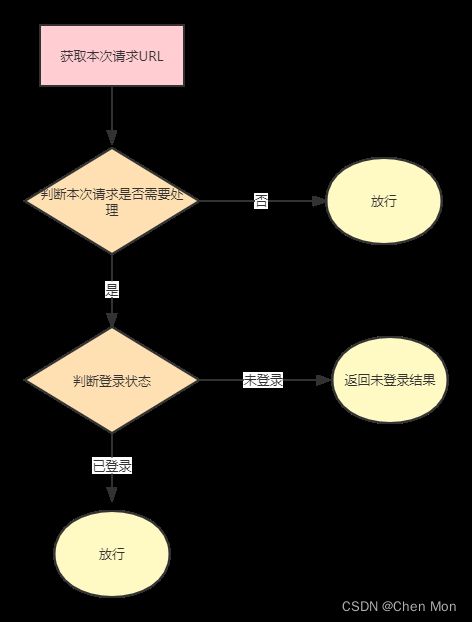
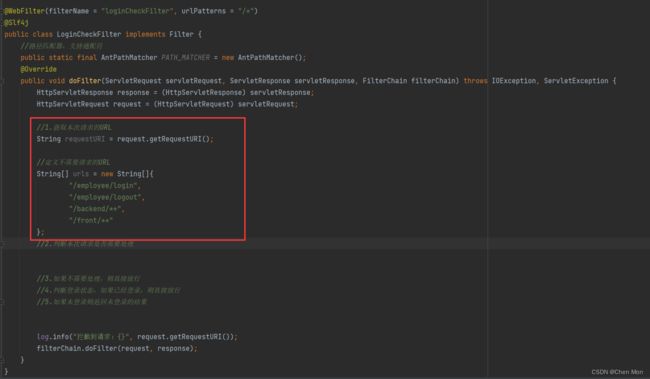
1.获取本次请求的URL
2.判断本次请求是否需要处理
3.如果不需要处理,则直接放行
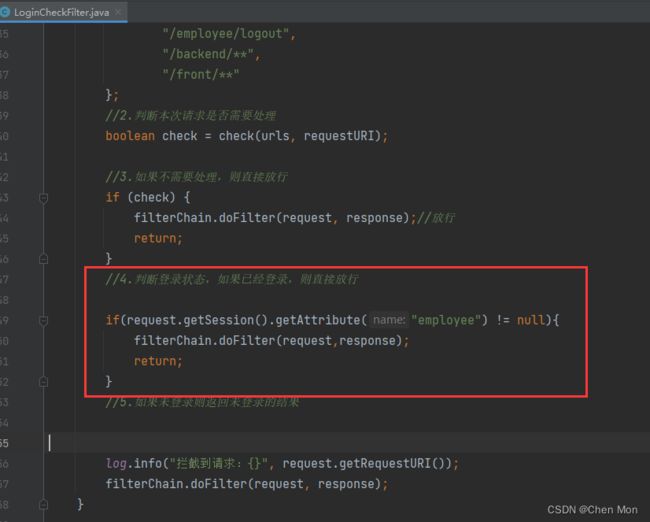
4.判断登录状态,如果已经登录,则直接放行
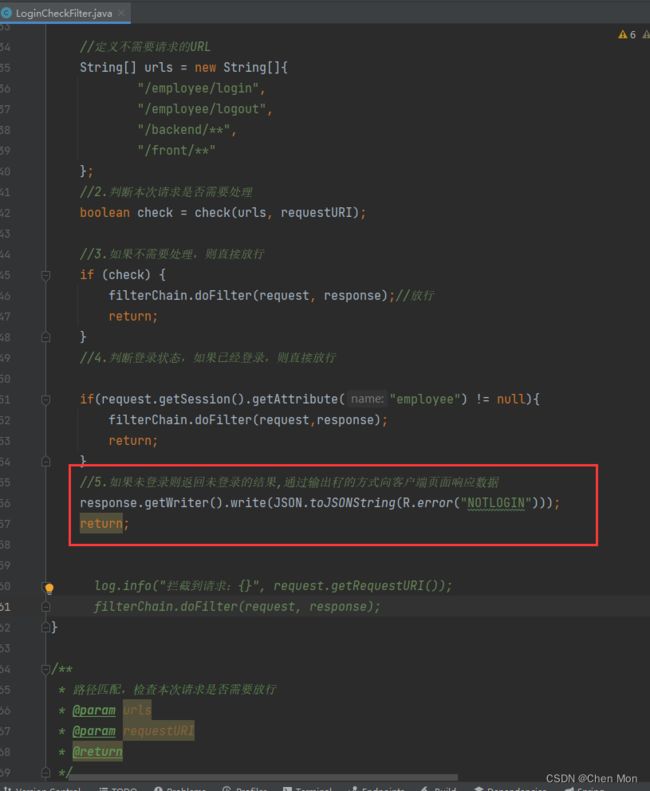
5.如果未登录则返回未登录的结果
package net.cch.reggie.filter;
import lombok.extern.slf4j.Slf4j;
import org.springframework.util.AntPathMatcher;
import javax.servlet.*;
import javax.servlet.annotation.WebFilter;
import javax.servlet.http.HttpServletRequest;
import javax.servlet.http.HttpServletResponse;
import java.io.IOException;
@WebFilter(filterName = "loginCheckFilter", urlPatterns = "/*")
@Slf4j
public class LoginCheckFilter implements Filter {
public static final AntPathMatcher PATH_MATCHER = new AntPathMatcher();
@Override
public void doFilter(ServletRequest servletRequest, ServletResponse servletResponse, FilterChain filterChain) throws IOException, ServletException {
HttpServletResponse response = (HttpServletResponse) servletResponse;
HttpServletRequest request = (HttpServletRequest) servletRequest;
String requestURI = request.getRequestURI();
String[] urls = new String[]{
"/employee/login",
"/employee/logout",
"/backend/**",
"/front/**"
};
log.info("拦截到请求:{}", request.getRequestURI());
filterChain.doFilter(request, response);
}
}
package net.cch.reggie.filter;
import lombok.extern.slf4j.Slf4j;
import org.springframework.util.AntPathMatcher;
import javax.servlet.*;
import javax.servlet.annotation.WebFilter;
import javax.servlet.http.HttpServletRequest;
import javax.servlet.http.HttpServletResponse;
import java.io.IOException;
@WebFilter(filterName = "loginCheckFilter", urlPatterns = "/*")
@Slf4j
public class LoginCheckFilter implements Filter {
public static final AntPathMatcher PATH_MATCHER = new AntPathMatcher();
@Override
public void doFilter(ServletRequest servletRequest, ServletResponse servletResponse, FilterChain filterChain) throws IOException, ServletException {
HttpServletResponse response = (HttpServletResponse) servletResponse;
HttpServletRequest request = (HttpServletRequest) servletRequest;
String requestURI = request.getRequestURI();
String[] urls = new String[]{
"/employee/login",
"/employee/logout",
"/backend/**",
"/front/**"
};
boolean check = check(urls, requestURI);
log.info("拦截到请求:{}", request.getRequestURI());
filterChain.doFilter(request, response);
}
public boolean check(String[] urls, String requestURI) {
for (String url : urls) {
boolean match = PATH_MATCHER.match(url, requestURI);
if (match) {
return true;
}
}
return false;
}
}

if (check) {
filterChain.doFilter(request, response);
return;
}
if(request.getSession().getAttribute("employee") != null){
filterChain.doFilter(request,response);
return;
}
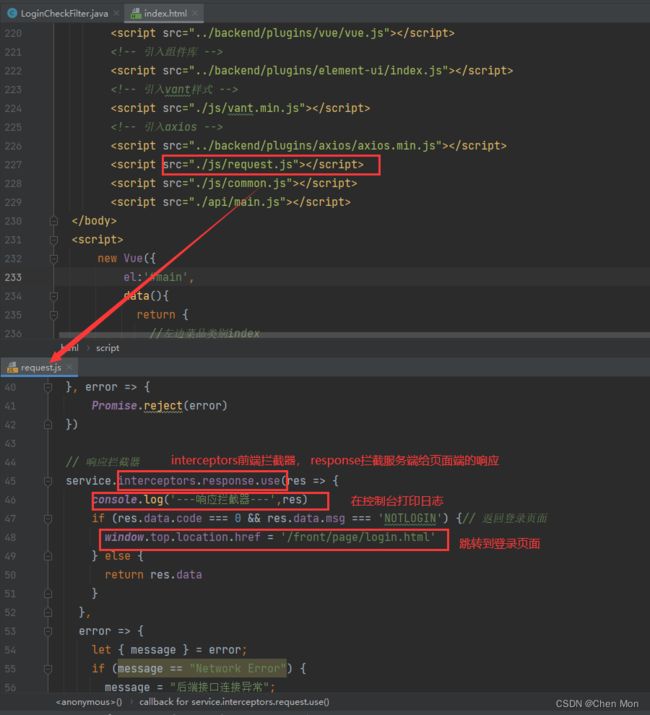
- 如果未登录则返回未登录的结果,需要结合页面上的js代码来看
package net.cch.reggie.filter;
import com.alibaba.fastjson2.JSON;
import lombok.extern.slf4j.Slf4j;
import net.cch.reggie.common.R;
import org.springframework.util.AntPathMatcher;
import javax.servlet.*;
import javax.servlet.annotation.WebFilter;
import javax.servlet.http.HttpServletRequest;
import javax.servlet.http.HttpServletResponse;
import java.io.IOException;
@WebFilter(filterName = "loginCheckFilter", urlPatterns = "/*")
@Slf4j
public class LoginCheckFilter implements Filter {
public static final AntPathMatcher PATH_MATCHER = new AntPathMatcher();
@Override
public void doFilter(ServletRequest servletRequest, ServletResponse servletResponse, FilterChain filterChain) throws IOException, ServletException {
HttpServletResponse response = (HttpServletResponse) servletResponse;
HttpServletRequest request = (HttpServletRequest) servletRequest;
String requestURI = request.getRequestURI();
String[] urls = new String[]{
"/employee/login",
"/employee/logout",
"/backend/**",
"/front/**"
};
boolean check = check(urls, requestURI);
if (check) {
filterChain.doFilter(request, response);
return;
}
if(request.getSession().getAttribute("employee") != null){
filterChain.doFilter(request,response);
return;
}
response.getWriter().write(JSON.toJSONString(R.error("NOTLOGIN")));
return;
}
public boolean check(String[] urls, String requestURI) {
for (String url : urls) {
boolean match = PATH_MATCHER.match(url, requestURI);
if (match) {
return true;
}
}
return false;
}
}
3、功能测试
- 在测试之前在代码里加入一些日志方便我们调试代码,因为加了
@Slf4j
注解,可以通过log来记录日志
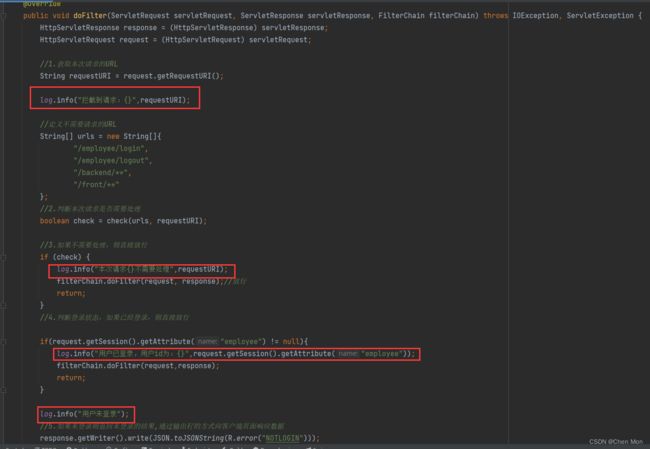
package net.cch.reggie.filter;
import com.alibaba.fastjson2.JSON;
import lombok.extern.slf4j.Slf4j;
import net.cch.reggie.common.R;
import org.springframework.util.AntPathMatcher;
import javax.servlet.*;
import javax.servlet.annotation.WebFilter;
import javax.servlet.http.HttpServletRequest;
import javax.servlet.http.HttpServletResponse;
import java.io.IOException;
@WebFilter(filterName = "loginCheckFilter", urlPatterns = "/*")
@Slf4j
public class LoginCheckFilter implements Filter {
public static final AntPathMatcher PATH_MATCHER = new AntPathMatcher();
@Override
public void doFilter(ServletRequest servletRequest, ServletResponse servletResponse, FilterChain filterChain) throws IOException, ServletException {
HttpServletResponse response = (HttpServletResponse) servletResponse;
HttpServletRequest request = (HttpServletRequest) servletRequest;
String requestURI = request.getRequestURI();
log.info("拦截到请求:{}",requestURI);
String[] urls = new String[]{
"/employee/login",
"/employee/logout",
"/backend/**",
"/front/**"
};
boolean check = check(urls, requestURI);
if (check) {
log.info("本次请求{}不需要处理",requestURI);
filterChain.doFilter(request, response);
return;
}
if(request.getSession().getAttribute("employee") != null){
log.info("用户已登录,用户id为:{}",request.getSession().getAttribute("employee"));
filterChain.doFilter(request,response);
return;
}
log.info("用户未登录");
response.getWriter().write(JSON.toJSONString(R.error("NOTLOGIN")));
return;
}
public boolean check(String[] urls, String requestURI) {
for (String url : urls) {
boolean match = PATH_MATCHER.match(url, requestURI);
if (match) {
return true;
}
}
return false;
}
}
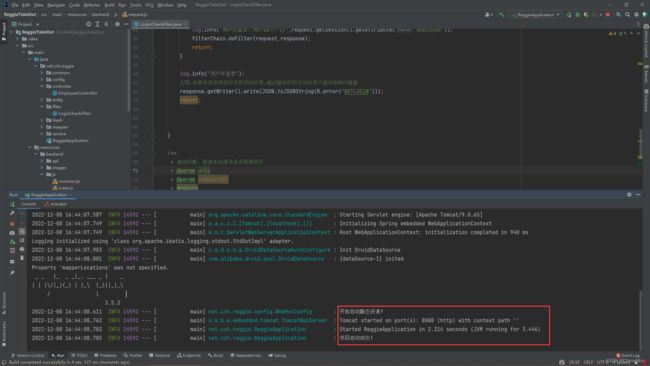
- 启动服务
- 直接进入首页会自动跳转到登录页面

- 单击登录


 -
-


