Pytorch在MINIST数据集上编写DCGAN,包含训练GAN的一些建议。
作者记录方便查询
不完全是DCGAN原版,受限于硬件设备,希望参数少一些,训练时间短一些,所以会有一些更改,并且生成的图像也不完美。
几点建议(不完全对):
1.生成器的复杂度要大于判别器,并且判别器的复杂度不宜过低,否则无法指导生成器优化,出现两个模型参数无法收敛的情况。
2.生成器的学习率建议略大于判别器,防止判别器损失值下降过快,这样会导致判别器的梯度很低。
3.生成数据使用的随机数,使用标准正态分布生成的随机数,而不是使用均匀分布。
4.模型使用的DCGAN主体结构来源于DCGAN
训练结果
训练100轮后,给予生成器随机变量,生成10*10个图像情况。

训练过程
数据方面
train_set = dsets.MNIST(root = './data/MNIST', train = True, download = True, transform = trans.ToTensor())
dataloader = torch.utils.data.DataLoader(train_set, batch_size = BATCH_SIZE,shuffle = True,drop_last = True,num_workers = 0)
直接使用Pytorch中的MNIST数据集。
模型结构
class Generator(torch.nn.Module):
    def __init__(self, channels):
        super().__init__()
        # Input_dim = 100
        # Output_dim = C (number of channels)
        self.conv1 = nn.Sequential(
            # Z latent vector 100
            nn.ConvTranspose2d(in_channels= , out_channels= , kernel_size= , stride= , padding= ),
            nn.BatchNorm2d(num_features= ),
            nn.ReLU(True),

            )
        self.conv2 = nn.Sequential(
            nn.ConvTranspose2d(in_channels= , out_channels= , kernel_size= , stride= , padding= ),
            nn.BatchNorm2d(num_features= ),
            nn.ReLU(True),

            )
        self.conv3 = nn.Sequential(
            nn.ConvTranspose2d(in_channels= , out_channels= , kernel_size= , stride= , padding= ),
            nn.BatchNorm2d(num_features= ),
            nn.ReLU(True),

            )
        self.conv4 = nn.Sequential(
            nn.ConvTranspose2d(in_channels= , out_channels=channels, kernel_size= , stride= , padding= ))
            # output of main module --> Image (Cx28x28)

        self.output = nn.Tanh()

    def forward(self, x):
        q = self.conv1(x)
        w = self.conv2(q)
        e = self.conv3(w)
        r = self.conv4(e)
        return self.output(r)


class Discriminator(torch.nn.Module):
    def __init__(self, channels):
        super().__init__()
        # Input_dim = channels (Cx64x64)
        # Output_dim = 1
        self.main_module = nn.Sequential(
            # Image (Cx28x28)
            nn.Conv2d(in_channels=channels, out_channels= , kernel_size= , stride= , padding= ),
            nn.LeakyReLU(0.2, inplace=True),

            # State (32x16x16)
            nn.Conv2d(in_channels= , out_channels=64, kernel_size=  , stride= , padding= ),
            nn.BatchNorm2d( ),
            nn.LeakyReLU(0.2, inplace=True),

            # State (64x8x8)
            nn.Conv2d(in_channels= , out_channels= , kernel_size= , stride= , padding= ),
            nn.BatchNorm2d( ),
            nn.LeakyReLU(0.2, inplace=True))


        self.output = nn.Sequential(
            nn.Conv2d(in_channels= , out_channels= , kernel_size= , stride= , padding= ),
            # Output 1
            nn.Sigmoid())

    def forward(self, x):
        x = self.main_module(x)
        x = self.output(x).view( ,1)
        return x
参数方面(未展出),需要生成器的复杂度大于判别器,不然容易出现判别器的损失值很低,向零靠近;并且判别器结构不能过于简单,否则会无法指导生成器生成图像,出现两个模型无法收敛的情况。
除此以外,由于MNIST数据集图像较为简单,所以这个网络的复杂度不需要很大。
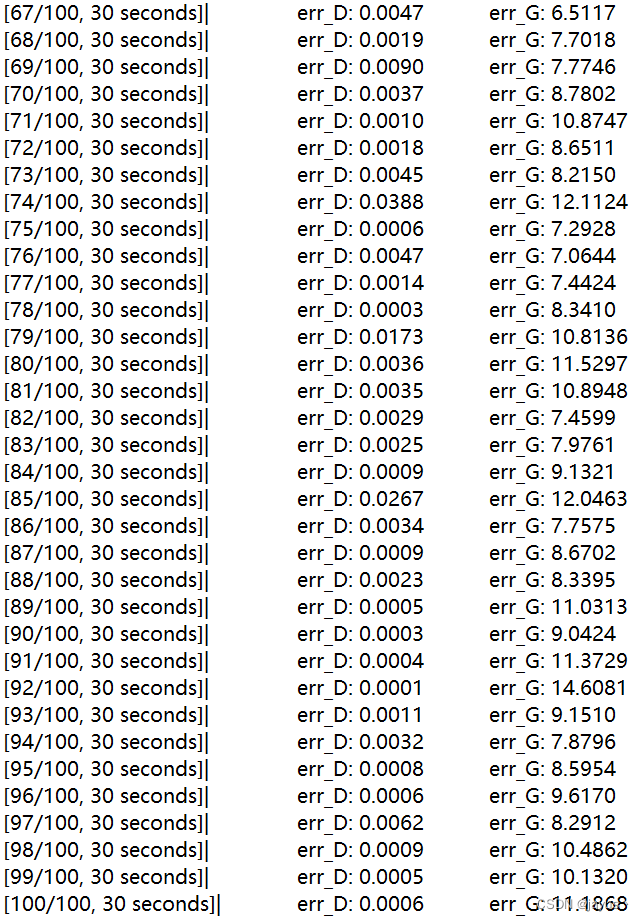
尽管多次调参,可惜经过多次训练之后,判别器的损失值还是一股脑地降到了零附近:(

实在是有点难以找到合适的参数。
损失函数与优化器
criterion = torch.nn.BCELoss()
optimizerD = torch.optim.Adam(netD.parameters(), lr=lr_D)
optimizerG = torch.optim.Adam(netG.parameters(), lr=lr_G)
之前看到资料说不能使用基于动量的优化器,经过尝试其实还可以。损失函数就使用正常的BCEloss。
推荐判别器的学习率小于生成器的优化器,避免判别器的损失值下降太快(这个是这次训练中遇到的最大问题)。
迭代过程
之前看文章,建议使用标准正态分布生成随机数,而不是使用均匀分布,之前做CIFAR10的训练时,均匀分布缺失生成图片较差,这次训练结果使用的是正态分布生成的随机数。
for epoch in range(nepochs):
    since = time.time()
    for batch_x in dataloader:

        # 更新判别器
        netD.zero_grad()
        real_x = batch_x[0].to(device)# size(real_x)=(batch_size,1,28,28)
        real_labels = torch.ones(BATCH_SIZE,1).to(device)
        real_y = netD(real_x)
        z = torch.normal(0.0,1.0,(100,Z_DIM,1,1)).to(device)# 在标准正态分布中生成随机数
        fake_labels = torch.zeros(BATCH_SIZE,1).to(device)
        fake_x = netG(z)
        fake_y = netD(fake_x)
        errD = criterion(real_y, real_labels)+ criterion(fake_y, fake_labels)
        errD.backward()
        optimizerD.step()
        accR_L.append(real_y.data.mean())
        accF_L.append(fake_y.data.mean())

        # 更新生成器
        netG.zero_grad()
        z = torch.normal(0.0,1.0,(100,Z_DIM,1,1)).to(device)
        fake_x = netG(z)
        fake_y = netD(fake_x)
        errG = criterion(fake_y, real_labels)
        errG.backward()
        optimizerG.step()

    now = time.time()
    print('[%d/%d, %.0f seconds]|\t err_D: %.4f \t err_G: %.4f'%(
         epoch+1,nepochs, now-since, errD, errG))
结果展示部份
在展示训练中的生成图片以及训练结束后的生成图片时,使用的是torchvision.utils内部函数。
训练过程中:
import torchvision.utils as vutils
vutils.save_image(fake_x.data.cpu().view(-1,1,28,28),'./gan_save/fake%d.png' %(epoch+1),normalize=True, nrow =10)
训练结束后:
torch.save(netG,'./gan_save/netG.pkl')
NETG = torch.load('./gan_save/netG.pkl')
noise = torch.normal(0.0,1.0,(100,Z_DIM,1,1))
fake_x = NETG(noise.to(device)).data.cpu().view(-1,1,28,28)
img = vutils.make_grid(fake_x, nrow = 10, normalize = True)  #将若干幅图像整合成一幅图像
img = img.numpy().transpose([1,2,0])  #图片数据格式转换
plt.imshow(img)
pylab.show()