基于pytorch的YOLOv5训练
基于pytorch的YOLOv5训练
- 一、数据集制作
-
- 方法一(推荐)
- 方法二
- 二、修改配置文件
-
- 方法一(推荐)
- 方法二
- 三、修改模型文件
- 四、修改训练参数
- 五、命令参数介绍
- 六、tensorboard可视化
- 七、测试
- 八、推理
一、数据集制作
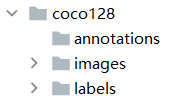
在data文件夹放入数据集
方法一(推荐)
- images文件夹存放训练图片:xxx.jpg
labels文件夹存放标注文件:xxx.txt - 生成train.txt,test.txt,val.txt
文件中内容为图片的路径,训练代码通过读取三个txt中的图片路径索引对应的文件图片。例如:xxx/xxx/xxx.jpg。 - labels文件夹中存放同名的txt标注文件
在yolo中文件的标注信息包括:【cls、 x_center、 y_center、 width、 height】
方法二
二、修改配置文件
下载yolov5-5.0代码。
修改data/xxx.yaml作为数据集的配置文件,为模型训练提供数据接口。
方法一(推荐)
# train and val datasets (image directory or *.txt file with image paths)
train: xx/xx/train2017.txt  # 上面我们生成的train,根据自己的路径进行更改
val: xx/xx/val2017.txt  # 上面我们生成的test
#test: ../coco/test-dev2017.txt  # 20k images for submission to https://competitions.codalab.org/competitions/20794

# number of classes
nc: 2   #训练的类别

# class names
names: ['apple','orange']
方法二
# train and val data as 1) directory: path/images/, 2) file: path/images.txt, or 3) list: [path1/images/, path2/images/]
train: data/coco128/images/train2017/  # 128 images
val: data/coco128/images/train2017/  # 128 images

# number of classes
nc: 2

# class names
names: ['apple','orange']
三、修改模型文件
修改models/xxx.yaml作为模型文件,搭建网络结构;
需要修改类别数nc为数据集包括的类别数。
# parameters
nc: 2  # number of classes
depth_multiple: 0.33  # model depth multiple
width_multiple: 0.50  # layer channel multiple

# anchors
anchors:
  - [10,13, 16,30, 33,23]  # P3/8
  - [30,61, 62,45, 59,119]  # P4/16
  - [116,90, 156,198, 373,326]  # P5/32

# YOLOv5 backbone
backbone:
  # [from, number, module, args]
  [[-1, 1, Focus, [64, 3]],  # 0-P1/2
   [-1, 1, Conv, [128, 3, 2]],  # 1-P2/4
   [-1, 3, BottleneckCSP, [128]],
   [-1, 1, Conv, [256, 3, 2]],  # 3-P3/8
   [-1, 9, BottleneckCSP, [256]],
   [-1, 1, Conv, [512, 3, 2]],  # 5-P4/16
   [-1, 9, BottleneckCSP, [512]],
   [-1, 1, Conv, [1024, 3, 2]],  # 7-P5/32
   [-1, 1, SPP, [1024, [5, 9, 13]]],
   [-1, 3, BottleneckCSP, [1024, False]],  # 9
  ]

# YOLOv5 head
head:
  [[-1, 1, Conv, [512, 1, 1]],
   [-1, 1, nn.Upsample, [None, 2, 'nearest']],
   [[-1, 6], 1, Concat, [1]],  # cat backbone P4
   [-1, 3, BottleneckCSP, [512, False]],  # 13

   [-1, 1, Conv, [256, 1, 1]],
   [-1, 1, nn.Upsample, [None, 2, 'nearest']],
   [[-1, 4], 1, Concat, [1]],  # cat backbone P3
   [-1, 3, BottleneckCSP, [256, False]],  # 17 (P3/8-small)

   [-1, 1, Conv, [256, 3, 2]],
   [[-1, 14], 1, Concat, [1]],  # cat head P4
   [-1, 3, BottleneckCSP, [512, False]],  # 20 (P4/16-medium)

   [-1, 1, Conv, [512, 3, 2]],
   [[-1, 10], 1, Concat, [1]],  # cat head P5
   [-1, 3, BottleneckCSP, [1024, False]],  # 23 (P5/32-large)

   [[17, 20, 23], 1, Detect, [nc, anchors]],  # Detect(P3, P4, P5)
  ]
四、修改训练参数
- 训练模型
终端中输入训练参数,进行训练;或直接运行train.py
python train.py --data coco.yaml --cfg yolov5s.yaml --weights '' --batch-size 64
                                         yolov5m                              48
                                         yolov5l                              32
                                         yolov5x                              16
- 可视化训练
tensorboard --logdir=runs
训练参数可以通过train.py文件修改
如cfg、data、weights、device、img-size(训练和测试图片的大小)等
五、命令参数介绍
 python detect.py --source file.jpg  # image
                            file.mp4  # video
                            ./dir  # directory
                            0  # webcam
                            rtsp://170.93.143.139/rtplive/470011e600ef003a004ee33696235daa  # rtsp stream
                            http://112.50.243.8/PLTV/88888888/224/3221225900/1.m3u8  # http stream
--cfg yolov5s.yaml --weights '':从头开始训练
--cfg yolov5s.yaml --weights yolov5s.pt:从预训练的模型加载开始训练
命令的中参数也可以通过train.py文件修改
python train.py --img 640 --batch 16 --epochs 5 --data ./data/coco128.yaml --cfg ./models/yolov5s.yaml --weights ''
训练的更多可选参数:
--epochs:训练的epoch,默认值300
--batch-size:默认值16
--cfg:模型的配置文件,默认为yolov5s.yaml
--data:数据集的配置文件,默认为data/coco128.yaml
--img-size:训练和测试输入大小,默认为[640, 640]
--rect:rectangular training,布尔值
--resume:是否从最新的last.pt中恢复训练,布尔值
--nosave:仅仅保存最后的checkpoint,布尔值
--notest:仅仅在最后的epoch上测试,布尔值
--evolve:进化超参数(evolve hyperparameters),布尔值
--bucket:gsutil bucket,默认值''
--cache-images:缓存图片可以更快的开始训练,布尔值
--weights:初始化参数路径,默认值''
--name:如果提供,将results.txt重命名为results_name.txt
--device:cuda设备,例如:0或0,1,2,3或cpu,默认''
--adam:使用adam优化器,布尔值
--multi-scale:改变图片尺寸img-size +/0- 50%,布尔值
--single-cls:训练单个类别的数据集,布尔值
六、tensorboard可视化
在命令行窗口输入
tensorboard --logdir=runs
然后把返回的url地址粘贴到浏览器中即可
注意:
如果返回拒绝了我们的请求,可以在tensorboard的后面加上参数–port ip:
tensorboard --logdir=runs --host=192.168.0.134
七、测试
测试命令
python test.py --weights yolov5s.pt --data ./data/coco.yaml --img 640
--weights :预训练模型路径,默认值weights/yolov5s.pt
--data:数据集的配置文件,默认为data/coco.yaml
--batch-size:默认值32
--img-size:推理大小(pixels),默认640
--conf-thres:目标置信度阈值,默认0.001
--iou-thres:NMS的IOU阈值,默认0.65
--save-json:把结果保存为cocoapi-compatible的json文件
--task:默认val,可选其他值:val, test, study
--device:cuda设备,例如:0或0,1,2,3或cpu,默认''
--half:半精度的FP16推理
--single-cls:将其视为单类别,布尔值
--augment:增强推理,布尔值
--verbose:显示类别的mAP,布尔值
训练结束后,会生成两个预训练的模型:
1.best.pt:保存的是中间一共比较好模型
2.last.pt:训练结束后保存的最后模型
八、推理
使用预训练的模型进行推理测试,YOLOv5支持多种数据源推理测试,如下:
- 图像
- 目录
- 视频
- 网络摄像头
- http流
- rtsp流
关于推理的更多参数使用如下命令查看:
python detect.py -h
--weights :预训练模型.pt的路径,默认值为:weights/yolov5s.pt
--source:输入的数据源,可以是:图片、目录、视频、网络摄像头、http和rtsp流,默认值为:interence/images
--output: 输出检测结果的路径,默认值为:inference/output
--img-size :用于推理图片的大小(pixels),默认值为:640
--conf-thres:对象的置信度阈值(object confidence threshold),默认值为:0.4
--iou-thres :NMS的IOU阈值( IOU threshold for NMS),默认值为:0.5
--fourcc:输出视频的编码格式(必须是ffmepeg支持的),例如:H264格式,默认格式为:mp4v
--half: 使用版精度F16推理(half precision FP16 inference),布尔值,默认为true
--device:cuda设备,例如:0或0,1,2,3或cpu,默认''
--view-img :显示结果,‘布尔值,默认为true’
--save-txt :把结果保存到*.txt文件中
--classes:过滤类别 CLASSES [CLASSES …],filter by class
--agnostic-nms:类不可知 NMS
--augment:增强推理(augmented inference)
推理图像
python detect.py --source inference/1_input/1_img/bus.jpg --weights ./weights/yolov5s.pt --output inference/2_output/1_img/
推理目录
python detect.py --source inference/1_input/2_imgs --weights ./weights/yolov5s.pt --output inference/2_output/2_imgs
检测中有些图片置信度比较低的可以通过--conf-thres参数过滤掉
python detect.py --source inference/1_input/2_imgs --weights ./weights/yolov5s.pt --output inference/2_output/2_imgs --conf-thres 0.8
推理视频
python detect.py --source test.mp4 --weights ./weights/yolov5s.pt --output test_result/3_video
# 示例语法
python detect.py --source ./file.jpg  # 图片
                          ./file.mp4  # 视频
                          ./dir  # 目录
                          0  # 网络摄像头
      'rtsp://170.93.143.139/rtplive/470011e600ef003a004ee33696235daa' # rtsp流
      'http://112.50.243.8/PLTV/88888888/224/3221225900/1.m3u8'  # http流
