Spring Security 总结
title: Spring Security 总结
date: 2022-03-15 17:18:25
tags:
- Spring
categories: - Spring
cover: https://cover.png
feature: true
文章目录
- 1. 概要
-
- 1.1 名词概念
-
- 1.1.1 主体(principal)
- 1.1.2 认证(authentication)
- 1.1.3 授权(authorization)
- 1.2 简介
-
- 1.2.1 SpringSecurity 特点
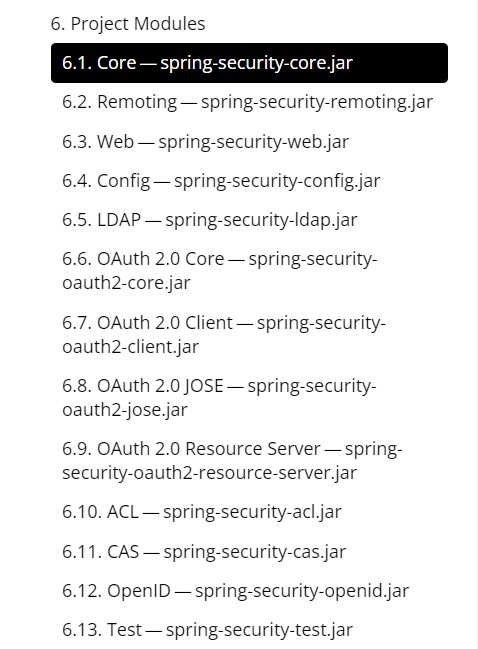
- 1.2.2 模块划分
- 2. 过滤器
-
- OncePerRequestFilter
- 2.1 WebAsyncManagerIntegrationFilter
- 2.2 SecurityContextPersistenceFilter
-
- 2.2.1 SecurityContextRepository
- 2.2.2 概念
- 2.3 HeaderWriterFilter
- 2.4 CsrfFilter
- 2.5 LogoutFilter
- 2.6 UsernamePasswordAuthenticationFilter(重要)
- 2.7 DefaultLoginPageGeneratingFilter
- 2.8 DefaultLogoutPageGeneratingFilter
- 2.9 BasicAuthenticationFilter
- 2.10 RequestCacheAwareFilter
- 2.11 SecurityContextHolderAwareRequestFilter
- 2.12 AnonymousAuthenticationFilter
- 2.13 SessionManagementFilter
- 2.14 ExceptionTranslationFilter(重要)
- 2.15 FilterSecurityInterceptor(重要)
- RememberMeAuthenticationFilter
- 执行流程图
- 3. 工作流程
-
- 3.1 认证流程
-
- 3.1.1 AbstractAuthenticationProcessingFilter
- 3.1.2 UsernamePasswordAuthenticationFilter
- 3.1.3 Authentication
- 3.1.4 UsernamePasswordAuthenticationToken
- 3.1.5 AuthenticationManager
- 3.1.6 ProviderManager
- 3.1.7 CredentialsContainer
- 3.1.8 AbstractAuthenticationToken
- 3.1.9 UserDetailsService
-
- 3.1.9.1 UserDetails
- 3.1.9.2 User
- 3.1.10 PasswordEncoder 接口
- 3.1.11 AbstractUserDetailsAuthenticationProvider
- 3.1.12 DaoAuthenticationProvider
- 3.1.13 AuthenticationEntryPoint 和 AccessDeniedHandler
- 3.1.14 LoginUrlAuthenticationEntryPoint
- 3.2 授权流程
-
- 3.2.1 FilterSecurityInterceptor
- 3.2.2 FilterInvocation
- 3.2.3 AbstractSecurityInterceptor
- 3.2.4 SecurityMetadataSource
- 3.2.5 FilterInvocationSecurityMetadataSource
- 3.2.6 ConfigAttribute
- 3.2.7 SecurityConfig
- 3.2.8 AccessDecisionManager
- 3.3 整体流程
-
- 3.3.1 SecurityContext
- 3.3.2 SecurityContextHolder
- 4. SpringSecurity Web 权限
-
- 4.1 设置登录系统的账号、密码
-
- 4.1.1 YML
- 4.1.2 配置基于内存的角色授权和认证信息
- 4.1.3 配置基于数据库的认证信息和角色授权
- 4.2 自定义表单认证登录(重要)
-
- 4.2.1 配置类
- 4.2.2 配置静态资源
- 4.2.3 配置错误页面(非必要)
- 4.2.4 Controller
- 4.2.5 自定义权限决策管理器
- 4.2.6 登录认证成功处理器
- 4.2.7 登录认证失败处理器
- 4.2.8 注销成功处理器
- 4.2.9 登录页面的 Form 表单
- 4.3 基于角色或权限进行访问控制
-
- 4.3.1 hasAuthority() 方法
- 4.3.2 hasAnyAuthority() 方法
- 4.3.3 hasRole() 方法
- 4.3.4 hasAnyRole() 方法
- 3.3.5 自定义没有权限访问页面(非必要)
- 4.4 注解使用
-
- 4.4.1 @Secured
- 4.4.2 @PreAuthorize
- 4.4.3 @PostAuthorize
- 4.4.4 @PreFilter
- 4.4.5 @PostFilter
- 4.5 基于数据库的记住我
-
- 4.5.1 SQL
- 4.5.2 添加记住我功能
- 4.5.3 登录页面
- 4.5.4 设置有效期
- 4.6 用户注销
-
- 4.6.1 退出链接
- 4.6.2 配置类
- 4.7 CSRF
-
- 4.7.1 概念
- 4.7.2 Spring Security 防御机制
-
- 4.7.2.1 Csrf Token
- 4.7.2.2 SpringSecurity 中使用 Csrf Token
- 4.7.2.3 HttpSessionCsrfTokenRepository
- 4.7.2.4 CookieCsrfTokenRepository
- 4.7.2.5 LazyCsrfTokenRepository
- 4.7.3 参数校验
- 4.7.4 CSRF 注销
- 4.8 新版本 WebSecurityConfigurerAdapter 被弃用
- 5. Spring Security 微服务权限方案
-
- 5.1 概念
- 5.2 微服务认证与授权实现
-
- 5.2.1 认证授权过程分析
- 5.2.2 具体实现
- 5.2.3 自定义 UsernamePasswordAuthenticationFilter
1. 概要
1.1 名词概念
1.1.1 主体(principal)
使用系统的用户或设备或从其他系统远程登录的用户等等。简单说就是谁使用系统谁就是主体
1.1.2 认证(authentication)
权限管理系统确认一个主体的身份,允许主体进入系统。简单说就是“主体”证明自己是谁。笼统的认为就是以前所做的登录操作
1.1.3 授权(authorization)
将操作系统的“权力”“授予”“主体”,这样主体就具备了操作系统中特定功能的能力。所以简单来说,授权就是给用户分配权限
1.2 简介
关于安全方面的两个主要区域是“认证”和“授权”(或者访问控制),一般来说,Web 应用的安全性包括用户认证(Authentication)和用户授权(Authorization) 两个部分,这两点也是 Spring Security 重要核心功能
- 用户认证: 验证某个用户是否为系统中的合法主体,也就是说用户能否访问该系统。用户认证一般要求用户提供用户名和密码。系统通过校验用户名和密码来完成认证过程。通俗点说就是系统认为用户是否能登录
- 用户授权: 验证某个用户是否有权限执行某个操作。在一个系统中,不同用户所具有的权限是不同的。比如对一个文件来说,有的用户只能进行读取,而有的用户可以进行修改。一般来说,系统会为不同的用户分配不同的角色,而每个角色则对应一系列的权限。通俗点讲就是系统判断用户是否有权限去做某些事情
1.2.1 SpringSecurity 特点
- 和 Spring 无缝整合
- 全面的权限控制
- 专门为 Web 开发而设计
- 旧版本不能脱离 Web 环境使用
- 新版本对整个框架进行了分层抽取,分成了核心模块和 Web 模块。单独引入核心模块就可以脱离 Web 环境
- 重量级,shiro 是轻量级的
1.2.2 模块划分
2. 过滤器
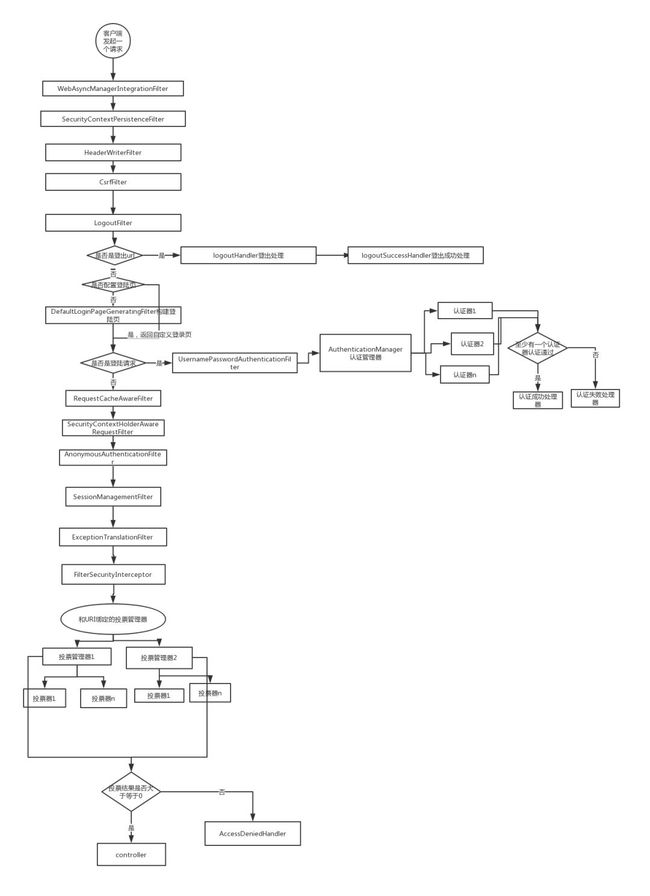
Spring Security 采用的是责任链的设计模式,它有一条很长的过滤器链(15个),只有当前过滤器通过,才能进入下一个过滤器
Spring Security 的过滤器链是配置在 SpringMVC 的核心组件 DispatcherServlet 运行之前。也就是说,请求通过 Spring Security 的所有过滤器,不意味着能够正常访问资源,该请求还需要通过 SpringMVC 的拦截器链
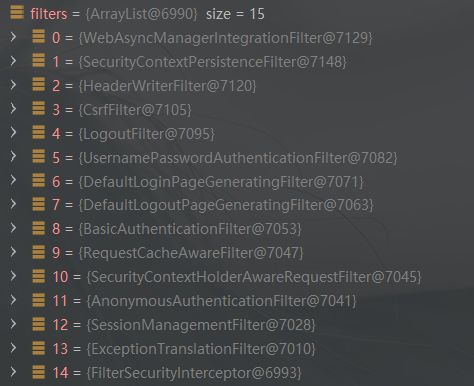
org.springframework.security.web.context.request.async.WebAsyncManagerIntegrationFilter
org.springframework.security.web.context.SecurityContextPersistenceFilter
org.springframework.security.web.header.HeaderWriterFilter
org.springframework.security.web.csrf.CsrfFilter
org.springframework.security.web.authentication.logout.LogoutFilter
org.springframework.security.web.authentication.UsernamePasswordAuthenticationFilter
org.springframework.security.web.authentication.ui.DefaultLoginPageGeneratingFilter
org.springframework.security.web.authentication.ui.DefaultLogoutPageGeneratingFilter
org.springframework.security.web.authentication.www.BasicAuthenticationFilter
org.springframework.security.web.savedrequest.RequestCacheAwareFilter
org.springframework.security.web.servletapi.SecurityContextHolderAwareRequestFilter
org.springframework.security.web.authentication.AnonymousAuthenticationFilter
org.springframework.security.web.session.SessionManagementFilter
org.springframework.security.web.access.ExceptionTranslationFilter
org.springframework.security.web.access.intercept.FilterSecurityInterceptor
OncePerRequestFilter
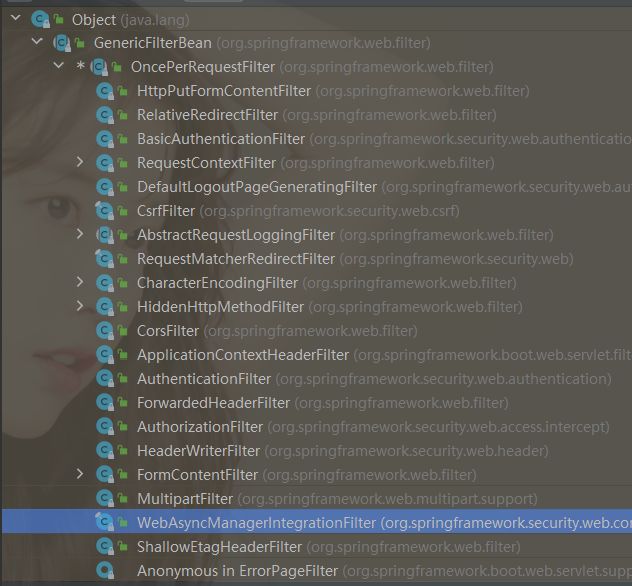
在 Spring中,Filter 默认继承OncePerRequestFilter,作用是兼容各种请求,保证每次执行一个Filter
2.1 WebAsyncManagerIntegrationFilter
将 Security 上下文与 Spring Web 中用于处理异步请求映射的 WebAsyncManager 进行集成
2.2 SecurityContextPersistenceFilter
2.2.1 SecurityContextRepository
用于在请求之间保持 SecurityContext 的策略。 SecurityContextPersistenceFilter 使用它来获取应该用于当前执行线程的上下文,并在上下文从线程本地存储中删除并且请求完成后存储该上下文。使用的持久性机制将取决于实现,但最常见的是 HttpSession 将用于存储上下文
2.2.2 概念
在请求开始时从配置好的 SecurityContextRepository 中获取该请求相关的安全上下文信息 SecurityContext,然后加载到 SecurityContextHolder 中。然后在该次请求处理完成之后将 SecurityContextHolder 持有的 SecurityContext 再保存到配置好的 SecurityContextRepository,同时清除 SecurityContextHolder 所持有的 SecurityContext
2.3 HeaderWriterFilter
向请求的 Header 中添加相应的信息,将头信息加入响应中,可在 http 标签内部使用 security:headers 来控制
2.4 CsrfFilter
用于处理跨站请求伪造,Spring Security会对 PATCH,POST,PUT 和 DELETE 方法进行防护,验证请求是否包含系统生成的 csrf 的 Token 信息,如果不包含,则报错
2.5 LogoutFilter
默认匹配 URL 为 /logout 的请求,实现用户注销,清除认证信息
2.6 UsernamePasswordAuthenticationFilter(重要)
进行认证操作。用于处理基于表单的登录请求,默认会拦截前端提交的 URL 为 /login 且必须为 POST 方式的登录表单请求,并进行身份认证,校验表单中用户名,密码。从表单中获取用户名和密码时,默认使用的表单 name 值为 username 和 password,这两个值可以通过设置这个过滤器的 usernameParameter 和 passwordParameter 两个参数的值进行修改。该过滤器的 doFilter() 方法实现在其抽象父类 AbstractAuthenticationProcessingFilter 中
2.7 DefaultLoginPageGeneratingFilter
如果没有配置登录页面,那系统初始化时就会配置这个过滤器,并且用于在需要进行登录认证时生成一个登录表单页面
2.8 DefaultLogoutPageGeneratingFilter
生成默认的注销页面
2.9 BasicAuthenticationFilter
此过滤器会自动解析 HTTP 请求中头部名字为 Authentication,且以 Basic 开头的头信息,检测和处理 HTTP Basic 认证
2.10 RequestCacheAwareFilter
通过 HttpSessionRequestCache 内部维护了一个 RequestCache,用于缓存 HttpServletRequest,处理请求的缓存
2.11 SecurityContextHolderAwareRequestFilter
针对 ServletRequest 进行了—次包装,使得 request 具有更加丰富的API
2.12 AnonymousAuthenticationFilter
当 SecurityContextHolder 中 Authentication 对象(认证信息)为空,则会创建一个匿名用户存入到 SecurityContextHolder 中。Spring Security 为了兼容未登录的访问,也走了一套认证流程,只不过是一个匿名的身份
2.13 SessionManagementFilter
管理 Session 的过滤器,SecurityContextRepository 限制同一用户开启多个会话的数量
2.14 ExceptionTranslationFilter(重要)
异常过滤器,处理 AccessDeniedException 和 AuthenticationException 异常,该过滤器不需要配置,对于前端提交的请求会直接放行,捕获后续抛出的异常并进行处理(如:权限访问限制)
public class ExceptionTranslationFilter extends GenericFilterBean {

	// ~ Instance fields
	// ~ Methods

	public void doFilter(ServletRequest req, ServletResponse res, FilterChain chain) throws IOException, ServletException {
		HttpServletRequest request = (HttpServletRequest) req;
		HttpServletResponse response = (HttpServletResponse) res;

		try {
			// 1. 对应前端提交的请求会直接放行,不进行拦截
			chain.doFilter(request, response);

			logger.debug("Chain processed normally");
		}
		catch (IOException ex) {
			throw ex;
		}
		catch (Exception ex) {
			// Try to extract a SpringSecurityException from the stacktrace
			// 2. 捕获后续出现的异常进行处理
			Throwable[] causeChain = throwableAnalyzer.determineCauseChain(ex);
			// 3. 访问需要认证的资源,但当前请求未认证所抛出的异常
			RuntimeException ase = (AuthenticationException) throwableAnalyzer
					.getFirstThrowableOfType(AuthenticationException.class, causeChain);

			if (ase == null) {
				// 访问权限受限的资源所抛出的异常
				ase = (AccessDeniedException) throwableAnalyzer.getFirstThrowableOfType(AccessDeniedException.class, causeChain);
			}

			if (ase != null) {
				if (response.isCommitted()) {
					throw new ServletException("Unable to handle the Spring Security Exception because the response is already committed.", ex);
				}
				handleSpringSecurityException(request, response, chain, ase);
			}
			else {
				// Rethrow ServletExceptions and RuntimeExceptions as-is
				if (ex instanceof ServletException) {
					throw (ServletException) ex;
				}
				else if (ex instanceof RuntimeException) {
					throw (RuntimeException) ex;
				}

				// Wrap other Exceptions. This shouldn't actually happen
				// as we've already covered all the possibilities for doFilter
				throw new RuntimeException(ex);
			}
		}
	}

	// ~ Methods
}
2.15 FilterSecurityInterceptor(重要)
该过滤器是过滤器链的最后一个过滤器,前面解决了认证问题,接下来是是否可访问指定资源的问题,FilterSecurityInterceptor 用了 AccessDecisionManager 来进行鉴权。获取所配置资源访问的授权信息,根据 SecurityContextHolder 中存储的用户信息来判断当前请求是否有权限访问对应的资源。如果访问受限会抛出相关异常,最终所抛出的异常会由前一个过滤器 ExceptionTranslationFilter 过滤器进行捕获和处理
public class FilterSecurityInterceptor extends AbstractSecurityInterceptor implements Filter {
	// ~ Static fields/initializers
	// ~ Instance fields
	// ~ Methods

	// 过滤器的 doFilter() 方法
	public void doFilter(ServletRequest request, ServletResponse response, FilterChain chain) throws IOException, ServletException {
		FilterInvocation fi = new FilterInvocation(request, response, chain);
		// 调用 invoke() 方法
		invoke(fi);
	}

	public void invoke(FilterInvocation fi) throws IOException, ServletException {
		if ((fi.getRequest() != null)
				&& (fi.getRequest().getAttribute(FILTER_APPLIED) != null)
				&& observeOncePerRequest) {
			// filter already applied to this request and user wants us to observe
			// once-per-request handling, so don't re-do security checking
			fi.getChain().doFilter(fi.getRequest(), fi.getResponse());
		}
		else {
			// first time this request being called, so perform security checking
			if (fi.getRequest() != null && observeOncePerRequest) {
				fi.getRequest().setAttribute(FILTER_APPLIED, Boolean.TRUE);
			}

			// 1. 根据资源权限配置来判断当前请求是否有权限访问对应的资源,如果不能访问,则抛出响应的异常
			InterceptorStatusToken token = super.beforeInvocation(fi);

			try {
				// 2. 访问相关资源,通过 SpringMVC 的核心组件 DispatcherServlet 进行访问
				fi.getChain().doFilter(fi.getRequest(), fi.getResponse());
			}
			finally {
				super.finallyInvocation(token);
			}

			super.afterInvocation(token, null);
		}
	}
}
RememberMeAuthenticationFilter
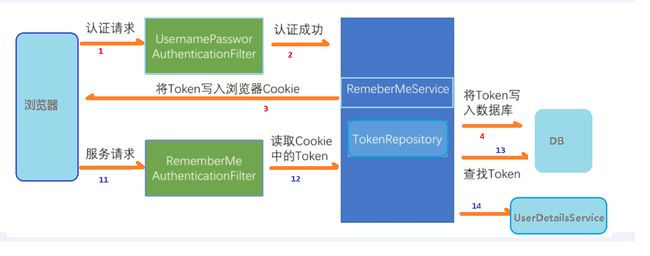
当用户没有登录而直接访问资源时, 从 Cookie 里找出用户的信息, 如果 Spring Security 能够识别出用户提供的 Remember Me Cookie, 用户将不必填写用户名和密码,而是直接登录进入系统,该过滤器默认不开启
执行流程图
3. 工作流程
3.1 认证流程
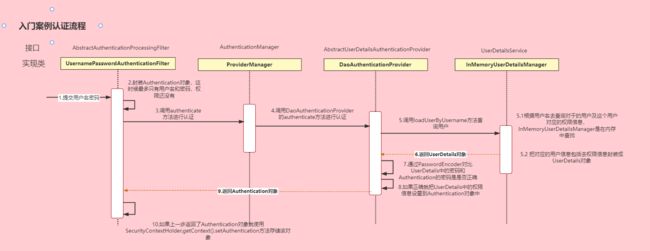
3.1.1 AbstractAuthenticationProcessingFilter
- 基于浏览器的基于 HTTP 的身份验证请求的抽象处理器。需要 AuthenticationManager 来处理由实现类创建的身份验证请求令牌
- 如果身份验证成功,生成的 Authentication 对象将被放入当前线程的 SecurityContext 中。然后将调用配置的 AuthenticationSuccessHandler 以在成功登录后重定向到适当的目的地。默认行为在 SavedRequestAwareAuthenticationSuccessHandler 中实现,它将利用 ExceptionTranslationFilter 设置的任何 DefaultSavedRequest 并将用户重定向到其中包含的 URL

- 如果身份验证失败,它将委托给配置的 AuthenticationFailureHandler 以允许将失败信息传达给客户端。默认实现是 SimpleUrlAuthenticationFailureHandler ,它向客户端发送 401 错误代码。它也可以配置一个失败的 URL 作为替代

- 如果身份验证成功,将通过应用程序上下文发布一个 InteractiveAuthenticationSuccessEvent。如果身份验证不成功,则不会发布任何事件,因为这通常会通过 AuthenticationManager 特定的应用程序事件进行记录
- 该类有一个可选的 SessionAuthenticationStrategy,它将在成功调用 attemptAuthentication() 后立即被调用。可以注入不同的实现来启用会话固定攻击预防或控制主体可能拥有的同时会话的数量
public abstract class AbstractAuthenticationProcessingFilter extends GenericFilterBean implements ApplicationEventPublisherAware, MessageSourceAware {

    // 过滤器 doFilter() 方法
	public void doFilter(ServletRequest req, ServletResponse res, FilterChain chain) throws IOException, ServletException {

		HttpServletRequest request = (HttpServletRequest) req;
		HttpServletResponse response = (HttpServletResponse) res;

		// 1. 判断该请求是否为 POST 方式的登录表单提交请求,如果不是则直接放行,进入下一个过滤器
		if (!requiresAuthentication(request, response)) {
			chain.doFilter(request, response);
			return;
		}

		if (logger.isDebugEnabled()) {
			logger.debug("Request is to process authentication");
		}

		// Authentication 是用来存储用户认证信息的类
		Authentication authResult;

		try {
			// 2. 调用子类 UsernamePasswordAuthenticationFilter 重写的方法进行身份认证
			// 返回的 authResult 对象封装认证后的用户信息
			authResult = attemptAuthentication(request, response);
			if (authResult == null) {
				// return immediately as subclass has indicated that it hasn't completed
				// authentication
				return;
			}
			// 3. Session 策略处理(如果配置了用户 Session 最大并发数,就是在此处进行判断并处理)
			sessionStrategy.onAuthentication(authResult, request, response);
		}
		catch (InternalAuthenticationServiceException failed) {
			logger.error(
					"An internal error occurred while trying to authenticate the user.",
					failed);
			unsuccessfulAuthentication(request, response, failed);

			return;
		}
		catch (AuthenticationException failed) {
			// Authentication failed,4. 认证失败,调用认证失败的处理器
			unsuccessfulAuthentication(request, response, failed);

			return;
		}

		// Authentication success,4. 认证成功的处理
		if (continueChainBeforeSuccessfulAuthentication) {
			// 默认的 continueChainBeforeSuccessfulAuthentication 为 false,所以认证成功后不进入下一个过滤器
			chain.doFilter(request, response);
		}

		// 调用认证成功的处理器
		successfulAuthentication(request, response, chain, authResult);
	}

	// 认证成功后的处理
	protected void successfulAuthentication(HttpServletRequest request, HttpServletResponse response, FilterChain chain, Authentication authResult) throws IOException, ServletException {

		if (logger.isDebugEnabled()) {
			logger.debug("Authentication success. Updating SecurityContextHolder to contain: " + authResult);
		}

		// 1. 将认证成功的用户信息对象 Authentication 封装进 SecurityContext 对象中,并存入 SecurityContextHolder
		// SecurityContextHolder 是对 ThreadLocal 的一个封装
		SecurityContextHolder.getContext().setAuthentication(authResult);

		// 2. rememberMe 的处理
		rememberMeServices.loginSuccess(request, response, authResult);

		// Fire event
		if (this.eventPublisher != null) {
			// 3. 发布认证成功的事件
			eventPublisher.publishEvent(new InteractiveAuthenticationSuccessEvent(authResult, this.getClass()));
		}

		// 4. 调用认证成功处理器
		successHandler.onAuthenticationSuccess(request, response, authResult);
	}
	// 认证失败后的处理
	protected void unsuccessfulAuthentication(HttpServletRequest request, HttpServletResponse response, AuthenticationException failed) throws IOException, ServletException {
		// 1. 清除该线程在 SecurityContextHolder 中对应的 SecurityContext 对象
		SecurityContextHolder.clearContext();

		if (logger.isDebugEnabled()) {
			logger.debug("Authentication request failed: " + failed.toString(), failed);
			logger.debug("Updated SecurityContextHolder to contain null Authentication");
			logger.debug("Delegating to authentication failure handler " + failureHandler);
		}

		// 2. rememberMe 的处理
		rememberMeServices.loginFail(request, response);

		// 3. 调用认证失败处理器
		failureHandler.onAuthenticationFailure(request, response, failed);
	}
}
上面第二步调用了 UsernamePasswordAuthenticationFilter 的 attemptAuthentication() 方法,见 3.1.2
3.1.2 UsernamePasswordAuthenticationFilter
进行认证操作。用于处理身份验证表单提交,默认会拦截前端提交的 URL 为 /login 且必须为 POST 方式的登录表单请求,并进行身份认证,校验表单中用户名和密码。从表单中获取用户名和密码时,登录表单必须向此过滤器提供两个参数:username 和 password。要使用的默认参数名称在静态字段中进行了定义。参数名称也可以通过设置 usernameParameter 和 passwordParameter 属性来更改。。该过滤器的 doFilter() 方法实现在 3.1.1 其抽象父类 AbstractAuthenticationProcessingFilter 中

public class UsernamePasswordAuthenticationFilter extends AbstractAuthenticationProcessingFilter {

	public static final String SPRING_SECURITY_FORM_USERNAME_KEY = "username";
	public static final String SPRING_SECURITY_FORM_PASSWORD_KEY = "password";

	//  默认表单用户名参数为 username
	private String usernameParameter = SPRING_SECURITY_FORM_USERNAME_KEY;
	//  默认表单密码参数为 password
	private String passwordParameter = SPRING_SECURITY_FORM_PASSWORD_KEY;
	// 默认请求方式只能为 POST
	private boolean postOnly = true;

	public UsernamePasswordAuthenticationFilter() {
		// 默认登录表单提交路径为 /login,POST 方式请求
		super(new AntPathRequestMatcher("/login", "POST"));
	}

	// 上面的 doFilter() 方法调用此 attemptAuthentication() 进行身份认证
	public Authentication attemptAuthentication(HttpServletRequest request,
			HttpServletResponse response) throws AuthenticationException {
		if (postOnly && !request.getMethod().equals("POST")) {
			// 1. 默认情况下,如果请求方式不是 POST,会抛出异常
			throw new AuthenticationServiceException(
					"Authentication method not supported: " + request.getMethod());
		}

		// 2. 获取请求携带的 username 和 password
		String username = obtainUsername(request);
		String password = obtainPassword(request);

		if (username == null) {
			username = "";
		}

		if (password == null) {
			password = "";
		}

		username = username.trim();

		// 3. 使用前端传入的 username、password 构造 Authentication 对象,其中 authenticated 属性初始化默认为 false(也就还没通过身份验证)
		UsernamePasswordAuthenticationToken authRequest = new UsernamePasswordAuthenticationToken(username, password);

		// Allow subclasses to set the "details" property
		// 4. 将请求中有关身份验证的其他属性信息设置到 Authentication 对象中,如 IP 地址、证书序列号等
		setDetails(request, authRequest);

		// 5. 调用 AuthenticationManager 的 authenticate() 方法进行身份认证
		return this.getAuthenticationManager().authenticate(authRequest);
	}
}
上面第三步创建的 UsernamePasswordAuthenticationToken 是 Authentication 接口的实现类,见 3.1.4
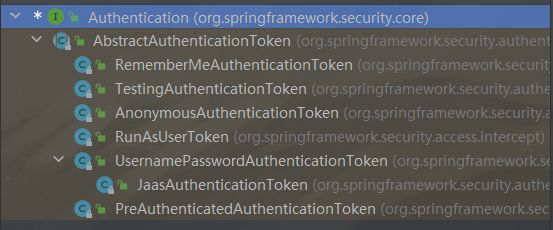
上面第五步将未认证的 Authentication 对象传入 AuthenticationManager 的 authenticate() 方法进行身份认证,见 3.1.5
3.1.3 Authentication
Spring Security 的认证主体,在Spring Security 中 Authentication 用来表示当前用户是谁,可以看作 authentication 就是一组用户名密码信息。接口定义如下:
public interface Authentication extends Principal, Serializable {

	// 获取用户权限集合
	Collection<? extends GrantedAuthority> getAuthorities();

	// 获取用户认证信息,通常是密码等信息
	Object getCredentials();

	// 存储有关身份验证请求的其他详细信息。如 IP 地址、证书序列号等
	Object getDetails();

	// 获取用户的身份信息,未认证时获取到的是前端请求传入的用户名
	// 认证成功后为封装用户信息的 UserDetails 对象
	Object getPrincipal();

	// 获取当前 Authentication 是否已认证
	boolean isAuthenticated();

	// 设置当前 Authentication 是否已认证
	void setAuthenticated(boolean isAuthenticated) throws IllegalArgumentException;
}
获取当前登录用户信息
// 已登录,获取用户信息
Authentication authentication = SecurityContextHolder.getContext().getAuthentication();

String username = authentication.getName(); // 获取登录的用户名
Collection<? extends GrantedAuthority> authorities = authentication.getAuthorities(); // 用户的所有权限
// 获取封装用户信息的 UserDetails 对象
User user = (User) SecurityContextHolder.getContext().getAuthentication().getPrincipal();
3.1.4 UsernamePasswordAuthenticationToken
Authentication 的实现类,旨在简单地显示用户名和密码。principal 和 credentials 应设置为通过其 Object.toString() 方法提供相应属性的对象。最简单的此类对象是字符串
- 该类有两个构造器,一个用于封装前端请求传入的未认证的用户信息,一个用于封装认证成功后的用户信息
- 该类实现的 eraseCredentials() 方法,该方法实现在 3.1.8 其父类 AbstractAuthenticationToken 中
public class UsernamePasswordAuthenticationToken extends AbstractAuthenticationToken {

	private static final long serialVersionUID = SpringSecurityCoreVersion.SERIAL_VERSION_UID;
	private final Object principal;
	private Object credentials;

	// 用于封装前端请求传入的未认证的用户信息,前面的 authRequest 对象就是调用该构造器进行构造的
	public UsernamePasswordAuthenticationToken(Object principal, Object credentials) {
		super(null); // 用户权限为 null
		this.principal = principal; // 前端传入的用户名
		this.credentials = credentials; // 前端传入的密码
		setAuthenticated(false); // 标记未认证
	}

	// 用户封装认证成功后的用户信息
	public UsernamePasswordAuthenticationToken(Object principal, Object credentials,
			Collection<? extends GrantedAuthority> authorities) {
		super(authorities); // 用户权限集合
		this.principal = principal; // 封装认证用户信息的 UserDetails 对象,不再是用户名
		this.credentials = credentials; // 前端传入的密码
		super.setAuthenticated(true); // must use super, as we override,标记认证成功
	}

	// ~ Methods
}
3.1.5 AuthenticationManager
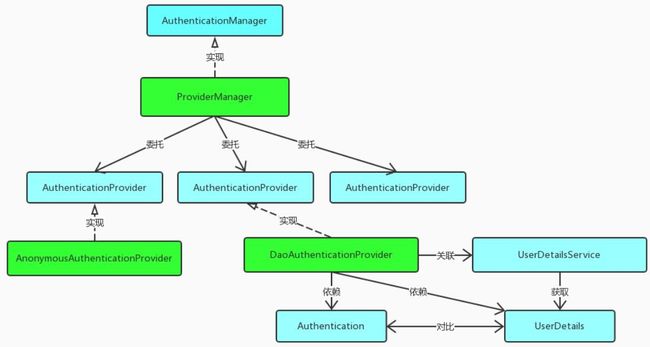
校验 Authentication,该接口是认证相关的核心接口,也是认证的入口。在实际开发中,可能有多种不同的认证方式,例如:用户名+密码、邮箱+密码、手机号+验证码等,而这些认证方式的入口始终只有一个,那就是 AuthenticationManager
如果验证失败会抛出 AuthenticationException 异常。AuthenticationException 是一个抽象类,因此代码逻辑并不能实例化一个 AuthenticationException 异常并抛出,实际上抛出的异常通常是其实现类,如 DisabledException、LockedException、BadCredentialsException 等。接口定义如下,其中可以包含多个 AuthenticationProvider,见 3.1.11 和 3.1.12。通常使用其实现类 ProviderManager
public interface AuthenticationManager {
    Authentication authenticate(Authentication var1) throws AuthenticationException;
}
3.1.6 ProviderManager
ProviderManager 是 AuthenticationManager 接口的实现类

在 AuthenticationManager 接口的常用实现类 ProviderManager 内部会维护一个 List
public class ProviderManager implements AuthenticationManager, MessageSourceAware,
		InitializingBean {
	// ~ Static fields/initializers
	// ~ Instance fields

	// 传入未认证的 Authentication 对象
	public Authentication authenticate(Authentication authentication) throws AuthenticationException {
		// 1. 获取传入的 Authentication 类型,即 UsernamePasswordAuthenticationToken.class
		Class<? extends Authentication> toTest = authentication.getClass();
		AuthenticationException lastException = null;
		AuthenticationException parentException = null;
		Authentication result = null;
		Authentication parentResult = null;
		boolean debug = logger.isDebugEnabled();

		// 2. 循环遍历认证方式列表
		for (AuthenticationProvider provider : getProviders()) {
			// 3. 判断当前 AuthenticationProvider 是否适用 UsernamePasswordAuthenticationToken.class 类型的 Authentication
			if (!provider.supports(toTest)) {
				continue;
			}

			if (debug) {
				logger.debug("Authentication attempt using " + provider.getClass().getName());
			}

			// 成功找到适配当前认证方式的 AuthenticationProvider ,此处为 DaoAuthenticationProvider
			try {
				// 4. 调用 DaoAuthenticationProvider 的 authenticate() 方法进行认证
				// 如果认证成功,会返回一个标记已认证的 Authentication 对象
				result = provider.authenticate(authentication);

				if (result != null) {
					// 5. 认证成功后,将传入的 Authentication 对象中的 details 信息拷贝到已认证的 Authentication 对象中
					copyDetails(authentication, result);
					break;
				}
			}
			catch (AccountStatusException | InternalAuthenticationServiceException e) {
				prepareException(e, authentication);
				// SEC-546: Avoid polling additional providers if auth failure is due to
				// invalid account status
				throw e;
			} catch (AuthenticationException e) {
				lastException = e;
			}
		}

		if (result == null && parent != null) {
			// Allow the parent to try.
			try {
				// 5. 认证失败,使用父类型 AuthenticationManager 进行验证
				result = parentResult = parent.authenticate(authentication);
			}
			catch (ProviderNotFoundException e) {
				// ignore as we will throw below if no other exception occurred prior to
				// calling parent and the parent
				// may throw ProviderNotFound even though a provider in the child already
				// handled the request
			}
			catch (AuthenticationException e) {
				lastException = parentException = e;
			}
		}

		if (result != null) {
			// 6. 认证成功之后,去除 result 中的敏感信息,要求相关类实现 CredentialsContainer 接口
			if (eraseCredentialsAfterAuthentication && (result instanceof CredentialsContainer)) {
				// Authentication is complete. Remove credentials and other secret data
				// from authentication
				// 去除过程就是调用 CredentialsContainer 接口的 eraseCredentials() 方法
				((CredentialsContainer) result).eraseCredentials();
			}

			// If the parent AuthenticationManager was attempted and successful than it will publish an AuthenticationSuccessEvent
			// This check prevents a duplicate AuthenticationSuccessEvent if the parent AuthenticationManager already published it
			// 7. 发布认证成功的事件
			if (parentResult == null) {
				eventPublisher.publishAuthenticationSuccess(result);
			}
			return result;
		}

		// Parent was null, or didn't authenticate (or throw an exception).
		// 8. 认证失败之后,抛出失败的异常信息
		if (lastException == null) {
			lastException = new ProviderNotFoundException(messages.getMessage(
					"ProviderManager.providerNotFound",
					new Object[] { toTest.getName() },
					"No AuthenticationProvider found for {0}"));
		}

		// If the parent AuthenticationManager was attempted and failed than it will publish an AbstractAuthenticationFailureEvent
		// This check prevents a duplicate AbstractAuthenticationFailureEvent if the parent AuthenticationManager already published it
		if (parentException == null) {
			prepareException(lastException, authentication);
		}

		throw lastException;
	}
	// ~ Methods
}
上面认证成功之后的第六步,调用 CredentialsContainer 接口定义的 eraseCredentials() 方法去除敏感信息,见 3.1.7
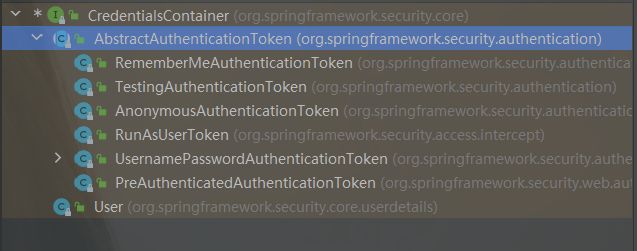
3.1.7 CredentialsContainer
表示实现对象包含敏感数据,可以使用 eraseCredentials 方法擦除这些数据。实现应该调用任何内部对象上的方法,这些对象也可以实现这个接口,仅供内部框架使用。编写自己的 AuthenticationProvider 实现的用户应该在那里创建并返回适当的 Authentication 对象,减去任何敏感数据,而不是使用此接口
public interface CredentialsContainer {
	void eraseCredentials();
}
3.1.8 AbstractAuthenticationToken
身份验证对象的基类。使用此类的实现应该是不可变的
public abstract class AbstractAuthenticationToken implements Authentication, CredentialsContainer {
	// ~ Instance fields
	// ~ Constructors

	public void eraseCredentials() {
		// credentials(前端传入的密码)会置为 null
		eraseSecret(getCredentials());
		// principal 在已认证的 Authentication 中是 UserDetails 的实现类,如果该实现类想要去除敏感信息,需要实现
		// CredentialsContainer 的 eraseCredentials() 方法,由于自定义的 User 类没有实现该接口,所以不进行任何操作
		eraseSecret(getPrincipal());
		eraseSecret(details);
	}

	private void eraseSecret(Object secret) {
		if (secret instanceof CredentialsContainer) {
			((CredentialsContainer) secret).eraseCredentials();
		}
	}

	// ~ Methods
}
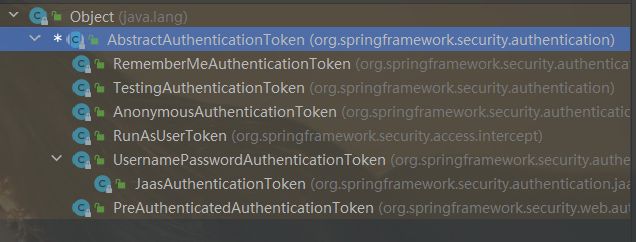
3.1.4 的 UsernamePasswordAuthenticationToken 是 AbstractAuthenticationToken 的子类,其 eraseCredentials 方法继承自 AbstractAuthenticationToken
3.1.9 UserDetailsService
加载用户特定数据的核心接口。它在整个框架中用作用户 DAO,并且是 DaoAuthenticationProvider 使用的策略。该接口只需要一种只读方法,这简化了对新数据访问策略的支持
当什么也没有配置的时候,账号和密码是由 Spring Security 定义生成的。而在实际项目中账号和密码都是从数据库中查询出来的。 所以我们要通过自定义逻辑控制认证逻辑。要自定义逻辑,需要自定义一个实现类实现 UserDetailsService 接口,让 Spring Security 使用我们的 UserDetailsService 。我们自己的 UserDetailsService 可以从数据库中查询用户名和密码
package org.springframework.security.core.userdetails;

public interface UserDetailsService {
    UserDetails loadUserByUsername(String username) throws UsernameNotFoundException;
}
3.1.9.1 UserDetails
上面 loadUserByUsername() 方法的返回值 UserDetails,这个类是系统默认的用户“主体”。提供核心用户信息。出于安全目的,Spring Security 不直接使用实现。它们只是存储用户信息,这些信息随后被封装到 Authentication 对象中。这允许将非安全相关的用户信息(例如电子邮件地址、电话号码等)存储在方便的位置
@Override
public UserDetails loadUserByUsername(String username) throws UsernameNotFoundException {
	return new UserDetails() {
		@Override
		// 表示获取登录用户所有权限
		public Collection<? extends GrantedAuthority> getAuthorities() {
			return null;
		}
		@Override
		// 表示获取密码
		public String getPassword() {
			return null;
		}
		@Override
		// 表示获取用户名
		public String getUsername() {
			return null;
		}
		@Override
		// 表示判断账户是否过期
		public boolean isAccountNonExpired() {
			return false;
		}
		@Override
		// 表示判断账户是否被锁定
		public boolean isAccountNonLocked() {
			return false;
		}
		@Override
		// 表示凭证{密码}是否过期
		public boolean isCredentialsNonExpired() {
			return false;
		}
		@Override
		// 表示当前用户是否可用
		public boolean isEnabled() {
			return false;
		}
	};
}
3.1.9.2 User
- UserDetails 实现类,对 UserDetailsService 检索的核心用户信息进行建模。可以直接使用这个类,或者自定义一个类实现 UserDetails
- equals 和 hashcode 实现仅基于 username 属性,因为其目的是查找相同的用户主体对象(例如,在用户注册表中)将匹配对象代表相同用户的位置,而不仅仅是当所有属性 (权限,例如密码)是相同的
- 此实现不是一成不变的。实现了 CredentialsContainer 接口,以允许在身份验证后删除密码。如果将实例存储在内存中并重用它们,可能会导致副作用。如果是这样,要确保每次调用 UserDetailsService 时都返回一个副本
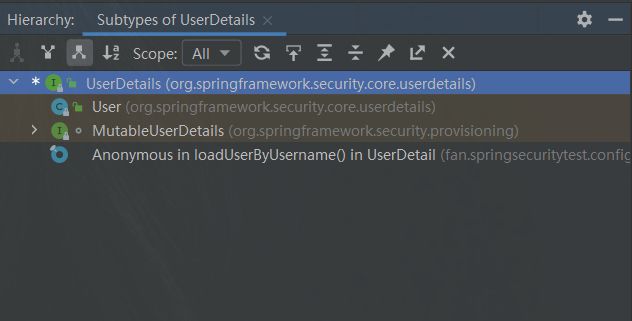
可以使用 User 这个实现类返回用户名、密码和权限

方法参数 username,表示用户名。此值是客户端表单传递过来的数据。默认情况下必须叫 username,否则无法接收
3.1.10 PasswordEncoder 接口
用于编码密码的服务接口,首选实现是 BCryptPasswordEncoder
package org.springframework.security.crypto.password;

public interface PasswordEncoder {
	// 表示把参数按照特定的解析规则进行解析
    String encode(CharSequence rawPassword);

	/* 表示验证从存储中获取的编码密码与编码后提交的原始密码是否匹配。如果密码匹配,则返回 true;
	如果不匹配,则返回 false。第一个参数表示需要被解析的密码。第二个参数表示存储的密码。 */
    boolean matches(CharSequence rawPassword, String encodedPassword);

	// 表示如果解析的密码能够再次进行解析且达到更安全的结果则返回 true,否则返回false。默认返回 false。
    default boolean upgradeEncoding(String encodedPassword) {
        return false;
    }
}
接口实现类:
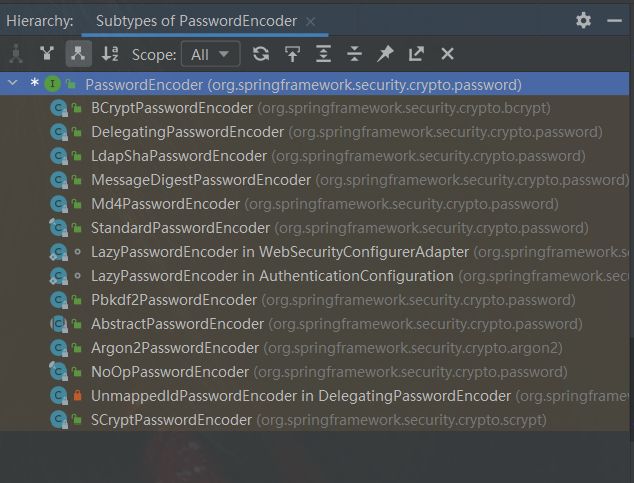
BCryptPasswordEncoder 是对 bcrypt 强散列方法的具体实现。是基于 Hash 算法实现的单向加密。可以通过 strength 控制加密强度,默认 10
// 使用
BCryptPasswordEncoder bCryptPasswordEncoder = new BCryptPasswordEncoder();
// 对密码进行加密
String fan = bCryptPasswordEncoder.encode("fan");
// 打印加密之后的数据
System.out.println("加密之后数据:\t" + fan);
//判断原字符加密后和加密之前是否匹配
boolean result = bCryptPasswordEncoder.matches("fan", fan);
// 打印比较结果
System.out.println("比较结果:\t"+result);
3.1.11 AbstractUserDetailsAuthenticationProvider
- 一个基本的 AuthenticationProvider,它允许子类覆盖和使用 UserDetails 对象。该类旨在响应 UsernamePasswordAuthenticationToken 身份验证请求
- 成功验证后,将创建一个 UsernamePasswordAuthenticationToken 并将其返回给调用者。Token 将包括作为其主体的用户名的字符串表示形式或从身份验证存储库返回的 UserDetails
- 如果正在使用容器适配器,则适合使用 String ,因为它需要 String 表示用户名。如果需要访问经过身份验证的用户的其他属性,例如电子邮件地址、人性化名称等,则适合使用 UserDetails。由于不建议使用容器适配器,并且 UserDetails 实现提供了额外的灵活性,默认情况下会返回 UserDetails。要覆盖此默认值,可以将 setForcePrincipalAsString 设置为 true
- 通过存储放置在 UserCache 中的 UserDetails 对象来处理缓存。这确保了可以验证具有相同用户名的后续请求,而无需查询 UserDetailsService。但需要注意的是,如果用户出现密码错误,将查询 UserDetailsService 以确认是否使用了最新密码进行比较。只有无状态应用程序才可能需要缓存。例如,在普通的 Web 应用程序中,SecurityContext 存储在用户的会话中,并且用户不会在每个请求上重新进行身份验证。因此,默认缓存实现是 NullUserCache
public abstract class AbstractUserDetailsAuthenticationProvider implements AuthenticationProvider, InitializingBean, MessageSourceAware {

    public Authentication authenticate(Authentication authentication) throws AuthenticationException {
        Assert.isInstanceOf(UsernamePasswordAuthenticationToken.class, authentication,
                messages.getMessage(
                        "AbstractUserDetailsAuthenticationProvider.onlySupports",
                        "Only UsernamePasswordAuthenticationToken is supported"));

        // Determine username
        String username = (authentication.getPrincipal() == null) ? "NONE_PROVIDED" : authentication.getName();

        boolean cacheWasUsed = true;

        // 1. 默认从缓存中获取 UserDetails 信息
        UserDetails user = this.userCache.getUserFromCache(username);

        if (user == null) {
            cacheWasUsed = false;

            try {
                // 2. 缓存中拿不到就从数据库中获取 UserDetails 信息 默认实现是 DaoAuthenticationProvider 的 retrieveUser方法
                user = retrieveUser(username, (UsernamePasswordAuthenticationToken) authentication);
            }
            catch (UsernameNotFoundException notFound) {
                logger.debug("User '" + username + "' not found");

                if (hideUserNotFoundExceptions) {
                    throw new BadCredentialsException(messages.getMessage(
                            "AbstractUserDetailsAuthenticationProvider.badCredentials",
                            "Bad credentials"));
                }
                else {
                    throw notFound;
                }
            }

            Assert.notNull(user, "retrieveUser returned null - a violation of the interface contract");
        }

        try {
            // 3. 检查 User 的各种状态, 用户过期, 密码过期等
            preAuthenticationChecks.check(user);
            // 4. 密码匹配校验, 调用加密类 PasswordEncoder (可以自己定义)
            additionalAuthenticationChecks(user, (UsernamePasswordAuthenticationToken) authentication);
        }
        catch (AuthenticationException exception) {
            if (cacheWasUsed) {
                // There was a problem, so try again after checking
                // we're using latest data (i.e. not from the cache)
                cacheWasUsed = false;
                user = retrieveUser(username, (UsernamePasswordAuthenticationToken) authentication);
                preAuthenticationChecks.check(user);
                additionalAuthenticationChecks(user, (UsernamePasswordAuthenticationToken) authentication);
            }
            else {
                throw exception;
            }
        }

        // 5. 检查一下一些数据是否过期
        postAuthenticationChecks.check(user);

        if (!cacheWasUsed) {
            // 6. 将 UserDetails 放入缓存
            this.userCache.putUserInCache(user);
        }

        Object principalToReturn = user;

        if (forcePrincipalAsString) {
            principalToReturn = user.getUsername();
        }

        // 7. 将用户所有的所有合法角色放入 Token 中的 authorities 中 并且 authenticated 设置为true 表示验证通过了
        return createSuccessAuthentication(principalToReturn, authentication, user);
    }
}
上面第二步,从数据库中获取 UserDetails 信息,默认实现是 DaoAuthenticationProvider 的 retrieveUser方法,见 3.1.12

3.1.12 DaoAuthenticationProvider
从 UserDetailsService 检索用户详细信息的 AuthenticationProvider 实现,提供利用数据库进行身份验证的一个类
public class DaoAuthenticationProvider extends AbstractUserDetailsAuthenticationProvider {

    protected final UserDetails retrieveUser(String username, UsernamePasswordAuthenticationToken authentication) throws AuthenticationException {
        prepareTimingAttackProtection();
        try {

            // 重要方法 调用自定义 UserDetailsService 的 loadUserByUsername 方法
            UserDetails loadedUser = this.getUserDetailsService().loadUserByUsername(username);
            if (loadedUser == null) {
                throw new InternalAuthenticationServiceException(
                        "UserDetailsService returned null, which is an interface contract violation");
            }
            return loadedUser;
        }
        catch (UsernameNotFoundException ex) {
            mitigateAgainstTimingAttack(authentication);
            throw ex;
        }
        catch (InternalAuthenticationServiceException ex) {
            throw ex;
        }
        catch (Exception ex) {
            throw new InternalAuthenticationServiceException(ex.getMessage(), ex);
        }
    }
}
3.1.13 AuthenticationEntryPoint 和 AccessDeniedHandler
在 Spring Security 中,如果在认证或者授权的过程中出现了异常会被 ExceptionTranslationFilter 捕获到。在 ExceptionTranslationFilter 中会去判断是认证失败还是授权失败出现的异常
- 如果是认证过程中出现的异常会被封装成 AuthenticationExceptio,然后调用 AuthenticationEntryPoint 对象的方法去进行异常处理
- 如果是授权过程中出现的异常会被封装成 AccessDeniedExceptio,然后调用 AccessDeniedHandler 对象的方法去进行异常处理
所以如果需要自定义异常处理,我们只需要自定义AuthenticationEntryPoint 和 AccessDeniedHandler,然后配置给 Spring Security 即可
AuthenticationEntryPoint 实现类:

AccessDeniedHandler 实现类:

3.1.14 LoginUrlAuthenticationEntryPoint
- 由 ExceptionTranslationFilter 用于通过 UsernamePasswordAuthenticationFilter 开始表单登录身份验证。在 loginFormUrl 属性中保存登录表单的位置,并使用它来构建到登录页面的重定向 URL,从而开始一个认证流程。 或者可以在此属性中设置绝对 URL,并将其专门使用
- 使用相对 URL 时,可以将 forceHttps 属性设置为 true,以强制用于登录表单的协议为 HTTPS,即使原始截获的资源请求使用 HTTP 协议也是如此。发生这种情况时,在成功登录(通过 HTTPS)后,原始资源仍将通过原始请求 URL 作为 HTTP 访问。要使强制 HTTPS 功能正常工作,要咨询 PortMapper 以确定 HTTP:HTTPS 对。如果使用绝对 URL,则 forceHttps 的值将不起作用
public class LoginUrlAuthenticationEntryPoint implements AuthenticationEntryPoint, InitializingBean {

	private static final Log logger = LogFactory.getLog(LoginUrlAuthenticationEntryPoint.class);
	private PortMapper portMapper = new PortMapperImpl();
	private PortResolver portResolver = new PortResolverImpl();
	private String loginFormUrl;

	// 是否强制使用 HTTPS 进行登录认证,默认 false
	private boolean forceHttps = false;

	// 指定是否要使用 forward,默认 false,
	private boolean useForward = false;

	// 跳转到登录页面的重定向策略
	private final RedirectStrategy redirectStrategy = new DefaultRedirectStrategy();

	// loginFormUrl 登录页面的url。使用相对路径(web-app context path 应用上下文路径,包括前缀 {@code /})或绝对 URL
	public LoginUrlAuthenticationEntryPoint(String loginFormUrl) {
		Assert.notNull(loginFormUrl, "loginFormUrl cannot be null");
		this.loginFormUrl = loginFormUrl;
	}

	// InitializingBean 接口定义的方法,在该bean创建后初始化阶段会调用该方法,主要是对属性 loginFormUrl进行格式检查和断言
	@Override
	public void afterPropertiesSet() {
		Assert.isTrue(StringUtils.hasText(this.loginFormUrl) && UrlUtils.isValidRedirectUrl(this.loginFormUrl), "loginFormUrl must be specified and must be a valid redirect URL");
		Assert.isTrue(!this.useForward || !UrlUtils.isAbsoluteUrl(this.loginFormUrl), "useForward must be false if using an absolute loginFormURL");
		Assert.notNull(this.portMapper, "portMapper must be specified");
		Assert.notNull(this.portResolver, "portResolver must be specified");
	}

	// Allows subclasses to modify the login form URL that should be applicable for a given request
	// 确定登录页面的 URL,子类可以覆盖实现该方法修改最终要应用的 URL
	protected String determineUrlToUseForThisRequest(HttpServletRequest request, HttpServletResponse response, AuthenticationException exception) {
		return getLoginFormUrl();
	}

	// Performs the redirect (or forward) to the login form URL.
	// 执行到 login 表单 URL 的重定向(或转发)
    @Override
	public void commence(HttpServletRequest request, HttpServletResponse response, AuthenticationException authException) throws IOException, ServletException {
		// 是否使用 forward,默认值为 false,取非则为 true,所以不走转发而是重定向
		if (!this.useForward) {
			// redirect to login page. Use https if forceHttps true
			// 重定向到 login 页面。如果 forceHttps 为真,则使用 https
			String redirectUrl = buildRedirectUrlToLoginPage(request, response, authException);
			// 使用 response.sendRedirect(redirectUrl);
			this.redirectStrategy.sendRedirect(request, response, redirectUrl);
			return;
		}
		String redirectUrl = null;
		if (this.forceHttps && "http".equals(request.getScheme())) {
			// First redirect the current request to HTTPS. When that request is received,
			// the forward to the login page will be used.
			redirectUrl = buildHttpsRedirectUrlForRequest(request);
		}
		if (redirectUrl != null) {
			this.redirectStrategy.sendRedirect(request, response, redirectUrl);
			return;
		}
		// 转发
		String loginForm = determineUrlToUseForThisRequest(request, response, authException);
		logger.debug(LogMessage.format("Server side forward to: %s", loginForm));
		RequestDispatcher dispatcher = request.getRequestDispatcher(loginForm);
		dispatcher.forward(request, response);
		return;
	}
}
3.2 授权流程
3.2.1 FilterSecurityInterceptor
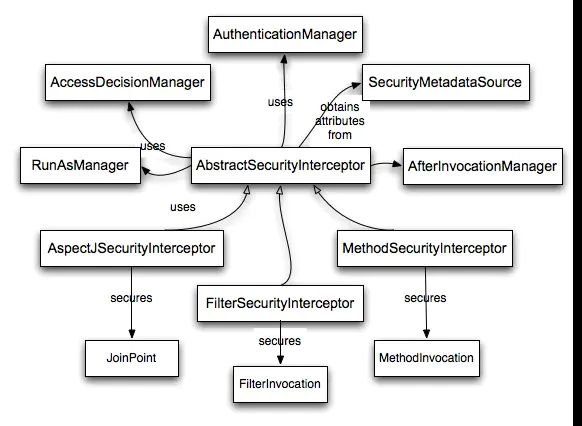
FilterSecurityInterceptor 是针对某个请求的层级进行拦截和安全检查,是比较常用的。还有支持方法层级的、AspectJ 层级的(更细的方法层级)。继承自AbstractSecurityInterceptor

public class FilterSecurityInterceptor extends AbstractSecurityInterceptor implements Filter {

    // 权限鉴定入口,由 filter 链进行调用
    public void doFilter(ServletRequest request, ServletResponse response, FilterChain chain) throws IOException, ServletException {
        FilterInvocation fi = new FilterInvocation(request, response, chain);
        // 调用开始
        invoke(fi);
    }

    public void invoke(FilterInvocation fi) throws IOException, ServletException {

        // fi.getRequest()一定不为null,observeOncePerRequest 默认为 true
        // getAttribute(FILTER_APPLIED)第一次进来没有值
        if ((fi.getRequest() != null)
                && (fi.getRequest().getAttribute(FILTER_APPLIED) != null)
                && observeOncePerRequest) {
            // 进来这里表示已经处理过一次请求了,不需要重新做安全检查
            fi.getChain().doFilter(fi.getRequest(), fi.getResponse());
        }
        else {
            // 进到这里表示第一次请求,需要进行安全检查
            if (fi.getRequest() != null && observeOncePerRequest) {
                //将FILTER_APPLIED标识放入request中
                fi.getRequest().setAttribute(FILTER_APPLIED, Boolean.TRUE);
            }

            InterceptorStatusToken token = super.beforeInvocation(fi);

            try {
                fi.getChain().doFilter(fi.getRequest(), fi.getResponse());
            }
            finally {
                super.finallyInvocation(token);
            }

            super.afterInvocation(token, null);
        }
    }
}
3.2.2 FilterInvocation
保存与 HTTP 过滤器关联的对象,保证请求对象和响应对象是 HttpServletRequest 的实例和 HttpServletResponse 的实例,并且没有 null 对象。为了 Security 框架内的类才能获得对过滤器环境的访问权,以及请求和响应
public class FilterInvocation {

    public FilterInvocation(ServletRequest request, ServletResponse response,
            FilterChain chain) {
        // 保证获取到非 null 的 request 和 response
        if ((request == null) || (response == null) || (chain == null)) {
            throw new IllegalArgumentException("Cannot pass null values to constructor");
        }

        this.request = (HttpServletRequest) request;
        this.response = (HttpServletResponse) response;
        this.chain = chain;
    }
}
3.2.3 AbstractSecurityInterceptor
- 为安全对象实现安全拦截的抽象类。 AbstractSecurityInterceptor 将确保安全拦截器的正确启动配置。它还将实现对安全对象调用的正确处理,即: 从 SecurityContextHolder 中获取 Authentication 对象。通过针对 SecurityMetadataSource 查找安全对象请求来确定请求是与安全调用还是公共调用相关
- 对于受保护的调用(有一个用于安全对象调用的 ConfigAttributes 列表):如果 Authentication.isAuthenticated() 返回 false,或者 alwaysReauthenticate 为 true,则根据配置的 AuthenticationManager 验证请求
- 通过身份验证后,将 SecurityContextHolder 上的 Authentication 对象替换为返回的值。根据配置的 AccessDecisionManager 授权请求。通过配置的 RunAsManager 执行任何运行方式替换。将控制权交还给具体的子类,该子类实际上将继续执行对象。返回一个 InterceptorStatusToken,以便在子类完成执行对象后,其 finally 子句可以确保重新调用 AbstractSecurityInterceptor 并使用 finallyInvocation(InterceptorStatusToken) 正确整理
- 具体子类将通过 afterInvocation(InterceptorStatusToken, Object) 方法重新调用 AbstractSecurityInterceptor。如果 RunAsManager 替换了 Authentication 对象,则将 SecurityContextHolder 返回到调用 AuthenticationManager 后存在的对象。如果定义了 AfterInvocationManager,则调用调用管理器并允许它替换因返回给调用者的对象。对于公开的调用(安全对象调用没有 ConfigAttributes):如上所述,具体子类将返回一个 InterceptorStatusToken,随后在执行安全对象后将其重新呈现给 AbstractSecurityInterceptor。当调用其 afterInvocation(InterceptorStatusToken, Object) 时,AbstractSecurityInterceptor 不会采取进一步的行动。控制再次返回到具体的子类,连同应该返回给调用者的对象。然后子类将该结果或异常返回给原始调用者
public abstract class AbstractSecurityInterceptor implements InitializingBean,ApplicationEventPublisherAware, MessageSourceAware {

	// object为 FilterInvocation
    protected InterceptorStatusToken beforeInvocation(Object object) {
        // 省略次要代码

        // 在此处获取ConfigAttribute集合,是通过调用SecurityMetadataSource的getAttributes方法获取的,
        // 可以使用的自定义的 FilterInvocationSecurityMetadataSource
        Collection<ConfigAttribute> attributes = this.obtainSecurityMetadataSource().getAttributes(object);

        // 第一次进来会会获取到 AnonymousAuthenticationToken,是在 AnonymousAuthenticationFilter 中初始化的,也就是匿名请求
        if (SecurityContextHolder.getContext().getAuthentication() == null) {
            credentialsNotFound(messages.getMessage(
                    "AbstractSecurityInterceptor.authenticationNotFound",
                    "An Authentication object was not found in the SecurityContext"),
                    object, attributes);
        }

        // 判断是否检查当前身份,验证 Token,并返回 Authentication 对象
        // 第一次进去不符合条件直接返回匿名Token 对象
        Authentication authenticated = authenticateIfRequired();

        // 尝试进行授权
        try {
            // 真正进行鉴定权限的地方通过的方法是在 AccessDecisionManager中的,可以自定义实现类进行使用
            // 第一次进来是匿名Token对象,角色也是 "ROLE_anonymous" 没有一定会抛异常
            this.accessDecisionManager.decide(authenticated, object, attributes);
        }
        catch (AccessDeniedException accessDeniedException) {
            publishEvent(new AuthorizationFailureEvent(object, attributes, authenticated, accessDeniedException));

            throw accessDeniedException;
        }

        if (debug) {
            logger.debug("Authorization successful");
        }

        if (publishAuthorizationSuccess) {
            publishEvent(new AuthorizedEvent(object, attributes, authenticated));
        }

        // Attempt to run as a different user
        Authentication runAs = this.runAsManager.buildRunAs(authenticated, object, attributes);

        if (runAs == null) {
            if (debug) {
                logger.debug("RunAsManager did not change Authentication object");
            }

            // no further work post-invocation
            return new InterceptorStatusToken(SecurityContextHolder.getContext(), false, attributes, object);
        }
        else {
            if (debug) {
                logger.debug("Switching to RunAs Authentication: " + runAs);
            }

            SecurityContext origCtx = SecurityContextHolder.getContext();
            SecurityContextHolder.setContext(SecurityContextHolder.createEmptyContext());
            SecurityContextHolder.getContext().setAuthentication(runAs);

            // need to revert to token.Authenticated post-invocation
            return new InterceptorStatusToken(origCtx, true, attributes, object);
        }
        this.logger.trace("Did not switch RunAs authentication since RunAsManager returned null");
		// no further work post-invocation
		return new InterceptorStatusToken(SecurityContextHolder.getContext(), false, attributes, object);
    }

	/** 在安全对象调用完成后完成 AbstractSecurityInterceptor 的工作。
	Params:token - 由 beforeInvocation(Object) 方法返回 returnedObject - 从安全对象调用返回的任何对象(可能为 null)
	Returns:安全对象调用最终应返回给其调用者的对象(可能为 null)
	*/
	protected Object afterInvocation(InterceptorStatusToken token, Object returnedObject) {
		if (token == null) {
			// public object
			return returnedObject;
		}
		finallyInvocation(token); // continue to clean in this method for passivity
		if (this.afterInvocationManager != null) {
			// Attempt after invocation handling
			try {
				returnedObject = this.afterInvocationManager.decide(token.getSecurityContext().getAuthentication(),
						token.getSecureObject(), token.getAttributes(), returnedObject);
			}
			catch (AccessDeniedException ex) {
				publishEvent(new AuthorizationFailureEvent(token.getSecureObject(), token.getAttributes(),
						token.getSecurityContext().getAuthentication(), ex));
				throw ex;
			}
		}
		return returnedObject;
	}

	/**
    如果 Authentication.isAuthenticated() 返回 false 或属性 alwaysReauthenticate 已设置为 true,
    则检查当前身份验证令牌并将其传递给 AuthenticationManager。返回经过身份验证的 Authentication 对象。
    */
	private Authentication authenticateIfRequired() {
		Authentication authentication = SecurityContextHolder.getContext().getAuthentication();
		if (authentication.isAuthenticated() && !this.alwaysReauthenticate) {
			if (this.logger.isTraceEnabled()) {
				this.logger.trace(LogMessage.format("Did not re-authenticate %s before authorizing", authentication));
			}
			return authentication;
		}
		authentication = this.authenticationManager.authenticate(authentication);
		// Don't authenticated.setAuthentication(true) because each provider does that
		if (this.logger.isDebugEnabled()) {
			this.logger.debug(LogMessage.format("Re-authenticated %s before authorizing", authentication));
		}
		SecurityContext context = SecurityContextHolder.createEmptyContext();
		context.setAuthentication(authentication);
		SecurityContextHolder.setContext(context);
		return authentication;
	}
}
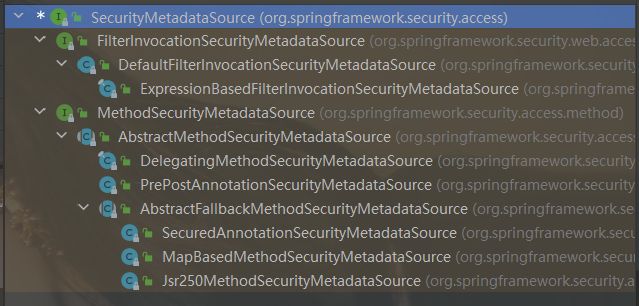
3.2.4 SecurityMetadataSource
由存储并可以识别应用于给定安全对象调用的 ConfigAttributes 的类实现
public interface SecurityMetadataSource extends AopInfrastructureBean {

	// 访问适用于给定安全对象的 ConfigAttributes
	Collection<ConfigAttribute> getAttributes(Object object) throws IllegalArgumentException;

	// 如果可用,则返回实现类定义的所有 ConfigAttributes
	// AbstractSecurityInterceptor 使用它来执行针对它配置的每个 ConfigAttribute 的启动时间验证
	Collection<ConfigAttribute> getAllConfigAttributes();

	// 指示 SecurityMetadataSource 实现是否能够为指示的安全对象类型提供 ConfigAttributes
	boolean supports(Class<?> clazz);

}
3.2.5 FilterInvocationSecurityMetadataSource
继承 SecurityMetadataSource 接口,旨在执行在 FilterInvocations 上键入的查找
public interface FilterInvocationSecurityMetadataSource extends SecurityMetadataSource {

}
自定义实现类:
// 自定义认证数据源
@Service
public class CustomFilterInvocationSecurityMetadataSource implements FilterInvocationSecurityMetadataSource {

    // ant风格的URL匹配
    AntPathMatcher antPathMatcher = new AntPathMatcher();

    @Autowired
    MenuMapper menuMapper;

    /**
     * @param object  一个FilterInvocation
     * @return  Collection 当前请求URL所需的角色
     * @throws IllegalArgumentException
     */
    @Override
    public Collection<ConfigAttribute> getAttributes(Object object) throws IllegalArgumentException {
        // 从FilterInvocation中获取当前请求的URL
        String requestUrl = ((FilterInvocation) object).getRequestUrl();
        // 从数据库中获取所有的资源(角色和menu都查询)信息,可以缓存
        List<Menu> allMenus = menuMapper.getAllMenus();
        // 遍历获取当前请求的URL所需要的角色信息
        for (Menu menu : allMenus) {
            if (antPathMatcher.match(menu.getPattern(), requestUrl)) {
                List<Role> roles = menu.getRoles();
                String[] roleArr = new String[roles.size()];
                for (int i = 0; i < roleArr.length; i++) {
                    roleArr[i] = roles.get(i).getName();
                }
                return SecurityConfig.createList(roleArr);
            }
        }
        // 假设不存在URL对应的角色,则登录后即可访问
        return SecurityConfig.createList("ROLE_LOGIN");
    }

    // 获取所有定义好的权限资源
    @Override
    public Collection<ConfigAttribute> getAllConfigAttributes() {
        return null;
    }

    // 返回类对象是否支持校验
    @Override
    public boolean supports(Class<?> clazz) {
        return FilterInvocation.class.isAssignableFrom(clazz);
    }
}
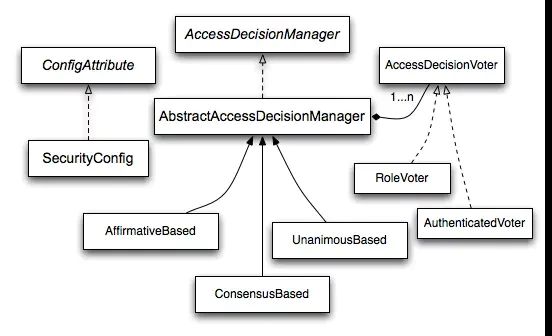
3.2.6 ConfigAttribute
存储与安全系统相关的配置属性。设置 org.springframework.security.access.intercept.AbstractSecurityInterceptor 时,会为安全对象模式定义配置属性列表。这些配置属性对 RunAsManager、AccessDecisionManager 或 AccessDecisionManager 的继承类具有特殊意义。在运行时与同一安全对象目标的其他 ConfigAttributes 一起存储。对于AccessDecisionManager 可以用这个列表进行决定访问的对象是否符合安全样式
public interface ConfigAttribute extends Serializable {
	/** 如果 ConfigAttribute 可以表示为字符串,并且该字符串的精度足以被 RunAsManager、AccessDecisionManager 或 AccessDecisionManager 的继承类作为配置参数依赖,
	则此方法应返回这样的字符串。如果 ConfigAttribute 不能以足够的精度表示为字符串,则应返回 null。
	返回 null 将需要任何依赖类专门支持 ConfigAttribute 实现,因此除非确实需要,否则应避免返回 null。
	*/
    String getAttribute();
}
3.2.7 SecurityConfig
将 ConfigAttribute 存储为字符串
public class SecurityConfig implements ConfigAttribute {

	private final String attrib;

	public SecurityConfig(String config) {
		Assert.hasText(config, "You must provide a configuration attribute");
		this.attrib = config;
	}

	// ~ Methods
}
3.2.8 AccessDecisionManager
进行最终的访问控制(授权)决定。当一个请求走完 FilterInvocationSecurityMetadataSource 中的 getAttributes 方法后就会到 AccessDecisionManager 中进行角色信息的对比
public interface AccessDecisionManager {

	// Resolves an access control decision for the passed parameters.
	// 解决传递参数的访问控制决策。
	void decide(Authentication authentication, Object object, Collection<ConfigAttribute> configAttributes) throws AccessDeniedException, InsufficientAuthenticationException;

	// 指示此 AccessDecisionManager 是否能够处理使用传递的 ConfigAttribute 呈现的授权请求
	// 这允许 AbstractSecurityInterceptor 检查每个配置属性可以被配置的 AccessDecisionManager and/or RunAsManager and/or AfterInvocationManager 使用
	boolean supports(ConfigAttribute attribute);

	// 指示 AccessDecisionManager 实现是否能够为指示的安全对象类型提供访问控制决策
	boolean supports(Class<?> clazz);
}
自定义实现类:
@Service
public class CustomAccessDecisionManager implements AccessDecisionManager {


    /* 取当前用户的权限与这次请求的这个url需要的权限作对比,决定是否放行
     * auth 包含了当前的用户信息,包括拥有的权限,即之前UserDetailsService登录时候存储的用户对象
     * object 就是FilterInvocation对象,可以得到request等web资源。
     * configAttributes 是本次访问需要的权限。即上一步的 MyFilterInvocationSecurityMetadataSource 中查询核对得到的权限列表
     */
    @Override
    public void decide(Authentication authentication, Object object, Collection<ConfigAttribute> configAttributes) throws AccessDeniedException, InsufficientAuthenticationException {
        for (ConfigAttribute configAttribute : configAttributes) {
            if (authentication == null){
                throw new AccessDeniedException("当前访问没有权限");
            }
            // 当前请求需要的权限
            String needRole = configAttribute.getAttribute();
            if ("ROLE_LOGIN".equals(needRole)){
                if (authentication instanceof AnonymousAuthenticationToken){
                    throw new  BadCredentialsException("未登录");
                }
                return;
            }
            // 当前用户所具有的权限
            Collection<? extends GrantedAuthority> authorities = authentication.getAuthorities();
            for (GrantedAuthority authority : authorities) {
                if (authority.getAuthority().equals(needRole)){
                    return;
                }
            }
        }
        throw new AccessDeniedException("权限不足");
    }

    @Override
    public boolean supports(ConfigAttribute attribute) {
        return true;
    }

    @Override
    public boolean supports(Class<?> clazz) {
        return true;
    }
}
3.3 整体流程
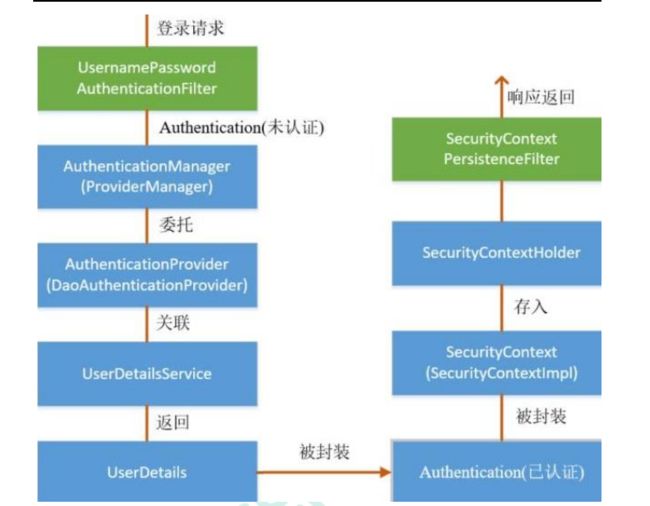
- 查看 SecurityContext 接口及其实现类 SecurityContextImpl , 该类其实就是 对Authentication 的封装
- 查看 SecurityContextHolder 类 ,该类其实是对 ThreadLocal 的封装 , 存储 SecurityContext 对象
在 UsernamePasswordAuthenticationFilter 过滤器认证成功之后,会在认证成功的处理方法中将已认证的用户信息对象 Authentication 封装进 SecurityContext,并存入 SecurityContextHolder。之后,响应会通过 SecurityContextPersistenceFilter 过滤器,将 SecurityContextHolder 持有的 SecurityContext 再保存到配置好的 SecurityContextRepository(一般用 HttpSession 进行存储),同时清除 SecurityContextHolder 所持有的 SecurityContext
认证成功的响应通过 SecurityContextPersistenceFilter 过滤器时,从配置好的 SecurityContextRepository 中获取该请求相关的安全上下文信息 SecurityContext,然后加载到 SecurityContextHolder 中。当请求再次到来时,请求首先经过该过滤器,该过滤器会判断当前请求是否存有 SecurityContext 对象,如果有则将该对象取出再次放入 SecurityContextHolder 中,之后该请求所在的线程获得认证用户信息,后续的资源访问不需要进行身份认证;当响应再次返回时,该过滤器同样将 SecurityContextHolder 持有的 SecurityContext 再保存到配置好的 SecurityContextRepository(一般用 HttpSession 进行存储),同时清除 SecurityContextHolder 所持有的 SecurityContext
3.3.1 SecurityContext
安全上下文,用户通过 Spring Security 的校验之后,验证信息 Authentication 存储在 SecurityContext 中,SecurityContext 存储在 SecurityContextHolder 中。接口定义如下:
public interface SecurityContext extends Serializable {
    // 获取当前经过身份验证的主体,或身份验证请求令牌
    Authentication getAuthentication();

	// 更改当前经过身份验证的主体,或删除身份验证信息
    void setAuthentication(Authentication var1);
}
这里只定义了两个方法,主要都是用来获取或修改认证信息(Authentication),Authentication 是用来存储着认证用户的信息,所以这个接口可以间接获取到用户的认证信息
SecurityContext securityContext = SecurityContextHolder.getContext();
Authentication authentication = securityContext.getAuthentication();
User user = (User) authentication.getPrincipal();
3.3.2 SecurityContextHolder
- 将给定的 SecurityContext 与当前执行线程相关联。此类提供了一系列委托给 SecurityContextHolderStrategy 实例的静态方法。该类的目的是提供一种方便的方法来指定应该用于给定 JVM 的策略。这是 JVM 范围的设置,因为此类中的所有内容都是静态的,以便于调用代码时使用。
- 要指定应使用哪种策略,必须提供模式设置。模式设置是定义为静态最终字段的三个有效 MODE_ 设置之一,或者是提供公共无参数构造函数的 SecurityContextHolderStrategy 具体实现的完全限定类名。
- 有两种方法可以指定所需的策略模式字符串。第一种是通过在 SYSTEM_PROPERTY 上键入的系统属性来指定它。第二种是在使用类之前调用 setStrategyName(String)。如果这两种方法都没有使用,则该类将默认使用 MODE_THREADLOCAL,它向后兼容,具有较少的 JVM 不兼容性并且适用于服务器(而 MODE_GLOBAL 绝对不适合服务器使用)
public class SecurityContextHolder {

	public static final String MODE_THREADLOCAL = "MODE_THREADLOCAL";

	public static final String MODE_INHERITABLETHREADLOCAL = "MODE_INHERITABLETHREADLOCAL";

	public static final String MODE_GLOBAL = "MODE_GLOBAL";

	private static final String MODE_PRE_INITIALIZED = "MODE_PRE_INITIALIZED";

	public static final String SYSTEM_PROPERTY = "spring.security.strategy";

	private static String strategyName = System.getProperty(SYSTEM_PROPERTY);

	private static SecurityContextHolderStrategy strategy;

	private static int initializeCount = 0;

	// ~ Methods
}
在典型的 Web 应用程序中,用户登录一次,然后由其会话ID标识。服务器缓存持续时间会话的主体信息。但是在 Spring Security 中,在请求之间存储 SecurityContext 的责任落在 SecurityContextPersistenceFilter 上,默认情况下,该过滤器将上下文存储为HTTP请求之间的 HttpSession 属性。请求访问时它会为每个请求恢复上下文 SecurityContextHolder,并且最重要的是,在请求完成时清除 SecurityContextHolder
4. SpringSecurity Web 权限
Spring Security 的核心配置类是 WebSecurityConfigurerAdapter 抽象类,这是权限管理启动的入口
在 Spring Security 5.7.1 或 SpringBoot 2.7.0 之后,该类被弃用了,改动见 4.8
4.1 设置登录系统的账号、密码
4.1.1 YML
spring:
  security:
    user:
      name: fan
      password: fan
4.1.2 配置基于内存的角色授权和认证信息
继承 WebSecurityConfigurerAdapter,重写 configure(AuthenticationManagerBuilder auth) 方法
@Configuration
public class SecurityConfig extends WebSecurityConfigurerAdapter {
    @Override
    protected void configure(AuthenticationManagerBuilder auth) throws Exception {
        BCryptPasswordEncoder bCryptPasswordEncoder = new BCryptPasswordEncoder();
        // 对密码进行加密
        String encode = bCryptPasswordEncoder.encode("fan223");
        // 设置用户名、加密后的密码、权限
        auth.inMemoryAuthentication().withUser("fan223").password(encode).roles("admin");
    }

	// 需要注入一个 PasswordEncoder 的 Bean,不然会报错,找不到 PasswordEncoder
    @Bean
    PasswordEncoder passwordEncoder(){
        // return new BCryptPasswordEncoder();
        return new PasswordEncoder() {
            @Override
            public String encode(CharSequence charSequence) {
            	// 加密
                return charSequence.toString();
            }

            @Override
            public boolean matches(CharSequence charSequence, String s) {
            	// 比对
                return Objects.equals(charSequence.toString(), s);
            }
        };
    }
}
4.1.3 配置基于数据库的认证信息和角色授权
1、编写实现类,实现 UserDetailsService 接口,实现其 loadUserByUsername(String username) 方法,返回一个 UserDetails 接口的实现类 User 对象,包括用户名、密码、权限
2、配置类里将实现类注入进入
// 实现类
@Service
public class MyUserDetailsServiceImpl implements UserDetailsService {
    @Resource
    private UserDAO userDAO;

    @Override
    public UserDetails loadUserByUsername(String username) throws UsernameNotFoundException {
        // 通过用户名从数据库查询用户信息
        fan.springsecuritytest.entity.User selectOne = userDAO.selectOne(new QueryWrapper<fan.springsecuritytest.entity.User>().eq("username", username));
        if (ObjectUtils.isEmpty(selectOne)){
            throw new UsernameNotFoundException("用户名不存在!");
        }
        // 权限列表,应从数据库中查
        List<GrantedAuthority> authorities = AuthorityUtils.commaSeparatedStringToAuthorityList("role, ROLE_sale");
        // 给用户设置权限和角色
        return new User(selectOne.getUsername(), new BCryptPasswordEncoder().encode(selectOne.getPassword()), authorities);
    }
}
// 配置类,注入 UserDetailsServiceImpl
@Configuration
public class SecurityConfig extends WebSecurityConfigurerAdapter {
    @Resource
    private UserDetailsService myUserDetailsServiceImpl;

    @Override
    protected void configure(AuthenticationManagerBuilder auth) throws Exception {
        auth.userDetailsService(myUserDetailsServiceImpl).passwordEncoder(passwordEncoder());
    }

	// 注入 PasswordEncoder 类到 Spring 容器中,用来对密码进行加密
    @Bean
    PasswordEncoder passwordEncoder(){
        return new BCryptPasswordEncoder();
    }
}
4.2 自定义表单认证登录(重要)
4.2.1 配置类
// 配置类
@Configuration
public class SecurityConfig extends WebSecurityConfigurerAdapter {
    @Resource
    private UserDetailsService myUserDetailsServiceImpl; // UserDetailsService 实现类

	@Resource
    private AuthenticationSuccessHandler loginSuccessHandler; // 认证成功结果处理器
    // 或 private LoginSuccessHandler loginSuccessHandler;
    @Resource
    private AuthenticationFailureHandler loginFailureHandler; // 认证失败结果处理器
    // 或 private LoginFailureHandler loginFailureHandler;

    @Override
    protected void configure(AuthenticationManagerBuilder auth) throws Exception {
        auth.userDetailsService(myUserDetailsServiceImpl).passwordEncoder(passwordEncoder());
    }

	// 注入 PasswordEncoder 类到 Spring 容器中,用来对密码进行加密
    @Bean
    PasswordEncoder passwordEncoder(){
        return new BCryptPasswordEncoder();
    }

    @Override
    protected void configure(HttpSecurity http) throws Exception {
        http.csrf().disable() // 关闭跨站 csrf 攻击防护
            // 1.配置权限认证
            .authorizeRequests()
                // 不需要通过登录验证就可以被访问到的资源路径
                .antMatchers("/", "/login", "/user/login").permitAll()
                // 前面是资源的访问路径,后面是资源的名称或资源 ID,需要 admin 权限才能访问该路径
                .antMatchers("/web/admin/**").hasAnyAuthority("admin")
                .anyRequest() // 任何其他请求
                .authenticated(); // 都需要认证
                .and()
            // 2. 配置登录表单认证方式
            .formLogin()
                /* 用户未登录时,访问任何资源都跳转到该路径,即登录页面,需要将这个地址设置为不认证也可以访问。如果不这样设置,
                页面会提示“重定向次数过多”。因为登录的时候会访问 "login" 路径,设置新的登录地址后,一直来访问新的这个地址,
                但是这个地址必须登录才可以访问,所以一直循环这样调用,就会出现重定向次数过多。需要在 Controller 中映射。 */
                .loginPage("/login")
                // 登录表单 form 中 action 的地址,也就是处理认证请求的路径,这个路径也需要放开,但不需要在 Controller 中映射
                .loginProcessingUrl("/user/login")
                // 登录表单 form 中用户名输入框 input 的 name 名, 不改的话默认是 username
                .usernameParameter("uname")
                // form 中密码输入框 input 的 name 名,不改默认是 password
                .passwordParameter("pword")
                // .defaultSuccessUrl("/success") //登录认证成功后默认转跳的路径,与 successForwardUrl同效果
                // 登录成功跳转路径,假如不是直接访问 /login,而是其他请求被拦截跳转到 /login,则登录成功会转发到拦截的请求路径,不会跳转到该路径
                .successForwardUrl("/success")
                .failureForwardUrl("/error") // 登录失败跳转路径,假如不设置就默认跳转到登录页
                 // 使用自定义的登录成功结果处理器
                .successHandler(loginSuccessHandler)
                // 使用自定义登录失败的结果处理器
                .failureHandler(loginFailureHandler)
                .and()
            // 3. 注销
            .logout()
                .logoutUrl("/logout") // 配置注销登录请求URL为 "/logout"(默认也就是 /logout)
                // 使用自定义的注销成功结果处理器(优先级高)
                .logoutSuccessHandler(new CustomLogoutSuccessHandler())
                // 退出成功后跳转的路径
                .logoutSuccessUrl("/login")
                .clearAuthentication(true) // 清除身份认证信息
                .invalidateHttpSession(true) //使Http会话无效
                .permitAll() // 允许访问登录表单、登录接口
                .and()
            // 4. session管理
            .sessionManagement()
                .invalidSessionUrl("/login") //失效后跳转到登陆页面
                //单用户登录,如果有一个登录了,同一个用户在其他地方登录将前一个剔除下线
                //.maximumSessions(1).expiredSessionStrategy(expiredSessionStrategy())
                //单用户登录,如果有一个登录了,同一个用户在其他地方不能登录
                //.maximumSessions(1).maxSessionsPreventsLogin(true);
		http.headers().frameOptions().disable(); // 开启运行iframe嵌套页面
    }

	@Override
	public void configure(WebSecurity web) throws Exception {
		// 不进行认证的路径,可以直接访问,可以配置静态资源路径
        web.ignoring().antMatchers("/static/**");
	}
}
4.2.2 配置静态资源
仅仅通过 Spring Security 配置是不够的,还需要去重写 addResourceHandlers 方法去映射静态资源。写一个类 WebMvcConfig 继承 WebMvcConfigurationSupport
@Configuration
public class WebMvcConfig extends WebMvcConfigurationSupport {
    @Override
    protected void addResourceHandlers(ResourceHandlerRegistry registry) {
        registry.addResourceHandler("/static/**")
                .addResourceLocations("classpath:/static/");
        super.addResourceHandlers(registry);
    }
}
4.2.3 配置错误页面(非必要)
可以不进行配置,只需对应错误页面放在 /error 文件夹下即可

@Configuration
public class ErrorPageConfig {

    @Bean
    public WebServerFactoryCustomizer<ConfigurableWebServerFactory> webServerFactoryCustomizer() {
        WebServerFactoryCustomizer<ConfigurableWebServerFactory> webServerFactoryCustomizer = new WebServerFactoryCustomizer<ConfigurableWebServerFactory>() {
            @Override
            public void customize(ConfigurableWebServerFactory factory) {
                ErrorPage[] errorPages = new ErrorPage[] {
                        new ErrorPage(HttpStatus.FORBIDDEN, "/403"),
                        new ErrorPage(HttpStatus.NOT_FOUND, "/404"),
                        new ErrorPage(HttpStatus.INTERNAL_SERVER_ERROR, "/500"),
                };
                factory.addErrorPages(errorPages);
            }
        };
        return webServerFactoryCustomizer;
    }
}
4.2.4 Controller
// Controller
@Controller
public class TestController {
    @GetMapping("/login") // 登录页面映射 .loginPage("/login")
    public String login(){
        return "login";
    }

    @GetMapping("/error") // 错误页面映射 .failureForwardUrl("/error") // 登录失败跳转路径
    public String error(){
        return "error";
    }

    @GetMapping("/success") // 成功页面映射 .successForwardUrl("/success") // 登录成功跳转路径
    public String success(){
        return "success";
    }

    @GetMapping("/hello") // 不需要认证即可访问页面映射
    public String hello(){
        return "/hello";
    }

    @GetMapping("/test") // 需要认证才可访问,访问该路径会自动跳转到 /login,登录成功后才会转发到该路径
    @ResponseBody
    public String test(){
        return "test 请求";
    }
}
4.2.5 自定义权限决策管理器
@Component
public class CustomAccessDecisionManager implements AccessDecisionManager {

    /* 取当前用户的权限与这次请求的这个url需要的权限作对比,决定是否放行
     * auth 包含了当前的用户信息,包括拥有的权限,即之前UserDetailsService登录时候存储的用户对象
     * object 就是FilterInvocation对象,可以得到request等web资源。
     * configAttributes 是本次访问需要的权限。即上一步的 MyFilterInvocationSecurityMetadataSource 中查询核对得到的权限列表
     */
    @Override
    public void decide(Authentication authentication, Object object, Collection<ConfigAttribute> configAttributes) throws AccessDeniedException, InsufficientAuthenticationException {
        for (ConfigAttribute configAttribute : configAttributes) {
            if (authentication == null){
                throw new AccessDeniedException("当前访问没有权限");
            }
            // 当前请求需要的权限
            String needRole = configAttribute.getAttribute();
            if ("ROLE_LOGIN".equals(needRole)){
                if (authentication instanceof AnonymousAuthenticationToken){
                    throw new  BadCredentialsException("未登录");
                }
                return;
            }
            // 当前用户所具有的权限
            Collection<? extends GrantedAuthority> authorities = authentication.getAuthorities();
            for (GrantedAuthority authority : authorities) {
                if (authority.getAuthority().equals(needRole)){
                    return;
                }
            }
        }
        throw new AccessDeniedException("权限不足");
    }

    @Override
    public boolean supports(ConfigAttribute attribute) {
        return true;
    }

    @Override
    public boolean supports(Class<?> clazz) {
        return true;
    }
}
4.2.6 登录认证成功处理器
在 UsernamePasswordAuthenticationFilter 进行登录认证的时候,如果登录成功了会调用 AuthenticationSuccessHandler 的方法进行认证成功后的处理。AuthenticationSuccessHandler 就是登录成功处理器

@Component
// 继承实现类 public class LoginSuccessHandler extends SimpleUrlAuthenticationSuccessHandler {
// 实现接口
public class LoginSuccessHandler implements AuthenticationSuccessHandler {
    @Resource
    private ObjectMapper objectMapper;

    @Override
    public void onAuthenticationSuccess(HttpServletRequest request, HttpServletResponse response, Authentication authentication) {
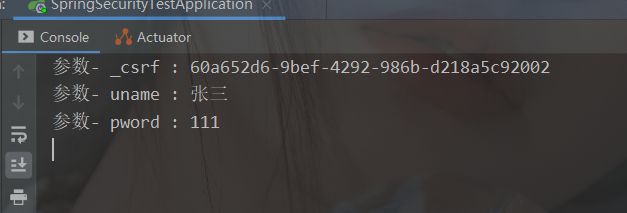
        // 获取前端传到后端的全部参数
        Enumeration<String> parameterNames = request.getParameterNames();
        while (parameterNames.hasMoreElements()) {
            String paraName = parameterNames.nextElement();
            System.out.println("参数- " + paraName + " : " + request.getParameter(paraName));
        }
        // 这里写登录成功后的逻辑,可以验证其他信息,如验证码等。
//        response.setContentType("application/json;charset=UTF-8");
//        JSONObject jsonObject = new JSONObject();
//        jsonObject.putOnce("code", HttpStatus.OK.value());
//        jsonObject.putOnce("msg","登录成功");
//        jsonObject.putOnce("authentication",objectMapper.writeValueAsString(authentication));
		// 返回响应信息
//		response.getWriter().write(jsonObject.toString());
        try {
        	// 重定向,等同于 .successForwardUrl("/success")
            this.getRedirectStrategy().sendRedirect(request, response, "/success");
        } catch (JsonProcessingException e) {
            e.printStackTrace();
        } catch (IOException e) {
            e.printStackTrace();
        }
    }
}
4.2.7 登录认证失败处理器
在 UsernamePasswordAuthenticationFilter 进行登录认证的时候,如果认证失败了会调用 AuthenticationFailureHandler 的方法进行认证失败后的处理。AuthenticationFailureHandler 就是登录失败处理器

@Component
// public class LoginFailureHandler extends SimpleUrlAuthenticationFailureHandler {
public class LoginFailureHandler implements AuthenticationFailureHandler {

	@Resource
    private ObjectMapper objectMapper;

    @Override
    public void onAuthenticationFailure(HttpServletRequest request, HttpServletResponse response, AuthenticationException exception) {
        this.saveException(request, exception);
//        response.setContentType("application/json;charset=UTF-8");
        // 这里写登录失败后的逻辑,可加验证码验证等
//        String errorInfo = "";
//        if (exception instanceof BadCredentialsException ||
//                exception instanceof UsernameNotFoundException) {
//            errorInfo = "账户名或者密码输入错误!";
//        } else if (exception instanceof LockedException) {
//            errorInfo = "账户被锁定,请联系管理员!";
//        } else if (exception instanceof CredentialsExpiredException) {
//            errorInfo = "密码过期,请联系管理员!";
//        } else if (exception instanceof AccountExpiredException) {
//            errorInfo = "账户过期,请联系管理员!";
//        } else if (exception instanceof DisabledException) {
//            errorInfo = "账户被禁用,请联系管理员!";
//        } else {
//            errorInfo = "登录失败!";
//        }
        // ajax请求认证方式
//        JSONObject resultObj = new JSONObject();
//        resultObj.putOnce("code", HttpStatus.UNAUTHORIZED.value());
//        resultObj.putOnce("msg",errorInfo);
//        resultObj.putOnce("exception",objectMapper.writeValueAsString(exception));
//        response.getWriter().write(resultObj.toString());
        try {
            this.getRedirectStrategy().sendRedirect(request, response, "/login");
        } catch (IOException e) {
            e.printStackTrace();
        }
    }
}
4.2.8 注销成功处理器
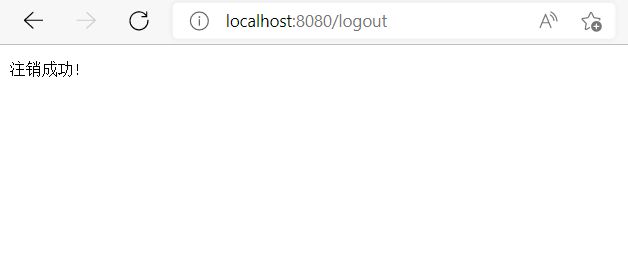
public class CustomLogoutSuccessHandler implements LogoutSuccessHandler {

    @Override
    public void onLogoutSuccess(HttpServletRequest httpServletRequest, HttpServletResponse response, Authentication authentication) {
        // 返回响应信息
        response.setStatus(HttpStatus.OK.value());
        response.setContentType("application/json;charset=UTF-8");
        try {
            response.getWriter().write("注销成功!");
        } catch (IOException e) {
            e.printStackTrace();
        }
    }
}
4.2.9 登录页面的 Form 表单
<form action="/user/login" method="post">

	用户名:<input type="text" name="uname"/><br/>

	密码:<input type="password" name="pword"/><br/>
	<input type="submit" value="提交"/>
form>
4.3 基于角色或权限进行访问控制
4.3.1 hasAuthority() 方法
如果当前的主体具有指定的权限,则返回 true,否则返回 false
// 配置类
@Override
protected void configure(HttpSecurity http) throws Exception {
	http.authorizeRequests()
		// 不需要通过登录验证就可以被访问到的资源路径
		.antMatchers("/", "/hello", "/login").permitAll()
		// 前面是资源的访问路径,后面是资源的名称或资源 ID,需要主体带有 admin 权限才可访问
		.antMatchers("/test").hasAuthority("admin")
		.anyRequest().authenticated(); // 其他请求需要认证
}
// 实现类
@Service
public class MyUserDetailsServiceImpl implements UserDetailsService {
    @Resource
    private UserDAO userDAO;

    @Override
    public UserDetails loadUserByUsername(String username) throws UsernameNotFoundException {
        fan.springsecuritytest.entity.User selectOne = userDAO.selectOne(new QueryWrapper<fan.springsecuritytest.entity.User>().eq("username", username));
        if (ObjectUtils.isEmpty(selectOne)){
            throw new UsernameNotFoundException("用户名不存在!");
        }
        // 设置权限,为 role,不可访问需要 admin 权限的路径
        List<GrantedAuthority> authorities = AuthorityUtils.commaSeparatedStringToAuthorityList("role");
        return new User(selectOne.getUsername(), new BCryptPasswordEncoder().encode(selectOne.getPassword()), authorities);
    }
}
4.3.2 hasAnyAuthority() 方法
如果当前的主体有任何提供的角色(给定的作为一个逗号分隔的字符串列表)的话,返回 true
// 配置类
@Override
protected void configure(HttpSecurity http) throws Exception {
	http.authorizeRequests()
		// 不需要通过登录验证就可以被访问到的资源路径
		.antMatchers("/", "/hello", "/login").permitAll()
		// 前面是资源的访问路径,后面是资源的名称或资源 ID,需要主体带有 admin或role 权限才可访问
		.antMatchers("/test").hasAnyAuthority("admin", "role")
		.anyRequest().authenticated(); // 其他请求需要认证
}
4.3.3 hasRole() 方法
如果用户具备给定角色就允许访问,否则出现 403。如果当前主体具有指定的角色,则返回 true


由于底层源码给设定的 role 加上了前缀 “ROLE_”,所以给主体设定角色时,也要加上前缀
// 配置类
@Override
protected void configure(HttpSecurity http) throws Exception {
	http.authorizeRequests()
		// 不需要通过登录验证就可以被访问到的资源路径
		.antMatchers("/", "/hello", "/login").permitAll()
		// 前面是资源的访问路径,后面是资源的名称或资源 ID,需要主体为 sale 角色才可访问
		.antMatchers("/test").hasRole("sale")
		.anyRequest().authenticated(); // 其他请求需要认证
}
// 实现类
@Service
public class MyUserDetailsServiceImpl implements UserDetailsService {
    @Resource
    private UserDAO userDAO;

    @Override
    public UserDetails loadUserByUsername(String username) throws UsernameNotFoundException {
        fan.springsecuritytest.entity.User selectOne = userDAO.selectOne(new QueryWrapper<fan.springsecuritytest.entity.User>().eq("username", username));
        if (ObjectUtils.isEmpty(selectOne)){
            throw new UsernameNotFoundException("用户名不存在!");
        }
        // 角色加上前缀
        List<GrantedAuthority> authorities = AuthorityUtils.commaSeparatedStringToAuthorityList("role, ROLE_sale");
        return new User(selectOne.getUsername(), new BCryptPasswordEncoder().encode(selectOne.getPassword()), authorities);
    }
}
4.3.4 hasAnyRole() 方法
表示用户具备任何一个角色都可以访问
// 配置类
@Override
protected void configure(HttpSecurity http) throws Exception {
	http.authorizeRequests()
		// 不需要通过登录验证就可以被访问到的资源路径
		.antMatchers("/", "/hello", "/login").permitAll()
		// 前面是资源的访问路径,后面是资源的名称或资源 ID,需要主体为 sale或sale1 角色才可访问
		.antMatchers("/test").hasAnyRole("sale", "sale1")
		.anyRequest().authenticated(); // 其他请求需要认证
}
3.3.5 自定义没有权限访问页面(非必要)
// 配置类
@Override
protected void configure(HttpSecurity http) throws Exception {
	// 没有权限访问跳转到该路径
	http.exceptionHandling().accessDeniedPage("/forbidden");
}
4.4 注解使用
4.4.1 @Secured
开启注解
@EnableGlobalMethodSecurity(securedEnabled=true)
可以加在启动类上,也可以在配置类上
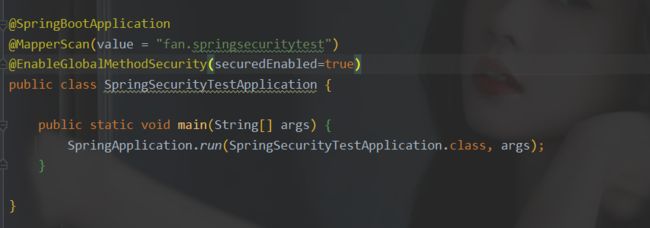
@Secured 判断是否具有角色,只有具有该角色才可以进行访问,这里匹配的字符串需要添加前缀 “ROLE_“
// Controller 方法
@GetMapping("/demo01")
@ResponseBody
@Secured(value = {"ROLE_sale", "ROLE_sale1"}) // 加上注解
public String demo01(){
	return "demo01 请求";
}
4.4.2 @PreAuthorize
进入方法前的权限验证, @PreAuthorize 可以将登录用户的 roles/permissions 参数传到方法中
@EnableGlobalMethodSecurity(prePostEnabled = true)
// Controller 方法
@GetMapping("/demo01")
@ResponseBody
@PreAuthorize("hasAnyAuthority('role')")
public String demo01(){
	return "demo01 请求";
}
4.4.3 @PostAuthorize
@EnableGlobalMethodSecurity(prePostEnabled = true)
@PostAuthorize 注解使用并不多,在方法执行后再进行权限验证,适合验证带有返回值的权限
@GetMapping("/demo02")
@ResponseBody
@PostAuthorize("hasAnyAuthority('admin')")
public String demo02(){
	System.out.println("返回前执行的方法!");
	return "demo02 请求";
}
4.4.4 @PreFilter
进入控制器之前对数据进行过滤,假如值取模 2 为 0,则输出
@RequestMapping("getTestPreFilter")
@PreAuthorize("hasRole('ROLE_管理员')")
@PreFilter(value = "filterObject.id%2==0")
@ResponseBody
public List<UserInfo> getTestPreFilter(@RequestBody List<UserInfo> list){
	list.forEach(t -> {
		System.out.println(t.getId() + "\t" + t.getUsername());
	});
	return list;
}
4.4.5 @PostFilter
权限验证之后对数据进行过滤 留下用户名是 admin1 的数据,表达式中的 filterObject 引用的是方法返回值 List 中的某一个元素
@GetMapping("/demo01")
@PreAuthorize("hasRole('ROLE_sale')")
@PostFilter("filterObject.username == 'admin1'")
@ResponseBody
public List<UserInfo> getAllUser(){
	ArrayList<UserInfo> list = new ArrayList<>();
	list.add(new UserInfo(1l,"admin1","6666"));
	list.add(new UserInfo(2l,"admin2","888"));
	return list;
}
4.5 基于数据库的记住我
4.5.1 SQL
jdbcTokenRepository.setCreateTableOnStartup(true);

该语句会自动在数据库中创建一个存放 Token 及相关信息的一个表,表名为 persistent_logins,也可以手动创建该表,不执行该语句。只有数据库中不存在该表需要创建表才执行。
CREATE TABLE `persistent_logins` (
  `username` varchar(64) NOT NULL,
  `series` varchar(64) NOT NULL,
  `token` varchar(64) NOT NULL,
  `last_used` timestamp NOT NULL,
  PRIMARY KEY (`series`)
) ENGINE=InnoDB DEFAULT CHARSET=utf8;
4.5.2 添加记住我功能
import org.springframework.security.web.authentication.rememberme.PersistentTokenRepository;

@Configuration
public class SecurityConfig extends WebSecurityConfigurerAdapter {
    @Resource
    private UserDetailsService myUserDetailsServiceImpl;

	// 注入数据源
    @Resource
    private DataSource dataSource;

    @Override
    protected void configure(AuthenticationManagerBuilder auth) throws Exception {
        auth.userDetailsService(myUserDetailsServiceImpl).passwordEncoder(passwordEncoder());
    }

    @Bean
    PasswordEncoder passwordEncoder(){
        return new BCryptPasswordEncoder();
    }

	@Bean
    public PersistentTokenRepository persistentTokenRepository(){
        JdbcTokenRepositoryImpl jdbcTokenRepository = new JdbcTokenRepositoryImpl();
        // 赋值数据源
        jdbcTokenRepository.setDataSource(dataSource);
        // 自动创建表, 第一次执行会创建,以后要执行就要删除掉!
        jdbcTokenRepository.setCreateTableOnStartup(true);
        return jdbcTokenRepository;
    }

    @Override
    protected void configure(HttpSecurity http) throws Exception {
    	// 开启记住我功能
        http.rememberMe()
	        .userDetailsService(myUserDetailsServiceImpl)
	        .tokenRepository(persistentTokenRepository());
    }
}
4.5.3 登录页面
<form action="/user/login" method="post">
  用户名:<input type="text" name="uname"/><br/>
  密码:<input type="password" name="pword"/><br/>
  <input type="submit" value="提交"/>

  记住我:<input type="checkbox" name="remember-me" title="记住密码"/><br/>
form>
4.5.4 设置有效期
@Override
protected void configure(HttpSecurity http) throws Exception {
	// 开启记住我功能
	http.rememberMe()
		.userDetailsService(myUserDetailsServiceImpl)
		.tokenRepository(persistentTokenRepository())
		.tokenValiditySeconds(100); // 设置过期时间为 100 秒,单位为秒
}
4.6 用户注销
4.6.1 退出链接
<a href="/logout">退出a>
4.6.2 配置类
@Configuration
public class SecurityConfig extends WebSecurityConfigurerAdapter {
    @Resource
    private UserDetailsService myUserDetailsServiceImpl;

    @Override
    protected void configure(AuthenticationManagerBuilder auth) throws Exception {
        auth.userDetailsService(myUserDetailsServiceImpl).passwordEncoder(passwordEncoder());
    }

    @Bean
    PasswordEncoder passwordEncoder(){
        return new BCryptPasswordEncoder();
    }

    @Override
    protected void configure(HttpSecurity http) throws Exception {
    	// 添加退出映射地址
        http.logout()
			.logoutUrl("/logout") // 与退出链接对应
			// 退出成功后跳转的地址,可以使用自定义退出成功处理器
			.logoutSuccessUrl("/login").permitAll();
    }
}
4.7 CSRF
4.7.1 概念
跨站请求伪造(英语:Cross-site request forgery),也被称为 one-click attack 或者 session riding,通常缩写为 CSRF 或者 XSRF, 是一种挟制用户在当前已登录的 Web 应用程序上执行非本意的操作的攻击方法。跟跨网站脚本(XSS)相比,XSS 利用的是用户对指定网站的信任,CSRF 利用的是网站对用户网页浏览器的信任
跨站请求攻击,简单地说,是攻击者通过一些技术手段欺骗用户的浏览器去访问一个自己曾经认证过的网站并运行一些操作(如发邮件,发消息,甚至财产操作如转账和购买商品)。由于浏览器曾经认证过,所以被访问的网站会认为是真正的用户操作而去运行。这利用了 web 中用户身份验证的一个漏洞:简单的身份验证只能保证请求发自某个用户的浏览器,却不能保证请求本身是用户自愿发出的
从 Spring Security 4.0 开始,默认情况下会启用 CSRF 保护,以防止 CSRF 攻击应用程序,Spring Security CSRF 会针对 PATCH,POST,PUT 和 DELETE 方法进行防护
4.7.2 Spring Security 防御机制
4.7.2.1 Csrf Token
用户登录时,系统发放一个 CsrfToken 值,用户携带该 CsrfToken 值与用户名、密码等参数完成登录。系统记录该会话的 CsrfToken 值,之后在用户的任何请求中,都必须带上该 CsrfToken 值,并由系统进行校验
4.7.2.2 SpringSecurity 中使用 Csrf Token
Spring Security 通过注册一个 CsrfFilter 来专门处理 CSRF 攻击,在 Spring Security 中,CsrfToken 是一个用于描述 Token 值,以及验证时应当获取哪个请求参数或请求头字段的接口
public interface CsrfToken extends Serializable {
	// 获取 _csrf 参数的 key
    String getHeaderName();
    String getParameterName();

	// 获取 _csrf 参数的 value
    String getToken();
}
public interface CsrfTokenRepository {
	// CsrfToken 的生成过程
    CsrfToken generateToken(HttpServletRequest request);

	// 保存 CsrfToken
    void saveToken(CsrfToken token, HttpServletRequest request, HttpServletResponse response);

	// 如何加载 CsrfToken
    CsrfToken loadToken(HttpServletRequest request);
}
实现类:
默认使用的是 DefaultCsrfToken
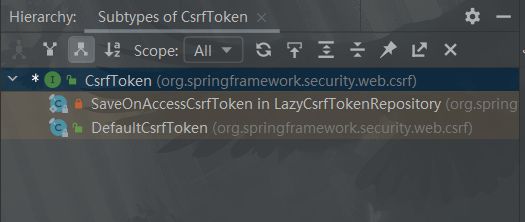
默认使用的是 HttpSessionCsrfTokenRepository
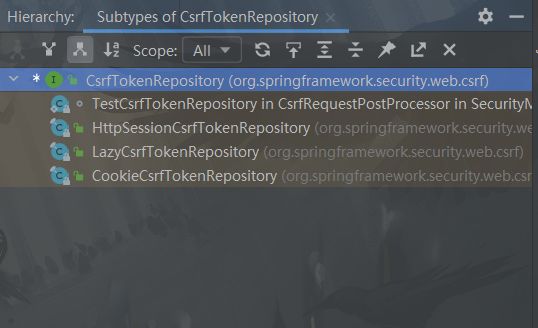
4.7.2.3 HttpSessionCsrfTokenRepository
在默认情况下,Spring Security 加载的是一个HttpSessionCsrfTokenRepository,将 CsrfToken 值存储在 HttpSession 中,并指定前端把 CsrfToken 值放在名为 “_csrf” 的请求参数或名为 “X-CSRF-TOKEN” 的请求头字段里(可以调用相应的设置方法来重新设定)。校验时,通过对比 HttpSession 内存储的 CsrfToken 值与前端携带的 CsrfToken 值是否一致,便能断定本次请求是否为 CSRF 攻击
public final class HttpSessionCsrfTokenRepository implements CsrfTokenRepository {
    private static final String DEFAULT_CSRF_PARAMETER_NAME = "_csrf";
    private static final String DEFAULT_CSRF_HEADER_NAME = "X-CSRF-TOKEN";
    private static final String DEFAULT_CSRF_TOKEN_ATTR_NAME = HttpSessionCsrfTokenRepository.class.getName().concat(".CSRF_TOKEN");
    private String parameterName = "_csrf";
    private String headerName = "X-CSRF-TOKEN";
    private String sessionAttributeName;

    public HttpSessionCsrfTokenRepository() {
        this.sessionAttributeName = DEFAULT_CSRF_TOKEN_ATTR_NAME;
    }

    public void saveToken(CsrfToken token, HttpServletRequest request, HttpServletResponse response) {
        HttpSession session;
        if (token == null) {
            session = request.getSession(false);
            if (session != null) {
                session.removeAttribute(this.sessionAttributeName);
            }
        } else {
            session = request.getSession();
            session.setAttribute(this.sessionAttributeName, token);
        }

    }

    public CsrfToken loadToken(HttpServletRequest request) {
        HttpSession session = request.getSession(false);
        return session == null ? null : (CsrfToken)session.getAttribute(this.sessionAttributeName);
    }

    public CsrfToken generateToken(HttpServletRequest request) {
        return new DefaultCsrfToken(this.headerName, this.parameterName, this.createNewToken());
    }

    public void setParameterName(String parameterName) {
        Assert.hasLength(parameterName, "parameterName cannot be null or empty");
        this.parameterName = parameterName;
    }

    public void setHeaderName(String headerName) {
        Assert.hasLength(headerName, "headerName cannot be null or empty");
        this.headerName = headerName;
    }

    public void setSessionAttributeName(String sessionAttributeName) {
        Assert.hasLength(sessionAttributeName, "sessionAttributename cannot be null or empty");
        this.sessionAttributeName = sessionAttributeName;
    }

    private String createNewToken() {
        return UUID.randomUUID().toString();
    }
}
- saveToken 方法将 CsrfToken 保存在 HttpSession 中,将来再从 HttpSession 中取出和前端传来的参数做比较
- loadToken 方法当然就是从 HttpSession 中读取 CsrfToken 出来
- generateToken 是生成 CsrfToken 的过程,可以看到,生成的默认载体就是 DefaultCsrfToken,而 CsrfToken 的值则通过 createNewToken 方法生成,是一个 UUID 字符串
- 在构造 DefaultCsrfToken 是还有两个参数 headerName 和 parameterName,这两个参数是前端保存参数的 key
适用于前后端不分离的开发
<input type="hidden" th:if="${_csrf}!=null" th:value="${_csrf.token}" name="_csrf"/>
或者<input type="hidden" th:value="${_csrf.token}" th:name="${_csrf.parameterName}">
4.7.2.4 CookieCsrfTokenRepository
前后端分离开发需要 CsrfTokenRepository 的另一个实现类 CookieCsrfTokenRepository ,是一种更加灵活可行的方案,它将 CsrfToken 值存储在用户的 cookie 内。减少了服务器 HttpSession 存储的内存消耗,并且当用 cookie 存储 CsrfToken 值时,前端可以用 JavaScript 读取(需要设置该 cookie 的 httpOnly 属性为 false),而不需要服务器注入参数,在使用方式上更加灵活
存储在 cookie 中是不会被 CSRF 利用的,cookie 只有在同域的情况下才能被读取,所以杜绝了第三方站点跨域获取 CsrfToken 值的可能。同时 CSRF 攻击本身是不知道 cookie 内容的,只是利用了当请求自动携带 cookie 时可以通过身份验证的漏洞。但服务器对 CsrfToken 值的校验并非取自 cookie,而是需要前端从 Cookie 中自己提取出来 _csrf 参数,然后拼接成参数传递给后端,单纯的将 Cookie 中的数据传到服务端是没用的
-
配置的时候通过 withHttpOnlyFalse 方法获取 CookieCsrfTokenRepository 的实例,该方法会设置 Cookie 中的 HttpOnly 属性为 false,也就是允许前端通过 JS 操作 Cookie(否则就没有办法获取到 _csrf)
@Override protected void configure(HttpSecurity http) throws Exception { http.csrf().csrfTokenRepository(CookieCsrfTokenRepository.withHttpOnlyFalse()); } -
可以采用 header 或者 param 的方式添加 csrf_token,下面示范从 cookie 中获取 token
<form action="/executeLogin" method="post">
	<input type="hidden" name="_csrf">
	用户名<input type="text" name="username" class="lowin-input">
	密码<input type="password" name="password" class="lowin-input">
	记住我<input name="remember-me" type="checkbox" value="true" />
	<input class="lowin-btn login-btn" type="submit">
form>
<script>
    $(function () {
        var aCookie = document.cookie.split("; ");
        console.log(aCookie);
        for (var i=0; i < aCookie.length; i++){
            var aCrumb = aCookie[i].split("=");
            if ("XSRF-TOKEN" == aCrumb[0])
                $("input[name='_csrf']").val(aCrumb[1]);
        }
    });
script>
4.7.2.5 LazyCsrfTokenRepository
对于常见的 GET 请求实际上是不需要 CSRF 攻击校验的,但是,每当 GET 请求到来时,下面这段代码都会执行:
if (missingToken) {
     csrfToken = this.tokenRepository.generateToken(request);
     this.tokenRepository.saveToken(csrfToken, request, response);
}
生成 CsrfToken 并保存,但实际上却没什么用,因为 GET 请求不需要 CSRF 攻击校验。所以,Spring Security 官方又推出了 LazyCsrfTokenRepository
LazyCsrfTokenRepository 实际上不能算是一个真正的 CsrfTokenRepository,它是一个代理,可以用来增强 HttpSessionCsrfTokenRepository 或者 CookieCsrfTokenRepository 的功能:
public final class LazyCsrfTokenRepository implements CsrfTokenRepository {
    private static final String HTTP_RESPONSE_ATTR = HttpServletResponse.class.getName();
    private final CsrfTokenRepository delegate;

    public LazyCsrfTokenRepository(CsrfTokenRepository delegate) {
        Assert.notNull(delegate, "delegate cannot be null");
        this.delegate = delegate;
    }

    public CsrfToken generateToken(HttpServletRequest request) {
        return this.wrap(request, this.delegate.generateToken(request));
    }

    public void saveToken(CsrfToken token, HttpServletRequest request, HttpServletResponse response) {
        if (token == null) {
            this.delegate.saveToken(token, request, response);
        }

    }

    public CsrfToken loadToken(HttpServletRequest request) {
        return this.delegate.loadToken(request);
    }

    private CsrfToken wrap(HttpServletRequest request, CsrfToken token) {
        HttpServletResponse response = this.getResponse(request);
        return new LazyCsrfTokenRepository.SaveOnAccessCsrfToken(this.delegate, request, response, token);
    }

    private HttpServletResponse getResponse(HttpServletRequest request) {
        HttpServletResponse response = (HttpServletResponse)request.getAttribute(HTTP_RESPONSE_ATTR);
        Assert.notNull(response, () -> {
            return "The HttpServletRequest attribute must contain an HttpServletResponse for the attribute " + HTTP_RESPONSE_ATTR;
        });
        return response;
    }

    private static final class SaveOnAccessCsrfToken implements CsrfToken {
        private transient CsrfTokenRepository tokenRepository;
        private transient HttpServletRequest request;
        private transient HttpServletResponse response;
        private final CsrfToken delegate;

        SaveOnAccessCsrfToken(CsrfTokenRepository tokenRepository, HttpServletRequest request, HttpServletResponse response, CsrfToken delegate) {
            this.tokenRepository = tokenRepository;
            this.request = request;
            this.response = response;
            this.delegate = delegate;
        }

        public String getHeaderName() {
            return this.delegate.getHeaderName();
        }

        public String getParameterName() {
            return this.delegate.getParameterName();
        }

        public String getToken() {
            this.saveTokenIfNecessary();
            return this.delegate.getToken();
        }

        public boolean equals(Object obj) {
            if (this == obj) {
                return true;
            } else if (obj != null && this.getClass() == obj.getClass()) {
                LazyCsrfTokenRepository.SaveOnAccessCsrfToken other = (LazyCsrfTokenRepository.SaveOnAccessCsrfToken)obj;
                if (this.delegate == null) {
                    if (other.delegate != null) {
                        return false;
                    }
                } else if (!this.delegate.equals(other.delegate)) {
                    return false;
                }

                return true;
            } else {
                return false;
            }
        }

        public int hashCode() {
            int prime = true;
            int result = 1;
            int result = 31 * result + (this.delegate == null ? 0 : this.delegate.hashCode());
            return result;
        }

        public String toString() {
            return "SaveOnAccessCsrfToken [delegate=" + this.delegate + "]";
        }

        private void saveTokenIfNecessary() {
            if (this.tokenRepository != null) {
                synchronized(this) {
                    if (this.tokenRepository != null) {
                        this.tokenRepository.saveToken(this.delegate, this.request, this.response);
                        this.tokenRepository = null;
                        this.request = null;
                        this.response = null;
                    }

                }
            }
        }
    }
}
- generateToken 方法,该方法用来生成 CsrfToken,默认 CsrfToken 的载体是 DefaultCsrfToken,现在换成了 SaveOnAccessCsrfToken
- SaveOnAccessCsrfToken 和 DefaultCsrfToken 并没有太大区别,主要是 getToken 方法有区别,在 SaveOnAccessCsrfToken 中,当开发者调用 getToken 想要去获取 csrfToken 时,才会去对 csrfToken 做保存操作(调用 HttpSessionCsrfTokenRepository 或者 CookieCsrfTokenRepository 的 saveToken 方法)
- LazyCsrfTokenRepository 自己的 saveToken 则做了修改,相当于放弃了 saveToken 的功能,调用该方法并不会做保存操作
在使用 Spring Security 时,如果对 csrf 不做任何配置,默认其实就是 LazyCsrfTokenRepository + HttpSessionCsrfTokenRepository 组合
4.7.3 参数校验
校验主要是通过 CsrfFilter 过滤器来进行,核心为 doFilterInternal() 方法
protected void doFilterInternal(HttpServletRequest request, HttpServletResponse response, FilterChain filterChain) throws ServletException, IOException {
        request.setAttribute(HttpServletResponse.class.getName(), response);
        CsrfToken csrfToken = this.tokenRepository.loadToken(request);
        boolean missingToken = csrfToken == null;
        if (missingToken) {
            csrfToken = this.tokenRepository.generateToken(request);
            this.tokenRepository.saveToken(csrfToken, request, response);
        }

        request.setAttribute(CsrfToken.class.getName(), csrfToken);
        request.setAttribute(csrfToken.getParameterName(), csrfToken);
        if (!this.requireCsrfProtectionMatcher.matches(request)) {
            if (this.logger.isTraceEnabled()) {
                this.logger.trace("Did not protect against CSRF since request did not match " + this.requireCsrfProtectionMatcher);
            }

            filterChain.doFilter(request, response);
        } else {
            String actualToken = request.getHeader(csrfToken.getHeaderName());
            if (actualToken == null) {
                actualToken = request.getParameter(csrfToken.getParameterName());
            }

            if (!equalsConstantTime(csrfToken.getToken(), actualToken)) {
                this.logger.debug(LogMessage.of(() -> {
                    return "Invalid CSRF token found for " + UrlUtils.buildFullRequestUrl(request);
                }));
                AccessDeniedException exception = !missingToken ? new InvalidCsrfTokenException(csrfToken, actualToken) : new MissingCsrfTokenException(actualToken);
                this.accessDeniedHandler.handle(request, response, (AccessDeniedException)exception);
            } else {
                filterChain.doFilter(request, response);
            }
        }
    }
- 首先调用 tokenRepository.loadToken 方法读取 CsrfToken 出来,这个 tokenRepository 就是配置的 CsrfTokenRepository 实例,CsrfToken 存在 HttpSession 中,这里就从 HttpSession 中读取,CsrfToken 存在 Cookie 中,这里就从 Cookie 中读取
- 如果调用 tokenRepository.loadToken 方法没有加载到 CsrfToken,那说明这个请求可能是第一次发起,则调用 tokenRepository.generateToken 方法生成 CsrfToken ,并调用 tokenRepository.saveToken 方法保存 CsrfToken
- 这里还调用 request.setAttribute 方法存了一些值进去,这就是默认情况下,通过 JSP 或者 Thymeleaf 标签渲染 _csrf 的数据来源
- requireCsrfProtectionMatcher.matches() 方法则使用用来判断哪些请求方法需要做校验,默认情况下,“GET”, “HEAD”, “TRACE”, “OPTIONS” 方法是不需要校验的
- 接下来获取请求中传递来的 CSRF 参数,先从请求头中获取,获取不到再从请求参数中获取
- 获取到请求传来的 CSRF 参数之后,再和一开始加载到的 csrfToken 做比较,如果不同的话,就抛出异常
4.7.4 CSRF 注销
开启 CSRF 后,不仅登录受到保护,注销也同样受到保护,因此同样需要带上 CsrfToken
<form action="/logout" method="post">
    <input type="hidden" th:value="${_csrf.token}" name="_csrf"/>
    <input type="submit" value="退出">
form>
4.8 新版本 WebSecurityConfigurerAdapter 被弃用
官方地址:Spring Security without the WebSecurityConfigurerAdapter
原写法:
@Configuration
public class SecurityConfiguration extends WebSecurityConfigurerAdapter {

    @Override
    protected void configure(HttpSecurity http) throws Exception {
        http
            .authorizeHttpRequests((authz) -> authz
                .anyRequest().authenticated()
            )
            .httpBasic(withDefaults());
    }

    @Override
    public void configure(WebSecurity web) {
        web.ignoring().antMatchers("/ignore1", "/ignore2");
    }

    @Bean
    public DataSource dataSource() {
        return new EmbeddedDatabaseBuilder()
            .setType(EmbeddedDatabaseType.H2)
            .build();
    }

    @Override
    protected void configure(AuthenticationManagerBuilder auth) throws Exception {
        UserDetails user = User.withDefaultPasswordEncoder()
            .username("user")
            .password("password")
            .roles("USER")
            .build();
        auth.jdbcAuthentication()
            .withDefaultSchema()
            .dataSource(dataSource())
            .withUser(user);
    }
}
改动后写法,由重写改为注入 Bean:
@Configuration
public class SecurityConfiguration {

    @Bean
    public SecurityFilterChain filterChain(HttpSecurity http) throws Exception {
        http
            .authorizeHttpRequests((authz) -> authz
                .anyRequest().authenticated()
            )
            .httpBasic(withDefaults());
        return http.build();
    }

    @Bean
    public WebSecurityCustomizer webSecurityCustomizer() {
        return (web) -> web.ignoring().antMatchers("/ignore1", "/ignore2");
    }

    @Bean
    public DataSource dataSource() {
        return new EmbeddedDatabaseBuilder()
            .setType(EmbeddedDatabaseType.H2)
            .addScript(JdbcDaoImpl.DEFAULT_USER_SCHEMA_DDL_LOCATION)
            .build();
    }

    @Bean
    public UserDetailsManager users(DataSource dataSource) {
        UserDetails user = User.withDefaultPasswordEncoder()
            .username("user")
            .password("password")
            .roles("USER")
            .build();
        JdbcUserDetailsManager users = new JdbcUserDetailsManager(dataSource);
        users.createUser(user);
        return users;
    }
}
具体详见官方文档示例
5. Spring Security 微服务权限方案
5.1 概念
微服务,关键其实不仅仅是微服务本身,而是系统要提供一套基础的架构,这种架构使得微服务可以独立的部署、运行、升级,不仅如此,这个系统架构还让微服务与微服务之间在结构上“松耦合”,而在功能上则表现为一个统一的整体。这种所谓的“统一的整体”表现出来的是统一风格的界面,统一的权限管理,统一的安全策略,统一的上线过程,统一的日志和审计方法,统一的调度方式,统一的访问入口等等。微服务的目的是有效的拆分应用,实现敏捷开发和部署
5.2 微服务认证与授权实现
5.2.1 认证授权过程分析
- 如果是基于 Session,那么 Spring-security 会对 cookie 里的 sessionid 进行解析,找到服务器存储的 session 信息,然后判断当前用户是否符合请求的要求
- 如果是 token,则是解析出 token,然后将当前请求加入到 Spring Security 管理的权限信息中去
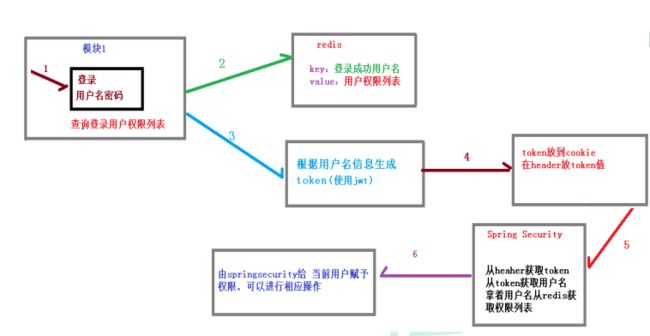
如果系统的模块众多,每个模块都需要进行授权与认证,所以选择基于 token 的形式进行授权与认证,用户根据用户名密码认证成功,然后获取当前用户角色的一系列权限值,并以用户名为 key,权限列表为 value 的形式存入 redis 缓存中,根据用户名相关信息生成 token 返回,浏览器将 token 记录到 cookie 中,每次调用 api 接口都默认将 token 携带到 header 请求头中,Spring-security 解析 header 头获取 token 信息,解析 token 获取当前用户名,根据用户名就可以从 redis 中获取权限列表,这样 Spring-security 就能够判断当前请求是否有权限访问
5.2.2 具体实现
详见:https://blog.csdn.net/ACE_U_005A/article/details/124464590
5.2.3 自定义 UsernamePasswordAuthenticationFilter
可以使用 Spring Security 默认的 UsernamePasswordAuthenticationFilter。假如需要在里面自定义认证逻辑的话,可以自定义类继承该过滤器
通过 AuthenticationManager 的 authenticate 方法来进行用户认证,所以需要把 AuthenticationManager 注入容器或者直接传入 authenticationManager() 方法。jwtAuthenticationFilter 为 JWT 过滤器
http.addFilter(new TokenLoginFilter(authenticationManager(), jwtAuthenticationFilter , redisTemplate);
认证成功的话生成一个 JWT 并返回。同时将 JWT 存入 Redis
public class TokenLoginFilter extends UsernamePasswordAuthenticationFilter {

    private JWTUtil jwtUtil; // JWT 工具类
    private RedisTemplate redisTemplate;
    private AuthenticationManager authenticationManager; // 用来认证

    public TokenLoginFilter(AuthenticationManager authenticationManager, JwtAuthenticationFilter  jwtAuthenticationFilter , RedisTemplate redisTemplate) {
        this.authenticationManager = authenticationManager;
        this.jwtAuthenticationFilter = jwtAuthenticationFilter ;
        this.redisTemplate = redisTemplate;
        this.setPostOnly(false);
        this.setRequiresAuthenticationRequestMatcher(new AntPathRequestMatcher("/hrms/login","POST"));
    }

    // 1. 获取表单提交用户名和密码
    @Override
    public Authentication attemptAuthentication(HttpServletRequest request, HttpServletResponse response) throws AuthenticationException {
        try {
        	// 获取表单提交的数据
            User user = new ObjectMapper().readValue(request.getInputStream(), User.class);
            // 将用户名和密码传给 UserDetailsService 进行认证,认证成功返回认证信息 Authentication
            Authentication authenticate = authenticationManager.authenticate(new UsernamePasswordAuthenticationToken(user.getUsername(), user.getPassword(), new ArrayList<>()));
            return authenticate;
        } catch (IOException e) {
            e.printStackTrace(); throw new RuntimeException();
        }
    }

    // 2. 认证成功之后调用的方法
    @Override
    protected void successfulAuthentication(HttpServletRequest request, HttpServletResponse response, FilterChain chain, Authentication authResult) throws IOException, ServletException {
        // 认证成功,得到认证成功之后的用户信息
        SecurityUser user = (SecurityUser)authResult.getPrincipal();
        // 根据用户名生成 jwt

        // 把用户名称和用户权限列表放到 Redis

        // 返回 jwt

    }

    // 3. 认证失败调用的方法
    @Override
    protected void unsuccessfulAuthentication(HttpServletRequest request, HttpServletResponse response, AuthenticationException failed) throws IOException, ServletException {

    }
}
