UCI数据集+机器学习+十折交叉验证
本文为本学期《生物医学信息》课程作业,第一次发文,希望可以记录自己的学习状态,和大家一起学习进步。
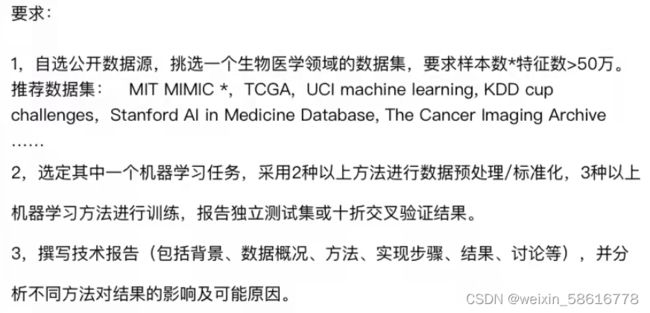
作业要求:
背景介绍:
UCI 数据集是加州大学欧文分校(University of CaliforniaIrvine)提出的用于机器学习的
数据库。目前共有 622 个数据集,是一个常用的机器学习标准测试数据集。本文选取 UCI
数据集中第 196 号数据集进行处理分析。
sklearn 是一个 Python 第三方提供的非常强力的机器学习库,它建立在 NumPy, SciPy,
Pandas 和 Matplotlib 之上,在 sklearn 里面有六大任务模块:分别是分类、回归、聚类、
降维、模型选择和预处理。合理的使用 sklearn 可以减少代码量与编程时间,使我们有更多
的精力去分析数据分布,调整模型和修改超参。
数据集介绍:
本实验使用的数据集来自 UCI machine learning 数据集生命科学类中的 Localization
Data for Person Activity Data Set,此数据集共有 164860 个样本以及 8 个特征,样本数×
特征数 > 50 万,包含了五个人的左右脚踝、腰部和胸部在不同时间点的位置坐标等属性,
根据这些属性,将受试者分为行走、躺下、站立等 11 种不同的行为状态。
数据下载地址为:
UCI Machine Learning Repository: Localization Data for Person Activity Data Set
数据实例:
A01,020-000-033-111,633790226057226795,27.05.2009 14:03:25:723,4.292500972747803,
2.0738532543182373,1.36650812625885, walking
第一列 SequenceName:{A01,A02,A03,A04,A05,B01,B02,B03,B04,B05,C01,C02,
C03,C04,C05,D01,D02,D03,D04,D05,E01,E02,E03,E04,E05} (Nominal) ,代表 A, B, C, D,
E 5 个人。
第二列 TagIdentificator:{010-000-024-033,020-000-033-111,020-000-032-221,
010-000-030-096} (Nominal) ,使用不同的数字序列,代表人体的不同部位,分别为
ANKLE_LEFT、ANKLE_RIGHT、CHEST、BELT。第三列 Timestamp:时间戳。
第四列 date:符合 dd.MM.yyyy HH:mm:ss:SSS 形式的日期数据。
第五列-第七列分别为 x、y、z 坐标。
第八列 activity:{walking, falling, lying down, lying, sitting down, sitting, standing up
from lying, on all fours, sitting on the ground, standing up from sitting, standing up from
sitting on the ground},表示人的行为状态,共有以上 11 种。
K折交叉验证:
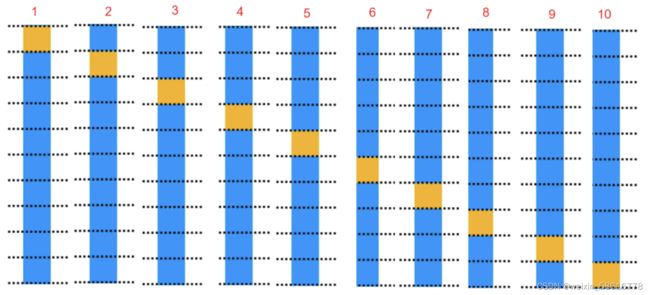
K 次交叉验证(K-fold cross-validation),将训练集分割成 K 个子样本,一个单独的
子样本被保留作为验证模型的数据,其他 K-1 个样本用来训练。交叉验证重复 K 次,每个
子样本验证一次,平均 K 次的结果或者使用其它结合方式,最终得到一个单一估测。这个
方法的优势在于,同时重复运用随机产生的子样本进行训练和验证,每次的结果验证一次,
相关操作:
代码需要import的包:
import pandas as pd
from sklearn import preprocessing,tree,model_selection,svm,naive_bayes
import time
from sklearn.model_selection import KFold, train_test_split
from sklearn.ensemble import BaggingClassifier, RandomForestClassifier, AdaBoostClassifier, GradientBoostingClassifier
from sklearn.neighbors import KNeighborsClassifier
读入数据,获取数据集基本信息,并显示前五行数据。代码如下:
path = "./ConfLongDemo_JSI.txt"
df = pd.read_table(path, sep=',', names=['SequenceName', 'TagIdentificator',
                                         'Timestamp', 'date', 'x', 'y', 'z', 'activity'])
print(df.head())
df.info()
运行结果:
# 对类别型特征进行哑变量的制作
cat_features = ['SequenceName', 'TagIdentificator']
for col in cat_features:
    df[col] = df[col].astype('object')
X_cat = df[cat_features]
X_cat = pd.get_dummies(X_cat)
# print(X_cat.head())

# 对数值型特征进行数据标准化和归一化
scale_X = preprocessing.StandardScaler()
num_features = ['Timestamp', 'x', 'y', 'z']
X_num = scale_X.fit_transform(df[num_features])
X_num = preprocessing.normalize(X_num, norm='l2')
X_num = pd.DataFrame(data=X_num, columns=num_features, index=df.index)
# print(X_num.head())
观察到 Timestamp 和 date 都为时间数据,存在强相关的冗余,因此可将 date 属性去
除,只对 Timestamp 进行分析。
进行数据预处理,挑选出类别型特征(SequenceName, TagIdentificator),将其转换为哑变
量。挑选出数值型特征(Timestamp,x,y,z),进行数据的标准化和归一化。标准化
( Z-Score ) 的 公 式 为 : (X-mean)/std 计 算 时 对 每 个 属 性 / 每 列 分 别 进 行 , 使 用
sklearn.preprocessing.scale()函数,可以直接将给定数据进行标准化。标准化的目的在于避
免原始特征值差异过大,导致训练得到的参数权重不归一,无法比较各特征的重要性。在数
据标准化之后进行数据的归一化,查看结果的前五行。代码如下:
# 对类别型特征进行哑变量的制作
cat_features = ['SequenceName', 'TagIdentificator']
for col in cat_features:
    df[col] = df[col].astype('object')
X_cat = df[cat_features]
X_cat = pd.get_dummies(X_cat)
# print(X_cat.head())

# 对数值型特征进行数据标准化和归一化
scale_X = preprocessing.StandardScaler()
num_features = ['Timestamp', 'x', 'y', 'z']
X_num = scale_X.fit_transform(df[num_features])
X_num = preprocessing.normalize(X_num, norm='l2')
X_num = pd.DataFrame(data=X_num, columns=num_features, index=df.index)
# print(X_num.head())
合并数据,在分别对数值型数据已经类别型数据进行数据预处理后,将它们合并组成
Sam,显示 Sam 的前 5 行与形状,代码如下:
# 合并数据
Sam = pd.concat([X_cat, X_num,df['activity']], axis=1, ignore_index=False)
# print(Sam.head())
# print(Sam.shape)
设置十折交叉,对数据集进行划分,并查看测试数据集。代码如下:
# 十折交叉
kf = KFold(n_splits=10)
for train_index, test_index in kf.split(Sam):
    print("Train:", train_index, "Validation:",test_index)
    print(len(train_index),len(test_index))
    print(Sam.iloc[train_index, 0:34])
根据十折交叉所得训练集及测试集的索引,从 Sam 中取得实际用于训练和测试的部分。
代码如下:
X_train, X_test = Sam.iloc[train_index, 0:33], Sam.iloc[test_index, 0:33]
y_train, y_test = Sam.iloc[train_index, 33], Sam.iloc[test_index, 33]
共使用8种算法进行训练,分别测试其准确率和用时。分别是K近邻算法、决策树算法、先验为高斯分布的朴素贝叶斯算法、支持向量机算法、Tree Bagging算法、随机森林算法、adaboost算法、GBDT算法。
采用十折交叉验证的方法代码如下:
clfs = {
        'K_neighbor': KNeighborsClassifier(),
        'decision_tree': tree.DecisionTreeClassifier(),
        'naive_gaussian': naive_bayes.GaussianNB(),
        'svm': svm.SVC(),
        'bagging_tree': BaggingClassifier(tree.DecisionTreeClassifier(), max_samples=0.5,max_features=0.5),
        'random_forest': RandomForestClassifier(n_estimators=50),
        'adaboost': AdaBoostClassifier(n_estimators=50),
        'gradient_boost': GradientBoostingClassifier(n_estimators=50, learning_rate=1.0,max_depth=1, random_state=0)
        }

# 合并数据
Sam = pd.concat([X_cat, X_num,df['activity']], axis=1, ignore_index=False)
# print(Sam.head())
# print(Sam.shape)

for clf_key in clfs.keys():
    print('\nthe classifier is:', clf_key)
    Sum_score = 0
    Sum_elapsed = 0

    # K折交叉
    n_splits = 5
    kf = KFold(n_splits)
    for train_index, test_index in kf.split(Sam):
        # print("Train:", train_index, "Validation:",test_index)
        # print(len(train_index),len(test_index))
        # print(Sam.iloc[train_index, 0:33])
        # # print(Sam.iloc[train_index,33])

        X_train, X_test = Sam.iloc[train_index, 0:33], Sam.iloc[test_index, 0:33]
        y_train, y_test = Sam.iloc[train_index, 33], Sam.iloc[test_index, 33]

        clf = clfs[clf_key]

        begin = time.perf_counter()
        clf.fit(X_train, y_train.ravel())
        elapsed = time.perf_counter() - begin

        score = clf.score(X_test, y_test.ravel())
        Sum_score = Sum_score + score
        Sum_elapsed = Sum_elapsed + elapsed
        print('the score is:', score)
        # print('the elapsed is:', elapsed)
    print('The score is:', Sum_score / n_splits)
    print('The elapsed is:', Sum_elapsed / n_splits)
使用如参考文章中划分独立测试集的方法代码为:
# 合并数据
X = pd.concat([X_cat, X_num], axis=1, ignore_index=False)
y = df['activity']
# print(X.head())
# print(X.shape)
# print(y.shape)

# 划分训练集测试集
X_train, X_test, y_train, y_test = train_test_split(X, y, random_state=0, test_size=0.20, shuffle=True)
# print(X_train.shape, y_train.shape)
# print(X_test.shape, y_test.shape)

for clf_key in clfs.keys():
    print('\nthe classifier is:', clf_key)
    clf = clfs[clf_key]

    begin = time.perf_counter()
    clf.fit(X_train, y_train.ravel())
    elapsed = time.perf_counter() - begin

    score = clf.score(X_test, y_test.ravel())
    print('the score is:', score)
    print('the elapsed is:', elapsed)
结果讨论:
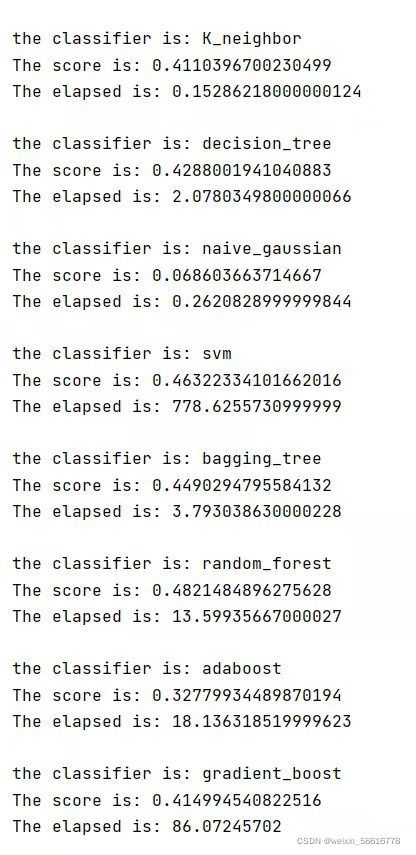
十折交叉验证运行结果如下:
划分独立测试集的结果如下:
可以看到,机器学习模型的复杂度并不直接与准确度成正比。
在十折交叉验证中,最简单的 KNN 模型都可以达到 0.411 的准确度,而集成方法 adaboost 的准
确度却只有 0.327 左右。在这 8 中算法中,随机森林算法的准确度最高,同时 SVM 和 Bagging
Tree 的表现也较为良好。
以 KNN 为例,分别输出十折交叉验证过程每一次实验的准确度如下图,可以看出,不
同训练集测试集对于同一模型的准确度存在一定影响,准确度最小为 0.361,最大为 0.489,
相差 0.128。因此采用十折交叉验证得到的结果可以更加准确体现这一模型的性能与好坏,
更加具有说服力。
在独立测试集中,最简单的 KNN 模型能达到 0.789 的准确度,而 adaboost、gradient_boost 等
集成方法却连 0.4 的准确度都达不到。在这 8 种算法中,准确度最高的是 三个算法是决策树、
Bagging Tree 和随机森林,都达到了 0.85 以上,树模型可能更加适合这个数据集。
同一模型在独立测试集的的表现优于十折交叉验证中的表现。为排除训练集以及测试集
大小对实验结果的影响,由于独立测试集是是按照 8 : 2 划分的,所以采用五折交叉验证重
新测试,即将 K 折交叉验证中的 n_splits 参数赋值为 5,再次运行代码。结果如下图:
可以看到即使训练集测试集大小相同(训练集:测试集 = 8 : 2),独立测试集的结果都远胜于K折交叉验证的结果,观察ConfLongDemo_JSI.txt文件,发现作为输出y的‘activity’字段,分布不是无序的,而是有聚集有按类别排序的分布,对于K折交叉验证的方法,其划分数据集采用的方式是按照索引大小整块取出的方法,因此用于训练和测试的数据集其‘activity’字段都有一定规律性存在。而使用sklearn的train_test_split()函数进行划分的训练集和测试集都是随机划分的,因此对于此数据集在同一模型下,使用独立测试集的表现更好。
模型和测试方法没有优劣之分,只有适不适合的区别,具体使用什么方法或模型取决于具体的问题。
由于刚刚入门,自己独立完成存在一定困难。所以在网上借鉴(copy)了相关文章的处理方法。并自己进行一定修改。主要体现在十折交叉验证这一方法的应用。
参考文章:
使用sklearn进行UCI machine learning数据集的机器学习实战 - 简书
3.1. Cross-validation: evaluating estimator performance — scikit-learn 1.1.dev0 documentation交叉验证法(cross validation) - 云+社区 - 腾讯云
3.1. Cross-validation: evaluating estimator performance — scikit-learn 1.1.dev0 documentation
文章资源及源代码:
数据文件及py文件已上传至百度网盘,可以按需下载。欢迎大家交流。
链接: https://pan.baidu.com/s/1U6VkgPesWcVGR285iLL-WQ?pwd=8sng 提取码: 8sng 复制这段内容后打开百度网盘手机App,操作更方便哦


