【Linux】在一台机器上同时安装多个版本的CUDA(切换CUDA版本)
目录
- 一、前言
- 二、安装CUDA
- 三、安装cuDNN
- 四、切换CUDA版本
- 五、总结
- 六、参考
一、前言
- 正如题目所言,最近笔者要跑一个
TensorFlow搭建的模型,等我按照要求将对应版本的TensorFlow和Keras安装好之后,发现训练模型巨慢,GPU显存只用了一点点而且利用率一直是零,而且提示找不到一些库,提示如下。
2022-06-10 13:06:14.299058: I tensorflow/stream_executor/platform/default/dso_loader.cc:53] Could not dlopen library 'libcudart.so.10.0'; dlerror: libcudart.so.10.0: cannot open shared object file: No such file or directory; LD_LIBRARY_PATH: /usr/local/cuda-10.0/lib64:/usr/local/cuda-10.0/extras/CUPTI/lib64
2022-06-10 13:06:14.299110: I tensorflow/stream_executor/platform/default/dso_loader.cc:53] Could not dlopen library 'libcublas.so.10.0'; dlerror: libcublas.so.10.0: cannot open shared object file: No such file or directory; LD_LIBRARY_PATH: /usr/local/cuda-10.0/lib64:/usr/local/cuda-10.0/extras/CUPTI/lib64
2022-06-10 13:06:14.299155: I tensorflow/stream_executor/platform/default/dso_loader.cc:53] Could not dlopen library 'libcufft.so.10.0'; dlerror: libcufft.so.10.0: cannot open shared object file: No such file or directory; LD_LIBRARY_PATH: /usr/local/cuda-10.0/lib64:/usr/local/cuda-10.0/extras/CUPTI/lib64
2022-06-10 13:06:14.299198: I tensorflow/stream_executor/platform/default/dso_loader.cc:53] Could not dlopen library 'libcurand.so.10.0'; dlerror: libcurand.so.10.0: cannot open shared object file: No such file or directory; LD_LIBRARY_PATH: /usr/local/cuda-10.0/lib64:/usr/local/cuda-10.0/extras/CUPTI/lib64
2022-06-10 13:06:14.299239: I tensorflow/stream_executor/platform/default/dso_loader.cc:53] Could not dlopen library 'libcusolver.so.10.0'; dlerror: libcusolver.so.10.0: cannot open shared object file: No such file or directory; LD_LIBRARY_PATH: /usr/local/cuda-10.0/lib64:/usr/local/cuda-10.0/extras/CUPTI/lib64
2022-06-10 13:06:14.299281: I tensorflow/stream_executor/platform/default/dso_loader.cc:53] Could not dlopen library 'libcusparse.so.10.0'; dlerror: libcusparse.so.10.0: cannot open shared object file: No such file or directory; LD_LIBRARY_PATH: /usr/local/cuda-10.0/lib64:/usr/local/cuda-10.0/extras/CUPTI/lib64
2022-06-10 13:06:14.299326: I tensorflow/stream_executor/platform/default/dso_loader.cc:53] Could not dlopen library 'libcudnn.so.7'; dlerror: libcudnn.so.7: cannot open shared object file: No such file or directory; LD_LIBRARY_PATH: /usr/local/cuda-10.0/lib64:/usr/local/cuda-10.0/extras/CUPTI/lib64
2022-06-10 13:06:14.299336: W tensorflow/core/common_runtime/gpu/gpu_device.cc:1663] Cannot dlopen some GPU libraries. Skipping registering GPU devices...
2022-06-10 13:06:14.299421: I tensorflow/core/common_runtime/gpu/gpu_device.cc:1181] Device interconnect StreamExecutor with strength 1 edge matrix:
- 观察提示信息和一些现象,笔者得出结论,是
CUDA和cuDNN版本没有装合适,因为该程序会去/usr/local/cuda-10.0/lib64文件夹下找库,但是我就没有装CUDA 10.0。去网上找了一番资料后,笔者发现果然是CUDA和cuDNN的版本问题,TensorFlow版本与CUDA版本居然也有对应关系,这下让我更加觉得TensorFlow不好用了。但是这台机器也不是笔者独占的,而且机器上已经有装好的CUDA 11.2和cuDNN 8.4.0了,这种情况确实让人抓狂,不过在笔者浏览了浩瀚的因特耐特之后,发现居然有一种多版本CUDA共存和自由切换的操作,现将该技术整理如下。 任务描述:在一台安装了CUDA 11.2和cuDNN 8.4.0的机器上安装CUDA 10.0和cuDNN 7.4.1,使得两者互不干扰和自由切换。CUDA和cuDNN的版本选择参考这篇博客。
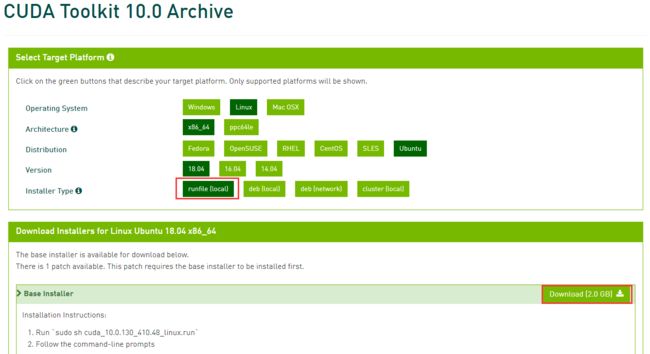
二、安装CUDA
-
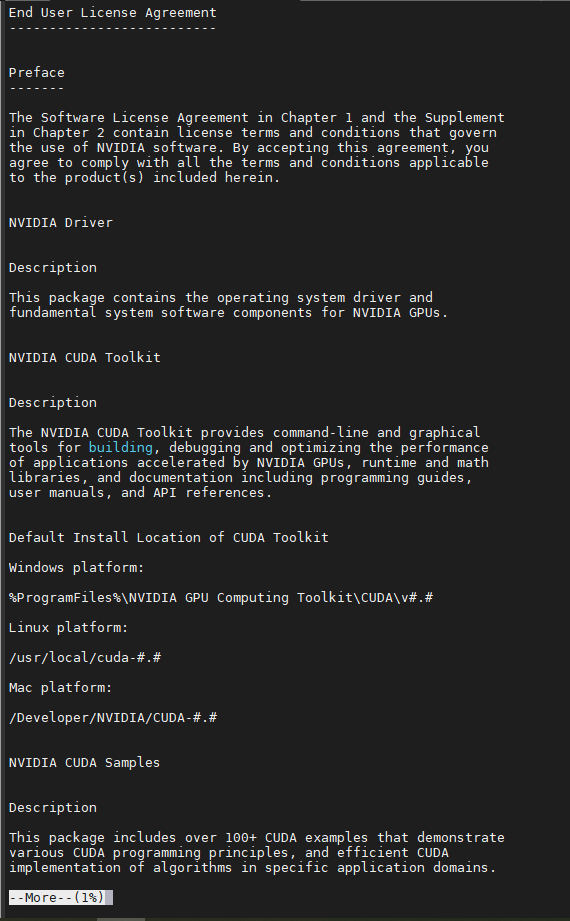
- 出现问题`Do you accept the previously read EULA?`
	- 输入`accept`+回车,继续安装。

- 出现不支持配置的提醒:`You are attempting to install on an unsupported configuration. Do you wish to continue?`
	- 输入`y`,继续安装。

- 出现是否安装显卡驱动的提醒,我们已经装过了:`Install NVIDIA Accelerated Graphics Driver for Linux-x86_64 410.48?`
	- 输入`n`,继续安装。

- 出现是否安装CUDA工具包:`Install the CUDA 10.0 Toolkit?`
	- 输入`y`,开始安装。

- 出现工具包安装地址:`Enter Toolkit Location`
	- 回车

- 出现是否添加符号链接,现在已经有一个了,为了不影响现有的CUDA环境,选择否:`Do you want to install a symbolic link at /usr/local/cuda?`
	- 输入`n`,继续安装。

- 出现是否安装样例,选择是:`Install the CUDA 10.0 Samples?`
	- 输入`y`,继续安装

- 出现安装样例位置,默认即可:`Enter CUDA Samples Location`
	- 回车
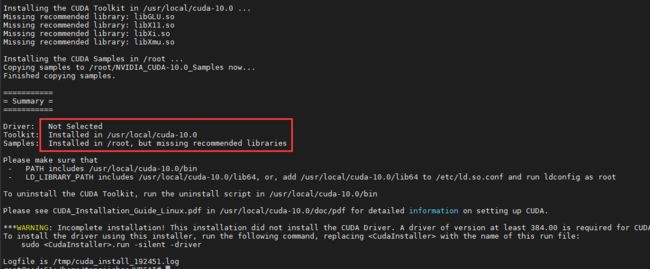
不出意外此时应该安装完成,但如果此时你也出现
Error: unsupported compiler: 9.4.0. Use --override to override this check.报错,我们按照他说的加上--override选项跳过检查。

执行新的指令,选项和上图一致:
sudo sh cuda_10.0.130_410.48_linux.run --override
- 为了不影响现有的CUDA环境,就不修改环境变量了,下文会详细讲述怎么使用新安装的CUDA 10.0。
三、安装cuDNN
-
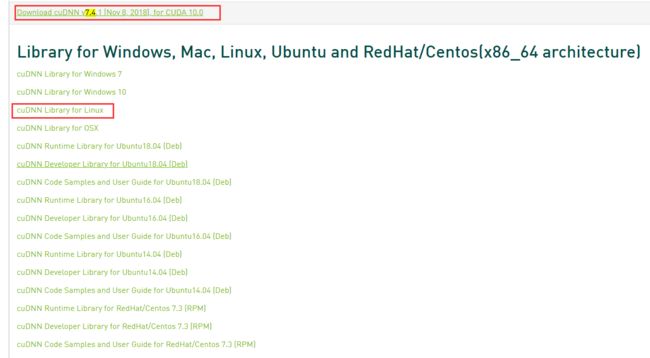
根据安装的CUDA工具包版本在官网选择适合版本的cuDNN,本文安装的CUDA版本是10.0,就选择TensorFlow 1.14.0对应的
cuDNN 7.4.1,选择Local Installer for Linux x86_64 (Tar)。
-
复制cuDNN库的链接,使用wget下载或者下载到自己电脑之后再传到服务器上。
下载下来之后,文件名是cudnn-10.0-linux-x64-v7.4.1.5.solitairetheme8,需要重命名一下,改成cudnn-10.0-linux-x64-v7.4.1.5.tgz:mv cudnn-10.0-linux-x64-v7.4.1.5.solitairetheme8 cudnn-10.0-linux-x64-v7.4.1.5.tgz -
解压cuDNN文件,并进入解压出的文件夹,拷贝文件到/usr/local/cuda-10.0中。
tar -xvf cudnn-10.0-linux-x64-v7.4.1.5.tgz cd cuda sudo cp lib64/* /usr/local/cuda-10.0/lib64/ sudo cp include/* /usr/local/cuda-10.0/include/ sudo chmod a+r /usr/local/cuda-10.0/lib64/* sudo chmod a+r /usr/local/cuda-10.0/include/* -
查看cuDNN版本,指令为
cat /usr/local/cuda-10.0/include/cudnn.h | grep CUDNN_MAJOR -A2。

-
更新软链接,如果你安装的不是7.4.1记得更新下边命令中的数字。
cd /usr/local/cuda-10.0/lib64/ sudo rm -rf libcudnn.so libcudnn.so.7 sudo ln -s libcudnn.so.7.4.1 libcudnn.so.7 sudo ln -s libcudnn.so.7 libcudnn.so sudo ldconfig -v -
最后避免影响到原来的CUDA环境,再执行一下
source /etc/profile此时另一个版本的CUDA和cuDNN已经“偷偷”安装好了。
但是此时
nvcc -V版本还是11.2,具体怎么实现CUDA版本转换,请看下节。
四、切换CUDA版本
#!/usr/bin/env bash
# Copyright (c) 2018 Patrick Hohenecker
#
# Permission is hereby granted, free of charge, to any person obtaining a copy
# of this software and associated documentation files (the "Software"), to deal
# in the Software without restriction, including without limitation the rights
# to use, copy, modify, merge, publish, distribute, sublicense, and/or sell
# copies of the Software, and to permit persons to whom the Software is
# furnished to do so, subject to the following conditions:
#
# The above copyright notice and this permission notice shall be included in all
# copies or substantial portions of the Software.
#
# THE SOFTWARE IS PROVIDED "AS IS", WITHOUT WARRANTY OF ANY KIND, EXPRESS OR
# IMPLIED, INCLUDING BUT NOT LIMITED TO THE WARRANTIES OF MERCHANTABILITY,
# FITNESS FOR A PARTICULAR PURPOSE AND NONINFRINGEMENT. IN NO EVENT SHALL THE
# AUTHORS OR COPYRIGHT HOLDERS BE LIABLE FOR ANY CLAIM, DAMAGES OR OTHER
# LIABILITY, WHETHER IN AN ACTION OF CONTRACT, TORT OR OTHERWISE, ARISING FROM,
# OUT OF OR IN CONNECTION WITH THE SOFTWARE OR THE USE OR OTHER DEALINGS IN THE
# SOFTWARE.
# author: Patrick Hohenecker - 新建
switch-cuda.sh文件,将上边代码写入;vi switch-cuda.sh source switch-cuda.sh source switch-cuda.sh 10.0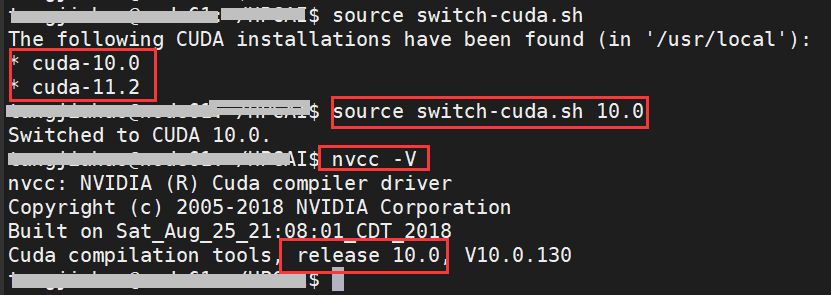
可以看到当执行source switch-cuda.sh的时候该脚本会扫描所有已安装的CUDA,并列出,用户只需要选择想用的CUDA版本号就可以轻松切换,例如source switch-cuda.sh 10.0,可以看到上图的nvcc也是成功切换了版本。
并且该脚本基于export语句,重启终端后,CUDA环境还是会恢复到默认的11.2,不影响下次使用,无需手动切回CUDA版本,下图为重启终端后的效果。

五、总结
以上就是今天要讲的内容,本文介绍了如何在一台机器上同时安装多个版本的CUDA,并且介绍了一种简便切换CUDA版本的操作。
如果本文能给你带来帮助的话,点个赞鼓励一下作者吧!
六、参考
- [1] CUDA工具包:https://developer.nvidia.com/cuda-toolkit-archive
- [2] cuDNN库:https://developer.nvidia.com/rdp/cudnn-archive
- [3] CUDA切换脚本:https://github.com/phohenecker/switch-cuda
- [4] 安装多版本CUDA:https://blog.csdn.net/sinat_30545761/article/details/107709468

