OpenGL入门第六次实验 纹理映射
链接: https://pan.baidu.com/s/1cBTTbbzRCVBCX_H4jf6qMA 提取码: kj8w
一、实验原理及要求
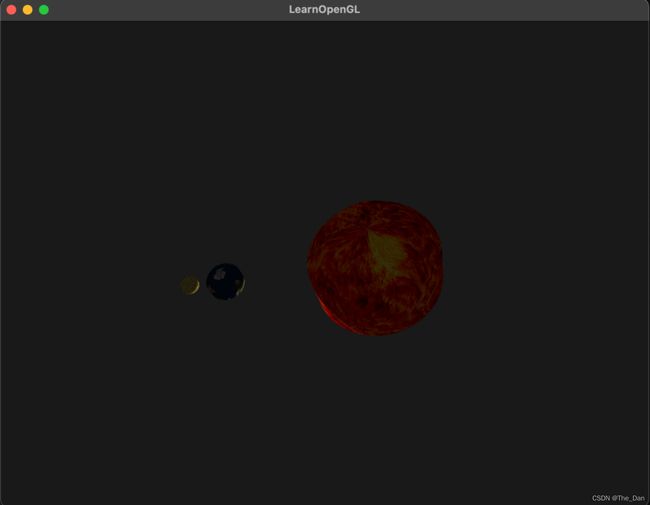
参考textureDemo程序,实现太阳、地球和月亮程序中的纹理映射,其中太阳、地球和月亮贴上各自的纹理,同时实现纹理和原来光照效果的混合,即既有光照效果,又有纹理映射效果。
GLFW是一个用于OpenGL应用程序开发的可移植库。它处理与OpenGL上下文创建、窗口管理、分辨率切换、键盘、鼠标、操纵杆和时间输入以及基本线程设施相关的系统特定任务。
GLEW能自动识别当前平台所支持的全部OpenGL高级扩展涵数。只要包含glew.h头文件,就能使用gl,glu,glext,wgl,glx的全部函数。GLEW支持目前流行的各种操作系统
实验过程中,利用VAO、VBO来存储直线或者图案的点集vertices,然后用OpenGL的绘制功能glDrawElements将直线或者图案绘制出来。
利用Sphere类绘制出三个球体,利用camera类实现视角任意转移。
二、代码设计和说明
1、设置纹理映射的各类参数(环绕方式等)
定义了三个纹理变量,texture、texture2、texture3,分别获取本地的太阳、地球、月亮的纹理。
	// 太阳的纹理
unsigned int texture;
	glGenTextures(1, &texture);
	glBindTexture(GL_TEXTURE_2D, texture); // all upcoming GL_TEXTURE_2D operations now have effect on this texture object
	// set the texture wrapping parameters
	glTexParameteri(GL_TEXTURE_2D, GL_TEXTURE_WRAP_S, GL_REPEAT);	// set texture wrapping to GL_REPEAT (default wrapping method)
	glTexParameteri(GL_TEXTURE_2D, GL_TEXTURE_WRAP_T, GL_REPEAT);
	// set texture filtering parameters
	glTexParameteri(GL_TEXTURE_2D, GL_TEXTURE_MIN_FILTER, GL_LINEAR);
	glTexParameteri(GL_TEXTURE_2D, GL_TEXTURE_MAG_FILTER, GL_LINEAR);

	// The FileSystem::getPath(...) is part of the GitHub repository so we can find files on any IDE/platform; replace it with your own image path.
	unsigned char *data = stbi_load("sun.jpg", &width, &height, &nrChannels, 0);
	if (data)
	{
		glTexImage2D(GL_TEXTURE_2D, 0, GL_RGB, width, height, 0, GL_RGB, GL_UNSIGNED_BYTE, data);
		glGenerateMipmap(GL_TEXTURE_2D);
	}
	else
	{
		std::cout << "Failed to load texture" << std::endl;
	}
	stbi_image_free(data);
	// 地球的纹理
	unsigned int texture2;
	glGenTextures(1, &texture2);
	glBindTexture(GL_TEXTURE_2D, texture2); // all upcoming GL_TEXTURE_2D operations now have effect on this texture object
	// set the texture wrapping parameters
	glTexParameteri(GL_TEXTURE_2D, GL_TEXTURE_WRAP_S, GL_REPEAT);	// set texture wrapping to GL_REPEAT (default wrapping method)
	glTexParameteri(GL_TEXTURE_2D, GL_TEXTURE_WRAP_T, GL_REPEAT);
	// set texture filtering parameters
	glTexParameteri(GL_TEXTURE_2D, GL_TEXTURE_MIN_FILTER, GL_LINEAR);
	glTexParameteri(GL_TEXTURE_2D, GL_TEXTURE_MAG_FILTER, GL_LINEAR);
	// load image, create texture and generate mipmaps
	//int width, height, nrChannels;
	// The FileSystem::getPath(...) is part of the GitHub repository so we can find files on any IDE/platform; replace it with your own image path.
	unsigned char *data2 = stbi_load("earth.jpg", &width, &height, &nrChannels, 0);
	if (data2)
	{
		glTexImage2D(GL_TEXTURE_2D, 0, GL_RGB, width, height, 0, GL_RGB, GL_UNSIGNED_BYTE, data2);
		glGenerateMipmap(GL_TEXTURE_2D);
	}
	else
	{
		std::cout << "Failed to load texture" << std::endl;
	}
	stbi_image_free(data2);
	// 月球的纹理
	unsigned int texture3;
	glGenTextures(1, &texture3);
	glBindTexture(GL_TEXTURE_2D, texture3); // all upcoming GL_TEXTURE_2D operations now have effect on this texture object
	// set the texture wrapping parameters
	glTexParameteri(GL_TEXTURE_2D, GL_TEXTURE_WRAP_S, GL_REPEAT);	// set texture wrapping to GL_REPEAT (default wrapping method)
	glTexParameteri(GL_TEXTURE_2D, GL_TEXTURE_WRAP_T, GL_REPEAT);
	// set texture filtering parameters
	glTexParameteri(GL_TEXTURE_2D, GL_TEXTURE_MIN_FILTER, GL_LINEAR);
	glTexParameteri(GL_TEXTURE_2D, GL_TEXTURE_MAG_FILTER, GL_LINEAR);
	// load image, create texture and generate mipmaps
	//int width, height, nrChannels;
	// The FileSystem::getPath(...) is part of the GitHub repository so we can find files on any IDE/platform; replace it with your own image path.
	unsigned char *data3 = stbi_load("moon.jpg", &width, &height, &nrChannels, 0);
	if (data)
	{
		glTexImage2D(GL_TEXTURE_2D, 0, GL_RGB, width, height, 0, GL_RGB, GL_UNSIGNED_BYTE, data3);
		glGenerateMipmap(GL_TEXTURE_2D);
	}
	else
	{
		std::cout << "Failed to load texture" << std::endl;
	}
	stbi_image_free(data3);
2、纹理的绑定
在每个球的glDrawElements操作结束之后,绑定纹理进行绘制,得到三个球体对应的纹理图像。

3、vertex shader加入纹理坐标属性
	//这是vertex shader
	#version 330 core
	layout (location = 0) in vec3 aPos;
	layout (location = 1) in vec3 aNormal;
	layout (location = 2) in vec2 aTexCoord;

	out vec3 FragPos;
	out vec3 Normal;
	out vec2 TexCoord;

	uniform mat4 model;
	uniform mat4 view;
	uniform mat4 projection;

	void main()
	{
	    FragPos = vec3(model * vec4(aPos, 1.0));
	    Normal = mat3(transpose(inverse(model))) * aNormal;
	    gl_Position = projection * view * vec4(FragPos, 1.0);
		    TexCoord = vec2(aTexCoord.x, aTexCoord.y);
	}
4、fragment shader修改
	//这是fragment shader
	#version 330 core
	out vec4 FragColor;

	in vec3 Normal;
	in vec3 FragPos;
	in vec2 TexCoord;

	uniform vec3 lightPos;
	uniform vec3 lightColor;
	uniform vec3 viewPos;
	uniform vec3 objectColor;
	uniform sampler2D texture1;


void main()
{
    // ambient
    float ambientStrength = 0.2;
    vec3 ambient = ambientStrength * lightColor;

    // diffuse
    vec3 norm = normalize(Normal);
    vec3 lightDir = normalize(lightPos - FragPos);//入射方向
    float diff = max(dot(norm, lightDir), 0.0);
    vec3 diffuse = diff * lightColor;

	// specular
	float specularStrength = 0.5;
	vec3 viewDir = normalize(viewPos - FragPos);
	vec3 reflectDir = reflect(-lightDir, norm);
	float spec = pow(max(dot(viewDir, reflectDir), 0.0), 128);
	vec3 specular = specularStrength * lightColor * spec;

    vec3 result = (ambient + diffuse + specular) * objectColor;
    FragColor = texture(texture1, TexCoord)*vec4(result, 1.0);
}

