opencv常用图像处理函数详解(一)
文章目录
-
-
- 1.读取图像(imread)
- 2.保存图像(imwrite)
- 3.获取图像像素值大小
- 4.转换图像色彩
- 5.叠加两张图像
- 6.图像二值化
-
1.读取图像(imread)
Mat cv::imread(const String & filename, int flags = IMREAD_COLOR)
cv.imread(filename[, flags]) -> retval
说明:函数imread从指定文件加载图像并将其返回。如果无法读取图像(因为缺少文件、权限不正确、格式不受支持或无效),
		函数将返回一个空矩阵(Mat::data==NULL)。
参数:
	filename 要加载的图像名称(路径)
	flags 图像的加载方式
| flag取值 | flag含义 |
|---|---|
| IMREAD_UNCHANGED Python: cv.IMREAD_UNCHANGED |
按原样返回加载的图像 |
| IMREAD_GRAYSCALE Python: cv.IMREAD_GRAYSCALE |
始终将图像转换为单通道灰度图像(编解码器内部转换) |
| IMREAD_COLOR Python: cv.IMREAD_COLOR |
始终将图像转换为3通道BGR彩色图像 |
| IMREAD_ANYDEPTH Python: cv.IMREAD_ANYDEPTH |
当输入具有相应深度时,返回16位/32位图像,否则将其转换为8位 |
| IMREAD_ANYCOLOR Python: cv.IMREAD_ANYCOLOR |
以任何可能的颜色格式读取图像 |
| IMREAD_LOAD_GDAL Python: cv.IMREAD_LOAD_GDAL |
使用gdal驱动程序加载图像 |
| IMREAD_REDUCED_x_y Python: cv.IMREAD_REDUCED_x_y |
始终将图像转换为x图像,图像大小减小1/y(x可以是COLOR或者GRAYSCALE,y可以是2,4,8) |
| IMREAD_IGNORE_ORIENTATION Python: cv.IMREAD_IGNORE_ORIENTATION |
不根据EXIF的方向标志旋转图像 |
例程:
#include 2.保存图像(imwrite)
bool cv::imwrite(const String & filename, InputArray img, const std::vector< int > & params = std::vector< int >())
cv.imwrite( filename, img[, params] ) ->retval
说明:数imwrite将图像保存到指定文件。图像格式是根据文件扩展名选择的
参数:
	filename 要保存的图像名称(路径)
	img 要保存的图像
	flags 图像的保存方式
示例:
#include 3.获取图像像素值大小
为了获得像素值大小,必须知道图像的类型和通道数量。
- 单通道灰度图像(类型8UC1)和像素坐标x和y时:
Scalar intensity = img.at<uchar>(y, x); //或者 Scalar intensity = img.at<uchar>(Point(x, y)); - 三通道彩色图像(类型8UC3)和像素坐标x和y时:
Vec3b intensity = img.at<Vec3b>(y, x);
uchar blue = intensity.val[0];
uchar green = intensity.val[1];
uchar red = intensity.val[2];
4.转换图像色彩
void cv::cvtColor(InputArray src, OutputArray dst, int code, int dstCn = 0 )
cv.cvtColor(src, code[, dst[, dstCn]]) ->dst
说明:将图像从一种颜色空间转换为另一种颜色。
参数:
	src 输入图像:8位无符号、16位无符号(CV_16UC…)或单精度浮点。
	dst 输出与src大小和深度相同的图像
	code 颜色空间转换码
	dstCn 目的图像中的频道数;如果参数为0,则通道的数量将自动从src和code中导出
示例:
#include 5.叠加两张图像
void cv::addWeighted(InputArray src1, double alpha, InputArray src2, double beta, double gamma, OutputArray dst, int dtype = -1 )
cv.addWeighted( src1, alpha, src2, beta, gamma[, dst[, dtype]]) ->dst
说明:将图像从一种颜色空间转换为另一种颜色。
参数:
	src1 第一张图像
	alpha 第一张图像所占的比重
	src2 第二张图像,必须与第一张有相同的大小
	beta 第二张图像所占的比重
	gamma 颜色空间转换码
	dst 叠加后的图像
	dtype 输出阵列的可选深度;当两个输入数组具有相同的深度时,dtype可以设置为-1,这相当于src1.depth().
函数addWeighted计算两个数组的加权和,计算方式如下所示:
dst ( I ) = s a t u r a t e ( src 1 ( I ) ∗ a l p h a + src 2 ( I ) ∗ b e t a + g a m m a ) \operatorname{dst}(I)= saturate (\operatorname{src} 1(I) * alpha +\operatorname{src} 2(I) * beta + gamma ) dst(I)=saturate(src1(I)∗alpha+src2(I)∗beta+gamma)
其中I是数组元素的多维索引。对于多通道阵列,每个通道都是独立处理的。
示例:
#include "opencv2/imgcodecs.hpp"
#include "opencv2/highgui.hpp"
#include 6.图像二值化
double cv::threshold(InputArray src, OutputArray dst, double thresh, double maxval, int type)
cv.threshold(src, thresh, maxval, type[, dst]) ->retval, dst
说明:对每个数组元素应用固定阈值处理。
参数:
	src 输入阵列(多通道、8位或32位浮点)
	dst 与src大小、类型和通道数相同的输出数组
	thresh 阈值
	maxval 与THRESH_BINARY和THRESH_INARY_INV阈值类型一起使用的最大值
	type 阈值类型
阈值类型说明:

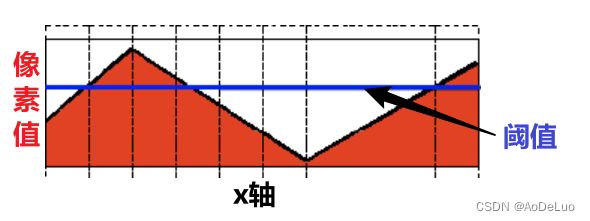
以上面这张图为例,X轴代表图像上某行的数据,y轴代表数据值的大小,蓝色的线代表阈值
-
Threshold Binary
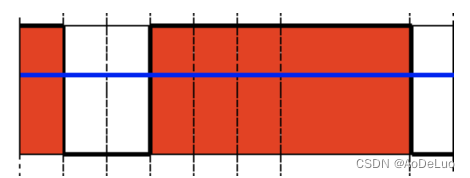
该阈值操作可以表示为:
dst ( x , y ) = { maxVal if src ( x , y ) > thresh 0 otherwise \operatorname{dst}(x, y)=\left\{\begin{array}{ll}\operatorname{maxVal} & \text { if } \operatorname{src}(x, y)>\operatorname{thresh} \\ 0 & \text { otherwise }\end{array}\right. dst(x,y)={maxVal0 if src(x,y)>thresh otherwise
如果像素src(x,y)的强度高于阈值,则将新的像素强度设置为MaxVal。否则,像素设置为0。经过Threshold Binary二值化处理,例图将变为如下所示:

-
Threshold Binary, Inverted
该阈值操作可以表示为:
dst ( x , y ) = { 0 if src ( x , y ) > thresh maxVal otherwise \operatorname{dst}(x, y)=\left\{\begin{array}{ll}0 & \text { if } \operatorname{src}(x, y)>\operatorname{thresh} \\ \operatorname{maxVal} & \text { otherwise }\end{array}\right. dst(x,y)={0maxVal if src(x,y)>thresh otherwise
如果像素src(x,y)的强度高于阈值,则新的像素强度设置为0。否则,设置为MaxVal。经过Threshold Binary, Inverted二值化处理,例图将变为如下所示:

-
Truncate
该阈值操作可以表示为:
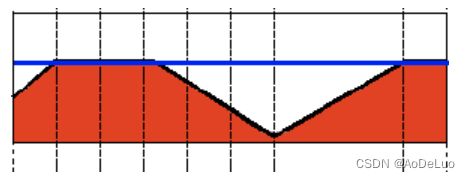
dst ( x , y ) = { threshold if src ( x , y ) > thresh src ( x , y ) otherwise \operatorname{dst}(x, y)=\left\{\begin{array}{ll}\operatorname{threshold} & \text { if } \operatorname{src}(x, y)>\operatorname{thresh} \\ \operatorname{src}(x, y) & \text { otherwise }\end{array}\right. dst(x,y)={thresholdsrc(x,y) if src(x,y)>thresh otherwise
像素的最大强度值为thresh,如果src(x,y)更大,则其值将被截断。经过Truncate二值化处理,例图将变为如下所示:

-
Threshold to Zero
该阈值操作可以表示为:
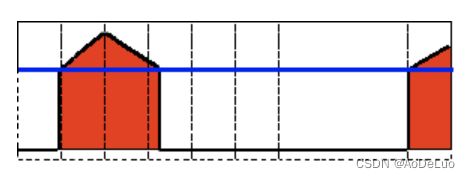
dst ( x , y ) = { src ( x , y ) if src ( x , y ) > thresh 0 otherwise \operatorname{dst}(x, y)=\left\{\begin{array}{ll}\operatorname{src}(x, y) & \text { if } \operatorname{src}(x, y)>\operatorname{thresh} \\ 0 & \text { otherwise }\end{array}\right. dst(x,y)={src(x,y)0 if src(x,y)>thresh otherwise
如果src(x,y)低于thresh,则新的像素值将设置为0。经过Threshold to Zero二值化处理,例图将变为如下所示:

-
Threshold Binary, Inverted
该阈值操作可以表示为:
dst ( x , y ) = { 0 if src ( x , y ) > thresh src ( x , y ) otherwise \operatorname{dst}(x, y)=\left\{\begin{array}{ll}0 & \text { if } \operatorname{src}(x, y)>\operatorname{thresh} \\ \operatorname{src}(x, y) & \text { otherwise }\end{array}\right. dst(x,y)={0src(x,y) if src(x,y)>thresh otherwise
如果src(x,y)大于thresh,则新的像素值将设置为0。经过Threshold Binary, Inverted二值化处理,例图将变为如下所示:

例程:
#include "opencv2/imgproc.hpp"
#include "opencv2/imgcodecs.hpp"
#include "opencv2/highgui.hpp"
#include 

