OkHttp3 源码分析
提起Android网络框架就不得不聊一下square公司开源的OKHttp 框架,今天就请跟着本文的思路来看下OKHttp3的源码。
目录
一、分发器
1、同步任务分发
2、异步任务分发
3、线程池的封装
二、拦截器
1、重试重定向拦截器:RetryAndFollowUpInterceptor
2、桥接拦截器:BridgeInterceptor
3、缓存拦截器:CacheInterceptor
第一步:根据 Request 对象查找是否有对应的缓存
第二步:如果是https 并且没有握手信息 则返回和第一步一样的策略
第三步:根据响应码和响应头来判断是否支持缓存
第四步:根据用户配置来判断
第五步:根据响应资源是否变化来判断
4、连接拦截器:ConnectInterceptor
5、请求服务器拦截器:CallServerInterceptor
本文会从两大主线来分析OKHttp3的源码:
主线一:分发器(涉及同步、异步任务分发和相关队列、线程池等模块)
主线二:拦截器(重试重定向、桥接、缓存、连接、请求服务器五大拦截器)
一、分发器
1、同步任务分发
我们先看一下一个普通的OKHttp同步请求:
//第一步:构建OkhttpClient对象
OkHttpClient client= new OkHttpClient();
//第二步:构建一个Request对象
Request request = new Request.Builder()
         .url("https:xxx")
         .build();
//第三步:构建一个Call对象
Call call = client.newCall(request);
//第四步:执行同步请求
Response response = call.execute();
其中最后一行call.execute执行就会将call添加到同步任务队列并执行,下面我们看源码:
首先Call是一个接口,execute方法真正的实现在RealCall里面
package okhttp3;

import java.io.IOException;
//实现类是RealCall
public interface Call extends Cloneable {
    ...

    Response execute() throws IOException;

    void enqueue(Callback var1);
    ...
}
RealCall相关源码:
package okhttp3;
final class RealCall implements Call {

    public Response execute() throws IOException {
        synchronized(this) {
            if (this.executed) {
                throw new IllegalStateException("Already Executed");
            }

            this.executed = true;
        }

        this.captureCallStackTrace();
        this.eventListener.callStart(this);

        Response var2;
        try {
            // ========= 关键代码1 =================
            this.client.dispatcher().executed(this);
            // ========= 关键代码2 =================
            Response result = this.getResponseWithInterceptorChain();
            if (result == null) {
                throw new IOException("Canceled");
            }

            var2 = result;
        } catch (IOException var7) {
            this.eventListener.callFailed(this, var7);
            throw var7;
        } finally {
            // ========= 关键代码3 =================
            this.client.dispatcher().finished(this);
        }

        return var2;
    }

}
我们看到关键代码1:this.client.dispatcher().executed(this);
这里是调用OkHttpClient里面的分发器Dispatcher的executed方法,这里的分发器是在创建OkHttpClient时自动创建的

当前如果有需要我们也可以自定义一个分发器去替换系统的分发器,一般默认用系统的就可以。
我们看Dispatcher的executed方法:
package okhttp3;

public final class Dispatcher {
    ...
    //同步任务队列
    private final Deque runningSyncCalls = new ArrayDeque();

    synchronized void executed(RealCall call) {
        this.runningSyncCalls.add(call);
    }
    ...
}
很简单,直接加入到了同步任务队列:runningSyncCalls:。
在看关键代码2:Response result = this.getResponseWithInterceptorChain();
这一步会去执行当前的任务
  Response getResponseWithInterceptorChain() throws IOException {
    // Build a full stack of interceptors.
    List interceptors = new ArrayList<>();
    //添加所有拦截器
    interceptors.addAll(client.interceptors());
    interceptors.add(retryAndFollowUpInterceptor);
    interceptors.add(new BridgeInterceptor(client.cookieJar()));
    interceptors.add(new CacheInterceptor(client.internalCache()));
    interceptors.add(new ConnectInterceptor(client));
    if (!forWebSocket) {
      interceptors.addAll(client.networkInterceptors());
    }
    interceptors.add(new CallServerInterceptor(forWebSocket));

    //责任链模式 构建Chain对象
    Interceptor.Chain chain = new RealInterceptorChain(interceptors, null, null, null, 0,
        originalRequest, this, eventListener, client.connectTimeoutMillis(),
        client.readTimeoutMillis(), client.writeTimeoutMillis());

    //执行请求
    return chain.proceed(originalRequest);
  }
这里使用了责任链模式,这里加入的拦截器会以"U形"方式执行,我们的任务也会在经过层层拦截器的处理之后被执行,拦截器的相关原理在下面的第二条主线上会分析。
在看关键代码3:this.client.dispatcher().finished(this);
这一步会移除同步队列中的当前任务,请注意下方代码中的注释
package okhttp3;

public final class Dispatcher {
  ...

  /** Used by {@code Call#execute} to signal completion. */
  void finished(RealCall call) {
    finished(runningSyncCalls, call, false);
  }

  private  void finished(Deque calls, T call, boolean promoteCalls) {
    int runningCallsCount;
    Runnable idleCallback;
    synchronized (this) {
      //========= 关键代码 移除同步队列里的任务 ==========
      if (!calls.remove(call)) throw new AssertionError("Call wasn't in-flight!");
      if (promoteCalls) promoteCalls();
      runningCallsCount = runningCallsCount();
      idleCallback = this.idleCallback;
    }

    if (runningCallsCount == 0 && idleCallback != null) {
      idleCallback.run();
    }
  }
  ...

}
到此为止,同步请求任务的分发、执行相关的逻辑就分析结束了。
2、异步任务分发
我们先看一下一个普通的OKHttp异步请求:
//第一步:构建OkhttpClient对象
OkHttpClient client= new OkHttpClient();
//第二步:构建一个Request对象
Request request = new Request.Builder()
         .url("https:xxx")
         .build();
//第三步:构建一个Call对象
Call call = client.newCall(request);
//第四步:构建Callback对象
Callback callback = new Callback() {
            @Override
            public void onFailure(Call call, IOException e) {
                //执行出错
            }

            @Override
            public void onResponse(Call call, Response response) throws IOException {
                //执行成功
            }
        };
//第五步:执行同步请求
Response response = call.enqueue(callback);
其中最后一行call.enqueue(callback)执行就会将call添加到异步任务队列并执行,下面我们看源码:
package okhttp3;

final class RealCall implements Call {
...

  @Override public void enqueue(Callback responseCallback) {
    synchronized (this) {
      if (executed) throw new IllegalStateException("Already Executed");
      executed = true;
    }
    captureCallStackTrace();
    eventListener.callStart(this);
    // ============ 关键代码1 ============================
    client.dispatcher().enqueue(new AsyncCall(responseCallback));
  }
继续跟进到:client.dispatcher().enqueue(new AsyncCall(responseCallback)); 里面
来到Dispatcher的enqueue方法
  synchronized void enqueue(AsyncCall call) {
    if (runningAsyncCalls.size() < maxRequests && runningCallsForHost(call) < maxRequestsPerHost) {
      //==== 关键代码 1 =======
      runningAsyncCalls.add(call);
      executorService().execute(call);
    } else {
      //==== 关键代码 2 =======
      readyAsyncCalls.add(call);
    }
  }
我们看到这里有两个队列,一个runningAsyncCalls,一个readyAsyncCalls,满足以下条件则放入runningAsyncCalls否则放入readyAsyncCalls。
- runningAsyncCalls的size小于最大值(默认64)
- runningAsyncCalls中与当前传入的call相同host的个数小于(默认5)
其中放入runningAsyncCalls后立刻就去执行了当前任务executorService().execute(call);
跟进去看:
  public synchronized ExecutorService executorService() {
    if (executorService == null) {
      executorService = new ThreadPoolExecutor(0, Integer.MAX_VALUE, 60, TimeUnit.SECONDS,
          new SynchronousQueue(), Util.threadFactory("OkHttp Dispatcher", false));
    }
    return executorService;
  }
executorService()得到了一个线程池,这里的线程池是高并发并且能及时响应的,具体如何做到的下面会分析,然后直接调用execute(call)执行了这个任务。
这里的call是AsyncCall,它继承了NamedRunnable

NamedRunnable 实现了Runnable接口
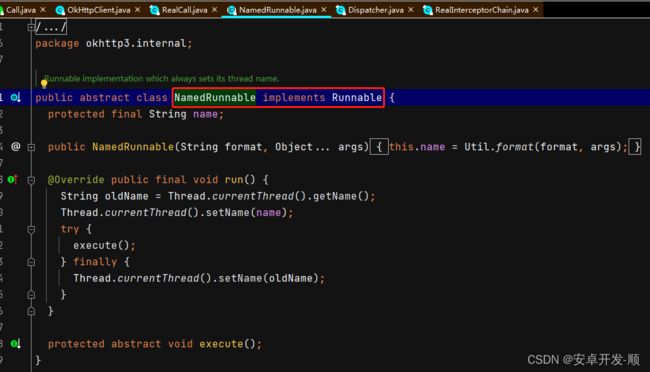
实现Runnable必然要重写run方法,这里在run方法中调用了execute方法 这是个抽象方法,那我们要找到对应的实现,实现就在AsyncCall里面
@Override protected void execute() {
      boolean signalledCallback = false;
      try {
        //=========== 关键代码1 =================
        Response response = getResponseWithInterceptorChain();
        if (retryAndFollowUpInterceptor.isCanceled()) {
          signalledCallback = true;
          responseCallback.onFailure(RealCall.this, new IOException("Canceled"));
        } else {
          signalledCallback = true;
          responseCallback.onResponse(RealCall.this, response);
        }
      } catch (IOException e) {
        if (signalledCallback) {
          // Do not signal the callback twice!
          Platform.get().log(INFO, "Callback failure for " + toLoggableString(), e);
        } else {
          eventListener.callFailed(RealCall.this, e);
          responseCallback.onFailure(RealCall.this, e);
        }
      } finally {
         //=========== 关键代码2 =================
        client.dispatcher().finished(this);
      }
    }
其中关键代码1和上面同步请求是一样的,这一行就会执行各种拦截器并最终发送请求到后台完成网络交互。
关键代码2 在finally里面,不管成失败或异常最终一定会执行到这里,跟进去:
调到Dispatcher的finished方法
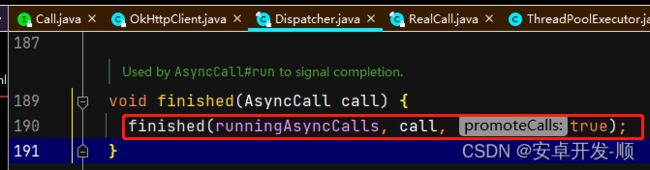
然后调到三个参数的finished方法
  private  void finished(Deque calls, T call, boolean promoteCalls) {
    int runningCallsCount;
    Runnable idleCallback;
    synchronized (this) {
      //====== 关键代码1 从队列移除当前任务 ========
      if (!calls.remove(call)) throw new AssertionError("Call wasn't in-flight!");
      //====== 关键代码2 处理ready队列任务 ========
      if (promoteCalls) promoteCalls();
      runningCallsCount = runningCallsCount();
      idleCallback = this.idleCallback;
    }

    if (runningCallsCount == 0 && idleCallback != null) {
      idleCallback.run();
    }
  }
关键代码1:执行完成后从runningAsyncCalls中移除,这里的calls就是传进来的runningAsyncCalls。
关键代码2:处理readyAsyncCalls,这里promoteCalls传入的是true,所以会执行promoteCalls()方法,跟进看下该方法源码:
public final class Dispatcher {
...
  private void promoteCalls() {
    //第一个前提条件 runningAsyncCalls 不能大于最大限制 和前面条件一样
    if (runningAsyncCalls.size() >= maxRequests) return; // Already running max capacity.
    if (readyAsyncCalls.isEmpty()) return; // No ready calls to promote.

    for (Iterator i = readyAsyncCalls.iterator(); i.hasNext(); ) {
      AsyncCall call = i.next();
      //第二个前提条件 runningAsyncCalls 中和当前call的host相同的个数不大于最大限制 这个也喝前面条件一样
      if (runningCallsForHost(call) < maxRequestsPerHost) {
        i.remove();
        runningAsyncCalls.add(call);
        executorService().execute(call);
      }

      if (runningAsyncCalls.size() >= maxRequests) return; // Reached max capacity.
    }
  }
}
这里会遍历readyAsyncCalls,取出每一个call进行判断,满足前面说的那两个条件
- runningAsyncCalls的size小于最大值(默认64)
- runningAsyncCalls中与当前传入的call相同host的个数小于(默认5)
就从readyAsyncCalls中移除,然后添加到runningAsyncCalls中,然后调用线程池执行,就这样循环执行下去,直到所有任务都执行完毕。
到此为止,异步请求任务的分发、执行相关的逻辑就分析结束了。
3、线程池的封装
在上面异步任务执行时用到了线程池,我们来看下OKHttp的线程池是怎么封装的,为什么这样封装?
public final class Dispatcher {
...
 public synchronized ExecutorService executorService() {
    if (executorService == null) {
      executorService = new ThreadPoolExecutor(0, Integer.MAX_VALUE, 60, TimeUnit.SECONDS,
          new SynchronousQueue(), Util.threadFactory("OkHttp Dispatcher", false));
    }
    return executorService;
  }
}
直接new了一个ThreadPoolExecutor,关键看传入的参数:
- 第一个参数 核心线程数,传入的是0,没有核心线程
- 第二个参数 线程的最大数量 Integer.MAX_VALUE 直接是int的最大值,非常大的数,理论上用不到
- 第三、四个参数 表示空闲线程60s会被回收
- 第五个参数 堵塞队列 同步堵塞队列(不能存储任何数据)
- 第六个参数 线程工厂 这个给线程设置一个名称,然后设置了非守护线程
第一、二、五个参数就决定了这个线程池具有一个支持高并发,最大吞吐量的性质,为什么呢?
先来复习下线程池的执行原理:
当我们调用线程池去执行任务时:
- 先在核心线程数范围内去承接任务,只要核心线程数没有用完,阻塞队列不起任何作用
- 核心线程数用完了,此时会存到阻塞队列里面
- 阻塞队列也存满了,第二个参数最大线程数就发挥作用 只要不超过最大线程数就直接开线程来执行任务
- 最大线程数也满了 就执行拒绝策略
然后在来分析此线程池性质:
- 首先,这里的核心线程数是0,那直接会往阻塞队列里面存
- 然后,阻塞队列是SynchronousQueue
() 啥都存不了,那直接去创建线程执行 - 最后,由于最大线程数设置的是Integer.MAX_VALUE,所以基本上就是来了任务就会立刻创建线程执行
所以此线程池具有高并发、最大吞吐量的性质。
那这样设计不担心疯狂的创建线程导致内存爆表吗?不用担心,因为有runningAsyncCalls和readyAsyncCalls两个队列在外层已经做了排队处理和数量限制(runningAsyncCalls默认最大是64个任务)
到此为止,线程池相关的逻辑就分析结束了。
二、拦截器
OKHttp内置了五大拦截器,通过责任链模式串联在一起,同时支持我们自定义拦截器来加入到责任链中,下面就来看下这些拦截器的具体实现:
final class RealCall implements Call {
...
  Response getResponseWithInterceptorChain() throws IOException {
    // Build a full stack of interceptors.
    List interceptors = new ArrayList<>();
    //添加用户自定义的拦截器
    interceptors.addAll(client.interceptors());
    //(1)添加重试重定向拦截器
    interceptors.add(retryAndFollowUpInterceptor);
    //(2)添加桥接拦截器
    interceptors.add(new BridgeInterceptor(client.cookieJar()));
    //(3)添加缓存拦截器
    interceptors.add(new CacheInterceptor(client.internalCache()));
    //(4)添加链接拦截器
    interceptors.add(new ConnectInterceptor(client));
    if (!forWebSocket) {
      //添加用户自定义的拦截器
      interceptors.addAll(client.networkInterceptors());
    }
    //(5)添加请求服务器拦截器
    interceptors.add(new CallServerInterceptor(forWebSocket));

    //责任链模式 构建Chain对象
    Interceptor.Chain chain = new RealInterceptorChain(interceptors, null, null, null, 0,
        originalRequest, this, eventListener, client.connectTimeoutMillis(),
        client.readTimeoutMillis(), client.writeTimeoutMillis());

    //执行请求
    return chain.proceed(originalRequest);
  }
} 
上图是OKHttp拦截器的执行过程,从执行过程中我们可以看出:
- 自定义Interceptors(非networkInterceptors)优先执行且只执行一次
- 重试重定向后面的拦截器可能被执行多次,因为重试重定向拦截器每次重试或者重定向都会执行后面的拦截器
- 自定义的networkInterceptors 执行顺序非常靠后,且可以被执行多次
下面来分析具体的每一个拦截器:
1、重试重定向拦截器:RetryAndFollowUpInterceptor
主要工作:重试与重定向
来看源码:
在 getResponseWithInterceptorChain 方法的最后一行触发了拦截器的执行

跟进去,我们假设用户没有自定义拦截器,那么重试重定向拦截器的index 就是0,桥接是1
public final class RealInterceptorChain implements Interceptor.Chain {

    @Override public Response proceed(Request request) throws IOException {
        return proceed(request, streamAllocation, httpCodec, connection);
    }

    public Response proceed(Request request, StreamAllocation streamAllocation, HttpCodec
           httpCodec,RealConnection connection) throws IOException {
    ...
    // 得到下一个拦截器
    // 如果重试重定向是第一个拦截器 那么 这里就是得到桥接拦截器
    RealInterceptorChain next = new RealInterceptorChain(interceptors, streamAllocation,
       httpCodec,connection, index + 1, request, call, eventListener, connectTimeout,
       readTimeout,writeTimeout);

    //取出当前拦截器 index 默认是0 如果没有自定义 那么
    //这里取出的就是重试重定向拦截器
    Interceptor interceptor = interceptors.get(index);

    //执行拦截器的相关逻辑
    Response response = interceptor.intercept(next);

    return response;
  }

}
如源码中的注释,第一个拦截器重试重定向拦截器要被执行了,看
Response response = interceptor.intercept(next);
进入到 RetryAndFollowUpInterceptor 看下执行过程
package okhttp3.internal.http;


public final class RetryAndFollowUpInterceptor implements Interceptor {
  ...

  @Override public Response intercept(Chain chain) throws IOException {
    //这里的chain 就是上一步传进来的 桥接拦截器
    Request request = chain.request();
    RealInterceptorChain realChain = (RealInterceptorChain) chain;
    Call call = realChain.call();
    ...

    int followUpCount = 0;
    Response priorResponse = null;
    while (true) {
      ...
      Response response;
      boolean releaseConnection = true;
      try {
        //执行后续的拦截器 从桥接开始 不断往后执行
        response = realChain.proceed(request, streamAllocation, null, null);
        releaseConnection = false;
      } catch (RouteException e) {
        if (!recover(e.getLastConnectException(), streamAllocation, false, request)) {
          throw e.getLastConnectException();
        }
        releaseConnection = false;
        //========== 关键代码1  进行重试============
        continue;
      } catch (IOException e) {
        boolean requestSendStarted = !(e instanceof ConnectionShutdownException);
        if (!recover(e, streamAllocation, requestSendStarted, request)) throw e;
        releaseConnection = false;
        //========== 关键代码2  进行重试============
        continue;
      } finally {
        ...
      }

      // Attach the prior response if it exists. Such responses never have a body.
      if (priorResponse != null) {
        response = response.newBuilder()
            .priorResponse(priorResponse.newBuilder()
                    .body(null)
                    .build())
            .build();
      }

      //========== 关键代码2  判断是否需要重定向============
      Request followUp = followUpRequest(response, streamAllocation.route());

      if (followUp == null) {
        if (!forWebSocket) {
          streamAllocation.release();
        }
        //不需要重定向
        return response;
      }


      // =========== 下面是重定向逻辑 ==========
      closeQuietly(response.body());
      // 重定向次数不能超过最大次数 20
      if (++followUpCount > MAX_FOLLOW_UPS) {
        streamAllocation.release();
        throw new ProtocolException("Too many follow-up requests: " + followUpCount);
      }

      ...

      if (!sameConnection(response, followUp.url())) {
        streamAllocation.release();
        streamAllocation = new StreamAllocation(client.connectionPool(),
            createAddress(followUp.url()), call, eventListener, callStackTrace);
        this.streamAllocation = streamAllocation;
      } else if (streamAllocation.codec() != null) {
        throw new IllegalStateException("Closing the body of " + response
            + " didn't close its backing stream. Bad interceptor?");
      }

      request = followUp;
      priorResponse = response;
    }
  }


}
从上面源码中我们可以看到,有两处可能发生重试的地方:
- 关键代码1的位置 捕获到RouteException的时候(请求未发出去)
- 关键代码2的位置 捕获到IOException的时候(Http1.1之前请求都发出去了)
这两处异常都会进行判断是否满足重试的条件,具体判断在recover方法中,看源码:
  private boolean recover(IOException e, StreamAllocation streamAllocation,
      boolean requestSendStarted, Request userRequest) {
    streamAllocation.streamFailed(e);

    // 配置OKHttpClient的时候设置了不允许重试 返回false 不进行重试
    if (!client.retryOnConnectionFailure()) return false;

    // 这里是针对IOException的情况的判断 因为RouteExcepton传入的是false
    // 请求体被UnrepeatableRequestBody标记,返回false 不进行重试
    if (requestSendStarted && userRequest.body() instanceof UnrepeatableRequestBody) return false;

    // 对异常进行细分 看是否是可以重试的异常 否则 返回false 不进行重试
    if (!isRecoverable(e, requestSendStarted)) return false;

    // 没有更多的路由路线 不重试
    if (!streamAllocation.hasMoreRoutes()) return false;

    // 其他情况才进行重试
    return true;
  }
重试条件总结:
- 配置上允许重试
- 特定的异常(首先属于RouteException或者IOException,然后在细分异常判断)
- 存在更多路由路线
其中异常的细分在 isRecoverable方法中:
private boolean isRecoverable(IOException e, boolean requestSendStarted) {
    // 协议异常 不能重试
    if (e instanceof ProtocolException) {
      return false;
    }

    // 不是超时异常,不能重试
    if (e instanceof InterruptedIOException) {
      return e instanceof SocketTimeoutException && !requestSendStarted;
    }

    // SSL 握手异常 证书有问题 不能重试
    if (e instanceof SSLHandshakeException) {
      if (e.getCause() instanceof CertificateException) {
        return false;
      }
    }
    //SSL 未授权异常 不能重试
    if (e instanceof SSLPeerUnverifiedException) {
      // e.g. a certificate pinning error.
      return false;
    }

    //其他异常才可以重试
    return true;
  }
再来看重定向的相关源码:
请求正常返回响应体并不代表请求就完成了,要根据响应内容来判断是否要进行重定向
  private Request followUpRequest(Response userResponse, Route route) throws IOException{
    if (userResponse == null) throw new IllegalStateException();
    int responseCode = userResponse.code();

    final String method = userResponse.request().method();
    switch (responseCode) {
      //407 客户端使用了HTTP代理服务器,在请求头中添加 “Proxy-Authorization”,让代理服务器授权
      case HTTP_PROXY_AUTH:
        Proxy selectedProxy = route != null
            ? route.proxy()
            : client.proxy();
        if (selectedProxy.type() != Proxy.Type.HTTP) {
          throw new ProtocolException("Received HTTP_PROXY_AUTH (407) code while not using proxy");
        }
        return client.proxyAuthenticator().authenticate(route, userResponse);
      // 401 需要身份验证 有些服务器接口需要验证使用者身份 在请求头中添加 “Authorization”
      case HTTP_UNAUTHORIZED:
        return client.authenticator().authenticate(route, userResponse);
      // 308 永久重定向
      // 307 临时重定向
      case HTTP_PERM_REDIRECT:
      case HTTP_TEMP_REDIRECT:
        // 如果请求方式不是GET或者HEAD,框架不会自动重定向请求
        if (!method.equals("GET") && !method.equals("HEAD")) {
          return null;
        }

      //300 301 302 303
      case HTTP_MULT_CHOICE:
      case HTTP_MOVED_PERM:
      case HTTP_MOVED_TEMP:
      case HTTP_SEE_OTHER:
        // 如果用户不允许重定向,那就返回null
        if (!client.followRedirects()) return null;
        // 从响应头取出location
        String location = userResponse.header("Location");
        if (location == null) return null;
        // 根据location 配置新的请求url
        HttpUrl url = userResponse.request().url().resolve(location);

        // 如果为null,说明协议有问题,取不出来HttpUrl,那就返回null,不进行重定向
        if (url == null) return null;

        // 如果重定向在http到https之间切换,需要检查用户是不是允许(默认允许)
        boolean sameScheme = url.scheme().equals(userResponse.request().url().scheme());
        if (!sameScheme && !client.followSslRedirects()) return null;


        Request.Builder requestBuilder = userResponse.request().newBuilder();
        //重定向请求中 只要不是 PROPFIND 请求,无论是POST还是其他的方法都要改为GET请求方式,
        //即只有 PROPFIND 请求才能有请求体
        //请求不是get与head
        if (HttpMethod.permitsRequestBody(method)) {
          final boolean maintainBody = HttpMethod.redirectsWithBody(method);
          // 除了 PROPFIND 请求之外都改成GET请求
          if (HttpMethod.redirectsToGet(method)) {
            requestBuilder.method("GET", null);
          } else {
            RequestBody requestBody = maintainBody ? userResponse.request().body() : null;
            requestBuilder.method(method, requestBody);
          }
          // 不是 PROPFIND 的请求,把请求头中关于请求体的数据删掉
          if (!maintainBody) {
            requestBuilder.removeHeader("Transfer-Encoding");
            requestBuilder.removeHeader("Content-Length");
            requestBuilder.removeHeader("Content-Type");
          }
        }

        // 在跨主机重定向时,删除身份验证请求头
        if (!sameConnection(userResponse, url)) {
          requestBuilder.removeHeader("Authorization");
        }

        return requestBuilder.url(url).build();
      // 408 客户端请求超时
      case HTTP_CLIENT_TIMEOUT:
        // 408 算是连接失败了,所以判断用户是不是允许重试
        if (!client.retryOnConnectionFailure()) {
          return null;
        }
        // UnrepeatableRequestBody实际并没发现有其他地方用到
        if (userResponse.request().body() instanceof UnrepeatableRequestBody) {
          return null;
        }
        // 如果是本身这次的响应就是重新请求的产物同时上一次之所以重请求还是因为408,
        // 那我们这次不再重请求了
        if (userResponse.priorResponse() != null
            && userResponse.priorResponse().code() == HTTP_CLIENT_TIMEOUT) {
          // We attempted to retry and got another timeout. Give up.
          return null;
        }

        // 如果服务器告诉我们了 Retry-After 多久后重试,那框架不管了。
        if (retryAfter(userResponse, 0) > 0) {
          return null;
        }

        return userResponse.request();
        // 503 服务不可用 和408差不多,
        //但是只在服务器告诉你 Retry-After:0(意思就是立即重试) 才重请求
      case HTTP_UNAVAILABLE:
        if (userResponse.priorResponse() != null
            && userResponse.priorResponse().code() == HTTP_UNAVAILABLE) {
          // We attempted to retry and got another timeout. Give up.
          return null;
        }

        if (retryAfter(userResponse, Integer.MAX_VALUE) == 0) {
          // specifically received an instruction to retry without delay
          return userResponse.request();
        }

        return null;

      default:
        return null;
    }
  }
总结:
系统默认的拦截器中重试重定向拦截器是整个责任链中的第一个,这意味着它会是首次接触到 Request 与最后接收到 Response 的角色,此拦截器中主要功能就是判断是否需要重试与重定向。
- 重试的前提是出现了 RouteException 或者 IOException 。一但在后续的拦截器执行过程中出现这两个异常,就会通过 recover 方法进行判断是否进行连接重试。
- 重定向发生在重试的判定之后,如果不满足重试的条件,还需要进一步调用 followUpRequest 根据 Response 的响应码(当然,如果直接请求失败, Response 都不存在就会抛出异常)。 followup 最大发生20次。
2、桥接拦截器:BridgeInterceptor
- 设置请求内容长度,编码,gzip压缩,cookie等
- 获取响应后保存Cookie等操作。
它可以自动补全以下请求头:
| 请求头 | 说明 |
|
Content - Type
|
请求体类型 , 如: application/x - www - form - urlencoded
|
| Content-Length / Transfer-Encoding |
请求体解析方式
|
|
Host
|
请求的主机站点 |
|
Connection: Keep - Alive
|
保持长连接
|
|
Accept - Encoding: gzip
|
接受响应支持 gzip 压缩
|
|
Cookie
|
cookie 身份辨别
|
|
User - Agent
|
请求的用户信息,如 : 操作系统、浏览器等
|
- 保存cookie,在下次请求则会读取对应的数据设置进入请求头,默认的 CookieJar 不提供实现
- 如果使用gzip返回的数据,则使用 GzipSource 包装便于解析。
- 对用户构建的 Request 进行添加或者删除相关头部信息,以转化成能够真正进行网络请求的 Request 将符合网络
- 请求规范的Request交给下一个拦截器处理,并获取 Response 如果响应体经过了GZIP压缩,那就需要解压,再构建成用户可用的 Response 并返回
3、缓存拦截器:CacheInterceptor
缓存拦截器知识点非常琐碎,我们这里只梳理核心流程:
核心逻辑就是判断是否有可用的缓存,有则用,没有就请求,具体判断步骤如下:
第一步:根据 Request 对象查找是否有对应的缓存
如果没有(cacheCandidate == null)则直接进行网络请求,这里是如何体现的呢,我们要接着看下接下来的逻辑才能找到答案

这里把cacheCandidate传入59行的对象中,然后得到一个CacheStrategy(缓存策略类),这个类很关键,它决定了用缓存还是请求网络
跟进到59行的get方法
package okhttp3.internal.cache;

public final class CacheStrategy {

    public CacheStrategy get() {
      // ==== 关键代码 ===
      CacheStrategy candidate = getCandidate();

      if (candidate.networkRequest != null && request.cacheControl().onlyIfCached()) {
        // We're forbidden from using the network and the cache is insufficient.
        return new CacheStrategy(null, null);
      }

      return candidate;
    }
}
进行跟进 CacheStrategy candidate = getCandidate();
    private CacheStrategy getCandidate() {
      // No cached response.
      if (cacheResponse == null) {
        return new CacheStrategy(request, null);
      }
    }
这里返回了一个缓存策略对象 return new CacheStrategy(request, null);
其中第二个参数为空,我们在回到CacheInterceptor类里面看这种缓存策略是如何处理的,请看注释:
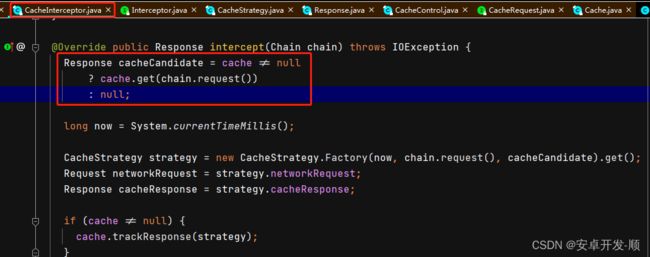
  @Override public Response intercept(Chain chain) throws IOException {
    Response cacheCandidate = cache != null
        ? cache.get(chain.request())
        : null;

    long now = System.currentTimeMillis();

    CacheStrategy strategy = new CacheStrategy.Factory(now, chain.request(), cacheCandidate).get();
    //两个关键的对象
    Request networkRequest = strategy.networkRequest;
    Response cacheResponse = strategy.cacheResponse;

    if (cache != null) {
      cache.trackResponse(strategy);
    }

    if (cacheCandidate != null && cacheResponse == null) {
      closeQuietly(cacheCandidate.body()); // The cache candidate wasn't applicable. Close it.
    }

    // 二者都为空,直接返回504
    if (networkRequest == null && cacheResponse == null) {
      return new Response.Builder()
          .request(chain.request())
          .protocol(Protocol.HTTP_1_1)
          .code(504)
          .message("Unsatisfiable Request (only-if-cached)")
          .body(Util.EMPTY_RESPONSE)
          .sentRequestAtMillis(-1L)
          .receivedResponseAtMillis(System.currentTimeMillis())
          .build();
    }

    // networkRequest为空 但是 cacheResponse不为空 则使用缓存
    if (networkRequest == null) {
      return cacheResponse.newBuilder()
          .cacheResponse(stripBody(cacheResponse))
          .build();
    }

    // 只要networkRequest不为空(能执行到这里肯定是不为空) 就发起网络请求
    Response networkResponse = null;
    try {
      networkResponse = chain.proceed(networkRequest);
    } finally {
      // If we're crashing on I/O or otherwise, don't leak the cache body.
      if (networkResponse == null && cacheCandidate != null) {
        closeQuietly(cacheCandidate.body());
      }
    }

    // 如果有缓存并且本次请求返回304 数据没有变化 就直接更新缓存
    if (cacheResponse != null) {
      if (networkResponse.code() == HTTP_NOT_MODIFIED) {
        Response response = cacheResponse.newBuilder()
            .headers(combine(cacheResponse.headers(), networkResponse.headers()))
            .sentRequestAtMillis(networkResponse.sentRequestAtMillis())
            .receivedResponseAtMillis(networkResponse.receivedResponseAtMillis())
            .cacheResponse(stripBody(cacheResponse))
            .networkResponse(stripBody(networkResponse))
            .build();
        networkResponse.body().close();

        // Update the cache after combining headers but before stripping the
        // Content-Encoding header (as performed by initContentStream()).
        cache.trackConditionalCacheHit();
        cache.update(cacheResponse, response);
        return response;
      } else {
        closeQuietly(cacheResponse.body());
      }
    }

    Response response = networkResponse.newBuilder()
        .cacheResponse(stripBody(cacheResponse))
        .networkResponse(stripBody(networkResponse))
        .build();

    //缓存本次数据
    if (cache != null) {
      if (HttpHeaders.hasBody(response) && CacheStrategy.isCacheable(response, networkRequest)) {
        // Offer this request to the cache.
        CacheRequest cacheRequest = cache.put(response);
        return cacheWritingResponse(cacheRequest, response);
      }

      if (HttpMethod.invalidatesCache(networkRequest.method())) {
        try {
          cache.remove(networkRequest);
        } catch (IOException ignored) {
          // The cache cannot be written.
        }
      }
    }

    return response;
  }
从源码中可以看出,只要request不为空,就是CacheStrategy(request, null);中的第一个参数,一定会发起网络请求。
这里第一步就完成了
总结下:没有缓存就直接请求,除非用户配置了onlyIfCached。
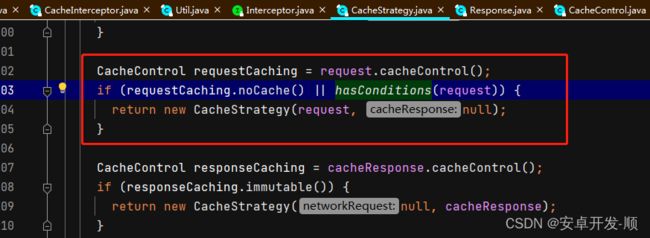
第二步:如果是https 并且没有握手信息 则返回和第一步一样的策略
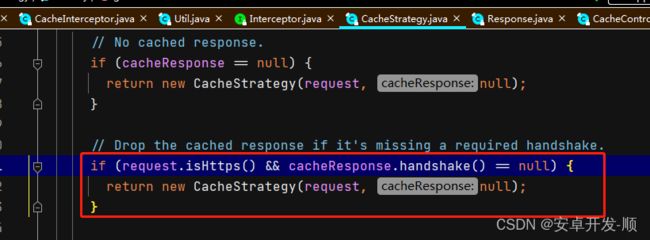
CacheStrategy(request, null) 结果和第一步是一样的
第三步:根据响应码和响应头来判断是否支持缓存
public class CacheStategy {
    public static boolean isCacheable(Response response, Request request) {
    // Always go to network for uncacheable response codes (RFC 7231 section 6.1),
    // This implementation doesn't support caching partial content.
    switch (response.code()) {
      case HTTP_OK:
      case HTTP_NOT_AUTHORITATIVE:
      case HTTP_NO_CONTENT:
      case HTTP_MULT_CHOICE:
      case HTTP_MOVED_PERM:
      case HTTP_NOT_FOUND:
      case HTTP_BAD_METHOD:
      case HTTP_GONE:
      case HTTP_REQ_TOO_LONG:
      case HTTP_NOT_IMPLEMENTED:
      case StatusLine.HTTP_PERM_REDIRECT:
        // These codes can be cached unless headers forbid it.
        break;

      case HTTP_MOVED_TEMP:
      case StatusLine.HTTP_TEMP_REDIRECT:
        // These codes can only be cached with the right response headers.
        // http://tools.ietf.org/html/rfc7234#section-3
        // s-maxage is not checked because OkHttp is a private cache that should ignore s-maxage.
        if (response.header("Expires") != null
            || response.cacheControl().maxAgeSeconds() != -1
            || response.cacheControl().isPublic()
            || response.cacheControl().isPrivate()) {
          break;
        }
        // Fall-through.

      default:
        // All other codes cannot be cached.
        return false;
    }

    // A 'no-store' directive on request or response prevents the response from being cached.
    return !response.cacheControl().noStore() && !request.cacheControl().noStore();
  }
}
总结下,响应码响应头应满足以下条件才可以使用缓存,否则就返回和第一步一样的策略:
CacheStrategy(request, null), 结果和第一步也是一样的
-
响应码是 200, 203, 204, 300, 301, 404, 405, 410, 414, 501, 308 , 302 , 307中的一种
-
当响应码为 302 或者 307 时,响应头包含Expires或者Cache-Control包含max-age、private、public中的一种
-
Cache-Control中不存在no-store的配置
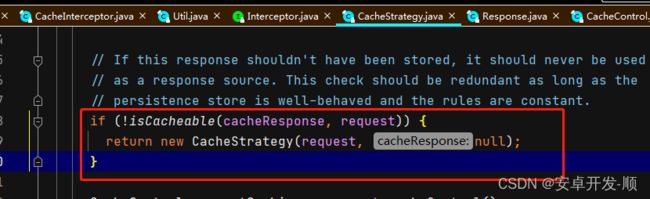
第四步:根据用户配置来判断
![]()
总结下:用户配置满足以下条件才有可能使用缓存,否则就返回和第一步一样的策略:
CacheStrategy(request, null), 结果和第一步也是一样的
- 没有 Cache-Control:no-cache配置
- 请求头中没有配置If-Modified-Since和If-None-Match
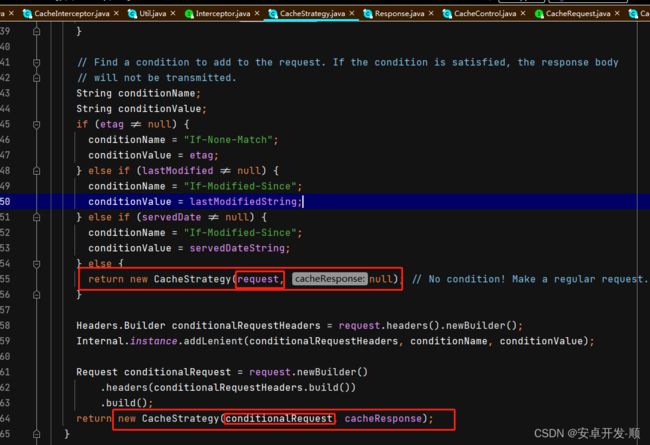
第五步:根据响应资源是否变化来判断

在经历了以上4步的判断后如果还满足使用缓存的条件的话,就判断响应资源是否有变化,如果没有变化就返回CacheStrategy(null, cacheResponse)的策略
在第一步的分析中我们已经看出,这种策略就会使用缓存(request为空,cacheResponse不为空)

如果响应资源有变化呢?继续往下看

这里会判断缓存的有效性,有效则返回CacheStrategy(null, cacheResponse)的策略 ,使用缓存
无效的话继续往下执行,一定会返回一个request不为空的策略,因此无效一定会去请求
到此为止,缓存的执行流程就分析完毕了,其中针对缓存策略CacheStrategy(xxx, xxx)的判断处理逻辑都在第一步中进行了分析,这里对返回的缓存策略稍微总结下:
- request不为空,发起网络请求
- request为空 cache不会空 使用缓存
- 都为空(配置了onlyIfCached的情况) 直接返回504
4、连接拦截器:ConnectInterceptor
这个拦截器中的所有实现都是为了获得一份(创建或者复用)与目标服务器的连接,在这个连接上进行HTTP数据的收发,源码如下:
package okhttp3.internal.connection;


public final class ConnectInterceptor implements Interceptor {
  public final OkHttpClient client;

  public ConnectInterceptor(OkHttpClient client) {
    this.client = client;
  }

  @Override public Response intercept(Chain chain) throws IOException {
    RealInterceptorChain realChain = (RealInterceptorChain) chain;
    Request request = realChain.request();
    //StreamAllocation 在重试和重定向拦截器中就创建了,它是用来协调请求、连接
    //与数据流三者之间的关系的,它负责为一次请求寻找连接,然后获得流来实现网络通信。
    StreamAllocation streamAllocation = realChain.streamAllocation();

    boolean doExtensiveHealthChecks = !request.method().equals("GET");
    //这里使用的 newStream 方法实际上就是去查找或者建立一个与请求主机有效的连接,
    //返回的 HttpCodec 中包含了输入输出流,并且封装了对HTTP请求报文的编码与解码,
    //直接使用它就能够与请求主机完成HTTP通信
    HttpCodec httpCodec = streamAllocation.newStream(client, chain, doExtensiveHealthChecks);

    //RealConnection 封装了Socket与一个Socket连接池
    RealConnection connection = streamAllocation.connection();

    return realChain.proceed(request, streamAllocation, httpCodec, connection);
  }
}
有几个重要的类和方法:StreamAllocation、newStream方法、HttpCodec、RealConnection都在注释中写了其大概的作用。
RealConnection里面有一个连接池 ConnectionPool
- 此连接池默认最大可保持5个连接,每个连接空闲5分钟就会被回收
- 复用机制:如果在连接池中找到与当前连接参数(DNS、代理、SSL证书、服务器域名、端口)一致并且未被关闭没被占用的连接,则可以复用
以上就是连接拦截器的主要内容。
5、请求服务器拦截器:CallServerInterceptor
此拦截器主要作用是:利用 HttpCodec 发出请求到服务器并且解析生成 Response ,下面分析源码:
所有源码的解读都放到注释中,请注意查看:
package okhttp3.internal.http;

public final class CallServerInterceptor implements Interceptor {
  private final boolean forWebSocket;

  public CallServerInterceptor(boolean forWebSocket) {
    this.forWebSocket = forWebSocket;
  }

  @Override public Response intercept(Chain chain) throws IOException {
    RealInterceptorChain realChain = (RealInterceptorChain) chain;
    HttpCodec httpCodec = realChain.httpStream();
    StreamAllocation streamAllocation = realChain.streamAllocation();
    RealConnection connection = (RealConnection) realChain.connection();
    Request request = realChain.request();

    long sentRequestMillis = System.currentTimeMillis();

    realChain.eventListener().requestHeadersStart(realChain.call());
    //将请求头写入到缓存中 (直到调用 flushRequest() 才真正发送给服务器)。
    httpCodec.writeRequestHeaders(request);
    realChain.eventListener().requestHeadersEnd(realChain.call(), request);

    Response.Builder responseBuilder = null;

    //判断是否有请求体 有就进入if
    if (HttpMethod.permitsRequestBody(request.method()) && request.body() != null) {

      //Expect: 100-continue 这个请求头的含义是 需要先问下服务器能不能接受请求体
      if ("100-continue".equalsIgnoreCase(request.header("Expect"))) {
        //开始询问
        httpCodec.flushRequest();
        realChain.eventListener().responseHeadersStart(realChain.call());
        responseBuilder = httpCodec.readResponseHeaders(true);
      }

      //注意如果responseBuilder == null 代表服务器愿意接受请求体
      if (responseBuilder == null) {
        // 开发发送请求体等剩余数据
        realChain.eventListener().requestBodyStart(realChain.call());
        long contentLength = request.body().contentLength();
        CountingSink requestBodyOut =
            new CountingSink(httpCodec.createRequestBody(request, contentLength));
        BufferedSink bufferedRequestBody = Okio.buffer(requestBodyOut);

        request.body().writeTo(bufferedRequestBody);
        bufferedRequestBody.close();
        realChain.eventListener()
            .requestBodyEnd(realChain.call(), requestBodyOut.successfulCount);
      } else if (!connection.isMultiplexed()) {
        // 如果服务器不接受 或者不是多路复用(http2) 就关闭连接
        streamAllocation.noNewStreams();
      }
    }

    httpCodec.finishRequest();

    //执行到这里 responseBuilder 是很可能为null的,有这3种情况
    //1、请求没有请求体
    //2、请求中有请求体 并且不包含Expect: 100-continue
    //3、请求中有请求体 并且包含Expect: 100-continue 并且 服务器愿意接受请求体
    if (responseBuilder == null) {
      realChain.eventListener().responseHeadersStart(realChain.call());
      //读取响应头 为 responseBuilder  赋值
      responseBuilder = httpCodec.readResponseHeaders(false);
    }

    //组成响应体(这里是响应头部分)
    Response response = responseBuilder
        .request(request)
        .handshake(streamAllocation.connection().handshake())
        .sentRequestAtMillis(sentRequestMillis)
        .receivedResponseAtMillis(System.currentTimeMillis())
        .build();

    int code = response.code();
    if (code == 100) {
      // 如果响应是100,这代表了是请求 Expect: 100-continue 成功的响应
      responseBuilder = httpCodec.readResponseHeaders(false);
      // 要在读取一次响应头 才是真正的响应头
      response = responseBuilder
              .request(request)
              .handshake(streamAllocation.connection().handshake())
              .sentRequestAtMillis(sentRequestMillis)
              .receivedResponseAtMillis(System.currentTimeMillis())
              .build();

      code = response.code();
    }

    realChain.eventListener().responseHeadersEnd(realChain.call(), response);

    //forWebSocket 暂不分析
    if (forWebSocket && code == 101) {
      response = response.newBuilder()
          .body(Util.EMPTY_RESPONSE)
          .build();
    } else {
      //这里才是真正读取响应体
      response = response.newBuilder()
          .body(httpCodec.openResponseBody(response))
          .build();
    }
    //如果客户端或服务端 有一方不希望长连接 就关闭socket
    if ("close".equalsIgnoreCase(response.request().header("Connection"))
        || "close".equalsIgnoreCase(response.header("Connection"))) {
      streamAllocation.noNewStreams();
    }

    //204 205代表无内容 但是响应体的内容长度还大于0 这就自相矛盾了 抛出异常
    if ((code == 204 || code == 205) && response.body().contentLength() > 0) {
      throw new ProtocolException(
          "HTTP " + code + " had non-zero Content-Length: " + response.body().contentLength());
    }

    return response;
  }
}
至此,OKHttp源码分析完毕!