Seata1.4.2-分布式事务-Seata实战
目录
-
-
- 一、什么是分布式事务问题:
-
- 1.1 单体应用:
- 1.2 微服务应用:
- 二、Seata简介:
-
- 2.1 Seata 是什么:
- 2.2 能干嘛:
- 2.3.怎么玩:
- 三、seata server服务器搭建:
-
- (1)我们先从官网下载seata-server和资源包:
- (2)解压seata-server安装包到指定目录:
- (3)修改seata-server配置文件file.conf:
- (4)修改seata-server/seata/conf目录下的regiester.conf文件:
- (5)初始化SQL:
- (6)启动seata-server:
- 四、使用Nacos作为Seata的配置中心:
- 五、订单、库存、账户业务数据库准备:
- 六、 微服务准备:
-
- 实体类:
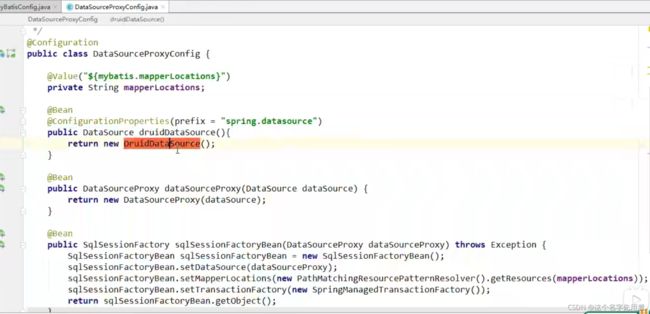
- 数据源代理:
- dao层:
https://www.jianshu.com/p/223ad263a822
一、什么是分布式事务问题:
1.1 单体应用:
单体应用中,一个业务操作需要调用三个模块完成,此时数据的一致性由本地事务来保证。
如下图:

1.2 微服务应用:
随着业务需求的变化,单体应用被拆分成微服务应用,原来的三个模块被拆分成三个独立的应用,分别使用独立的数据源,业务操作需要调用三个服务来完成。此时每个服务内部的数据一致性由本地事务来保证,但是全局的数据一致性问题没法保证。
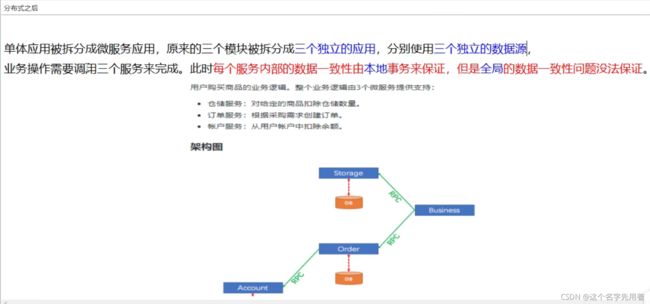
如下图所示:
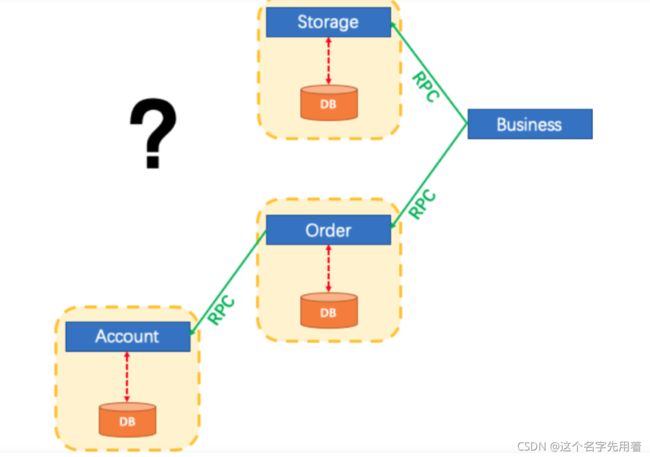
总结:
在微服务架构中由于全局数据一致性没法保证产生的问题就是分布式事务问题。简单来说,一次业务操作需要操作多个数据源或需要进行远程调用,就会产生分布式事务问题。

二、Seata简介:
Seata 是一款开源的分布式事务解决方案,致力于提供高性能和简单易用的分布式事务服务。Seata 将为用户提供了 AT、TCC、SAGA 和 XA 事务模式,为用户打造一站式的分布式解决方案。
2.1 Seata 是什么:
Seata 是一款开源的分布式事务解决方案,致力于提供高性能和简单易用的分布式事务服务。Seata 将为用户提供了 AT、TCC、SAGA 和 XA 事务模式,为用户打造一站式的分布式解决方案。
官网地址: http://seata.io/zh-cn/.
2.2 能干嘛:

Seata原理和设计:
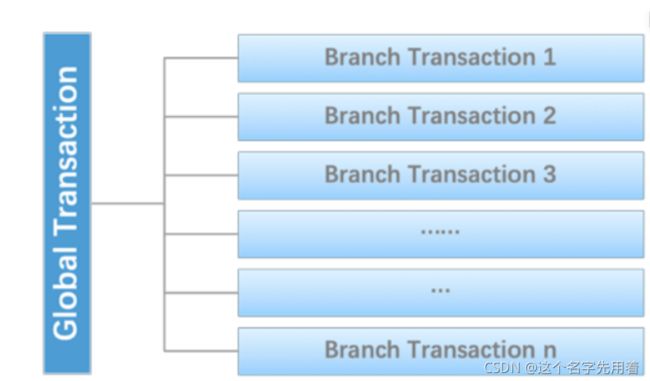
(1)定义一个分布式事务:
我们可以把一个分布式事务理解成一个包含了若干分支事务的全局事务,全局事务的职责是协调其下管辖的分支事务达成一致,要么一起成功提交,要么一起失败回滚。此外,通常分支事务本身就是一个满足ACID的本地事务。这是我们对分布式事务结构的基本认识,与 XA 是一致的。
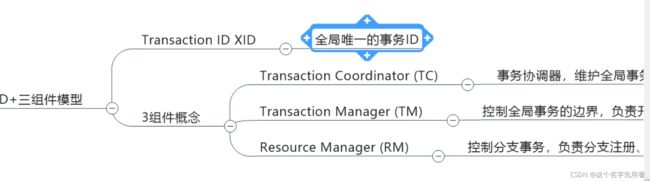
(2)协议分布式事务处理过程的三个组件:
-
TC (Transaction Coordinator) - 事务协调者:维护全局和分支事务的状态,驱动全局事务提交或回滚。
-
TM (Transaction Manager) - 事务管理器:定义全局事务的范围:开始全局事务、提交或回滚全局事务。
-
RM (Resource Manager) -资源管理器:管理分支事务处理的资源,与TC交谈以注册分支事务和报告分支事务的状态,并驱动分支事务提交或回滚。

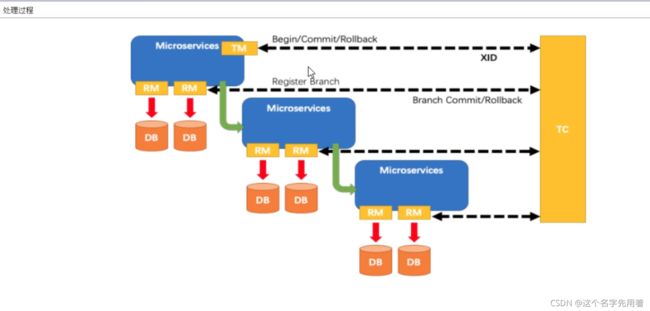
一个典型的分布式事务过程:
TM 向 TC 申请开启一个全局事务,全局事务创建成功并生成一个全局唯一的 XID;
XID 在微服务调用链路的上下文中传播;
RM 向 TC 注册分支事务,将其纳入 XID 对应全局事务的管辖;
TM 向 TC 发起针对 XID 的全局提交或回滚决议;
TC 调度 XID 下管辖的全部分支事务完成提交或回滚请求。
处理过程如图:
2.3.怎么玩:


三、seata server服务器搭建:
seata 1.4.2安装与配置:
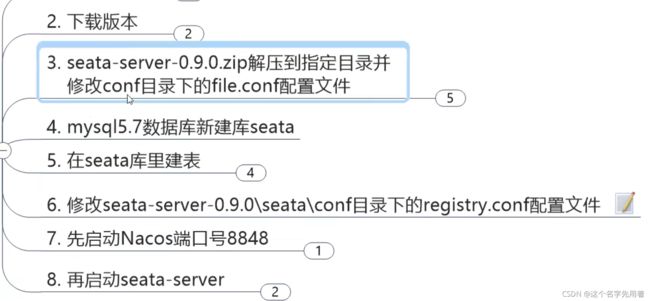
(1)我们先从官网下载seata-server和资源包:
这里下载的是seata-server-1.4.2.zip(windows版本)和源码的zip包 、 下载地址: https://github.com/seata/seata/releases.
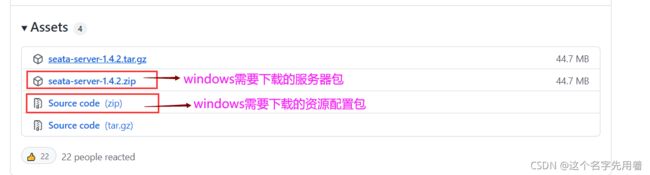
(1.1)或者 从其他地方下载源码的zip包:https://github.com/seata/seata/tree/1.4.2.两个地方下载的资源包是一样的。
(1.2)这里我们使用Nacos作为注册中心,Nacos的安装及使用可以参考:Spring Cloud Alibaba:Nacos 作为注册中心使用https://blog.csdn.net/weixin_38568503/article/details/120591999.
(2)解压seata-server安装包到指定目录:
修改conf目录下的file.conf配置文,事务日志存储模式为db及数据库连接信息;
(3)修改seata-server配置文件file.conf:
先备份file.conf文件。
此配置项为seata 服务器的存储配置,存储方式选择db,再配置数据库的连接信息,以及处理事务的全局性表(表名使用默认的就可以)。
修改配置文件:file.conf:
#修改数据库地址,注意mysql5/mysql8驱动不同

store {
 ## store mode: file、db、redis
 mode = "db"
	## database store property
	 db {
	 ## the implement of javax.sql.DataSource, such as DruidDataSource(druid)/BasicDataSource(dbcp)/HikariDataSource(hikari) etc.
	 datasource = "druid"
	 ## mysql/oracle/postgresql/h2/oceanbase etc.
	 dbType = "mysql"
	 ## mysql 5.xx版本的driverClassName :
     ## driverClassName = "com.mysql.jdbc.Driver"
     ## mysql 8.0的driverClassName :
	 driverClassName = "com.mysql.cj.jdbc.Driver"
	 url = "jdbc:mysql://127.0.0.1:3306/seata?serverTimezone=Asia/Shanghai&useUnicode=true&characterEncoding=utf8&useSSL=true"
	 ## 自己数据库的登录名和密码
	 user = "root"
	 password = "root"
	 minConn = 5
	 maxConn = 100
	 globalTable = "global_table"
	 branchTable = "branch_table"
	 lockTable = "lock_table"
	 queryLimit = 100
	 maxWait = 5000
	 }
	}
修改了两处:
(1)mode = "file"修改为 mode = “db”,
(2)driverClassName 换成自己5或者8版本的,url = “jdbc:mysql://127.0.0.1:3305/seata” 换成你自己的数据库,用户名密码等也需要修改成自己的。
(4)修改seata-server/seata/conf目录下的regiester.conf文件:
需要配置选用的注册中心类型(nacos),注册中心的连接信息;配置中心的类型,配置中心的连接信息。
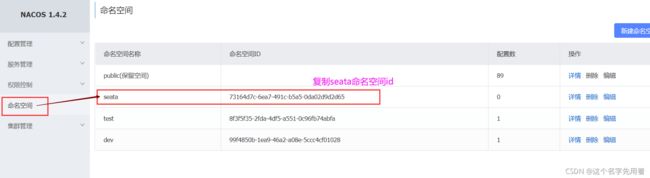
最好新建一个命名空间专门隔离seata的服务和配置:
先后台启动nacos服务(startup.cmd -m standalone:单机启动),然后打开nacos控制台,新建命名空间seata:然后复制命名空间的id到regiester.conf中的
namespace 配置项:

#我使用的nacos作为配置中心和注册中心,使用将配置文件改为nacos


registry {
  # file 、nacos 、eureka、redis、zk、consul、etcd3、sofa
  type = "nacos"

##nacos修改的地方一
  nacos {
    application = "seata-server"
    ##nacos服务的地址
    serverAddr = "127.0.0.1:8848"
    group = "SEATA_GROUP"
    ##nacos中新建的一个命名空间,用于专门隔离seata的服务和配置
    namespace = "73164d7c-6ea7-491c-b5a5-0da02d9d2d65"
    cluster = "default"
    username = "nacos"
    password = "nacos"
  }
}

config {
  # file、nacos 、apollo、zk、consul、etcd3
  type = "nacos"
##nacos修改的地方二
  nacos {
    ##nacos服务的地址:
    serverAddr = "127.0.0.1:8848"
    ## nacos中新建的一个命名空间,用于专门隔离seata的服务和配置
    namespace = "73164d7c-6ea7-491c-b5a5-0da02d9d2d65"
    group = "SEATA_GROUP"
    username = "nacos"
    password = "nacos"
    ##seata使用1.4.2版本,新建的data id文件类型选择properties
    dataId = "seataServer.properties"
  }
}
修改了三处: type = “nacos”,nacos {},config{}
注意:
①当nacos开启安全配置(在nacos的conf/application.properties中配置nacos.core.auth.enabled=true)后,对nacos的连接信息都要带上用户名、密码等信息
②在seata1.4.2后才可以使用dataId = "seataServer.properties"的方式读取配置信息。
从v1.4.2版本开始,已支持从一个Nacos dataId中获取所有配置信息,你只需要额外添加一个dataId配置项, 所以后面所有的配置都是围绕这个方式来实现的
(5)初始化SQL:
由于我们使用了db模式存储事务日志,所以我们需要自己在本机上创建一个seata数据库,建表sql在源码包里面(seata-1.4.2\seata-1.4.2\script\server\db\mysql.sql),这里是重点不然根本找不到.
5.创建数据库和表:同时我们创建数据回滚的表undo_log:
	创建数据库seata,并建立下面三张表(branch_table, global_table, lock_table),创建undo_log表放到业务库中

-- the table to store GlobalSession data
CREATE TABLE IF NOT EXISTS `global_table`
(
    `xid`                       VARCHAR(128) NOT NULL,
    `transaction_id`            BIGINT,
    `status`                    TINYINT      NOT NULL,
    `application_id`            VARCHAR(32),
    `transaction_service_group` VARCHAR(32),
    `transaction_name`          VARCHAR(128),
    `timeout`                   INT,
    `begin_time`                BIGINT,
    `application_data`          VARCHAR(2000),
    `gmt_create`                DATETIME,
    `gmt_modified`              DATETIME,
    PRIMARY KEY (`xid`),
    KEY `idx_gmt_modified_status` (`gmt_modified`, `status`),
    KEY `idx_transaction_id` (`transaction_id`)
) ENGINE = InnoDB
  DEFAULT CHARSET = utf8;

-- the table to store BranchSession data
CREATE TABLE IF NOT EXISTS `branch_table`
(
    `branch_id`         BIGINT       NOT NULL,
    `xid`               VARCHAR(128) NOT NULL,
    `transaction_id`    BIGINT,
    `resource_group_id` VARCHAR(32),
    `resource_id`       VARCHAR(256),
    `branch_type`       VARCHAR(8),
    `status`            TINYINT,
    `client_id`         VARCHAR(64),
    `application_data`  VARCHAR(2000),
    `gmt_create`        DATETIME(6),
    `gmt_modified`      DATETIME(6),
    PRIMARY KEY (`branch_id`),
    KEY `idx_xid` (`xid`)
) ENGINE = InnoDB
  DEFAULT CHARSET = utf8;

-- the table to store lock data
CREATE TABLE IF NOT EXISTS `lock_table`
(
    `row_key`        VARCHAR(128) NOT NULL,
    `xid`            VARCHAR(128),
    `transaction_id` BIGINT,
    `branch_id`      BIGINT       NOT NULL,
    `resource_id`    VARCHAR(256),
    `table_name`     VARCHAR(32),
    `pk`             VARCHAR(36),
    `gmt_create`     DATETIME,
    `gmt_modified`   DATETIME,
    PRIMARY KEY (`row_key`),
    KEY `idx_branch_id` (`branch_id`)
) ENGINE = InnoDB
  DEFAULT CHARSET = utf8;

-- the table to store seata xid data
-- 0.7.0+ add context
-- you must to init this sql for you business databese. the seata server not need it.
-- 此脚本必须初始化在你当前的业务数据库中,用于AT 模式XID记录。与server端无关(注:业务数据库)
-- 注意此处0.3.0+ 增加唯一索引 ux_undo_log
drop table `undo_log`;
CREATE TABLE `undo_log` (
 `id` bigint(20) NOT NULL AUTO_INCREMENT,
 `branch_id` bigint(20) NOT NULL,
 `xid` varchar(100) NOT NULL,
 `context` varchar(128) NOT NULL,
 `rollback_info` longblob NOT NULL,
 `log_status` int(11) NOT NULL,
 `log_created` datetime NOT NULL,
 `log_modified` datetime NOT NULL,
 `ext` varchar(100) DEFAULT NULL,
 PRIMARY KEY (`id`),
 UNIQUE KEY `ux_undo_log` (`xid`,`branch_id`)
) ENGINE=InnoDB AUTO_INCREMENT=1 DEFAULT CHARSET=utf8;
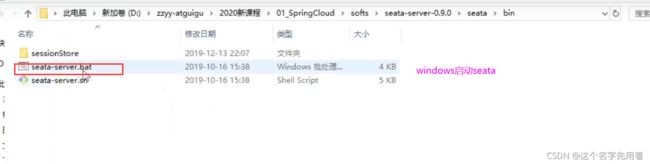
(6)启动seata-server:
先启动Nacos,再使用seata-server中/bin/seata-server.bat文件启动seata-server。
windows单机启动nacos:startup.cmd -m standalone
然后启动seata-server:

我们这里使用的是seata的1.4.2版本的启动:
直接点击seata-server.bat即可;
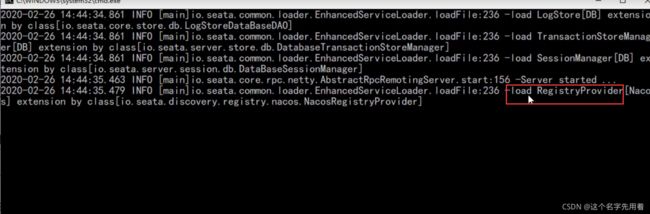
nacos中查看服务是否注册成功:在seata命名空间下查看:

seata-server启动完毕。
四、使用Nacos作为Seata的配置中心:
script/config-center/config.txt此配置信息是seata事务的相关属性。
注意:
seata使用1.4.2版本,新建的data id文件类型选择properties。若是使用seata1.4.2之前的版本,以下的每个配置项在nacos中就是一个条目,需要使用script/config-center/nacos/下的nacos-config.sh(linux或者windows下装git)或者nacos-config.py(python脚本)执行上传注册.
seata-1.4.2的配置:
1.解压seata-1.4.2资源包,并修改配置:
先本地修改seata-1.4.2\seata-1.4.2\script\config-center\config.txt,然后提交到nacos仓库:
seata 源码包配置修改,该步骤将seata的配置写入nacos配置中心,存入nacos的数据的配置表,源码包根目录下script\config-center 中的config.txt
路径:script\config-center
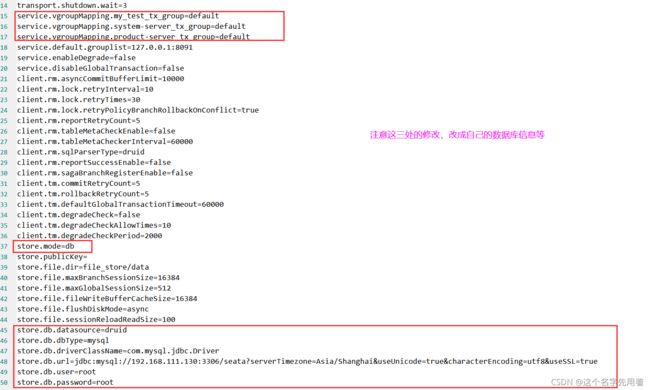
修改了service.vgroupMapping和数据库地址和存储模式
-----------------------------------------------------------
transport.type=TCP
transport.server=NIO
transport.heartbeat=true
transport.enableClientBatchSendRequest=false
transport.threadFactory.bossThreadPrefix=NettyBoss
transport.threadFactory.workerThreadPrefix=NettyServerNIOWorker
transport.threadFactory.serverExecutorThreadPrefix=NettyServerBizHandler
transport.threadFactory.shareBossWorker=false
transport.threadFactory.clientSelectorThreadPrefix=NettyClientSelector
transport.threadFactory.clientSelectorThreadSize=1
transport.threadFactory.clientWorkerThreadPrefix=NettyClientWorkerThread
transport.threadFactory.bossThreadSize=1
transport.threadFactory.workerThreadSize=default
transport.shutdown.wait=3
# service
# 1.自己命名一个vgroupMapping
service.vgroupMapping.my_test_tx_group=default
# seata的地址列表,此处是一个本地的
service.default.grouplist=127.0.0.1:8091
service.enableDegrade=false
service.disableGlobalTransaction=false
# client
client.rm.asyncCommitBufferLimit=10000
client.rm.lock.retryInterval=10
client.rm.lock.retryTimes=30
client.rm.lock.retryPolicyBranchRollbackOnConflict=true
client.rm.reportRetryCount=5
client.rm.tableMetaCheckEnable=false
client.rm.tableMetaCheckerInterval=60000
client.rm.sqlParserType=druid
client.rm.reportSuccessEnable=false
client.rm.sagaBranchRegisterEnable=false
client.tm.commitRetryCount=5
client.tm.rollbackRetryCount=5
client.tm.defaultGlobalTransactionTimeout=60000
client.tm.degradeCheck=false
client.tm.degradeCheckAllowTimes=10
client.tm.degradeCheckPeriod=2000
# store
# 2.model改为db
store.mode=db
store.publicKey=""
store.file.dir=file_store/data
store.file.maxBranchSessionSize=16384
store.file.maxGlobalSessionSize=512
store.file.fileWriteBufferCacheSize=16384
store.file.flushDiskMode=async
store.file.sessionReloadReadSize=100
store.db.datasource=druid
store.db.dbType=mysql
# 3.修改数据库的连接信息driverClassName和url,user,password
store.db.driverClassName=com.mysql.cj.jdbc.Driver
# 改为上面创建的seata服务数据库
store.db.url=jdbc:mysql://127.0.0.1:3306/seata?serverTimezone=Asia/Shanghai&useUnicode=true&characterEncoding=utf8&useSSL=true
# 改为自己的数据库用户名
store.db.user=root
# 改为自己的数据库密码
store.db.password=root
store.db.minConn=5
store.db.maxConn=30
store.db.globalTable=global_table
store.db.branchTable=branch_table
store.db.queryLimit=100
store.db.lockTable=lock_table
store.db.maxWait=5000
store.redis.mode=single
store.redis.single.host=127.0.0.1
store.redis.single.port=6379
store.redis.sentinel.masterName=""
store.redis.sentinel.sentinelHosts=""
store.redis.maxConn=10
store.redis.minConn=1
store.redis.maxTotal=100
store.redis.database=0
store.redis.password=""
store.redis.queryLimit=100
server.recovery.committingRetryPeriod=1000
server.recovery.asynCommittingRetryPeriod=1000
server.recovery.rollbackingRetryPeriod=1000
server.recovery.timeoutRetryPeriod=1000
server.maxCommitRetryTimeout=-1
server.maxRollbackRetryTimeout=-1
server.rollbackRetryTimeoutUnlockEnable=false
# client.undo
client.undo.dataValidation=true
client.undo.logSerialization=jackson
client.undo.onlyCareUpdateColumns=true
server.undo.logSaveDays=7
server.undo.logDeletePeriod=86400000
client.undo.logTable=undo_log
client.undo.compress.enable=true
client.undo.compress.type=zip
client.undo.compress.threshold=64k
log.exceptionRate=100
transport.serialization=seata
transport.compressor=none
metrics.enabled=false
metrics.registryType=compact
metrics.exporterList=prometheus
metrics.exporterPrometheusPort=9898
----------------------------------------------------------------
注:
service.vgroupMapping.my_test_tx_group=default
与项目模块中yml配置的seata.tx-service-group内容相同
注意上传的版本必须将所有注释#都直接删除掉,否则上传失败,还有必须将=后边给值,没有值的话给"";
2.使用script/config-center/nacos/下的nacos-config.sh(linux或者windows下装git)或者nacos-config.py(python脚本)执行上传注册:
seata-1.4.2\seata-1.4.2\script\config-center\nacos下启动nacos-config.sh,将我们刚才修改好的配置上传到远程仓库nacos中:
打开git bash或linux类命令行,执行sh脚本(注意脚本是否有执行的权限)
github命令解析:
-h nacos地址
-p 端口
-t 命名空间不写默认public
-u 用户名
-p 密码

sh nacos-config.sh -h 192.168.7.231 -p 8848 -g SEATA_GROUP -t 73164d7c-6ea7-491c-b5a5-0da02d9d2d65 -u nacos -w nacos
在seata-server-1.4.2\script\config-center\nacos目录下,右键 Git Bash Here
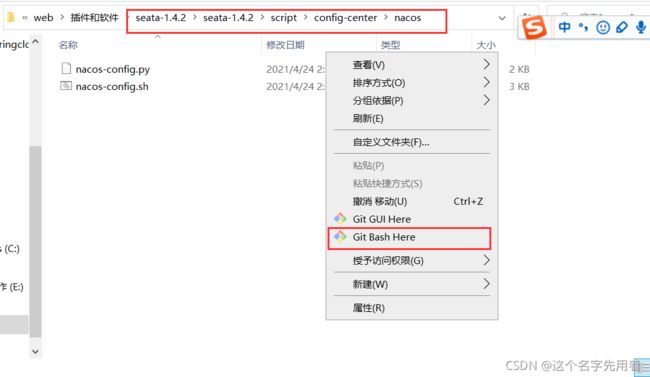
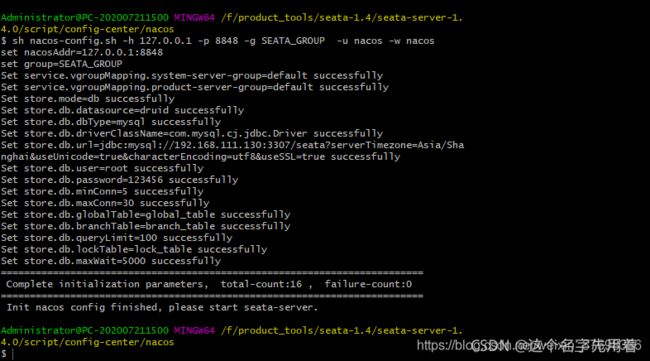
输入命令:
sh nacos-config.sh -h 127.0.0.1 -p 8848 -g SEATA_GROUP -u nacos -w nacos
返回成功即可。
有命名空间的方式:
sh nacos-config.sh -h 127.0.0.1 -p 8848 -g SEATA_GROUP -t 73164d7c-6ea7-491c-b5a5-0da02d9d2d65 -u nacos -w nacos
-t 命名空间,不写默认public
3.然后我们看我们的配置是否推送上来到nacos:

五、订单、库存、账户业务数据库准备:
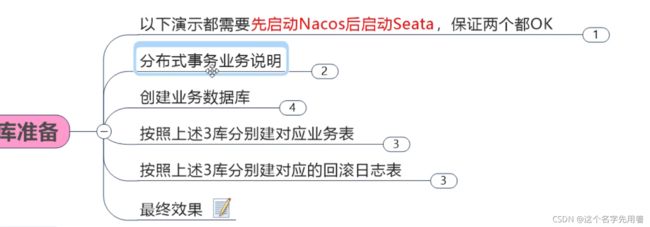
分布式业务说明:

创建业务数据库
seata_order:存储订单的数据库
seata_storage:存储库存的数据库
seata_account:存储账户信息的数据库

创建数据库和表:
建表:

seata_order:存储订单的数据库
CREATE DATABASE seata_order;
USE seata_order;
CREATE TABLE t_order(
    id BIGINT(11) NOT NULL AUTO_INCREMENT PRIMARY KEY ,
    user_id BIGINT(11) DEFAULT NULL COMMENT '用户id',
    product_id BIGINT(11) DEFAULT NULL COMMENT '产品id',
    count INT(11) DEFAULT NULL COMMENT '数量',
    money DECIMAL(11,0) DEFAULT NULL COMMENT '金额',
    status INT(1) DEFAULT NULL COMMENT '订单状态:0创建中,1已完结'
)ENGINE=InnoDB AUTO_INCREMENT=7 CHARSET=utf8;
seata_storage:存储库存的数据库
CREATE DATABASE seata_storage;
USE seata_storage;
CREATE TABLE t_storage(
    id BIGINT(11) NOT NULL AUTO_INCREMENT PRIMARY KEY ,
    product_id BIGINT(11) DEFAULT NULL COMMENT '产品id',
    total INT(11) DEFAULT NULL COMMENT '总库存',
    used INT(11) DEFAULT NULL COMMENT '已用库存',
    residue INT(11) DEFAULT NULL COMMENT '剩余库存'
)ENGINE=InnoDB AUTO_INCREMENT=7 CHARSET=utf8;
INSERT INTO t_storage(id, product_id, total, used, residue) VALUES(1,1,100,0,100);
seata_account:存储账户信息的数据库
CREATE DATABASE seata_account;
USE seata_account;
CREATE TABLE t_account(
    id BIGINT(11) NOT NULL AUTO_INCREMENT PRIMARY KEY ,
    user_id BIGINT(11) DEFAULT NULL COMMENT '用户id',
    total DECIMAL(10,0) DEFAULT NULL COMMENT '总额度',
    used DECIMAL(10,0) DEFAULT NULL COMMENT '已用额度',
    residue DECIMAL(10,0) DEFAULT 0 COMMENT '剩余可用额度'
)ENGINE=InnoDB AUTO_INCREMENT=7 CHARSET=utf8;
INSERT INTO t_account(id, user_id, total, used, residue) VALUES(1,1,1000,0,1000);
按照上述三个库分别键对应的回滚日志表undo_log:
为各个微服务模块的数据库添加 事务回滚表 undo_log ,切记用到的微服务都要创建这张表。
创建数据库seata,并建立下面三张表(branch_table, global_table, lock_table),创建undo_log表放到业务库中

-- the table to store seata xid data
-- 0.7.0+ add context
-- you must to init this sql for you business databese. the seata server not need it.
-- 此脚本必须初始化在你当前的业务数据库中,用于AT 模式XID记录。与server端无关(注:业务数据库)
-- 注意此处0.3.0+ 增加唯一索引 ux_undo_log
drop table `undo_log`;
CREATE TABLE `undo_log` (
 `id` bigint(20) NOT NULL AUTO_INCREMENT,
 `branch_id` bigint(20) NOT NULL,
 `xid` varchar(100) NOT NULL,
 `context` varchar(128) NOT NULL,
 `rollback_info` longblob NOT NULL,
 `log_status` int(11) NOT NULL,
 `log_created` datetime NOT NULL,
 `log_modified` datetime NOT NULL,
 `ext` varchar(100) DEFAULT NULL,
 PRIMARY KEY (`id`),
 UNIQUE KEY `ux_undo_log` (`xid`,`branch_id`)
) ENGINE=InnoDB AUTO_INCREMENT=1 DEFAULT CHARSET=utf8;
创建完成之后的数据库

六、 微服务准备:
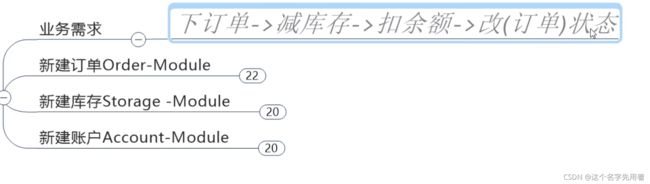
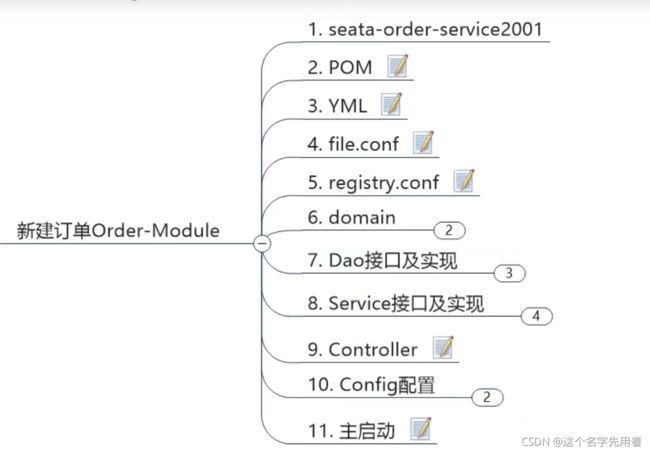
1.创建模块:seata-order-service2001
2.pom:
        com.fan.springcloud
        org.example
        1.0-SNAPSHOT


    4.0.0

    seata-order-service2001


            io.seata
            seata-spring-boot-starter
            1.4.2


            com.alibaba.cloud
            spring-cloud-starter-alibaba-seata


                    io.seata
                    seata-spring-boot-starter


            com.alibaba.cloud
            spring-cloud-starter-alibaba-nacos-discovery


            org.springframework.cloud
            spring-cloud-starter-openfeign


            org.springframework.boot
            spring-boot-starter-web


            org.springframework.boot
            spring-boot-starter-actuator


            mysql
            mysql-connector-java


            com.alibaba
            druid-spring-boot-starter


            org.mybatis.spring.boot
            mybatis-spring-boot-starter


            org.springframework.boot
            spring-boot-starter-test
            test


            org.junit.jupiter
            junit-jupiter
            RELEASE
            test


            org.springframework.boot
            spring-boot-devtools
            runtime
            true


            org.projectlombok
            lombok
            true


            cn.hutool
            hutool-core
            5.6.5
yml:
server:
  port: 2001

spring:
  application:
    name: seata-order-service

  cloud:
    #nacos配置
    nacos:
      discovery:
        #nacos服务地址
        server-addr: localhost:8848
    alibaba:
      #事务群组,要和下方vgroup-mapping保持一致(可以每个应用独立取名,也可以使用相同的名字),
      #要与服务端nacos-config.txt中service.vgroup_mapping中存在,并且要保证多个群组情况下后缀名要保持一致-tx_group
      seata:
        tx-service-group: my_test_tx_group

  datasource:  #druid数据源连接池
    driver-class-name: com.mysql.cj.jdbc.Driver
    url: jdbc:mysql://127.0.0.1:3306/seata?serverTimezone=Asia/Shanghai&useUnicode=true&characterEncoding=utf-8&zeroDateTimeBehavior=convertToNull&useSSL=false&allowPublicKeyRetrieval=true
    username: root
    password: root
    type: com.alibaba.druid.pool.DruidDataSource
#seata配置
seata:
  application-id: ${spring.application.name}
  enable-auto-data-source-proxy: true  #是否开启数据源自动代理,默认为true
  #(1)事务群组(可以每个应用独立取名,也可以使用相同的名字),
  #要与服务端nacos-config.txt中service.vgroupMapping.my_test_tx_group=default,并且要保证多个群组情况下后缀名要保持一致-tx_group
  service:
    vgroup-mapping:
      my_test_tx_group: default
  # (2)seata配置中心
  config:
    type: nacos
    nacos:
      namespace: 73164d7c-6ea7-491c-b5a5-0da02d9d2d65  #nacos命名空间ID
      serverAddr: 127.0.0.1:8848  #nacos服务的地址
      group: SEATA_GROUP    #seata分组名称
      username: "nacos"  #nacos服务登录名称
      password: "nacos"  #nacos服务登录密码
  # (3)seata的注册中心
  registry:  #registry根据seata服务端的registry配置
    type: nacos
    nacos:
      application: seata-server #配置自己的seata服务
      server-addr: 127.0.0.1:8848  #nacos服务的地址
      group: SEATA_GROUP  #seata分组名称
      namespace: 73164d7c-6ea7-491c-b5a5-0da02d9d2d65  #nacos命名空间ID
      username: "nacos"  #nacos服务登录名称
      password: "nacos"  #nacos服务登录密码


# feign组件超时设置,用于查看seata数据库中的临时数据内容
feign:
  client:
    config:
      default:
        connect-timeout: 30000
        read-timeout: 30000
#mybatis的配置
mybatis:
  mapper-locations: classpath:mapper/*.xml
  configuration:
    map-underscore-to-camel-case: true
  type-aliases-package: com.fan.springcloud.domain

#日志打印,可以打印sql语句
logging:
  level:
    root: debug

实体类:
实体类:domain.CommonResult:
package com.fan.springcloud.domain;

import lombok.AllArgsConstructor;
import lombok.Data;
import lombok.NoArgsConstructor;

@Data
@AllArgsConstructor
@NoArgsConstructor
public class CommonResult {
    private Integer code;
    private String message;
    private T  data;

    public CommonResult(Integer code,String message){
        this(code,message,null);
    }
}
domain.Order实体类:
package com.fan.springcloud.domain;

import lombok.AllArgsConstructor;
import lombok.Data;
import lombok.NoArgsConstructor;
import java.math.BigDecimal;
@Data
@AllArgsConstructor
@NoArgsConstructor
public class Order {
    private Long id;
    private Long userId;
    private Long prodctId;
    private Integer count;
    private BigDecimal money;

    //订单 状态0:创建中,1已完结
    private Integer status;
}
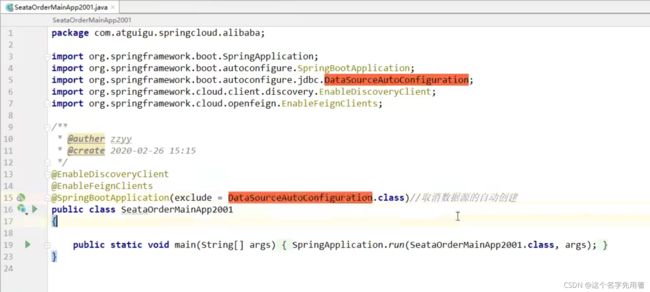
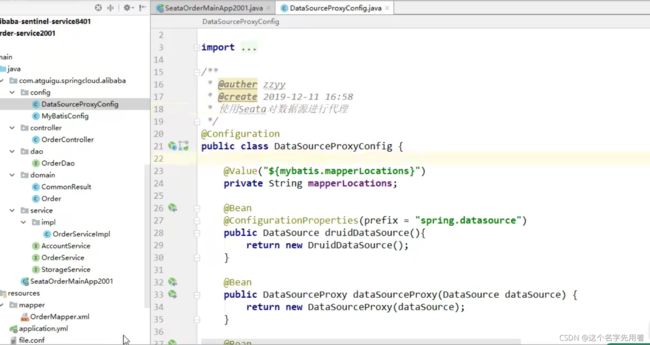
数据源代理:
spring boot 启动程序添加数据自动代理
直接在启动类上加注解:@EnableAutoDataSourceProxy
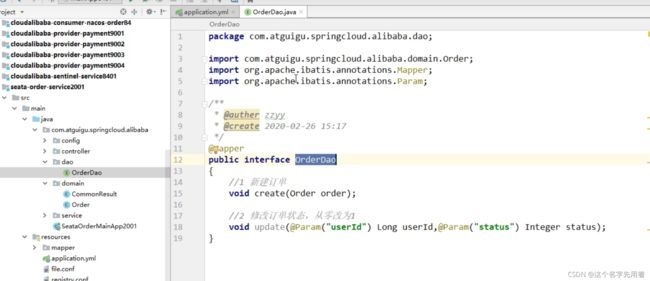
dao层:

dao.OrderDao接口:
package com.fan.springcloud.dao;

import com.fan.springcloud.domain.Order;
import org.apache.ibatis.annotations.Mapper;
import org.apache.ibatis.annotations.Param;
import org.springframework.stereotype.Repository;

@Mapper  //接口扫描
@Repository //dao层组件注解
public interface OrderDao {
    //1.新建订单
    public void create(Order order);

    //2.修改订单状态,从0改为1
    //@Param用于和sql映射文件参数不一致进行匹配的
    public void update(@Param("userId")Long userId,
                  @Param("status")Integer status);
}

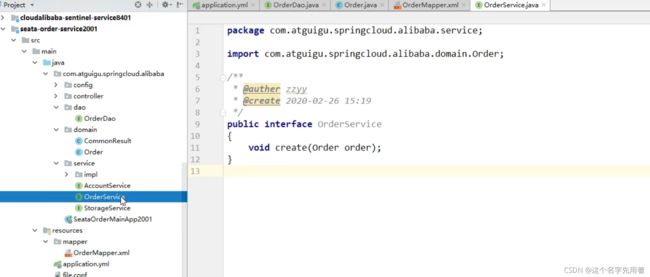
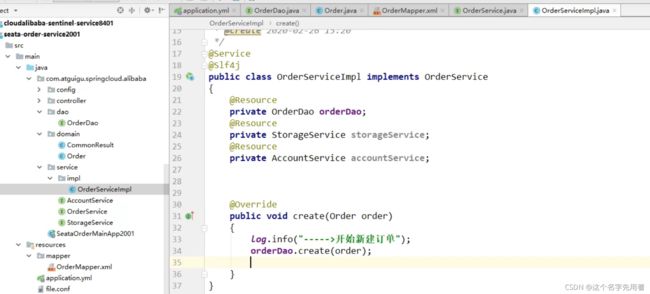
service:
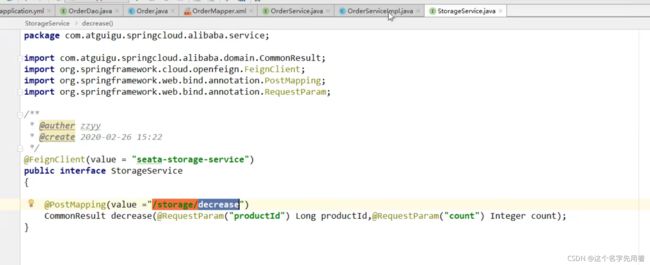
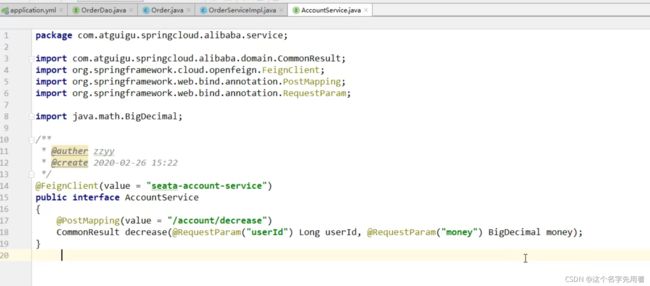

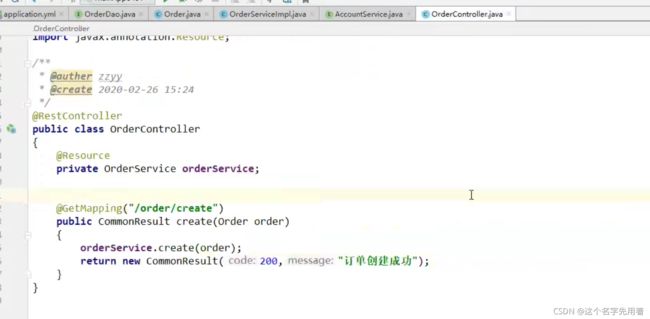
controller:


主启动类:SeataOrderMainApp2001