「深度学习一遍过」必修3:使用Pytorch进行数据读取
本专栏用于记录关于深度学习的笔记,不光方便自己复习与查阅,同时也希望能给您解决一些关于深度学习的相关问题,并提供一些微不足道的人工神经网络模型设计思路。
专栏地址:「深度学习一遍过」必修篇
目录
1 CreateDataset——生成训练集和测试集
1.1 思路
1.2 代码
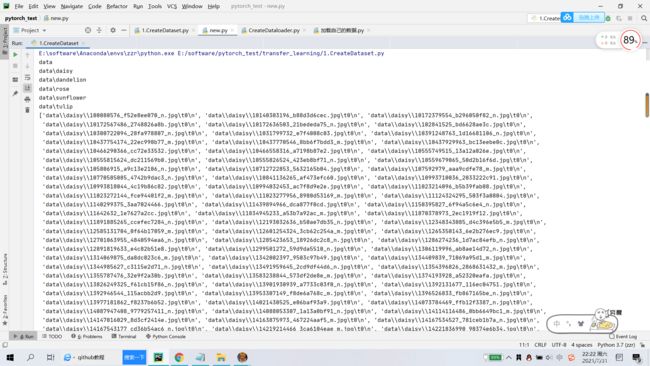
1.3 结果
2 CreateDataloader——数据加载
2.1 思路
2.2 代码
2.3 结果
2.4 补充
3 加载自己的数据——使用DataLoader读取Dataset
3.1 思路
3.2 代码
3.3 结果
1 CreateDataset——生成训练集和测试集
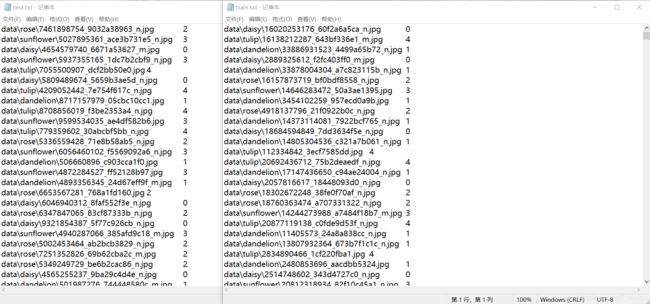
生成训练集和测试集,保存在 txt 文件中。
相当于模型的输入。后面做数据加载器 dataload 的时候从里面读它的数据。
1.1 思路
导入库
import os   # 导入系统库
import random  # 随机数生成器(打乱数据用的)
百分之 60 用来当训练集
百分制 40 用来当测试集
train_ratio = 0.6
test_ratio = 1 - train_ratio
数据的根目录,保存到这个根目录下的 data 文件夹
rootdata = r"data" 产生 train.txt 和 test.txt
前一部分:图片所在目录/位置;
后一部分:图片对应标签 具体如下图所示
打乱训练数据集次序
random.shuffle(train_list)写入 train.txt 和 test.txt
1.2 代码
import os
import random

train_ratio = 0.6
test_ratio = 1 - train_ratio

rootdata = r"data"

train_list, test_list = [], []
data_list = []

class_flag = -1
for a, b, c in os.walk(rootdata):
    print(a)
    for i in range(len(c)):
        data_list.append(os.path.join(a, c[i]))
    for i in range(0, int(len(c) * train_ratio)):
        train_data = os.path.join(a, c[i]) + '\t' + str(class_flag) + '\n'    # os.path.join 拼接起来,给一个从0开始逐一编号的标签
        train_list.append(train_data)

    for i in range(int(len(c) * train_ratio), len(c)):
        test_data = os.path.join(a, c[i]) + '\t' + str(class_flag) + '\n'
        test_list.append(test_data)

    class_flag += 1

print(train_list)
random.shuffle(train_list)
random.shuffle(test_list)

with open('train.txt', 'w', encoding='UTF-8') as f:
    for train_img in train_list:
        f.write(str(train_img))

with open('test.txt', 'w', encoding='UTF-8') as f:
    for test_img in test_list:
        f.write(test_img)
1.3 结果
2 CreateDataloader——数据加载
把数据传入模型中进行训练。
2.1 思路
图片标准化
transform_BZ= transforms.Normalize(
    mean=[0.5, 0.5, 0.5],# 取决于数据集
    std=[0.5, 0.5, 0.5]
)
加载得到图片信息
def get_images(self, txt_path):
        with open(txt_path, 'r', encoding='utf-8') as f:
            imgs_info = f.readlines()
            imgs_info = list(map(lambda x:x.strip().split('\t'), imgs_info))
        return imgs_info
训练与测试数据的归一化与标准化
self.train_tf = transforms.Compose([
        transforms.Resize(224),               # 将图片压缩成224*224的大小
        transforms.RandomHorizontalFlip(),    # 对图片进行随机的水平翻转
        transforms.RandomVerticalFlip(),      # 随机的垂直翻转
        transforms.ToTensor(),                # 把图片改为Tensor格式
        transform_BZ                          # 图片标准化的步骤
    ])
self.val_tf = transforms.Compose([            # 简单把图片压缩了变成Tensor模式
        transforms.Resize(224),
        transforms.ToTensor(),
        transform_BZ                          # 标准化操作
    ])
填充黑色操作,如果尺寸太小可以扩充,填充黑色使得图片成为 224*224。
 def padding_black(self, img):
        w, h  = img.size
        scale = 224. / max(w, h)
        img_fg = img.resize([int(x) for x in [w * scale, h * scale]])
        size_fg = img_fg.size
        size_bg = 224
        img_bg = Image.new("RGB", (size_bg, size_bg))
        img_bg.paste(img_fg, ((size_bg - size_fg[0]) // 2,
                              (size_bg - size_fg[1]) // 2))
        img = img_bg
        return img
True 为将 "train.txt" 文件数据看做训练集对待
train_dataset = LoadData("train.txt", True) 2.2 代码
import torch
from PIL import Image

import torchvision.transforms as transforms
from PIL import ImageFile
ImageFile.LOAD_TRUNCATED_IMAGES = True

from torch.utils.data import Dataset

transform_BZ= transforms.Normalize(
    mean=[0.5, 0.5, 0.5],
    std=[0.5, 0.5, 0.5]
)


class LoadData(Dataset):
    def __init__(self, txt_path, train_flag=True):
        self.imgs_info = self.get_images(txt_path)
        self.train_flag = train_flag

        self.train_tf = transforms.Compose([
                transforms.Resize(224),
                transforms.RandomHorizontalFlip(),
                transforms.RandomVerticalFlip(),
                transforms.ToTensor(),
                transform_BZ
            ])
        self.val_tf = transforms.Compose([
                transforms.Resize(224),
                transforms.ToTensor(),
                transform_BZ
            ])

    def get_images(self, txt_path):
        with open(txt_path, 'r', encoding='utf-8') as f:
            imgs_info = f.readlines()
            imgs_info = list(map(lambda x:x.strip().split('\t'), imgs_info))
        return imgs_info

    def padding_black(self, img):
        w, h  = img.size
        scale = 224. / max(w, h)
        img_fg = img.resize([int(x) for x in [w * scale, h * scale]])
        size_fg = img_fg.size
        size_bg = 224
        img_bg = Image.new("RGB", (size_bg, size_bg))
        img_bg.paste(img_fg, ((size_bg - size_fg[0]) // 2,
                              (size_bg - size_fg[1]) // 2))
        img = img_bg
        return img

    def __getitem__(self, index):          # 返回真正想返回的东西
        img_path, label = self.imgs_info[index]
        img = Image.open(img_path)
        img = img.convert('RGB')
        img = self.padding_black(img)
        if self.train_flag:
            img = self.train_tf(img)
        else:
            img = self.val_tf(img)
        label = int(label)

        return img, label

    def __len__(self):
        return len(self.imgs_info)


if __name__ == "__main__":
    train_dataset = LoadData("train.txt", True)
    print("数据个数:", len(train_dataset))
    train_loader = torch.utils.data.DataLoader(dataset=train_dataset,
                                               batch_size=10,
                                               shuffle=True)
    for image, label in train_loader:
        print(image.shape)
        print(image)
        print(label)
2.3 结果
2.4 补充
import torchvision
# 准备的测试数据集
from torch.utils.data import DataLoader
from torch.utils.tensorboard import SummaryWriter

test_data = torchvision.datasets.CIFAR10('./dataset', train=False, download=True, transform=torchvision.transforms.ToTensor())
test_loader = DataLoader(dataset=test_data, batch_size=64, shuffle=True, num_workers=0, drop_last=True)

# 测试数据集中第一张图片及target
img, target = test_data[0]
print(img.shape)
print(target)

writer = SummaryWriter('dataloader')
step = 0

for data in test_loader:
    imgs, targets = data
    writer.add_images('test_data', imgs, step)
    step = step + 1

writer.close()
3 加载自己的数据——使用DataLoader读取Dataset
3.1 思路
定义网络模型
class NeuralNetwork(nn.Module):
    def __init__(self):
        super(NeuralNetwork, self).__init__()
        # 碾平,将数据碾平为一维
        self.flatten = nn.Flatten()
        # 定义linear_relu_stack,由以下众多层构成
        self.linear_relu_stack = nn.Sequential(
            # 全连接层
            nn.Linear(3*224*224, 512),
            # ReLU激活函数
            nn.ReLU(),
            # 全连接层
            nn.Linear(512, 512),
            nn.ReLU(),
            nn.Linear(512, 5),     # 5个类别按照分类数来
            nn.ReLU()
        )
    # x为传入数据
    def forward(self, x):
        # x先经过碾平变为1维
        x = self.flatten(x)
        # 随后x经过linear_relu_stack
        logits = self.linear_relu_stack(x)
        # 输出logits
        return logits
定义训练函数
def train(dataloader, model, loss_fn, optimizer):
    size = len(dataloader.dataset)
    # 从数据加载器中读取batch(一次读取多少张,即批次数),X(图片数据),y(图片真实标签)。
    for batch, (X, y) in enumerate(dataloader):
        # 将数据存到显卡
        X, y = X.cuda(), y.cuda()

        # 得到预测的结果pred
        pred = model(X)

        # 计算预测的误差
        # print(pred,y)
        loss = loss_fn(pred, y)

        # 反向传播,更新模型参数
        optimizer.zero_grad()
        loss.backward()
        optimizer.step()

        # 每训练100次,输出一次当前信息
        if batch % 100 == 0:
            loss, current = loss.item(), batch * len(X)
            print(f"loss: {loss:>7f}  [{current:>5d}/{size:>5d}]")
定义测试函数
def test(dataloader, model):
    size = len(dataloader.dataset)
    print("size = ",size)
    # 将模型转为验证模式
    model.eval()
    # 初始化test_loss 和 correct, 用来统计每次的误差
    test_loss, correct = 0, 0
    # 测试时模型参数不用更新,所以no_gard()
    # 非训练, 推理期用到
    with torch.no_grad():
        # 加载数据加载器,得到里面的X(图片数据)和y(真实标签)
        for X, y in dataloader:
            # 将数据转到GPU
            X, y = X.cuda(), y.cuda()
            # 将图片传入到模型当中就,得到预测的值pred
            pred = model(X)
            # 计算预测值pred和真实值y的差距
            test_loss += loss_fn(pred, y).item()
            # 统计预测正确的个数
            correct += (pred.argmax(1) == y).type(torch.float).sum().item()
    test_loss /= size
    correct /= size
    print("correct = ",correct)
    print(f"Test Error: \n Accuracy: {(100*correct):>0.1f}%, Avg loss: {test_loss:>8f} \n")
给训练集和测试集分别创建一个数据集加载器
train_data = LoadData("train.txt", True)
valid_data = LoadData("test.txt", False)
num_workers :CPU开多线程读取数据(数字越大读取速度越快,适合多少要看 CPU 多线程能力有多强);
pin_memory = True :原本先放到内存在放到显卡,现在避免放到电脑虚拟内存中,这样写使得读取速度变快;
batch_size = batch_size :一次读多少数据;
shuffle = True :每次读取数据进行打乱。
而测试数据集不需打乱数据。
train_dataloader = DataLoader(dataset=train_data, num_workers=4, pin_memory=True, batch_size=batch_size, shuffle=True)
test_dataloader = DataLoader(dataset=valid_data, num_workers=4, pin_memory=True, batch_size=batch_size)
如果显卡可用,则用显卡进行训练
device = "cuda" if torch.cuda.is_available() else "cpu"调用刚定义的模型,将模型转到GPU(如果可用)
model = NeuralNetwork().to(device)定义损失函数,计算相差多少,交叉熵,
loss_fn = nn.CrossEntropyLoss()定义优化器,用来训练时候优化模型参数,随机梯度下降法
optimizer = torch.optim.SGD(model.parameters(), lr=1e-3) # lr:初始学习率读取训练好的模型,加载训练好的参数
model = NeuralNetwork()
model.load_state_dict(torch.load("model.pth"))
3.2 代码
import torch
from torch import nn
from torch.utils.data import DataLoader
from transfer_learning.CreateDataloader import LoadData

# 定义网络模型
class NeuralNetwork(nn.Module):
    def __init__(self):
        super(NeuralNetwork, self).__init__()
        self.flatten = nn.Flatten()
        self.linear_relu_stack = nn.Sequential(
            nn.Linear(3*224*224, 512),
            nn.ReLU(),
            nn.Linear(512, 512),
            nn.ReLU(),
            nn.Linear(512, 5),
            nn.ReLU()
        )

    def forward(self, x):
        x = self.flatten(x)
        logits = self.linear_relu_stack(x)
        return logits

# 定义训练函数
def train(dataloader, model, loss_fn, optimizer):
    size = len(dataloader.dataset)
    for batch, (X, y) in enumerate(dataloader):
        X, y = X.cuda(), y.cuda()
        pred = model(X)
        loss = loss_fn(pred, y)
        optimizer.zero_grad()
        loss.backward()
        optimizer.step()
        if batch % 100 == 0:
            loss, current = loss.item(), batch * len(X)
            print(f"loss: {loss:>7f}  [{current:>5d}/{size:>5d}]")

# 定义测试函数
def test(dataloader, model):
    size = len(dataloader.dataset)
    print("size = ",size)
    model.eval()
    test_loss, correct = 0, 0
    with torch.no_grad():
        for X, y in dataloader:
            X, y = X.cuda(), y.cuda()
            pred = model(X)
            test_loss += loss_fn(pred, y).item()
            correct += (pred.argmax(1) == y).type(torch.float).sum().item()
    test_loss /= size
    correct /= size
    print("correct = ",correct)
    print(f"Test Error: \n Accuracy: {(100*correct):>0.1f}%, Avg loss: {test_loss:>8f} \n")

if __name__=='__main__':
    batch_size = 16

    train_data = LoadData("train.txt", True)
    valid_data = LoadData("test.txt", False)

    train_dataloader = DataLoader(dataset=train_data, num_workers=4, pin_memory=True, batch_size=batch_size, shuffle=True)
    test_dataloader = DataLoader(dataset=valid_data, num_workers=4, pin_memory=True, batch_size=batch_size)

    for X, y in test_dataloader:
        print("Shape of X [N, C, H, W]: ", X.shape)
        print("Shape of y: ", y.shape, y.dtype)
        break

    device = "cuda" if torch.cuda.is_available() else "cpu"
    print("Using {} device".format(device))

    model = NeuralNetwork().to(device)
    print(model)

    loss_fn = nn.CrossEntropyLoss()

    optimizer = torch.optim.SGD(model.parameters(), lr=1e-3)

    epochs = 5
    for t in range(epochs):
        print(f"Epoch {t+1}\n-------------------------------")
        train(train_dataloader, model, loss_fn, optimizer)
        test(test_dataloader, model)
    print("Done!")

    model = NeuralNetwork()
    model.load_state_dict(torch.load("model.pth"))
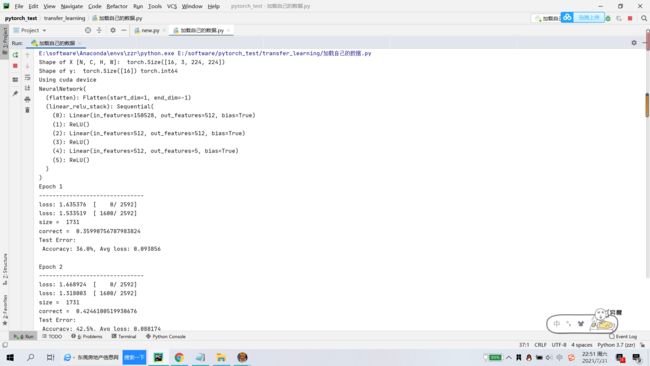
3.3 结果
欢迎大家交流评论,一起学习
希望本文能帮助您解决您在这方面遇到的问题
感谢阅读
END
版权声明:本文为CSDN博主「荣仔!最靓的仔!」的原创文章,遵循 CC 4.0 BY-SA 版权协议。
         转载请在醒目位置附上原文出处链接及本声明。


