Spring 中 @Value 注解使用和源码分析
1、@Value 注解使用
先配置本地 application.properties 如下:
apple.name=abc
代码如下:
@PropertySource("application.properties")
public class Apple {
	@Value("${apple.name}")
	public String name;
}

@ComponentScan
public class AtValueTest {
	public static void main(String[] args) {
		AnnotationConfigApplicationContext context = new AnnotationConfigApplicationContext(AtValueTest.class);
		Apple bean = context.getBean(Apple.class);
		System.out.println("bean.name = " + bean.name);
	}
}
结果如下:
bean.name = abc
可以看到最终在 Apple 中可以获取到配置文件中的值,那么 Spring 是怎样解析获取到该值的呢?下面开始分析下。
2、@Value 注解源码分析
分析源码之前,我么可以简单思考下, Spring 会怎么样去处理这个 @Value 注解的?然后再带着我们的问题去看看 Spring 是不是和我们想的一样呢?
简单分析有三个步骤,如下:
1、首先 Spring 肯定要去解析收集该注解,找到被 @Value 注解修饰的所有属性,注意此时属性的值是一个占位符 ${apple.name},并不是真正的值
2、然后加载一个资源文件,可以是本地 application.properties、也可以是其他,比如 Environment 、xml
3、最后去判断哪个类上的属性有 @Value 修饰,就把占位符替换成资源文件中配置的值
在脑海中有了大致思路,再去追踪源码就事半功倍了。
2.1、Spring 解析并收集 @Value 修饰的属性
Spring 解析收集 @Value 修饰的属性和解析收集 @Autowired 注解一模一样,懂这个,@Autowired 注解解析流程也就懂了。
Spring 提供很多 BeanFactoryPostProcessor、BeanPostProcessor 接口作为扩展,从而使 Spring 非常强大,因为我们属性赋值相当于是在实例化之后的事,所以这里的 @Value 解析就是 BeanPostProcessor 接口的应用啦!
一个大家非常熟悉的类 AutowiredAnnotationBeanPostProcessor,Spring 的 DI(依赖注入) 就是这个 BeanPostProcessor 完成的,接下来看 Spring 源码,如下:
可以看到 Spring 是在实例化之后开始去收集的,这个时序非常重要,一定要注意
然后进入 AutowiredAnnotationBeanPostProcessor 类核心部分,如下:
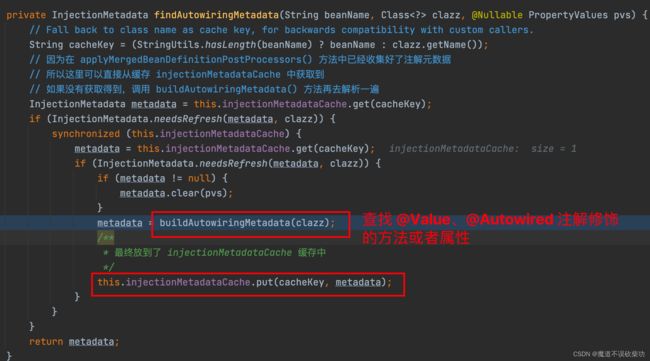
对过来的每个类进行筛选判断是否有被 @Value、@Autowired 修饰的方法或者属性,如果找到有,就会将这个类记录下来,放到一个 injectionMetadataCache 缓存中,为后续的 DI 依赖注作准备,注意哦,解析并收集到的结果最终放到 Spring 的 injectionMetadataCache 缓存中
进入 buildAutowiringMetadata() 方法内部,如下:
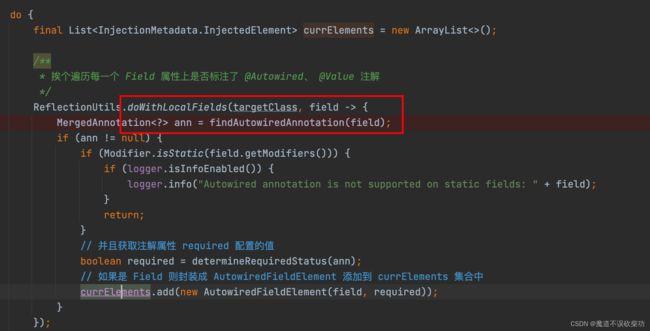
获取到这个类上所有的属性,然后遍历每个属性,判断是否有 @Value、@Autowired 修饰,如果有,直接封装成 AutowiredFieldElement 对象,然后保存到一个名为 currElements List 容器中
最后在封装到 InjectionMetadata 对象中,最终返回出去放到 injectionMetadataCache 缓存中保存,不用管他封装到哪个对象,反正这里就是扫描并解析到了哪些属性,或者方法后续需要做处理就可以了。
上面源码中 findAutowiredAnnotation() 方法内部逻辑如下:
在 AutowiredAnnotationBeanPostProcessor 类创建的时候,Spring 就默认往 autowiredAnnotationTypes 容器中添加两个元素,如下:
至此,解析收集 @Value 修饰的属性已经完成,最终将收集到的结果放到了 injectionMetadataCache 缓存中保存,后续需要使用直接可以从这个缓存中获取即可。
2.2、Spring 为 @Value 修饰属性赋值
上面通过 postProcessMergedBeanDefinition() 方法收集好了 @Value 注解修饰的属性,那么下面要做的就是去为这个属性进行赋值。
进入属性填充的方法,源码如下:
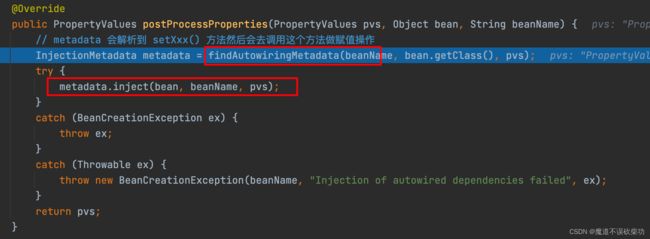
然后进入到 AutowiredAnnotationBeanPostProcessor 类中,源码如下:
注意此时的 injectionMetadataCache 缓存中早已经有值了,因为前面我们就已经收集完成了 @Value 修饰的属性,所以这里直接从缓存中就可以获取到。
然后进入 metadata.inject(bean, beanName, pvs) 代码内部,如下:
最终通过 resolveFieldValue() 方法获取到属性值,然后通过反射 field.set() 方法给这个属性赋值,如下:
至此,整个 @Value 的流程就算完成,下面就是对这个 resolveFieldValue() 方法进一步分析,看下是怎么获取到属性值的,是怎么样将 $ 符号替换成解析成真正的值的
2.3、Spring $ 占位符替换成真正的值
继续深入分析 resolveFieldValue() 方法,核心源码如下:
下面这段逻辑是去解析 ${apple.name} 占位符的,这里面为什么需要递归 parseStringValue(),因为怕你出现这种形式的占位符 ${ ${apple.name} },最终获取到 key = apple.name,然后拿着这个 key 就去资源文件(xml、application.properties、Environment 等)中查找是否配置了这个 key 的值
注意这里是函数式写法,传入一个方法体 this::getPropertyAsRawString,后面会回调到这里。
当调用 resolvePlaceholder() 方法时,回调到 getPropertyAsRawString() 方法,源码如下:
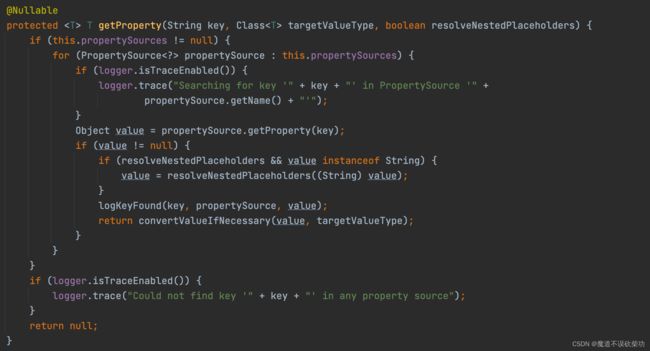
可以看到最终会调用到 getProperty() 方法获取到对应 key = apple.name 的值
从 propertySources 资源中获取 key = apple.name 的值,只要在这里获取到一个值就直接 return 出去即可
propertySources 这里会有三个,如下所示:
PropertiesPropertySource:封装操作系统属性键值对SystemEnvironmentPropertySource:封装 JVM Environment 里面的键值对ResourcePropertySource:封装 application.properties、xml 中键值对
然后 debug 发现最终是从 ResourcePropertySource 资源对象中获取到 apple.name 对应的值 abc,最终将 ${apple.name} 替换成真正的值 abc,最终通过反射将该值 abc 赋值到 Apple 类中的 name 属性上。
那么这里肯定有很多人会有这样的疑问?这三个对象是从哪里来的呢?如果要想知道这个,需要下面一些知道做铺垫,那么继续往下看 !
2.4、理解 PropertySource 和 MutablePropertySource
在 Spring 中需要加载一些额外的配置文件,比如操作系统相关的配置,JVM 环境变量相关的配置,自定义配置文件等等。那么这些文件加载到代码中可定要有一个类来封装它,这个类就是 PropertySource,先来看看 PropertySource 的源码如下:
public abstract class PropertySource<T> {

	protected final Log logger = LogFactory.getLog(getClass());

	// 给这个配置文件起个名字呗
	protected final String name;

    // 配置文件中所有的 key-value 键值对
    // T 只要是 key-value 键值对即可,比如: Map、Properties 都可以
	protected final T source;

	public String getName() {
		return this.name;
	}

	public T getSource() {
		return this.source;
	}

    // 根据 name 获取到对应的配置文件
	@Nullable
	public abstract Object getProperty(String name);
}
看完这个 PropertySource 类的结构,我们看看上面三个类中封装的属性到底是啥?如下所示:
-
PropertiesPropertySource:封装操作系统属性键值对(os.name、file.encoding、user.name 等等)
-
SystemEnvironmentPropertySource:封装 JVM Environment 里面的键值对(PATH、JAVA_HOME)
理解了 PropertySource 这个类之后,在来理解 MutablePropertySource 就非常容易。先来看看 MutablePropertySource 的源码,如下:
public class MutablePropertySources {

	private final List<PropertySource<?>> propertySourceList = new CopyOnWriteArrayList<>();

}
从源码中可以看到,就是做了一个收集,将所有的 PropertySource 收集到一个 propertySourceList 容器中进行管理,至于为什么这样做呢?
个人理解是为了更方便的查找属性,将所有的资源文件汇集到一起,然后想要找一个 key = apple.name 就可以直接遍历一下所有的资源文件,看下这个 key 在哪个资源文件中能够找到,找到立即返回。
但是此时就会存在一个问题,那就是文件的加载顺序,可以发现最先加载 PropertiesPropertySource、其次 SystemEnvironmentPropertySource,最后才是自定义的配置文件 ResourcePropertySource!比如,我们在 application.properties 中配置 user.home=abc 如下所示:
user.home=abc
@Component
@PropertySource("application.properties")
public class Apple {
	@Value("${user.home}")
	public String name;
}
输出结果:
name = /Users/gongwm
并不是 abc,因为 PropertiesPropertySource 优先于 ResourcePropertySource 被加载。
下面这个源码是获取资源文件,可以发现只要获取到就会立即 return,所以最终决定权交给了往 propertySources 容器添加的顺序决定,那么我们来看看上面三个文件分别是在什么时候方进去的?
2.5、Spring 资源文件装载源码分析?
直接进入源码分析,如下:
然后再 StandardEnvironment 的构造方法中,隐式调用父类 AbstractEnvironment 的构造方法,源码如下:
可以发现在这里直接 new 创建了 MutablePropertySources 对象
最终可以发现这两个 systemProperties、systemEnvironment 资源文件都是在这里被加载的,添加到了 MutablePropertySources 对象中
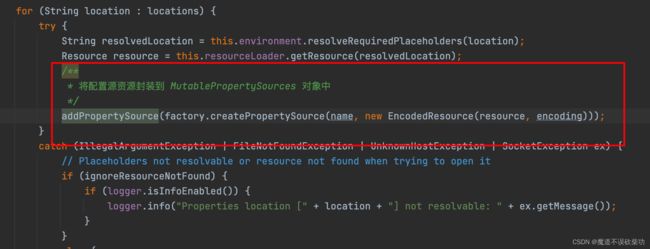
对于自定义的配置文件在 ConfigurationClassPostProcessor 类中被加载,源码如下:
最终就是在这里被加载进去的,注意这个添加方法是 addLast() 也就是往后面追加,这个方法就体现了这些资源文件的加载顺序,那么有 addLast() ,必然有 addFirst() 等等 API,此时 propertySourceList 容器中就已经保存了三个资源文件,并且顺序是这样的PropertiesPropertySource(优先级最高) -> SystemEnvironmentPropertySource -> ResourcePropertySource (优先级最低)
最后有一点要注意,不要把 MutablePropertySources 和 MutablePropertyValues 搞混了,两完全不是一一码事!具体想看 MutablePropertyValues 是啥,可以转到另一篇文章!
2.6、在 Environment 中添加自定义属性
借助 BeanDefinitionRegistryPostProcessor 类来实现这个功能,如下所示:
@Component
public class AppendAttrToEnvironment implements BeanDefinitionRegistryPostProcessor, ResourceLoaderAware {

	private ResourceLoader resourceLoader;

	@Override
	public void postProcessBeanFactory(ConfigurableListableBeanFactory beanFactory) throws BeansException {
		// 从容器中获取到 Environment 对象
		StandardEnvironment bean = (StandardEnvironment)beanFactory.getBean(Environment.class);
		// 然后再获取到 MutablePropertySources 资源文件管家(它会收集打包所有的资源文件)
		MutablePropertySources propertySources = bean.getPropertySources();

		// 创建第一个资源文件,其中有个属性 key666 值为 hangman
		Properties properties = new Properties();
		properties.put("key666", "hangman");
		PropertiesPropertySource propertiesSource = new PropertiesPropertySource("myPropertySource",properties);
		// 添加到 MutablePropertySources 资源文件管家中,注意使用 addLast() 添加的,也就是往后追加
        propertySources.addLast(propertiesSource);


		// 创建第二资源文件,看下面的 abc.properties 配置文件
		Resource resource = resourceLoader.getResource("abc.properties");
		ResourcePropertySource localResource = new ResourcePropertySource("myResourceSource",resource);
		// 添加到 MutablePropertySources 资源文件管家中,注意是添加到最前面了,这样就会被最先加载
		propertySources.addFirst(localResource);
	}

	@Override
	public void postProcessBeanDefinitionRegistry(BeanDefinitionRegistry registry) throws BeansException {}

	@Override
	public void setResourceLoader(ResourceLoader resourceLoader) {
		this.resourceLoader = resourceLoader;
	}
}
创建一个 abc.properties 配置文件如下所示:
key666 = 6666
key777 = ggg
然后在一个 Apple 类中去获取对应的值,如下所示:
@Component
@PropertySource("application.properties")
public class Apple implements EnvironmentAware {
	@Value("${apple.name}")
	public String name;

	@Override
	public void setEnvironment(Environment environment) {
		String property = environment.getProperty("apple.name");
		String key666 = environment.getProperty("key666");
		String key777 = environment.getProperty("key777");
		System.out.println("key666 = " + key666);
		System.out.println("key777 = " + key777);
		System.out.println("name = " + name);
		System.out.println("property = " + property);
	}
}
输出结果如下:
key666 = 6666
key777 = ggg
name = abc
property = abc
bean.name = abc
这里会发现一个问题,key = key666 的这个键值对,在 propertiesSource 资源和 localResource 资源文件同时出现,最终因为 localResource 资源是通过 addFirst() 方法添加到 MutablePropertySources 管家容器最前面,优先生效。

