春节期间重装anaconda+opencv血泪史分享
关于网络上的分享
进过2022年2月~6月这一段时间重装2次(指达到目的的次数)的血泪史,阅读国内外众多苦主的分享后,我意识到,其实大家都是不明白深层或根本原因,不清楚全面彻底解决问题的方法以及解决问题的机理,只是在不断沟通和尝试中发现的自己成功经验。
因此,如果本分享帮助到各位,本人深感实现自我价值的快乐;如果相反,那么也恳请各位在找到解决问题的方法后,请留言或私信指点批评,我不胜感激~
故事背景
本人在学习KMeans算法的时候在import sklearn库中函数时,发生一系列bugs(真的是bugs,解决了一个问题马上出现新的问题,最后博主崩溃)导致我不得不选择重装anaconda。重装之后虽然sklearn库的问题消失了(这里不能说解决了,你们懂的),然而opencv库居然无法安装,于是博主不得不研究这个新的问题……
一、重装Anaconda
1.1 卸载anaconda
- ①如何彻底的卸载anaconda(包括配置文件)【written by kuweicai】
 https://blog.csdn.net/kuweicai/article/details/90145242
 - ②Anaconda如何卸载干净【written by Skilllllll】
 https://blog.csdn.net/qq_43200548/article/details/104806678?spm=1001.2101.3001.6650.3&utm_medium=distribute.pc_relevant.none-task-blog-2~default~CTRLIST~Rate-3.pc_relevant_aa&depth_1-utm_source=distribute.pc_relevant.none-task-blog-2~default~CTRLIST~Rate-3.pc_relevant_aa&utm_relevant_index=6
 - ③【官方文档】Uninstalling Anaconda
 https://docs.anaconda.com/anaconda/install/uninstall/
之前博主也“惯性地”直接采用win11界面的“开始→设置→应用→应用和功能”中找到python x.x(anaconda...)卸载。但这次灵光乍现质疑这样卸载会不会不够“科学”,于是查找资料,发现CSDN上数位博主分享了比较符合官方文档提供的卸载教程,能够比较完全地卸载anaconda。
个人推荐按照官方文档的步骤卸载anaconda,如果阅读英文文档有困难的小伙伴也可以参考上面两位博主的博客。
1.2 安装Anaconda
这部分网上有大量教程,博主不过多赘述,但也为小白们提供官网教程参考阅读。
- anaconda官方文档
 https://docs.anaconda.com/anaconda/
1.3 添加清华源【2022.06.04 update】
运行Anaconda Prompt,在命令行中一次运行如下命令:
conda config --add channels https://mirrors.tuna.tsinghua.edu.cn/anaconda/pkgs/free/
conda config --add channels https://mirrors.tuna.tsinghua.edu.cn/anaconda/pkgs/main/
conda config --set show_channel_urls yes
conda config --add channels https://mirrors.tuna.tsinghua.edu.cn/anaconda/cloud/conda-forge/
conda config --add channels https://mirrors.tuna.tsinghua.edu.cn/anaconda/cloud/msys2/
conda config --add channels https://mirrors.tuna.tsinghua.edu.cn/anaconda/cloud/bioconda/
conda config --add channels https://mirrors.tuna.tsinghua.edu.cn/anaconda/cloud/menpo/
conda config --add channels https://mirrors.tuna.tsinghua.edu.cn/anaconda/cloud/pytorch/
运行完毕后,即添加了清华镜像,好处就是下载库更快~
二、问题来了,有直行也有岔路
2.1 库名字发生变化
虽然不知道从何开始,但是opencv 4.5.5 版本中python版本的库名称由“opencv-python”变成了“py-opencv”。
所以,如果你在安装命令上遇到问题,那么在anaconda prompt命令行中用conda安装该库的命令写法为“conda install py-opencv”应当可以解决你遇到的问题。
2.2 使用pip安装发生环境依赖问题
因为博主使用conda安装包习惯,因此从未使用过python的pip安装方法,此小节CSDN中有大神写了不错的文章,在此引用分享给大家,感谢作者@DWC_DIP为大家分享anaconda+pycharm下载安装调试流程,使用pip命令安装的一些tips和opencv+matplotlib一些入门介绍。
非常贴心的Anaconda3 + Pycharm2020+ OpenCV 下载安装及环境搭建教程![]() https://blog.csdn.net/DIPDWC/article/details/111183849
https://blog.csdn.net/DIPDWC/article/details/111183849
2.3 使用下载的.whl文件安装opencv
此方法需要自己去官网下载对应版本的.whl文件到对应路径后安装。博主同样没有试过,但是也分享给大家。感谢作者mawonly和iracer为大家详细介绍anaconda下载安装教程+opencv包下载时如何看懂资源包的名称以及最重要的通过pip命令和.whl命令安装的一些注意细节。
anaconda+openCV终于装好了~![]() https://blog.csdn.net/mawonly/article/details/87856530windows环境下的Anaconda安装与OpenCV机器视觉环境搭建
https://blog.csdn.net/mawonly/article/details/87856530windows环境下的Anaconda安装与OpenCV机器视觉环境搭建![]() https://blog.csdn.net/iracer/article/details/80498732
https://blog.csdn.net/iracer/article/details/80498732
2.4 通过创建新的虚拟环境方法安装menpo opencv
该博主通过创建新的虚拟环境进行从头环境搭建,并且安装的menpo opencv也同样解决了opencv的安装。感谢作者pick一只可爱常。
Anaconda安装opencv遇到的问题,亲测!![]() https://blog.csdn.net/weixin_42368070/article/details/105691984
https://blog.csdn.net/weixin_42368070/article/details/105691984
2.5 使用conda命令安装opencv
需要指出xpick一只可爱常博主文章中的问题截图,正是本人遇到的问题。由于本人没有截图,因此引用该作者的文章的第二节。
当你重装anaconda知道关闭anaconda安装程序后,首次运行anaconda prompt并正确输入“conda install py-opencv”运行几分钟到约半小时后,如果遇到如下代码:
Collecting package metadata (current_repodata.json): done Solving
environment: failed with initial frozen solve. Retrying with flexible
solve. Solving environment: failed with repodata from
current_repodata.json, will retry with next repodata source.
Collecting package metadata (repodata.json): done Solving environment:
failed with initial frozen solve. Retrying with flexible solve.
Solving environment: \ Found conflicts! Looking for incompatible
packages. This can take several minutes. Press CTRL-C to abort.
————————————————
版权声明:本文为CSDN博主「pick一只可爱常」的原创文章,遵循CC 4.0 BY-SA版权协议,转载请附上原文出处链接及本声明。
原文链接:https://blog.csdn.net/weixin_42368070/article/details/105691984
如果此时你没有点“Ctrl+C”终止程序,继续等待,大约一个小时左右,你会看到类似如下过程代码:
Collecting package metadata (current_repodata.json): done Solving
environment: failed with initial frozen solve. Retrying with flexible
solve. Solving environment: failed with repodata from
current_repodata.json, will retry with next repodata source.
Collecting package metadata (repodata.json): done Solving environment:
failed with initial frozen solve. Retrying with flexible solve.
Solving environment: \ Found conflicts! Looking for incompatible
packages. This can take several minutes. Press CTRL-C to abort.
Examining vc: 2%|███▌
| 2/108 [00:00 34%|█████████████████████████████████████████████████████▊
| 20/58 [01:05<02:05, 3.29s/i- Comparing specs that have this
dependency:
57%|████████████████████████████████████████████████████████████████████████████████████████▊
| 33/58 [01:18<00:59, 2.38s/i| \ Comparing specs that have this
dependency:
62%|████████████████████████████████████████████████████████████████████████████████████████████████▊
| 36/58 [01:19<00:48, 2.20s/it] Finding shortest conflict path for
vc=14:
50%|███████████████████████████████████████████████████████████████████████████████▌
| 2/4 [00:04<00:04, 2.29s/i/ / Comparing specs that have this
dependency:
67%|████████████████████████████████████████████████████████████████████████████████████████████████████████▉
| 39/58 [01:24<00:41, 2.16s/i| - Examining wincertstore:
6%|█████████▋
| 6/108 [01:52<47:43, 28.08s/i/ - Comparing specs that have this
dependency: 2%|███▍
| 1/46 [00:00<00:17, 2.59it/- / | mparing specs that have this
dependency: 9%|█████████████▋
| 4/46 [00:13<02:22, 3.40s/i| - Comparing specs that have this
dependency: 33%|██████████████████████████████████████████████████▊
| 15/46 [02:20<04:50, 9.36s/i| \ Comparing specs that have this
dependency:
41%|████████████████████████████████████████████████████████████████▍
| 19/46 [02:26<03:27, 7.69s/i\ / Comparing specs that have this
dependency:
48%|██████████████████████████████████████████████████████████████████████████▌
| 22/46 [02:33<02:47, 6.99s/i\ |mparing specs that have this dependency: 52%|█████████████████████████████████████████████████████████████████████████████████▍
| 24/46 [02:34<02:21, 6.44s/i| Comparing specs that have this
dependency:
61%|██████████████████████████████████████████████████████████████████████████████████████████████▉
| 28/46 [02:47<01:47, 5.99s/i/ | Comparing specs that have this
dependency:
74%|███████████████████████████████████████████████████████████████████████████████████████████████████████████████████▎
| 34/46 [03:45<01:19, 6.63s/i/ / Examining python:
8%|██████████████▉
| 9/108 [06:19<1:05:28, 39.68s/i/ - Comparing specs that have this
dependency: 4%|██████▊
| 2/46 [00:00<00:04, 10.72it/\ - Comparing specs that have this
dependency: 15%|███████████████████████▉
| 7/46 [00:32<03:00, 4.62s/i- \ inding shortest conflict path for
python[version=’>=3.6,❤️.7.0a0’]:
62%|██████████████████████████████████
————————————————
版权声明:本文为CSDN博主「pick一只可爱常」的原创文章,遵循CC 4.0 BY-SA版权协议,转载请附上原文出处链接及本声明。
原文链接:https://blog.csdn.net/weixin_42368070/article/details/105691984
最后的最后,只会提示将本次错误信息报告至anaconda等待解决……就结束了……
此时只留下一脸懵逼+绝望的自己。
但还好 xpick一只可爱常博主文章中提到了他所查阅资料中有前辈提到首先运行conda install conda,在运行conda upgrade --all(或者conda update --all)升级所有包后再安装opencv。
这句话提醒了我。在我第一次安装opencv之所以没有遇到错误提示,就是在第一次安装opencv之前的几个月我运行过上述命令。然而重装的我并没有再次运行那两个命令,会不会就是这个差异导致了这个问题?
于是我依次运行conda install conda和conda upgrade --all,然后再次运行“conda install py-opencv”。成功安装,并且运行代码得到正确结果。验证安装成功。
至此(包含之前研究sklearn库的过程),从年三十晚上到初四,过了一个郁闷的年。但是回头看这一切,感觉这个年收获了一些成长,非常有成就感。感谢本文引用的所有文章的作者提供的优秀文章,也感谢过年期间为我答疑和与我讨论献计献策的老师的同学们。这篇小小的汇总,分享给大家~2022虎年共勉~!
【2022年6月4日 update】
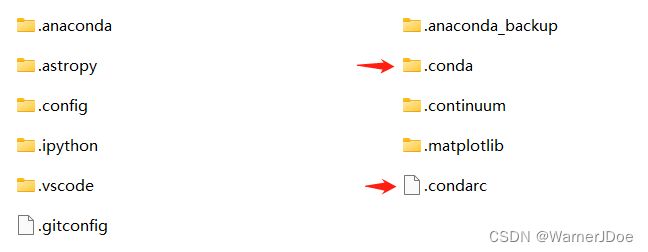
卸载Anaconda后,你是否手动删掉了一些不起眼的文件?
在 C:/用户/ 目录下,有.conda文件夹和.condarc文件。
其中.condarc文件。默认是不会自动创建这个文件的,只有当用户第一次使用conda config命令时,系统才会自动创建.condarc文件。(有一个专用词,.condarc叫运行期配置文件)参考作者 :ljx0951《解决.condarc文件找不到的问题》
.conda文件夹博主没有找到更多系统的资料。但有一点可以肯定,这应该是第一次安装anaconda及之后某个动作生成的,如果卸载anaconda重装之前手动删除的话,再次安装anaconda的安装程序在安装过程中的“显示明细”中可能有一条报警信息:
Executing transaction: ...working... WARNING conda.core.envs_manager:register_env(50): Unable to register environment. Path not writable or missing.
environment location: C:\Users\username\anaconda3registry file: C:\Users\username\.conda\environments.txt
见到这条报警信息并不影响安装程序进行到最后(也有可能安装失败),甚至anaconda-navigator仍可以正常运行。 但无疑这是一个不知道会引发什么问题的“隐患”!
目前我能找到的解决方案之一是:再次全部卸载anaconda,并在重装之前,手动创建.conda文件夹,之后再重装anaconda可以看到不再报错,且.conda文件夹下出现environments.txt文件。
本人使用的anaconda安装文件
Anaconda3-2021.11-Windows-x86_64.exe,您可以在Index of /找到。

