Atlas 200 DK 环境配置,踩坑与学习记录
第一步:采购配件
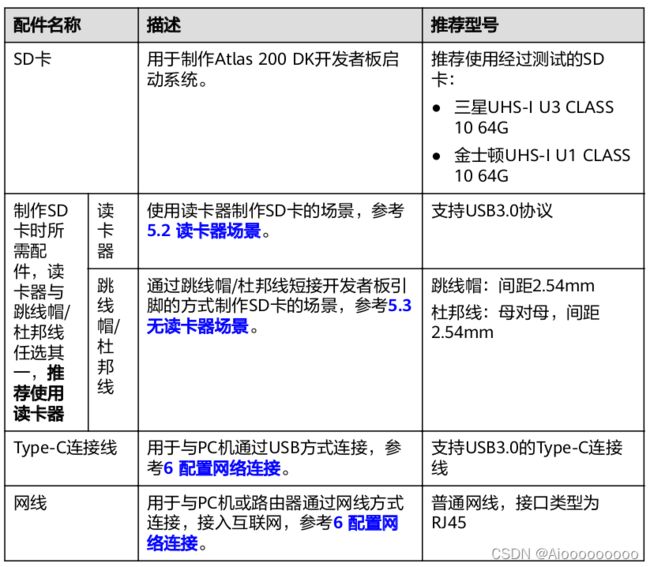
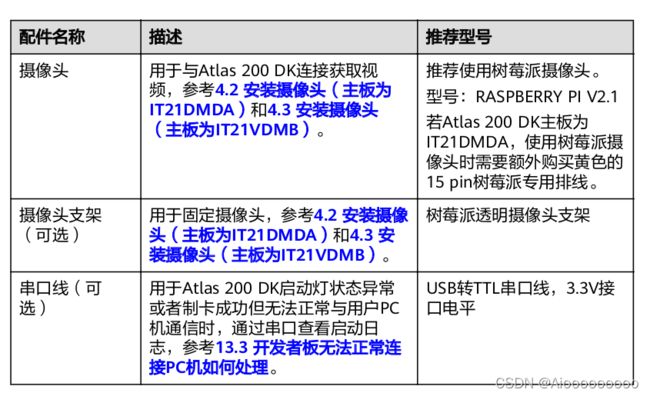
除了Atlas 200 DK 还需要准备以下配件:
其中,在PC配置中作者采用的是直接将Ubuntu18.04.6装在了电脑上而不是采用虚拟机的方式(虚拟机当然也是可行的)。也就是在装系统的时候踩到了第一个坑:把系统装到了U盘上面,导致了PC端没有系统启动,而且在装系统的时候巨慢。究其原因,是在系统安装引导的时候由于盲目自信想着装了无数次这还不so easy,就一直惯性的点下一步,下一步,但是在选择安装到哪个盘的时候,这次安装默认竟然是/dev/sdb(外接硬盘)。要警惕安装需要安装到/dev/sda也就是PC的硬盘中去。
第二步:硬件安装
在这个部分是将树莓派或者是其他摄像头设备接在Atlas 200Dk上面,这里有两个要注意的地方:
1.在树莓派的摄像头抽出白色排线时,其固定器是水平推出的,如图所是:
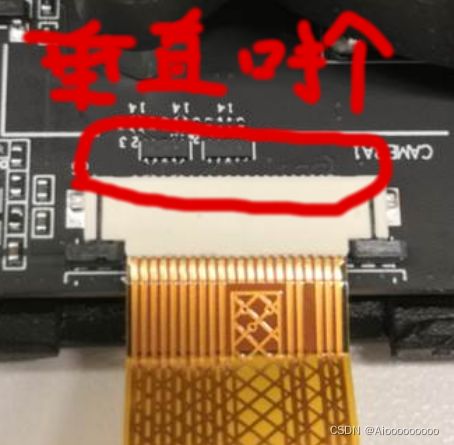
2.在Atlas 200 DK的摄像头接口,其固定器是垂直扣出来的,如图所是:
第三步:制作安装Atlas操作系统和驱动的SD卡
1.在Ubuntu的官网下载,Ubuntu18.04.5的安装镜像文件。Index of /releases/18.04.3![]() http://old-releases.ubuntu.com/releases/18.04.3/在其中选择ubuntu-18.04.5-server-arm64.iso下载。
http://old-releases.ubuntu.com/releases/18.04.3/在其中选择ubuntu-18.04.5-server-arm64.iso下载。
2.在华为官网昇腾社区-官网丨昇腾万里 让智能无所不及,下载Atlas 200 DK的固件包和驱动宝:
选择5.0.4.alpha005下面的1.0.12.alpha。(这里有一个大坑,如果你是通过Atlas 200 DK 的安装说明进行安装的话,如下图所示,你就会选择1.0.13版本。然后制卡插到ATlas 200DK上去启动的时候你会发现,马蛋,怎么搞都只亮2个灯,就是升级不了。然后你就会查各种资料,又是usb口可能有问题,可能硬件有问题,可能网络配置有问题,可能SD坏了等等等等,害死人。最后其实就是这个驱动文件选择错了,1.0.13就是连不上。)
3.Anyway,折腾半天之后,你的下载文件夹下现在就会有这2个文件了:
4.接着在进入命令行终端,输入以下命令:
su - root
apt-get update
pip3 install pyyaml
apt-get install qemu-user-static binfmt-support python3-yaml squashfs-tools gcc-aarch64-linux-gnu g++-aarch64-linux-gnu
5.然后在任意位置创建一个文件夹 例如mkdir $HOME/mksd,把之前下载的两个文件放进来,接下来通过以下命令下载制卡脚本make_sd_card.py以及make_ubuntu_sd.sh。
wget https://gitee.com/ascend/tools/raw/master/makesd/generic_script/make_sd_card.py
wget https://gitee.com/ascend/tools/raw/master/makesd/generic_script/make_ubuntu_sd.sh
6.最后连接读卡器。将准备的SD通过读卡器插在PC端中,并通过fdisk -l命令找到其名字,一般为/dev/sdb,或者/dev/sdc等等以此类推,反正不是/dev/sda。然后在刚刚创建的文件夹中,执行制卡脚本:python3 make_sd_card.py local /dev/sdb。(如果这里你不幸写的sda,恭喜你重装系统吧。)
7.这样就制卡成功了,接着将卡抽下来插在Atlas 200 DK上,上电完成Atlas 200 DK 的系统和驱动安装(这里就是将电源插上就算上电,Atlas 200 Dk 没有所谓的开机关机按键,插上电源就是开机,抽掉电源就是关机)。
8.判断是否安装成功。当你上电之后,等大概5分钟左右Atlas 200 Dk 靠近网线口那边的4个灯都亮了,就算成功。亮2个灯是开机成功,亮另外2个灯在闪说明在升级中,最后4个灯全亮就ok了。除此之外,比如一直2个灯就是失败,说明制卡有问题。
第四步:连接Atlas 200 DK
1.第一次连接Atlas 200 DK 时,必须用USB相连。通过Atlas 200 DK 默认的usb0:192.168.1.2的网段进行连接。于是呼这里就需要将PC的USB网口的IP地配置到192.168.1.X(例如192.168.1.99)的网段中去。如果熟悉操作的话,就自然能简单完成。如果不熟悉的话,可以通过下载以下脚本进行自动配置:
wget https://gitee.com/ascend/tools/raw/master/configure_usb_ethernet/for_20.1/configure_usb_ethernet.sh
接着执行bash configure_usb_ethernet.sh完成配置。
可以通过ifconfigm命令进行查看:
2.接着通过 ssh [email protected], 初始密码为Mind@123。(这里也有一个大坑:如果你第一次成功登陆了,但是在第二次登陆或者Atlas 200 DK 断电重启之后无法登陆了(4个灯全亮),显示的no route to 192.168.1.2,或者是其他你已经配置好的IP。出现这个问题的原因不明,可能是之前没有安全退出什么的。我调过网络配置,重置过网络,重启过设备,重装过系统,我都试过,没用,只有重新制卡管用。)
3.执行"passwd"修改密码
4.为用户HWHiAiUser用户赋予权限:切换成root(su - root[密码也是Mind@123]),进入主目录的/etc/。编辑文件sudoers文件(vi sudoers)在这段代码root ALL=(ALL:ALL) ALL下:添加:
HWHiAiUser ALL=(ALL:ALL) ALL
然后wq!保存退出。
5.让Atlas 200 DK 能够连上网络。首先插上网线,然后通过编辑网络配置文件 vi /etc/netplan/01-netcfg.yaml将文件中的eth0(网线网口设置,另一个usb0是usb口设置)的:dhcp4: yes(这里改为yes本来是no)eth0的其余设置全部删掉即可。
然后wq!保存退出。执行命令,netplan apply完成网络配置,此时可以看到eth0的IP地址已经有了,并且能够Ping 通www.baidu.com。在这之后,用路由器将IP地址和MAC地址绑定,你就可以一直用 ssh [email protected](你设置的IP地址)访问了。
第五步:配置CANN环境
1.用root创建一个文件夹用来存储配置的相关文件:在主目录下 mkdir cann 建立文件夹;然后 chmod 777 cann 为文件夹开放权限(这里也是一个坑,你不赋予权限,在外面文件传不进来)。
2.在官网昇腾社区-官网丨昇腾万里 让智能无所不及将CANN的相关文件(Ascend-cann-toolkit_5.1.RC2.alpha001_linux-aarch64.run. Ascend-cann-nnrt_5.1.RC2.alpha001_linux-aarch64.run)下载来并且,上传到Atlas 200 DK上去。
-通过logout 命令从Atlas 200 DK 上面退出,进入到PC端储存上面文件的目录执行以下命令:
scp Ascend-cann-toolkit_5.1.RC2.alpha001_linux-aarch64.run [email protected]:/cann
scp Ascend-cann-nnrt_5.1.RC2.alpha001_linux-aarch64.run [email protected]:/cann
3.安装相关依赖:再次以root身份进入到Atlas 200 DK上,之前我们创建的cann目录,这时已经有了上面的2个文件。然后是执行以下命令安装相关依赖:
首先对/etc/apt目录下的source文件里面添加以下源:
# deb cdrom:[Ubuntu 20.04.1 LTS _Focal Fossa_ - Release amd64 (20200731)]/ focal main restricted
# See http://help.ubuntu.com/community/UpgradeNotes for how to upgrade to
# newer versions of the distribution.
deb https://repo.huaweicloud.com/ubuntu/ focal main restricted
# deb-src http://us.archive.ubuntu.com/ubuntu/ focal main restricted
## Major bug fix updates produced after the final release of the
## distribution.
deb https://repo.huaweicloud.com/ubuntu/ focal-updates main restricted
# deb-src http://us.archive.ubuntu.com/ubuntu/ focal-updates main restricted
## N.B. software from this repository is ENTIRELY UNSUPPORTED by the Ubuntu
## team. Also, please note that software in universe WILL NOT receive any
## review or updates from the Ubuntu security team.
deb https://repo.huaweicloud.com/ubuntu/ focal universe
# deb-src http://us.archive.ubuntu.com/ubuntu/ focal universe
deb https://repo.huaweicloud.com/ubuntu/ focal-updates universe
# deb-src http://us.archive.ubuntu.com/ubuntu/ focal-updates universe
## N.B. software from this repository is ENTIRELY UNSUPPORTED by the Ubuntu
## team, and may not be under a free licence. Please satisfy yourself as to
## your rights to use the software. Also, please note that software in
## multiverse WILL NOT receive any review or updates from the Ubuntu
## security team.
# deb-src http://us.archive.ubuntu.com/ubuntu/ focal multiverse
# deb-src http://us.archive.ubuntu.com/ubuntu/ focal-updates multiverse
## N.B. software from this repository may not have been tested as
## extensively as that contained in the main release, although it includes
## newer versions of some applications which may provide useful features.
## Also, please note that software in backports WILL NOT receive any review
## or updates from the Ubuntu security team.
deb https://repo.huaweicloud.com/ubuntu/ focal-backports main restricted universe
# deb-src http://us.archive.ubuntu.com/ubuntu/ focal-backports main restricted universe multiverse
## Uncomment the following two lines to add software from Canonical's
## 'partner' repository.
## This software is not part of Ubuntu, but is offered by Canonical and the
## respective vendors as a service to Ubuntu users.
# deb http://archive.canonical.com/ubuntu focal partner
# deb-src http://archive.canonical.com/ubuntu focal partner
deb https://repo.huaweicloud.com/ubuntu/ focal-security main restricted
# deb-src http://security.ubuntu.com/ubuntu focal-security main restricted
deb https://repo.huaweicloud.com/ubuntu/ focal-security universe
# deb-src http://security.ubuntu.com/ubuntu focal-security universe
# deb-src http://security.ubuntu.com/ubuntu focal-security multiverse
# This system was installed using small removable media
# (e.g. netinst, live or single CD). The matching "deb cdrom"
# entries were disabled at the end of the installation process.
# For information about how to configure apt package sources,
# see the sources.list(5) manual.
然后apt-get update
接着:sudo apt-get install software-properties-common
sudo add-apt-repository main
sudo apt-get update
sudo apt-get install -y gcc g++ make cmake zlib1g zlib1g-dev openssl libsqlite3-dev libssl-dev libffi-dev unzip pciutils net-tools libblas-dev gfortran libblas3 libopenblas-dev
完成依赖安装
4.安装python3.7.5,其实安装3.7-3.9都行。(这个地方也是一个坑,既然CANN要求python3.7-3.9。你自带一个python3.6.9高毛)
在我们创建的cann文件夹中,执行以下命令:
wget https://www.python.org/ftp/python/3.7.5/Python-3.7.5.tgz
tar -zxvf Python-3.7.5.tgz
cd Python-3.7.5
./configure --prefix=/usr/local/python3.7.5 --enable-loadable-sqlite-extensions --enable-shared
make
sudo make install
然后通过 vi ~/.bashrc命令,在文件的末尾添加以下命令:
#用于设置python3.7.5库文件路径
export LD_LIBRARY_PATH=/usr/local/python3.7.5/lib:$LD_LIBRARY_PATH
#如果用户环境存在多个python3版本,则指定使用python3.7.5版本
export PATH=/usr/local/python3.7.5/bin:$PATH
保存之后,执行source ~/.bashrc,完成python配置。
此时可以通过python3 --version 命令查看版本。
5.接下来安装python 的库:
pip3 install --upgrade pip
然后在当前文件夹创建一个文档 requirment(vi requirment)添加以下代码:
attrs
numpy==1.17.2
decorator
sympy
cffi
pyyaml
pathlib2
psutil
protobuf
scipy
requests
保存,执行 pip3 install -r requirment 完成。
6.安装包:
在cann文件架中以HwHiAiUser用户(root 会显示空间不存,然后弹出来很多warning)来输入:
chmod +x Ascend-cann-toolkit_5.1.RC2.alpha001_linux-aarch64.run
./Ascend-cann-toolkit_5.1.RC2.alpha001_linux-aarch64.run --check
./Ascend-cann-toolkit_5.1.RC2.alpha001_linux-aarch64.run --install --chip=Ascend310-minirc
并在 ~/.bashrc文件末尾添加:
. /home/HwHiAiUser/Ascend/ascend-toolkit/set_env.sh(这里有个坑,那个.后面有个空格,一定不要忘了)
然后source ~/.bashrc。
同理
在cann文件架中:输入:
chmod +x Ascend-cann-nnrt_5.1.RC2.alpha001_linux-aarch64.run
./Ascend-cann-nnrt_5.1.RC2.alpha001_linux-aarch64.run --check
./Ascend-cann-nnrt_5.1.RC2.alpha001_linux-aarch64.run --install --chip=Ascend310-minirc
并在 ~/.bashrc文件末尾添加:
. /home/HwHiAiUser/Ascend/nnrt/set_env.sh(这里有个坑,那个.后面有个空格,一定不要忘了)
然后source ~/.bashrc。
第六步:准备编译运行依赖文件
export INSTALL_DIR=${HOME}/Ascend/ascend-toolkit/latest
mkdir -p ${INSTALL_DIR}/driver
cp /usr/lib64/libmedia_mini.so ${INSTALL_DIR}/driver/
cp /usr/lib64/libslog.so ${INSTALL_DIR}/driver/
cp /usr/lib64/libc_sec.so ${INSTALL_DIR}/driver/
cp /usr/lib64/libmmpa.so ${INSTALL_DIR}/driver/
cp /usr/local/Ascend/include/peripheral_api.h ${INSTALL_DIR}/driver/
然后就大功告成啦!


