rdkit 化学指纹(fingerprint)和相似性
文章目录
- 一、引入所需库
- 二、化学指纹
-
- 2.1 拓扑指纹 Chem.RDKFingerprint(mol)
- 2.2 MACCS 指纹MACCSkeys.GenMACCSKeys(mol)
- 2.3 原子对Atom Pairs
- 2.4 拓扑扭曲topological torsions
- 2.5 摩根指纹(圆圈指纹)AllChem.GetMorganFingerprint(mol,2)
- 2.6 摩根指纹拓展
- 三、相似性计算
-
- 3.1 基于指纹计算相似性
-
- 3.1.1 方案一:基于拓扑指纹和Tanimoto相似性方法指纹计算3个分子的相似性
- 3.1.2 基于MACCS指纹和Dice相似性方法计算相似性
- 3.2 摩根指纹的形式
- 3.3 摩根指纹->ECFP4 和 摩根指纹->FCFP4的比较
- 3.4 解释摩根指纹中bit的含义
- 3.5 获取指纹对应的结构
- 3.6 可视化指纹中的bit
- 3.7 可视化摩根指纹中的bit
- 3.8 可视化拓扑指纹中的bit
- 3.9 基于分子指纹挑选差异较大的分子
- 3.10 相似性地图
RDKit具有多种内置功能,可用于生成分子指纹,并使用他们来计算分子相似性
一、引入所需库
#! /usr/bin/python
# coding: utf-8

from rdkit import Chem
from rdkit import DataStructs

from rdkit.Chem import AllChem
from rdkit.Chem import Draw

from rdkit.Chem.Draw import SimilarityMaps
from rdkit.Chem import MACCSkeys
from rdkit.Chem.AtomPairs import Pairs
from rdkit.Chem.AtomPairs import Torsions

from rdkit.SimDivFilters.rdSimDivPickers import MaxMinPicker

import matplotlib.pyplot as plt  # 画图
二、化学指纹
2.1 拓扑指纹 Chem.RDKFingerprint(mol)
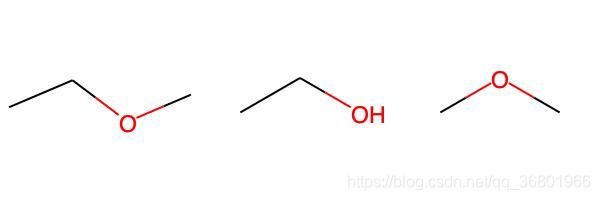
ms = [
    Chem.MolFromSmiles('CCOC'),
    Chem.MolFromSmiles('CCO'),
    Chem.MolFromSmiles('COC'),
]
img = Draw.MolsToGridImage(
    ms,
    molsPerRow=3,
    subImgSize=(200, 200),
    legends=['' for x in ms]
)
img.save('/Users/zeoy/st/drug_development/st_rdcit/img/mol20.jpg')
fps = [Chem.RDKFingerprint(x) for x in ms]
print(fps)
# [,
# ,
# ]

ds_1 = DataStructs.FingerprintSimilarity(fps[0], fps[1])
print(ds_1)  # 0.6
ds_2 = DataStructs.FingerprintSimilarity(fps[0], fps[2])
print(ds_2)  # 0.4
ds_3 = DataStructs.FingerprintSimilarity(fps[2], fps[1])
print(ds_3)  # 0.25

# 也可以设置相似度指标
ds_4 = DataStructs.FingerprintSimilarity(
    fps[0], fps[1], metric=DataStructs.DiceSimilarity)
print(ds_4)  # 0.75
2.2 MACCS 指纹MACCSkeys.GenMACCSKeys(mol)
fps = [MACCSkeys.GenMACCSKeys(x) for x in ms]
ds_1 = DataStructs.FingerprintSimilarity(fps[0], fps[1])
print(ds_1)  # 0.5
ds_2 = DataStructs.FingerprintSimilarity(fps[0], fps[2])
print(ds_2)  # 0.5384615384615384
ds_3 = DataStructs.FingerprintSimilarity(fps[2], fps[1])
print(ds_3)  # 0.21428571428571427
2.3 原子对Atom Pairs
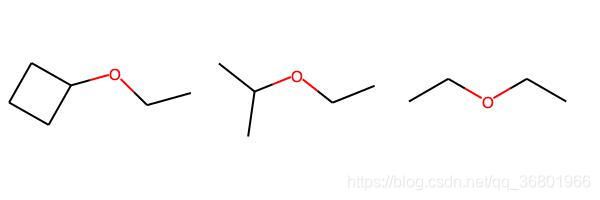
ms = [
    Chem.MolFromSmiles('C1CCC1OCC'),
    Chem.MolFromSmiles('CC(C)OCC'),
    Chem.MolFromSmiles('CCOCC')
]
img = Draw.MolsToGridImage(
    ms,
    molsPerRow=3,
    subImgSize=(200, 200),
    legends=['' for x in ms]
)
img.save(
    '/Users/zeoy/st/drug_development/st_rdcit/img/mol21.jpg'
)
pairFps = [Pairs.GetAtomPairFingerprint(x) for x in ms]
print(pairFps)
# 由于包含在原子对指纹中的位空间很大,因此他们以稀疏的方式存储为字典形式
d = pairFps[-1].GetNonzeroElements()
print(d)  # {541732: 1, 558113: 2, 558115: 2, 558146: 1, 1606690: 2, 1606721: 2}
print(d[541732])  # 1
位描述也可以像如下所示展示
de = Pairs.ExplainPairScore(558115)
print(de)  # (('C', 1, 0), 3, ('C', 2, 0))
# The above means: C with 1 neighbor and 0 pi electrons which is 3 bonds from a C with 2 neighbors and 0 pi electrons
碳带有一个邻位孤电子和0个π电子,这是因为碳与两个邻位原子和氧原子形成3个化学键。
2.4 拓扑扭曲topological torsions
tts = [Torsions.GetTopologicalTorsionFingerprintAsIntVect(x) for x in ms]
d_ds = DataStructs.DiceSimilarity(tts[0], tts[1])
print(d_ds)  # 0.16666666666666666
2.5 摩根指纹(圆圈指纹)AllChem.GetMorganFingerprint(mol,2)
通过将Morgan算法应用于一组用户提供的原子不变式,可以构建这一系列的指纹。生成Morgan指纹时,还必须提供指纹的半径
m1 = Chem.MolFromSmiles('Cc1ccccc1')
m2 = Chem.MolFromSmiles('Cc1ncccc1')

fp1 = AllChem.GetMorganFingerprint(m1, 2)
fp2 = AllChem.GetMorganFingerprint(m2, 2)
d_mf = DataStructs.DiceSimilarity(fp1, fp2)
print(d_mf)  # 0.55
Morgan指纹像原子对和拓扑扭转一样,默认情况系按使用计数,但有也可以将他们计算为位向量
fp1 = AllChem.GetMorganFingerprintAsBitVect(m1, 2, nBits=1024)
fp2 = AllChem.GetMorganFingerprintAsBitVect(m2, 2, nBits=1024)
d_mf_b = DataStructs.DiceSimilarity(fp1, fp2)
print(d_mf_b)  # 0.5185185185185185
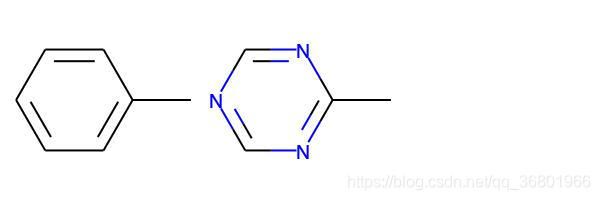
也可以将常量用于不变式,产生指纹分子比较拓扑
m1 = Chem.MolFromSmiles('Cc1ccccc1')
m2 = Chem.MolFromSmiles('Cc1ncncn1')
ms = [m1, m2]
img = Draw.MolsToGridImage(
    ms,
    molsPerRow=3,
    subImgSize=(200, 200),
    legends=['' for x in ms]
)
img.save(
    '/Users/zeoy/st/drug_development/st_rdcit/img/mol22.jpg'
)
fp1 = AllChem.GetMorganFingerprint(m1, 2, invariants=[1]*m1.GetNumAtoms())
fp2 = AllChem.GetMorganFingerprint(m2, 2, invariants=[1]*m2.GetNumAtoms())
print(fp1 == fp2)  # True
2.6 摩根指纹拓展
通过bitinfo参数获取Morgan指纹中特定位有贡献的原子信息。所提供的指纹信息存储在字典中。
每条信息是一个条目,键是位id,值是(原子索引,半径)元祖列表。
m = Chem.MolFromSmiles('c1cccnc1C')
info = {}
fp = AllChem.GetMorganFingerprint(m, 2, bitInfo=info)
# GetNonzeroElements()返回非零元素的字典
print(len(fp.GetNonzeroElements()))  # 16
print(info)
# {
#     98513984: ((1, 1), (2, 1)), 422715066: ((6, 1),),
#     951226070: ((0, 1),), 1100037548: ((4, 1),),
#     1207774339: ((2, 2),), 1235524787: ((0, 2),),
#     1751362425: ((4, 2),), 2041434490: ((4, 0),),
#     2246728737: ((6, 0),), 2614860224: ((3, 2),),
#     3217380708: ((5, 0),), 3218693969: ((0, 0), (1, 0), (2, 0), (3, 0)),
#     3776905034: ((3, 1),), 3999906991: ((1, 2),),
#     4036277955: ((5, 1),), 4048591891: ((5, 2),)
# }
由上述输出内容可知:
98513984位设置了两次:一次由原子1设置,一次由原子2设置,每个半径为1。
4048591891位被原子5设置一次,半径为2。
根据第4048591891位的信息,我们可以获取到原子5的2层电荷内的所有子原子
env = Chem.FindAtomEnvironmentOfRadiusN(m, 2, 5)
amap = {}
submol = Chem.PathToSubmol(m, env, atomMap=amap)
submol_num = submol.GetNumAtoms()
print('子原子数', submol_num)  # 子原子数 6
print(amap)  # {0: 0, 1: 1, 3: 2, 4: 3, 5: 4, 6: 5}
或者可以使用下面的方法(由其对于大量分子而言,速度更快)
atoms = set()
for bidx in env:
    atoms.add(m.GetBondWithIdx(bidx).GetBeginAtomIdx())
    atoms.add(m.GetBondWithIdx(bidx).GetEndAtomIdx())

smi = Chem.MolFragmentToSmiles(m, atomsToUse=list(
    atoms), bondsToUse=env, rootedAtAtom=5)
print(smi)  # c(C)(cc)nc
三、相似性计算
3.1 基于指纹计算相似性
相似性计算的方法有:
- Tanimoto, 默认的方法
- Dice,
- Cosine,
- Sokal,
- Russel,
- Kulczynski,
- McConnaughey, and
- Tversky.
3.1.1 方案一:基于拓扑指纹和Tanimoto相似性方法指纹计算3个分子的相似性
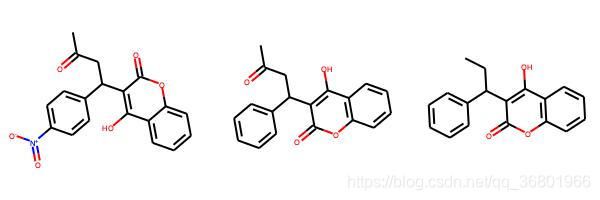
smis = [
    'CC(=O)CC(C1=CC=C(C=C1)[N+]([O-])=O)C1=C(O)C2=CC=CC=C2OC1=O',
    'CC(=O)CC(C1=CC=CC=C1)C1=C(O)C2=C(OC1=O)C=CC=C2',
    'CCC(C1=CC=CC=C1)C1=C(O)C2=C(OC1=O)C=CC=C2'
]
mols = []
for smi in smis:
    m = Chem.MolFromSmiles(smi)
    mols.append(m)

img = Draw.MolsToGridImage(
    mols,
    molsPerRow=3,
    subImgSize=(200, 200),
    legends=['' for x in mols]
)
img.save('/Users/zeoy/st/drug_development/st_rdcit/img/mol23.jpg')
fps = [Chem.RDKFingerprint(x) for x in mols]
sm01 = DataStructs.FingerprintSimilarity(fps[0], fps[1])
sm02 = DataStructs.FingerprintSimilarity(fps[0], fps[2])
sm12 = DataStructs.FingerprintSimilarity(fps[1], fps[2])

print("similarity between mol1 and mol2: %.2f" %
      sm01)  # similarity between mol1 and mol2: 0.93
print("similarity between mol1 and mol3: %.2f" %
      sm02)  # similarity between mol1 and mol3: 0.87
print("similarity between mol2 and mol3: %.2f" %
      sm12)  # similarity between mol2 and mol3: 0.93
根据分子指纹相似性对比发现,分子1和分子3的差异最大
3.1.2 基于MACCS指纹和Dice相似性方法计算相似性
fps = [MACCSkeys.GenMACCSKeys(x) for x in mols]

sm01 = DataStructs.FingerprintSimilarity(fps[0], fps[1])
sm02 = DataStructs.FingerprintSimilarity(fps[0], fps[2])
sm12 = DataStructs.FingerprintSimilarity(fps[1], fps[2])

print("similarity between mol1 and mol2: %0.2f" %
      sm01)  # similarity between mol1 and mol2: 0.63
print("similarity between mol1 and mol3: %0.2f" %
      sm01)  # similarity between mol1 and mol3: 0.63
print("similarity between mol2 and mol3: %0.2f" %
      sm01)  # similarity between mol2 and mol3: 0.63
根据分子指纹相似性对比发现,分子1和分子3的差异最大
3.2 摩根指纹的形式
摩根指纹和atompairs以及topologicaltosions一样 , 有两种表现形式 :
- counts (默认)
- bit vectors
m1 = Chem.MolFromSmiles('Cc1ccccc1')
fp1_count = AllChem.GetMorganFingerprint(m1, 2)
fp1_bit = AllChem.GetMorganFingerprintAsBitVect(m1, 2, nBits=1024)
print('非零原子数的字典', len(fp1_count.GetNonzeroElements())) # 非零原子数的字典 11
# 3.3 摩根指纹->ECFP4 和 摩根指纹->FCFP4的比较
通过定义不同的invariants可以输出ECFP 、 FCFP指纹 。ECFP 、 FCFP不同点在于如何计算atom invariants.
ECFP的atom intvariants是连接信息, FCFP的atom invariants是fature-based invariants
RDKit 中的Morgan算法支持feature,ECFP和FCFP中的4代表是摩根指纹的直径为4,半径为2.默认半径为2的摩根指纹就是ECFP指纹,半径为2且考虑feature-based invariants得到的指纹为FCFP4指纹。
ecfp4_mg = AllChem.GetMorganFingerprint(m1, 2)
fcfp4_mg = AllChem.GetMorganFingerprint(m1, 2, useFeatures=True)

print(len(ecfp4_mg.GetNonzeroElements()))  # 11
print(len(fcfp4_mg.GetNonzeroElements()))  # 8
同样的两个分子分别基于ECFP4和FCFP4计算相似性其差别可能很大
也可以自己定义atom invariants
m1 = Chem.MolFromSmiles('Cc1ccccc1')
m2 = Chem.MolFromSmiles('Cc1ncncn1')
m3 = Chem.MolFromSmiles('CC1CCCCC1')

mols = [m1, m2, m3]
img = Draw.MolsToGridImage(
    mols,
    molsPerRow=3,
    subImgSize=(300, 300),
    #legends=['' for x in mols],
    legends=['methylbenzene', '1-Methyl benzotriazine', '1-methylcyclohexane']
    # legends=['甲苯', '1-甲基苯三嗪', '1-甲基环己烷']
)
img.save('/Users/zeoy/st/drug_development/st_rdcit/img/mol24.jpg')
以上述3个分子为例,认识自定义atom invariants计算分子指纹
从上述结构来看,如果原子的atom invariants 是一样的,则分子1和分子2的指纹相同。 默认计算分子指纹的时候会考虑键的类型 bond order。因此 分子3 和分子1、2不同。 如果计算分子指纹的时候不考虑键的类型,则分子1、2、3的指纹相同。
fp1 = AllChem.GetMorganFingerprint(m1, 2, invariants=[1] * m1.GetNumAtoms())
fp2 = AllChem.GetMorganFingerprint(m2, 2, invariants=[1] * m2.GetNumAtoms())
fp3 = AllChem.GetMorganFingerprint(m3, 2, invariants=[1] * m3.GetNumAtoms())
print(fp1)

if (fp1 == fp2):
    print('If set atom invariants are the same, the fp of moleclue 1 and 2 are the same too')
if(fp1 != fp3):
    print("The fp of moleclue 1 and 3 are different because the bond order will be consided in the calculation of fp ")
# If set atom invariants are the same, the fp of moleclue 1 and 2 are the same too
# The fp of moleclue 1 and 3 are different because the bond order will be consided in the calculation of fp

fp1 = AllChem.GetMorganFingerprint(
    m1, 2, invariants=[1]*m1.GetNumAtoms(), useBondTypes=False)
fp3 = AllChem.GetMorganFingerprint(
    m3, 2, invariants=[1]*m3.GetNumAtoms(), useBondTypes=False)
if(fp1 == fp3):
    print("when atom invariants are the same and bond type not considered in the calculation of fp, the fp mol 1 and 3 are the same")
# when atom invariants are the same and bond type not considered in the calculation of fp, the fp mol 1 and 3 are the same
3.4 解释摩根指纹中bit的含义
ECFP4以count形式表示的时候是没有位数限制的 。 ECFP4以bit的形式表示的时候可以设置bit的位数 , 如果不设置默认是2048bit 。 尽管是2048bit但是是非常冗余的稀疏矩阵 , 里面大部分是0
首先通过count 形式计算ECFP4指纹中的有效信息
m = Chem.MolFromSmiles('c1cccnc1C')
info = {}
fp = AllChem.GetMorganFingerprint(m, 2, bitInfo=info)
# print("非零原子:", fp.GetNonzeroElements())
# 非零原子 :
# {
#     98513984: 2, 422715066: 1,
#     951226070: 1, 1100037548: 1,
#     1207774339: 1, 1235524787: 1,
#     1751362425: 1, 2041434490: 1,
#     2246728737: 1, 2614860224: 1,
#     3217380708: 1, 3218693969: 4,
#     3776905034: 1, 3999906991: 1,
#     4036277955: 1, 4048591891: 1
# }
print('num of keys of info', len(info.keys()))  # num of keys of info 16
由此可知,甲基吡啶分子在ECFP4指纹中最多有16个有效信息
设置不同的nBits计算有效信息的个数
nbits = [64, 128, 256, 1024, 2048]
for nbit in nbits:
    bi = {}
    fp = AllChem.GetMorganFingerprintAsBitVect(
        m, radius=2, nBits=nbit, bitInfo=bi)
    print('num nonzero bit in nBit=%d:%d' % (nbit, len(bi.keys())))
# num nonzero bit in nBit=64:13
# num nonzero bit in nBit=128:15
# num nonzero bit in nBit=256:16
# num nonzero bit in nBit=1024:16
# num nonzero bit in nBit=2048:16
由以上信息可知,当nBit设置为256的时候就不会丢失信息
检查nBits = 256和2048获取的指纹信息是否相同 :
nbits = [256, 2048]
bis = []
for nbit in nbits:
    bi = {}
    fp = AllChem.GetMorganFingerprintAsBitVect(
        m, radius=2, nBits=nbit, bitInfo=bi)
    bis.append(bi)

a = bis[0].values()
b = bis[1].values()

a = list(a)
b = list(b)
ab = a + b
if (len(set(ab)) == len(a)):
    print('fp info calculated by nBits=256 and 2048 are the same')
# fp info calculated by nBits=256 and 2048 are the same
注:不同位数算出来的相同信息对应在不同的bit上,且先后排序不一定一样
查看这16个bit信息
m = Chem.MolFromSmiles('c1cccnc1C')
bi = {}
fp = AllChem.GetMorganFingerprintAsBitVect(m, radius=2, nBits=256, bitInfo=bi)

for b_v in bi.values():
    print(b_v)

# ((5, 2),)
# ((6, 0),)
# ((1, 1), (2, 1))
# ((3, 1),)
# ((0, 0), (1, 0), (2, 0), (3, 0))
# ((5, 0),)
# ((4, 2),)
# ((4, 0),)
# ((2, 2),)
# ((4, 1),)
# ((1, 2),)
# ((0, 2),)
# ((6, 1),)
# ((3, 2),)
# ((5, 1),)
# ((0, 1),)
解释第一个信息和第三个信息:信息里面的最小单元对应的是(atom index, radius)。 第一个信息是5号原子半径2的指纹。 第二个信息是1号原子和2原子原子半径为1的指纹。
3.5 获取指纹对应的结构
获取这3个指纹对应的结构信息
m = Chem.MolFromSmiles('c1cccnc1C')
amap用于接收原子索引的映射关系,键为原始分子中的原子索引,值为子结构中的原子索引
env是被提取出的键的索引
env = Chem.FindAtomEnvironmentOfRadiusN(m, 2, 5)
amap = {}
submol25 = Chem.PathToSubmol(m, env, atomMap=amap)
env = Chem.FindAtomEnvironmentOfRadiusN(m, 1, 1)
amap = {}
submol11 = Chem.PathToSubmol(m, env, atomMap=amap)
env = Chem.FindAtomEnvironmentOfRadiusN(m, 1, 2)
amap = {}
submol12 = Chem.PathToSubmol(m, env, atomMap=amap)

mols = [submol25, submol11, submol12]
img = Draw.MolsToGridImage(
    mols,
    molsPerRow=3,
    subImgSize=(200, 200),
    legends=['' for x in mols]
)
img.save('/Users/zeoy/st/drug_development/st_rdcit/img/mol25.jpg')
3.6 可视化指纹中的bit
RDKit中的拓扑指纹 Chem.RDKFingerprint 和摩根指纹 Morgan,可以通过如下函数进行可视化。
rdkit.Chem.Draw.DrawMorganBit() # 对摩根指纹中的bit 进行可视化。
rdkit.Chem.Draw.DrawRDKitBit() # 对拓扑指纹中的bit 进行可视化。
3.7 可视化摩根指纹中的bit
首先查看分子摩根指纹中的有效bit
mol = Chem.MolFromSmiles('c1cccnc1C')
bi = {}
fp = AllChem.GetMorganFingerprintAsBitVect(
    mol, radius=2, nBits=256, bitInfo=bi)
print(bi)
# {
#     19: ((5, 2),), 33: ((6, 0),),
#     64: ((1, 1), (2, 1)), 74: ((3, 1),),
#     81: ((0, 0), (1, 0), (2, 0), (3, 0)), 100: ((5, 0),),
#     121: ((4, 2),), 122: ((4, 0),),
#     131: ((2, 2),), 172: ((4, 1),),
#     175: ((1, 2),), 179: ((0, 2),),
#     186: ((6, 1),), 192: ((3, 2),),
#     195: ((5, 1),), 214: ((0, 1),)
# }
对bit进行可视化
bits = list(bi.keys())
print(bits)
[19, 33, 64, 74, 81, 100, 121, 122, 131, 172, 175, 179, 186, 192, 195, 214]
bits = [19, 64, 81]
imgs = []
for bit in bits:
    mfp2_svg = Draw.DrawMorganBit(mol, bit, bi)
    imgs.append(mfp2_svg)

def displayingsinrow(imgs, col=4):
    plt.figure(figsize=(20, 20))
    columns = col
    for i, image in enumerate(imgs):
        ax = plt.subplot(len(imgs) / columns, columns, i)
        ax.set_axis_off()
        plt.imshow(image)

displayingsinrow(imgs)

bi_tuple = [(mol, bit, bi) for bit in list(bi.keys())]
img = Draw.DrawMorganBits(
    bi_tuple,
    molsPerRow=4,
    subImgSize=(250, 250),
    legends=list(
        map(str, list(bi.keys()))
    )
)
# 存储为图片
with open('/Users/zeoy/st/drug_development/st_rdcit/img/mol26.svg', 'w+') as outf:
    outf.write(img)
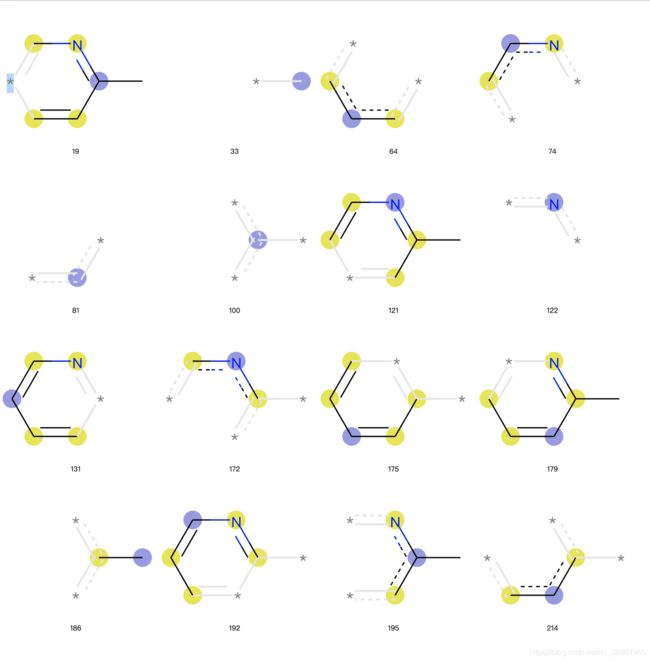
从上图我们可以看到对摩根指纹可视化的时候,不仅有片段结构,而且对原子用不同颜色进行了标注
- 蓝色:说明该原子是中心原子
- 黄色:说明该原子是芳香原子
- 灰色:说明该原子是脂肪烃原子
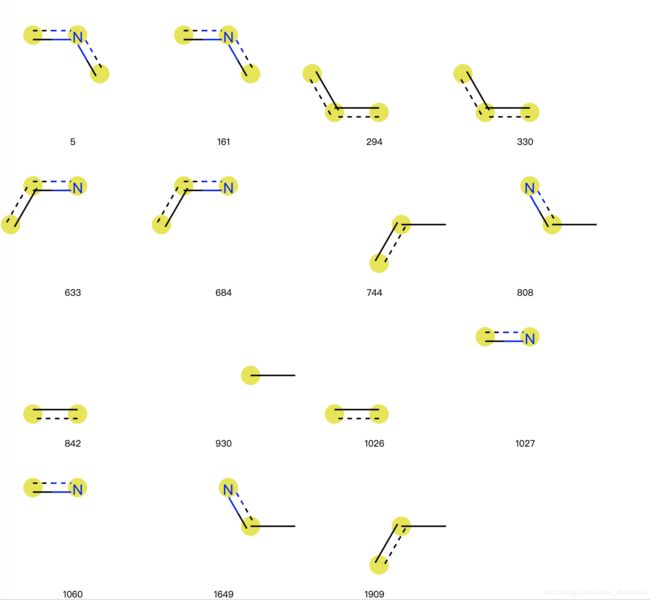
3.8 可视化拓扑指纹中的bit
拓扑指纹也称为RDKit指纹,其调用函数
Chem.RDKFingerprint(mol)
mol = Chem.MolFromSmiles('c1cccnc1C')
rdkbi = {}
rdkfp = Chem.RDKFingerprint(mol, maxPath=2, bitInfo=rdkbi)
print(list(rdkbi.keys()))
# [5, 161, 294, 330, 633, 684, 744, 808, 842, 930, 1026, 1027, 1060, 1649, 1909]
# 可视化展示
rdkbi_tuple = [(mol, bit, rdkbi) for bit in list(rdkbi.keys())]

img = Draw.DrawRDKitBits(
    rdkbi_tuple,
    molsPerRow=4,
    subImgSize=(200, 200),
    legends=list(
        map(str, list(rdkbi.keys()))
    )
)
with open('/Users/zeoy/st/drug_development/st_rdcit/img/mol27.svg', 'w+') as outf:
    outf.write(img)
3.9 基于分子指纹挑选差异较大的分子
药物虚拟筛选中关键步骤挑选分子,比如筛选获得前1000个分子, 由于成本、时间等因素你想挑选100个分子进行活性测试, 如果你直接挑选前100个分子进行测试,命中率可能会降低。 一般流程是对1000个分子进行聚类,然后每一类里面挑选一个分子(或者中心分子), 这样可以提高分子骨架的多样性,从而提供虚拟筛选的成功率。
ms = [x for x in Chem.SDMolSupplier(
    '/Users/zeoy/st/drug_development/st_rdcit/2d.sdf')]
while ms.count(None):
    ms.remove(None)

fps = [AllChem.GetMorganFingerprint(x, 3) for x in ms]


def distij(i, j, fps=fps):
    return 1 - DataStructs.DiceSimilarity(fps[i], fps[j])


picker = MaxMinPicker()
pickIndices = picker.LazyPick(distij, nfps, 10, seed=23)
picks = [ms[x] for x in pickIndices]
print(picks)
3.10 相似性地图
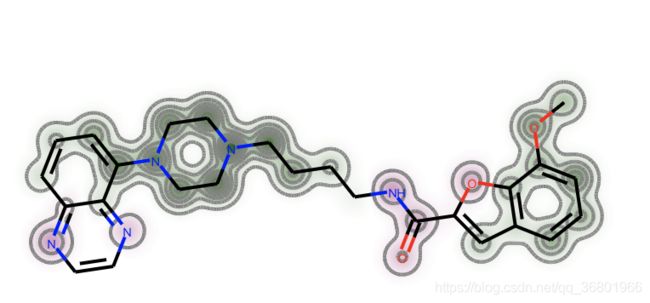
相似性地图可用于可视化原子对两个分子的相似性贡献, 该方法位于 rdkit.Chem.Draw.SimilarityMaps 模块中。
该方法支持三种类型的指纹:
- atom pairs 类型表现形式 normal(default)、hashed 和 bit vector(bv)
- topological torsions 类型表现形式normal(default)、hashed 和 bit vector(bv)
- Morgan fingerprints 类型表现形式 bit vector(bv, default) 和 count vector(count)
计算目标相似性地图,最少需要3个参数:
- 参考分子
- 目标分子
- 指纹函数
- 相似性函数(默认是 Dice similarity)
# 目标分子
targetmol = Chem.MolFromSmiles(
    'COc1cccc2cc(C(=O)NCCCCN3CCN(c4cccc5nccnc54)CC3)oc21')
# 参考分子
refmol = Chem.MolFromSmiles('CCCN(CCCCN1CCN(c2ccccc2OC)CC1)Cc1ccc2ccccc2c1')

d = Draw.MolDraw2DSVG(400, 400)
d.ClearDrawing()
target_mol_simi_fig, maxweight = SimilarityMaps.GetSimilarityMapForFingerprint(
    refmol,
    targetmol,
    lambda m, i: SimilarityMaps.GetMorganFingerprint(
        m, i, radius=2, fpType='bv'),
    draw2d=d
)
print(target_mol_simi_fig)  # Figure(250x250)
print(maxweight)  # 0.12255947497949138
d.FinishDrawing()
with open('/Users/zeoy/st/drug_development/st_rdcit/img/mol28.svg', 'w+') as outf:
    outf.write(d.GetDrawingText())
或者可以用以下方法
weights = SimilarityMaps.GetAtomicWeightsForFingerprint(
    refmol, mol, SimilarityMaps.GetMorganFingerprint)

print(['%.2f' % w for w in weights])
# ['0.11', '0.11', '0.08', '0.07', '-0.03', '0.07', '0.02']

target_mol_simi_fig = SimilarityMaps.GetSimilarityMapFromWeights(mol, weights)
