windows下编译OpenCV,使用VSCode
准备工作
-
D盘新建一个opencv目录,然后去下载opencv最新版以及扩展包。下载链接,下载“opencv-4.6.0.tar.gz”与“opencv_contrib-4.6.0.zip”即可。
-
下载并安装cmake
-
下载并安装Mingw64,链接,解压到某个路径,并将对应的bin路径添加到path环境(我下载的是GCC 11.2.0 + MinGW-w64 10.0.0 (UCRT) - release 1)。
正式编译
CPU版本编译
- 打开Cmake-GUI,选择code路径,“D:/opencv/opencv-4.6.0”,选择target路径“D:/opencv/build/x64/mingw”(该路径要是不存在就自己建一个)。
- 点击“Add Entry”,type选择“Path”,然后name填为:
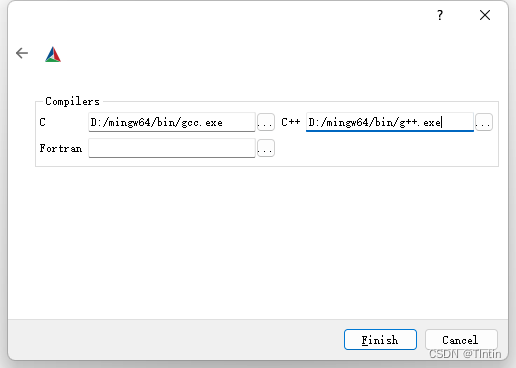
OPENCV_EXTRA_MODULES_PATH,value填为opencv_contrib解压后的路径,然后默认添加“modules”即可,例如D:/opencv/opencv_contrib-4.6.0/modules - 点击“Configure”,选择“Unix Makes”, 选择第二个“Specify native compile”,分别选择c对应gcc.exe所在路径,以及c++对应的g++.exe所在路径。点击“Finish”即可,然后等待1分钟,等待配置完成。


- 终端进入目录编译路径,如"D:\opencv\build\x64\mingw",然后输入下面的命令正式多线程编译(如果不识别,大概率是你没有将MinGW的bin路径放到path环境)。
mingw32-make.exe -j10
- 正式安装,最后会生成一个install目录,然后就可以使用了。
mingw32-make install
- 将Instal下面的bin目录放到path环境,不然编译后的程序会提示找不到lib。比如我的路径是“D:\opencv\build\x64\mingw\install\x64\mingw\bin”
GPU版编译
- 找到你的cuda安装路径,比如我装的默认路径“C:/Program Files/NVIDIA GPU Computing Toolkit/CUDA/v11.6”
- 在opencv4.6的源码路径下,新建一个build文件夹,然后终端进入该文件夹。比如我的是“D:\opencv\opencv-4.6.0\build”
- 确保你已安装Visual Studio 2019,并且将对应的cl.exe文件所在路径放置到path环境下面。我的cl.exe文件路径参考“C:/Program Files (x86)/Microsoft Visual Studio/2019/Community/VC/Tools/MSVC/14.29.30133/bin/Hostx64/x64/cl.exe”
- 然后,终端进入build目录"D:/opencv/opencv-4.6.0/build"(没有就创建一个),在powershell执行下面这个命令,开始配置cmake信息。
cmake `
-D CMAKE_EXPORT_COMPILE_COMMANDS:BOOL=TRUE `
-D CUDAToolkit_ROOT="C:/Program Files/NVIDIA GPU Computing Toolkit/CUDA/v11.6" `
-D WITH_CUDA=ON `
-D OPENCV_EXTRA_MODULES_PATH=D:/opencv/opencv_contrib-4.6.0/modules `
-D ENABLE_FAST_MATH=ON `
-D CUDA_FAST_MATH=ON `
-D WITH_CUBLAS=ON `
-D OPENCV_DNN_CUDA=ON `
-D CMAKE_BUILD_TYPE=Release `
..
- 最后开始编译
cmake --build . -- -j10
测试与使用
CPU版测试
- 打开VScode编写一个demo.cpp文件,内容如下(图片路径建议绝对路径,改成你的即可):
//读取图片并显示
#include
#include
using namespace cv;
int main()
{
Mat img = imread("C:/Users/18826/Pictures/头像.png");
namedWindow("测试opencv");
imshow("测试opencv", img);
waitKey(10000);
}
- Ctrl + F5,选择C++(GDB/LLDB),选择g++.exe所在路径即可,然后.vscode目录下面会自动生成一个tasks.json。tasks.json内容如下:
{
  "tasks": [
    {
      "type": "cppbuild",
      "label": "C/C++: g++.exe 生成活动文件",
      "command": "D:\\MinGW-10\\mingw64\\bin\\g++.exe",
      "args": [
        "-fdiagnostics-color=always",
        "-g",
        "${file}",
        "-o",
        "${fileDirname}\\${fileBasenameNoExtension}.exe"
      ],
      "options": {
        "cwd": "${fileDirname}"
      },
      "problemMatcher": [
        "$gcc"
      ],
      "group": {
        "kind": "build",
        "isDefault": true
      },
      "detail": "调试器生成的任务。"
    }
  ],
  "version": "2.0.0"
}
- 提示找不到.h文件,需要将OpenCV的对应include目录添加到tasks.json。并且顺便也将lib库也放进去。修改后的tasks.json如下:
{
  "tasks": [
    {
      "type": "cppbuild",
      "label": "C/C++: g++.exe 生成活动文件",
      "command": "D:\\mingw64\\bin\\g++.exe",
      "args": [
        "-fdiagnostics-color=always",
        "-g",
        "${file}",
        "-o",
        "${fileDirname}\\${fileBasenameNoExtension}.exe",
        "-I",
        "D:/opencv/build/x64/mingw_10/install/include",
        "-L",
        "D:/opencv/build/x64/mingw_10/install/x64/mingw/lib",
        "-L",
        "D:/opencv/build/x64/mingw_10/install/x64/mingw/bin",
        "-l",
        "opencv_core460",
        "-l",
        "opencv_imgproc460",
        "-l",
        "opencv_imgcodecs460",
        "-l",
        "opencv_video460",
        "-l",
        "opencv_ml460",
        "-l",
        "opencv_highgui460",
        "-l",
        "opencv_objdetect460",
        "-l",
        "opencv_flann460",
        "-l",
        "opencv_imgcodecs460",
        "-l",
        "opencv_photo460",
        "-l",
        "opencv_videoio460"
      ],
      "options": {
        "cwd": "${fileDirname}"
      },
      "problemMatcher": [
        "$gcc"
      ],
      "group": {
        "kind": "build",
        "isDefault": true
      },
      "detail": "调试器生成的任务。"
    }
  ],
  "version": "2.0.0"
}
- 在ctrl+f5运行一次,这次没报错了,但是也没有显示出任何图片,说明程序是编译成功了,只不过没有运行而已,所以还需要我们手动添加一下launch.json来执行编译后的程序。launch.json文件内容如下:
{
  // 使用 IntelliSense 了解相关属性。
  // 悬停以查看现有属性的描述。
  // 欲了解更多信息,请访问: https://go.microsoft.com/fwlink/?linkid=830387
  "version": "0.2.0",
  "configurations": [
    {
      "name": "g++.exe - 生成和调试活动文件",
      "type": "cppdbg",
      "request": "launch",
      "program": "${fileDirname}\\${fileBasenameNoExtension}.exe",
      "args": [],
      "stopAtEntry": false,
      "cwd": "${fileDirname}",
      "environment": [],
      "externalConsole": false,
      "MIMode": "gdb",
      "miDebuggerPath": "D:\\mingw64\\bin\\gdb.exe",
      "setupCommands": [
        // {
        //   "description": "为 gdb 启用整齐打印",
        //   "text": "-enable-pretty-printing",
        //   "ignoreFailures": true
        // }
      ],
      "preLaunchTask": "C/C++: g++.exe 生成活动文件"
    }
  ]
}
- 貌似还是要手动在文件管理双击才能运行,原因未知。
GPU版测试
- 在系统环境配置,用户环境配置,新建两个变量
INCLUDE与LIB,INCLUDE对应的是C/C++头文件信息,需要填上cl.exe所需头文件,不然标准库都会找不到的。我的INCLUDE变量与LIB变量内容分别如下:
- INCLUDE变量
C:\Program Files (x86)\Microsoft Visual Studio\2019\Community\VC\Tools\MSVC\14.29.30133\include;
C:\Program Files (x86)\Windows Kits\10\Include\10.0.22621.0\ucrt;
- LIB变量
C:\Program Files (x86)\Microsoft Visual Studio\2019\Community\VC\Tools\MSVC\14.29.30133\lib\x64;
C:\Program Files (x86)\Windows Kits\10\Lib\10.0.22621.0\ucrt\x64;
C:\Program Files (x86)\Windows Kits\10\Lib\10.0.22621.0\um\x64;
- 随便在vscode里面写一个标准的c++程序,ctrl+F5测试一下,选择C/C++ windows,它会在.vscode目录下自动生成tasks.json。观察是否输出正常。
- 自动生成的tasks.json如下:
{
  "tasks": [
    {
      "type": "cppbuild",
      "label": "C/C++: cl.exe 生成活动文件",
      "command": "cl.exe",
      "args": [
        "/Zi",
        "/EHsc",
        "/nologo",
        "/Fe${fileDirname}\\${fileBasenameNoExtension}.exe",
        "${file}"
      ],
      "options": {
        "cwd": "${fileDirname}"
      },
      "problemMatcher": [
        "$msCompile"
      ],
      "group": {
        "kind": "build",
        "isDefault": true
      },
      "detail": "调试器生成的任务。"
    }
  ],
  "version": "2.0.0"
}
- 暂时不弄了,转wsl去了。告辞。
