TorchVision中使用FasterRCNN+ResNet50+FPN进行目标检测
TorchVision中给出了使用ResNet-50-FPN主干(backbone)构建Faster R-CNN的pretrained模型,模型存放位置为https://download.pytorch.org/models/fasterrcnn_resnet50_fpn_coco-258fb6c6.pth,可通过fasterrcnn_resnet50_fpn函数下载,此函数实现在torchvison/models/detection/faster_rcnn.py中,下载后在Ubuntu上存放在~/.cache/torch/hub/checkpoints目录下,在Windows上存放在C:\Users\spring\.cache\torch\hub\checkpoints目录下,其中spring为用户名。
模型的输入是一个tensor列表;每个shape都是[c,h,w];每个shape指定一副图像,并且图像中值的范围为[0,1],即已做过normalized;不同的图像可以有不同的大小,即此模型支持非固定大小图像的输入。
模型的行为取决于它是处于训练模式(training)还是评估模式(evaluation):
(1).在训练期间,模型需要输入tensors和targets(字典列表),包含boxes和labels。
boxes类型为FloatTensor[N,4],其中N为图像数;4为[x1,y1,x2,y2],即ground-truth box的左上和右下角坐标,它们的值要合理范围内。
labels类型为Int64Tensor[N],每个ground-truth box的class label。
(2).在推理(inference)过程中,模型只需要输入tensors,并返回后处理的预测(post-processed predictions),此预测类型为List[Dict[Tensor]],对应每个输入图像。
Dict字段内容除包含boxes和labels外,还包含scores。
scores类型为Tensor[N],每个预测的分值,按照值从大到小的顺序排列。
模型是通过COCO数据集训练获得的,COCO数据集的介绍参考:https://blog.csdn.net/fengbingchun/article/details/121308708
FPN全称为Feature Pyramid Networks,即特征金字塔网络,是一种多尺度的目标检测算法,FPN的介绍参考:https://blog.csdn.net/fengbingchun/article/details/87359191
ResNet即Residual Networks,也称为残差网络,是为了解决深度神经网络的”退化(degradation)”问题。ResNet-50中的50指此网络有50层。ResNet介绍参考:https://blog.csdn.net/fengbingchun/article/details/114167581
Faster R-CNN为目标检测算法,为RPN(Region Proposal Network)和Fast R-CNN的结合。Faster R-CNN介绍参考:https://blog.csdn.net/fengbingchun/article/details/87195597
以下为测试代码:
import torch
from torchvision import models
from torchvision import transforms
import cv2

'''
Note: conda pytorch install opencv
windows: conda install opencv # python=3.8.8, opencv=4.0.1
ubuntu: pip3 install opencv-python # python=3.7.11, opencv=4.5.4
'''

images_path = "../../data/image/"
images_name = ["1.jpg", "2.jpg", "4.jpg"]
images_data = [] # opencv
tensor_data = [] # pytorch tensor

for name in images_name:
    img = cv2.imread(images_path + name)
    print(f"name: {images_path+name}, opencv image shape: {img.shape}") # (w,h,c)
    images_data.append(img)

    transform = transforms.Compose([transforms.ToTensor()])
    tensor = transform(img) # Normalized Tensor image: [0., 1.]
    print(f"tensor shape: {tensor.shape}, max: {torch.max(tensor)}, min: {torch.min(tensor)}") # (c,h,w)
    tensor_data.append(tensor)

# reference: torchvison/models/detection/faster_rcnn.py
# 使用ResNet-50-FPN(Feature Pyramid Networks, 特征金字塔网络)构建Faster RCNN模型
model = models.detection.fasterrcnn_resnet50_fpn(pretrained=True)
#print(model) # 可查看模型结构
model.eval() # 推理
predictions = model(tensor_data) # result: list: boxes (FloatTensor[N, 4]), labels (Int64Tensor[N]), scores (Tensor[N])
#print(predictions)

coco_labels_name = ["unlabeled", "person", "bicycle", "car", "motorcycle", "airplane", "bus", "train", "truck", "boat",
    "traffic light", "fire hydrant", "street sign", "stop sign", "parking meter", "bench", "bird", "cat", "dog", "horse",
    "sheep", "cow", "elephant", "bear", "zebra", "giraffe", "hat", "backpack", "umbrella", "shoe",
    "eye glasses", "handbag", "tie", "suitcase", "frisbee", "skis", "snowboard", "sports_ball", "kite", "baseball bat",
    "baseball glove", "skateboard", "surfboard", "tennis racket", "bottle", "plate", "wine glass", "cup", "fork", "knife",
    "spoon", "bowl", "banana", "apple", "sandwich", "orange", "broccoli", "carrot", "hot_dog", "pizza",
    "donut", "cake", "chair", "couch", "potted plant", "bed", "mirror", "dining table", "window", "desk",
    "toilet", "door", "tv", "laptop", "mouse", "remote", "keyboard", "cell phone", "microwave", "oven",
    "toaster", "sink", "refrigerator", "blender", "book", "clock", "vase", "scissors", "teddy bear", "hair drier",
    "toothbrush", "hair brush"] # len = 92

for x in range(len(predictions)):
    pred = predictions[x]
    scores = pred["scores"]
    mask = scores > 0.5 # 只取scores值大于0.5的部分

    boxes = pred["boxes"][mask].int().detach().numpy() # [x1, y1, x2, y2]
    labels = pred["labels"][mask]
    scores = scores[mask]
    print(f"prediction: boxes:{boxes}, labels:{labels}, scores:{scores}")

    img = images_data[x]

    for idx in range(len(boxes)):
        cv2.rectangle(img, (boxes[idx][0], boxes[idx][1]), (boxes[idx][2], boxes[idx][3]), (255, 0, 0))
        cv2.putText(img, coco_labels_name[labels[idx]]+" "+str(scores[idx].detach().numpy()), (boxes[idx][0]+10, boxes[idx][1]+10), cv2.FONT_HERSHEY_SIMPLEX, 0.4, (0, 255, 0), 1)

    cv2.imshow("image", img)
    cv2.waitKey(1000)
    cv2.imwrite(images_path+"result_"+images_name[x], img)

print("test finish")
说明:
(1).输入图像既可以是彩色图也可以是灰度图,即channel为3或1均可。
(2).输入图像的大小不受限制,一组图像可以大小不一致。
(3).输入图像要求normalized到[0., 1.]。
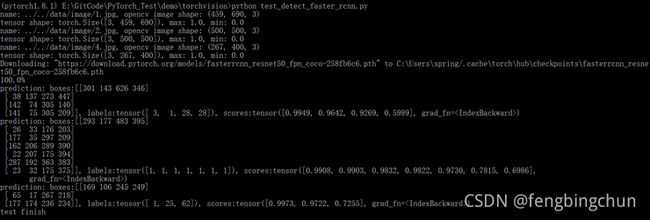
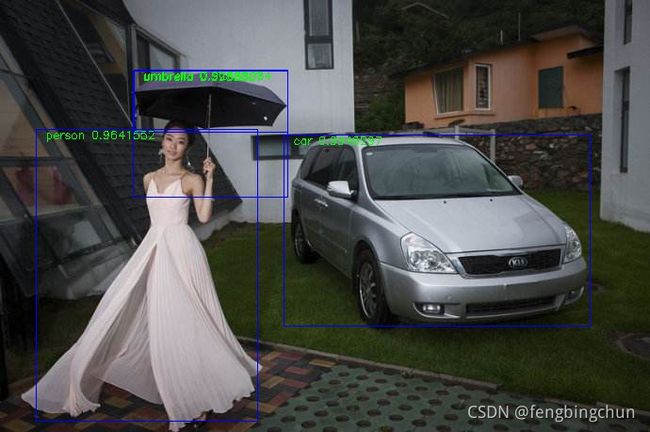
(4).执行结果仅显示scores值大于0.5的情况。
(5).测试代码中类别数为92而不是80,92=1+11+80。其中1为id为0,label name为unlabeled;11为从COCO中移除的label,如street sign;80为真正的label数,如person。详细参考:https://github.com/nightrome/cocostuff/blob/master/labels.md
(6).结果显示中有冗余的检测框,可以通过NMS(Non-Maximum Suppression)非极大值抑制算法移除。
执行结果如下:以下原始测试图像来自网络
GitHub: GitHub - fengbingchun/PyTorch_Test: PyTorch's usage


