Tensorflow - 一文搞懂 TF2.x tf.feature_column
一.引言
上一篇文章 Tensorflow - TF1.x VS TF2.x tf.feature_column 介绍了 feature_column 在 TF1.x 与 TF 2.x 在使用上的区别,这里介绍一下 feature_column 中用到的特征列以及对应方法。
二.feature_column 整体介绍
1.整体关系
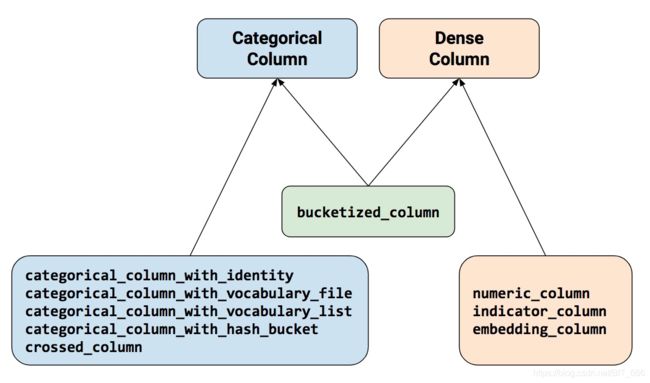
feature_column 模块中包含下述9个函数,除 buketized_column 函数外,其他函数只能返回 Categorical Column 或 Dense Column 中的一个。
 CSDN-BITDDD
2.功能介绍
| 用 法 | API | 返回值 |
|---|---|---|
| 离散数值列 | numeric_column | 数值 |
| 指标列 | indicator_column | one/multi hot |
| emb嵌入列 | embedding_column | embedding(N) |
| 分桶列 | bucketized_column | one-hot |
| 直接类别列 | categorical_column_with_identity | one-hot |
| 文件类别列 | categorical_column_with_vocabulary_file | one-hot |
| 数组类别列 | categorical_column_with_vocabulary_list | one-hot |
| Hash类别类 | categorical_column_with_hash_bucket | one-hot |
| 特征交叉列 | crossed_column | one-hot |
Tips: 这里 Categorical Column 需要通过 indicator_column 或者 embedding_column 转换为 Dense Column 才能应用于深度模型输入。上述标红的 feature_column 是最外层返回的特征列,只有用他们包装其他特征列才可以得到模型正确的输入,否则会有如下报错:
ValueError: Items of feature_columns must be a
.
You can wrap a categorical column with an embedding_column or indicator_column.
3.使用流程
(1) 构建特征列 feature_column = tf.feature_column.......
(2) 构建features{},其中 key 要与 feature_column 的 key 对齐, features = { key : value }
(3) 构建特征层 layer = tf.keras.layers.DenseFeatures(feature_column || List[feature_column])
(4) 将 features feed 给 特征层 DenseFeatures,input = layer(features)
三.特征列应用
1.直接数值 numeric_column
numeric_column : 输入数值即可
    number = tf.feature_column.numeric_column("number")
    feature_dict = {"number": [1.1, 1.2, 1.3]}
    feature_layer = tf.keras.layers.DenseFeatures(number)
    output = feature_layer(feature_dict)
    print(output)
    print("=========================")
返回值:
直接返回对应数值
tf.Tensor(
[[1.1]
 [1.2]
 [1.3]], shape=(3, 1), dtype=float32)
=========================
Tips:
normalizer_fn : 数值类型还支持归一化函数,可以传入函数或者 lambda 表达式表征归一化方法
    number = tf.feature_column.numeric_column("number", normalizer_fn=lambda x: (x - 1.0) / 2.0)
    feature_dict = {"number": [1.1, 1.2, 1.3]}
    feature_layer = tf.keras.layers.DenseFeatures(number)
    output = feature_layer(feature_dict)
    print(output)
    print("=========================")
tf.Tensor(
[[0.05000001]
[0.10000002]
[0.14999998]], shape=(3, 1), dtype=float32)
=========================2.数字分桶 numeric_column + bucketized_column
numeric_column: 获取离散数值
buketized_column: 离散数值分桶,需给定 boundaries
    cos_index = tf.feature_column.bucketized_column(
        tf.feature_column.numeric_column(key='cos', shape=(1,),
                                         default_value=0,
                                         dtype=tf.dtypes.float32),
        boundaries=[0.1, 0.2, 0.3, 0.4, 0.5, 0.6, 0.7, 0.8, 0.9])

    product_dict = {"cos": np.random.random(size=(10, 1))}
    feature_layer = tf.keras.layers.DenseFeatures(cos_index)
    output = feature_layer(product_dict)
    print(output)
    print("=========================")
返回值:
假设 boundaries 有9个元素,则原始数值会被分到10个桶中,并得到 10 维的 one-hot 向量
tf.Tensor(
[[0. 0. 1. 0. 0. 0. 0. 0. 0. 0.]
 [0. 0. 0. 0. 0. 0. 0. 1. 0. 0.]
 [0. 1. 0. 0. 0. 0. 0. 0. 0. 0.]
 [0. 0. 0. 1. 0. 0. 0. 0. 0. 0.]
 [0. 0. 0. 0. 0. 1. 0. 0. 0. 0.]
 [0. 1. 0. 0. 0. 0. 0. 0. 0. 0.]
 [0. 1. 0. 0. 0. 0. 0. 0. 0. 0.]
 [0. 0. 0. 0. 0. 1. 0. 0. 0. 0.]
 [0. 0. 0. 0. 0. 0. 1. 0. 0. 0.]
 [0. 0. 0. 0. 0. 0. 1. 0. 0. 0.]], shape=(10, 10), dtype=float32)
3.列表分桶 categorical_column_with_vocabulary_list + indicator_column
categorical_column_with_vocabulary_list : 通过列表标识所有种类
    age = tf.feature_column.indicator_column(
        tf.feature_column.categorical_column_with_vocabulary_list(key='age', vocabulary_list=(
            '50s', '60s', '70s', '80s', '90s'), num_oov_buckets=0, default_value=0))
    feature_dict = {"age": ["90s", "70s"]}
    feature_layer = tf.keras.layers.DenseFeatures(age)
    output = feature_layer(feature_dict)
    print(output)
    print("=========================")
返回值:
list的长度代表输出 one-hot 的维度,通过字符串列表与传入的字符串进行匹配
tf.Tensor(
[[0. 0. 0. 0. 0. 1. 0.]
 [0. 0. 0. 1. 0. 0. 0.]], shape=(2, 7), dtype=float32)
4.文件分桶 categorical_column_with_vocabulary_file + indicator_column
categorical_column_with_vocabulary_file : 通过文件标识所有种类
Tips: 与上面唯一区别就是分类依据从 List 放到了 File 中,主要针对类别特别多的情况。加入 File 中放入如下类别,则 feature_column 会顺序编号代表他们的 index。
a
b
c
d
e
f
g
h
i
j
file = tf.feature_column.indicator_column(
tf.feature_column.categorical_column_with_vocabulary_file(key='app',
vocabulary_file='../FileList/app_list', vocabulary_size=10, num_oov_buckets=0,
default_value=0))
feature_dict = {"app": ["a", "b", "c", "d"]}
feature_layer = tf.keras.layers.DenseFeatures(file)
output = feature_layer(feature_dict)
print(output)
print("=========================")返回值:
根据类别返回 one-hot,向量维度由文件的有效行数决定。
tf.Tensor(
[[1. 0. 0. 0. 0. 0. 0. 0. 0. 0.]
 [0. 1. 0. 0. 0. 0. 0. 0. 0. 0.]
 [0. 0. 1. 0. 0. 0. 0. 0. 0. 0.]
 [0. 0. 0. 1. 0. 0. 0. 0. 0. 0.]], shape=(4, 10), dtype=float32)
5.Hash分桶 categorical_column_with_hash_bucket + indicator_column
categorical_column_with_hash_bucket : 将原始特征 Hash 分桶得到 one-hot
Tips:
Hash 规则需要指定好传入数据的类型,例如 string 还是 int 还是其他等等
    hash_word = tf.feature_column.indicator_column(
        tf.feature_column.categorical_column_with_hash_bucket(key='id',
        hash_bucket_size=100, dtype=tf.dtypes.string))
    feature_dict = {"id": ["123", "234", "345", "456"]}
    feature_layer = tf.keras.layers.DenseFeatures(hash_word)
    output = feature_layer(feature_dict)
    print(output)
    print("=========================")
返回值:
hash_bucket_size 决定了输出 one-hot 的维度
tf.Tensor(
[[0. 1. 0. 0. 0. 0. 0. 0. 0. 0.]
 [0. 0. 0. 0. 0. 0. 1. 0. 0. 0.]
 [0. 0. 0. 0. 0. 0. 0. 0. 1. 0.]
 [0. 0. 1. 0. 0. 0. 0. 0. 0. 0.]], shape=(4, 10), dtype=float32)
6.multi_hot categorical_column_with_identity + indicator_column
categorical_column_with_identity: 上面的类别需要通过文件,列表,Hash获取映射关系,将特征值映射到数字索引,identity 属于直接类型,即你告诉我你是哪个类别,无需映射,直接输入类别。
Tips: features 中多维类别数组需要保持相同维度,如果不够可以使用默认值填充
    multi_category = tf.feature_column.indicator_column(
        tf.feature_column.categorical_column_with_identity("multi", 50))
    feature_dict = {"multi": [[4, 5, 7, 10], [1, 2, 9, 30], [0, 1, 2, 3]]}  # 必须是大于等于0的数,不能是负数
    feature_layer = tf.keras.layers.DenseFeatures(multi_category)
    output = feature_layer(feature_dict)
    print(output)
    print("=========================")
返回值:
返回 multi_hot 向量,向量维度由 identity 定义的分类类别数量决定
tf.Tensor(
[[0. 0. 0. 0. 1. 1. 0. 1. 0. 0. 1. 0. 0. 0. 0. 0. 0. 0. 0. 0. 0. 0. 0. 0.
  0. 0. 0. 0. 0. 0. 0. 0. 0. 0. 0. 0. 0. 0. 0. 0. 0. 0. 0. 0. 0. 0. 0. 0.
  0. 0.]
 [0. 1. 1. 0. 0. 0. 0. 0. 0. 1. 0. 0. 0. 0. 0. 0. 0. 0. 0. 0. 0. 0. 0. 0.
  0. 0. 0. 0. 0. 0. 1. 0. 0. 0. 0. 0. 0. 0. 0. 0. 0. 0. 0. 0. 0. 0. 0. 0.
  0. 0.]
 [1. 1. 1. 1. 0. 0. 0. 0. 0. 0. 0. 0. 0. 0. 0. 0. 0. 0. 0. 0. 0. 0. 0. 0.
  0. 0. 0. 0. 0. 0. 0. 0. 0. 0. 0. 0. 0. 0. 0. 0. 0. 0. 0. 0. 0. 0. 0. 0.
  0. 0.]], shape=(3, 50), dtype=float32)
7.向量化 categorical_column_with_hash_bucket + embedding_column
categorical_column_with_hash_bucket : hash生成类别特征向量
embedding_column : 映射到多维向量
    embedding = tf.feature_column.embedding_column(tf.feature_column.categorical_column_with_hash_bucket(
        'embedding', hash_bucket_size=3, dtype=tf.string), dimension=10)
    feature_dict = {"embedding": [["a"], ["b"], ["c"]]}
    feature_layer = tf.keras.layers.DenseFeatures(embedding)
    output = feature_layer(feature_dict)
    print(output)
    print("=========================")
返回值:
这里先使用 categorical_column_with_hash_bucket 生成特征 one-hot 向量,随后通过embedding_column 映射到多维向量,这里 dimension 表征映射后的向量,这里有点像为原始特征接入一个 hash_bucket_size x dimension 的 dense 层,将 one-hot 转化到对应 embedding,这里默认的 Trainable 为 True。
tf.Tensor(
[[-0.13449314  0.29922524 -0.3940527   0.29981396  0.47632942  0.06662703
   0.46329567  0.420091    0.22160548 -0.2352298 ]
 [-0.12182757  0.4098371   0.41853845  0.1819125   0.04440727  0.41887495
   0.26709485 -0.1805281   0.15641369  0.4741768 ]
 [-0.12182757  0.4098371   0.41853845  0.1819125   0.04440727  0.41887495
   0.26709485 -0.1805281   0.15641369  0.4741768 ]], shape=(3, 10), dtype=float32)
8.交叉特征 crossed_column
crossed_column : 将多个特征结合在一起并重新hash得到新的特征,相当于做了一次特征交叉
    sex = tf.feature_column.categorical_column_with_identity("sex", num_buckets=2)
    age = tf.feature_column.categorical_column_with_identity("age", num_buckets=10)
    feature_cross = tf.feature_column.crossed_column([sex, age], hash_bucket_size=20)
    feature_cross = tf.feature_column.indicator_column(feature_cross)
    feature_dict = {"sex": [[0], [0], [1]], "age": [[1], [3], [5]]}
    feature_layer = tf.keras.layers.DenseFeatures(feature_cross)
    output = feature_layer(feature_dict)
    print(output)
    print("=========================")
返回值:
这里使用年龄与性别特征交叉,采用 identity 特征列,所以需要直接给出类别,sex 共分两类,age共分两类,所以 num_buckets 为 2 和 10,crossed_column 的 hash_bucket_size 并不一定需要等于 2 * 10 = 20,也可以大于,小于,只要大于0即可,这涉及到信息压缩和维度选择的问题,可以根据实际场景自定义。最后返回的 Embedding 维度以 hash_bucket_size 为准。
tf.Tensor(
[[0. 1. 0. 0. 0. 0. 0. 0. 0. 0. 0. 0. 0. 0. 0. 0. 0. 0. 0. 0.]
 [0. 0. 0. 0. 0. 0. 0. 0. 0. 0. 0. 0. 0. 1. 0. 0. 0. 0. 0. 0.]
 [0. 0. 0. 0. 0. 0. 0. 0. 0. 0. 0. 0. 0. 0. 1. 0. 0. 0. 0. 0.]], shape=(3, 20), dtype=float32)
=========================
9.多特征列
上面介绍的方法都是针对单个或多个特征得到最终的一个特征Tensor,实际应用场景中特征工程都是根据一条样本生成多个特征的特征列,所以常用的是将多个特征列同时应用。
    feature_1 = tf.feature_column.numeric_column("feat1")
    feature_2 = tf.feature_column.categorical_column_with_hash_bucket(
        "feat2", hash_bucket_size=3)
    feature_3 = tf.feature_column.embedding_column(
        feature_2, dimension=3)
    feature_4 = tf.feature_column.indicator_column(feature_2)
    feature_dict = {
        "feat1": [[1.1], [2.2]],
        "feat2": [["hello"], ["world"]]
    }
    # feature1 常数 feature2 Emb feature3 one-hot
    feature_layer = tf.keras.layers.DenseFeatures([feature_1, feature_3, feature_4])
    output = feature_layer(feature_dict)
    print(output)
    print("=========================")
传参:
多个 feature_column 通过 List 传入,特征工程返回的顺序与列表顺序一致,这里 features 的顺序不用按照 feature_column List 的顺序传入,因为 feature_column 和 features 通过 key 关联,只有找不到 key 或者 key 对应的 value 不合规时才会出问题。
返回值:
feat1 为 numeric_column,直接返回数值
feat2 为 categorical_column_with_hash_bucket,dimention 为3,为 feat3,feat4提供支持
feat3 为 embedding_column 返回维度为3的 Emb Tensor
feat4 为 indicator_column 返回维度为3的 One Hot Tensor
共7维,分别为 number-1 + emb-3 + one-hot-3,复杂的特殊工程大家也只需要根据数据类型,扩展 feature_column 的list和样本即可。
tf.Tensor(
[[ 1.1        -0.15385251  0.01407223  0.35717204  0.          1.
   0.        ]
 [ 2.2        -0.15385251  0.01407223  0.35717204  0.          1.
   0.        ]], shape=(2, 7), dtype=float32)
=========================
四.总结
经过上面的实例展示了开篇图中所有9种 feature_column 的使用方法,现在我们可以处理:
=> 离散特征:
a.直接得到数值,也可归一化
b.通过 List,File,idnetity 得到 one-hot
c.hash得到one-hot
d.映射得到 multi_hot
e.得到 embedding 向量
=> 连续特征:
a.直接得到数值,也可归一化
b.通过 hash_bucket 做特征分桶并得到 one-hot
c.得到 embedding 向量
=> 组合特征:
a.将多类型特征组合并重新hash得到新的特征
通过 List 将上述特征列传入 Layer,配合样本就可以得到一套特征工程,我们只需要保证没有脏数据,做好异常处理即可得到模型需要的 Input,后续可以通过 Esitimator,Keras 配合模型获得结果。
Feature Column 的优点通过上面的例子也可以看出来,只需要定义好特征的类型和处理方式,剩下的按 key 扔到 features 里即可,非常的省事,但是也存在缺点和不足,由于 python 的运算效率较低,在一些大规模的工业场景下 feature_column 的吞吐和处理效率可能会偏低,不过这不影响它在常规机器学习中应用的位置。