用BERT进行中文短文本分类
最近参加了一个关于医疗短文本分类的比赛。刚开始用了SVM、xgBoost效果都不是很好,群里有人说BERT的效果不错,于是自己赶鸭子上架,根据网上的文章,手动实践,赶在比赛结束前一天提交了结果,效果确实比传统机器学习模型要强得多,特记录一下详细步骤与程序。
1. 环境配置
本实验使用操作系统:Ubuntu 18.04.3 LTS 4.15.0-29-generic GNU/Linux操作系统。
1.1 查看CUDA版本
cat /usr/local/cuda/version.txt
输出:
CUDA Version 10.0.130*
1.2 查看 cudnn版本
cat /usr/local/cuda/include/cudnn.h | grep CUDNN_MAJOR -A 2
输出:
#define CUDNN_MINOR 6
#define CUDNN_PATCHLEVEL 3
--
#define CUDNN_VERSION (CUDNN_MAJOR * 1000 + CUDNN_MINOR * 100 + CUDNN_PATCHLEVEL)
如果没有安装 cuda 和 cudnn,到官网根自己的 GPU 型号版本安装即可
1.3 安装tensorflow-gpu
通过Anaconda创建虚拟环境来安装tensorflow-gpu(Anaconda安装步骤就不说了)
创建虚拟环境
虚拟环境名为:tensorflow
conda create -n tensorflow python=3.7.1
进入虚拟环境
下次使用也可以通过此命令进入虚拟环境
source activate tensorflow
安装tensorflow-gpu
不推荐直接pip install tensorflow-gpu 因为速度比较慢。可以从豆瓣的镜像中下载,速度还是很快的。https://pypi.doubanio.com/simple/tensorflow-gpu/
找到自己适用的版本(cp37表示python版本为3.7)
然后通过pip install 安装
pip install https://pypi.doubanio.com/packages/15/21/17f941058556b67ce6d1e3f0e0932c9c2deaf457e3d45eecd93f2c20827d/tensorflow_gpu-1.14.0rc1-cp37-cp37m-manylinux1_x86_64.whl
我选择了1.14.0的tensorflow-gpu linux版本,python版本为3.7。使用BERT的话,tensorflow-gpu版本必须大于1.11.0。同时,不建议选择2.0版本,2.0版本好像修改了一些方法,还需要自己手动修改代码
环境测试
在tensorflow虚拟环境中,python命令进入Python环境中,输入import tensorflow,看是否能成功导入
2. 准备工作
2.1 BERT源码下载
git clone https://github.com/google-research/bert.git
windows系统下直接进入
https://github.com/google-research/bert,选择Clone or download
2.2 预训练模型下载
- Bert-base Chinese
- BERT-wwm :由哈工大和讯飞联合实验室发布的,效果比Bert-base Chinese要好一些(链接地址为讯飞云,密码:mva8。无奈当时用wwm训练完提交结果时,提交通道已经关闭了,呜呜)
bert_model.ckpt:负责模型变量载入
vocab.txt:训练时中文文本采用的字典
bert_config.json:BERT在训练时,可选调整的一些参数
2.3 数据准备
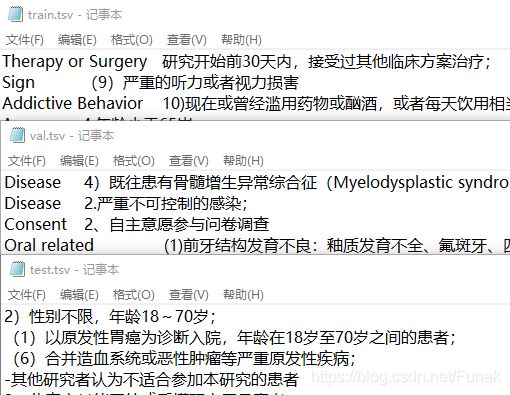
1)将自己的数据集格式改成如下格式:第一列是标签,第二列是文本数据,中间用tab隔开(若测试集没有标签,只保留一列样本数据)。 分别将训练集、验证集、测试集文件名改为train.tsv、val.tsv、test.tsv。文件格式为UTF-8(无BOM)

2)新建data文件夹,存放这三个文件。
3)预训练模型解压,存放到新建文件夹chinese中
2.4 代码修改
我们需要对bert源码中run_classifier.py进行两处修改
1)在run_classifier.py中添加我们的任务类
可以参照其他Processor类,添加自己的任务类
# 自定义Processor类
class MyProcessor(DataProcessor):

    def __init__(self):
        self.labels = ['Addictive Behavior',
                       'Address',
                       'Age',
                       'Alcohol Consumer',
                       'Allergy Intolerance',
                       'Bedtime',
                       'Blood Donation',
                       'Capacity',
                       'Compliance with Protocol',
                       'Consent',
                       'Data Accessible',
                       'Device',
                       'Diagnostic',
                       'Diet',
                       'Disabilities',
                       'Disease',
                       'Education',
                       'Encounter',
                       'Enrollment in other studies',
                       'Ethical Audit',
                       'Ethnicity',
                       'Exercise',
                       'Gender',
                       'Healthy',
                       'Laboratory Examinations',
                       'Life Expectancy',
                       'Literacy',
                       'Multiple',
                       'Neoplasm Status',
                       'Non-Neoplasm Disease Stage',
                       'Nursing',
                       'Oral related',
                       'Organ or Tissue Status',
                       'Pharmaceutical Substance or Drug',
                       'Pregnancy-related Activity',
                       'Receptor Status',
                       'Researcher Decision',
                       'Risk Assessment',
                       'Sexual related',
                       'Sign',
                       'Smoking Status',
                       'Special Patient Characteristic',
                       'Symptom',
                       'Therapy or Surgery']

    def get_train_examples(self, data_dir):
        return self._create_examples(
            self._read_tsv(os.path.join(data_dir, "train.tsv")), "train")

    def get_dev_examples(self, data_dir):
        return self._create_examples(
            self._read_tsv(os.path.join(data_dir, "val.tsv")), "val")

    def get_test_examples(self, data_dir):
        return self._create_examples(
            self._read_tsv(os.path.join(data_dir, "test.tsv")), "test")

    def get_labels(self):
        return self.labels

    def _create_examples(self, lines, set_type):
        examples = []
        for (i, line) in enumerate(lines):
            guid = "%s-%s" % (set_type, i)
            if set_type == "test":
            """
            因为我的测试集中没有标签,所以对test进行单独处理,
            test的label值设为任意一标签(一定是存在的类标签,
            不然predict时会keyError),如果测试集中有标签,就
            不需要if了,统一处理即可。
            """
                text_a = tokenization.convert_to_unicode(line[0])
                label = "Address"
            else:
                text_a = tokenization.convert_to_unicode(line[1])
                label = tokenization.convert_to_unicode(line[0])
            examples.append(
                InputExample(guid=guid, text_a=text_a, text_b=None, label=label))
        return examples
2)修改processor字典
def main(_):
    tf.logging.set_verbosity(tf.logging.INFO)

    processors = {
        "cola": ColaProcessor,
        "mnli": MnliProcessor,
        "mrpc": MrpcProcessor,
        "xnli": XnliProcessor,
        "mytask": MyProcessor, # 将自己的Processor添加到字典
    }
3 开工
3.1 配置训练脚本
创建并运行run.sh文件
python run_classifier.py \
  --data_dir=data \
  --task_name=mytask \
  --do_train=true \
  --do_eval=true \
  --vocab_file=chinese/vocab.txt \
  --bert_config_file=chinese/bert_config.json \
  --init_checkpoint=chinese/bert_model.ckpt \
  --max_seq_length=128 \
  --train_batch_size=8 \
  --learning_rate=2e-5 \
  --num_train_epochs=3.0
  --output_dir=out \
fine-tune需要一定的时间,我的训练集有两万条,验证集有八千条,GPU为2080Ti,需要20分钟左右。如果显存不够大,记得适当调整max_seq_length 和 train_batch_size
3.2 预测
创建并运行test.sh(注:init_checkpoint为自己之前输出模型地址)
python run_classifier.py \
  --task_name=mytask \
  --do_predict=true \
  --data_dir=data \
  --vocab_file=chinese/vocab.txt \
  --bert_config_file=chinese/bert_config.json \
  --init_checkpoint=out \
  --max_seq_length=128 \
  --output_dir=out
预测完会在out目录下生成test_results.tsv。生成文件中,每一行对应你训练集中的每一个样本,每一列对应的是每一类的概率(对应之前自定义的label列表)。如第5行第8列表示第5个样本是第8类的概率。
3.3 预测结果处理
因为预测结果是概率,我们需要对其处理,选取每一行中的最大值最为预测值,并转换成对应的真实标签。
data_dir = "C:\\test_results.tsv"
lable = ['Addictive Behavior',
         'Address',
         'Age',
         'Alcohol Consumer',
         'Allergy Intolerance',
         'Bedtime',
         'Blood Donation',
         'Capacity',
         'Compliance with Protocol',
         'Consent',
         'Data Accessible',
         'Device',
         'Diagnostic',
         'Diet',
         'Disabilities',
         'Disease',
         'Education',
         'Encounter',
         'Enrollment in other studies',
         'Ethical Audit',
         'Ethnicity',
         'Exercise',
         'Gender',
         'Healthy',
         'Laboratory Examinations',
         'Life Expectancy',
         'Literacy',
         'Multiple',
         'Neoplasm Status',
         'Non-Neoplasm Disease Stage',
         'Nursing',
         'Oral related',
         'Organ or Tissue Status',
         'Pharmaceutical Substance or Drug',
         'Pregnancy-related Activity',
         'Receptor Status',
         'Researcher Decision',
         'Risk Assessment',
         'Sexual related',
         'Sign',
         'Smoking Status',
         'Special Patient Characteristic',
         'Symptom',
         'Therapy or Surgery']
# 用pandas读取test_result.tsv,将标签设置为列名
data_df = pd.read_table(data_dir, sep="\t", names=lable, encoding="utf-8")
label_test = []
for i in range(data_df.shape[0]):
	# 获取一行中最大值对应的列名,追加到列表
    label_test.append(data_df.loc[i, :].idxmax())
4. 参考文章:
TensorFlow + GPU配置
BERT模型fine-tuning代码解析(一)
中文最佳,哈工大讯飞联合发布全词覆盖中文BERT预训练模型
