Lift-Splat-Shoot:论文、代码解析
一、文章解决的问题
纵观全文和整个代码,这篇文章解决了一个什么事情:解决了多相机融合的问题,而且最重要的是相机是没有深度信息的,在这种没有深度的情况下,我怎么将多副图像融合在一起,而这篇文章通过训练可以自己学习到深度信息。而且据作者所说,其还能避免一定的标定误差。
二、读懂代码关键
1.数据处理流程中维度的变换,以及数据的实际意义。
2.矩阵运算:拼接、扩展、加减法、乘积、差积。
3.栅格坐标和空间坐标是怎么转换的,点云怎样投影到栅格中的。
4.模型自己学习深度,在哪里体现的。
所以纵观全文和整个代码,这篇文章解决了一个什么事情:解决了多相机融合的问题,而且最重要的是相机是没有深度信息的,在这种没有深度的情况下,我怎么将多副图像融合在一起,而这篇文章通过训练可以自己学习到深度信息。而且据作者所说,其还能避免一定的标定误差。
三、模型代码解读
输入:BxNxCxHxW(4x6x3x128x352)幅图像数据,以及相机的内外参数矩阵
for batchi, (imgs, rots, trans, intrins, post_rots, post_trans, binimgs) in enumerate(trainloader):
            t0 = time()
            opt.zero_grad()
            preds = model(imgs.to(device),
                    rots.to(device),
                    trans.to(device),
                    intrins.to(device),
                    post_rots.to(device),
                    post_trans.to(device),
                    )
            binimgs = binimgs.to(device)
            loss = loss_fn(preds, binimgs)
            loss.backward()
步骤一:获得像素点云在车体坐标系中的三维空间位置
1.根据图像像素坐标创建截锥体,截锥体的维度为DxfHxfWx3(fH = H/16, fW = W/16),在这里截锥体的维度是41x8x22x3。
注意!!截锥体里保存的数据是什么,实际上是图像像素坐标在下采样之后的像素坐标。其实际意义就是在一个栅格中的图像坐标和深度(u,v,d)。
    def create_frustum(self):
        # make grid in image plane
        ogfH, ogfW = self.data_aug_conf['final_dim']
        fH, fW = ogfH // self.downsample, ogfW // self.downsample
        ds = torch.arange(*self.grid_conf['dbound'], dtype=torch.float).view(-1, 1, 1).expand(-1, fH, fW)
        D, _, _ = ds.shape
        xs = torch.linspace(0, ogfW - 1, fW, dtype=torch.float).view(1, 1, fW).expand(D, fH, fW)
        ys = torch.linspace(0, ogfH - 1, fH, dtype=torch.float).view(1, fH, 1).expand(D, fH, fW)

        # D x H x W x 3
        frustum = torch.stack((xs, ys, ds), -1)
        return nn.Parameter(frustum, requires_grad=False)
2.结合相机的内外参数将截锥体中图像坐标先转化为相机坐标,再转化为车体坐标系的空间坐标(x,y,z)。geom_feats:6x4x41x8x22x3
注意!!这里面的截锥体就生成了单目相机图像的像素在所有可能深度上的车体坐标系的三维空间位置。
    def get_geometry(self, rots, trans, intrins, post_rots, post_trans):
        """Determine the (x,y,z) locations (in the ego frame)
        of the points in the point cloud.
        Returns B x N x D x H/downsample x W/downsample x 3
        """
        B, N, _ = trans.shape

        # undo post-transformation
        # B x N x D x H x W x 3
        points = self.frustum - post_trans.view(B, N, 1, 1, 1, 3)
        points = torch.inverse(post_rots).view(B, N, 1, 1, 1, 3, 3).matmul(points.unsqueeze(-1))

        # cam_to_ego
        points = torch.cat((points[:, :, :, :, :, :2] * points[:, :, :, :, :, 2:3],
                            points[:, :, :, :, :, 2:3]
                            ), 5)
        combine = rots.matmul(torch.inverse(intrins))
        points = combine.view(B, N, 1, 1, 1, 3, 3).matmul(points).squeeze(-1)
        points += trans.view(B, N, 1, 1, 1, 3)

        return points
步骤二:提取图像特征
1.输入图像经过预训练的efficientnet提取特征:4x6x3x128x352 ==> 24x512x8x22
    def get_eff_depth(self, x):
        # adapted from https://github.com/lukemelas/EfficientNet-PyTorch/blob/master/efficientnet_pytorch/model.py#L231
        endpoints = dict()

        # Stem
        x = self.trunk._swish(self.trunk._bn0(self.trunk._conv_stem(x)))
        prev_x = x

        # Blocks
        for idx, block in enumerate(self.trunk._blocks):
            drop_connect_rate = self.trunk._global_params.drop_connect_rate
            if drop_connect_rate:
                drop_connect_rate *= float(idx) / len(self.trunk._blocks) # scale drop connect_rate
            x = block(x, drop_connect_rate=drop_connect_rate)
            if prev_x.size(2) > x.size(2):
                endpoints['reduction_{}'.format(len(endpoints)+1)] = prev_x
            prev_x = x

        # Head
        endpoints['reduction_{}'.format(len(endpoints)+1)] = x
        x = self.up1(endpoints['reduction_5'], endpoints['reduction_4'])
        return x
2.1x1卷积变换图像维度:24x512x8x22 ==> 24x105x8x22
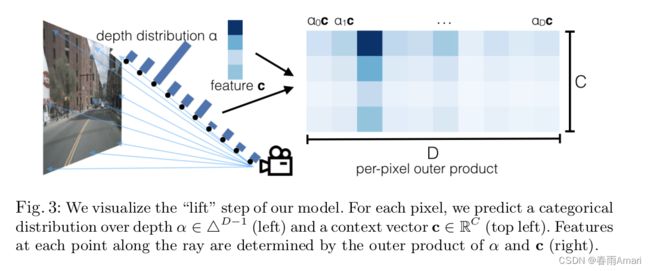
3.接下来将第二个维度105中的前41个数据经过一个softmax作为最后的深度预测,后64的数据作为图像特征,并作乘积,输出的最终图像特征维度:4x6x41x8x22x64
注意!!这里面为后续的splat打下了基础:注意作为深度预测的前41个数据经过了softmax,再和特征做乘积,这样训练出来的特征就是深度相乘的特征,选的越准确,那么softmax其中的一个位置就更接近于1,其余接近0,这样就说明在四十一个深度中选出了最有可能的那一个深度。
    def get_depth_dist(self, x, eps=1e-20):
        return x.softmax(dim=1)

    def get_depth_feat(self, x):
        x = self.get_eff_depth(x)
        # Depth
        x = self.depthnet(x)

        depth = self.get_depth_dist(x[:, :self.D])
        new_x = depth.unsqueeze(1) * x[:, self.D:(self.D + self.C)].unsqueeze(2)

        return depth, new_x
步骤三:图像特征投影到栅格地图
1.首先将x打平:BNDfHfWx64(173184x64):其实际意义为图像像素所有可能深度的特征。
2.现将点云中的所有点平移到正数(有利于后面投影到栅格的矩阵运算),再将点云中的点的空间坐标(x,y,z)转换成栅格坐标。将点云geom_feats打平,并计算每个点对应的batch:BNDfHfW*4(最后一个维度:x,y,z,batch)。
注意!!空间坐标是以米为单位,范围是长宽都是正负50米,转换成栅格之后,单位就变成了单位1,一个格子代表0.5米。此时geom_feats中的点云坐标就是栅格坐标了。
3.剔除边界范围之外的点
4.cumsum:给每个点赋予一个ranks,ranks相等的点在同一个batch中,也在同一个栅格中,将ranks排序并返回排序的索引以至于x,geom_feats,ranks都是按照ranks排序的。接着进行挑选,在同一个格子的所有点的特征相加,放在栅格中。消除掉z维得到最终输出:x:4x64x200x200,其意义为,所有点云投影到栅格地图中每个栅格的特征。
注意!!超级重要:为什么他敢把所有的点的特征相加?
步骤四:最后用resnet18提取栅格地图特征,模型任务完成。
输出:x:4x1x200x200
    def voxel_pooling(self, geom_feats, x):
        B, N, D, H, W, C = x.shape
        Nprime = B*N*D*H*W

        # flatten x
        x = x.reshape(Nprime, C)

        # flatten indices
        geom_feats = ((geom_feats - (self.bx - self.dx/2.)) / self.dx).long()
        geom_feats = geom_feats.view(Nprime, 3)
        batch_ix = torch.cat([torch.full([Nprime//B, 1], ix,
                             device=x.device, dtype=torch.long) for ix in range(B)])
        geom_feats = torch.cat((geom_feats, batch_ix), 1)

        # filter out points that are outside box
        kept = (geom_feats[:, 0] >= 0) & (geom_feats[:, 0] < self.nx[0])\
            & (geom_feats[:, 1] >= 0) & (geom_feats[:, 1] < self.nx[1])\
            & (geom_feats[:, 2] >= 0) & (geom_feats[:, 2] < self.nx[2])
        x = x[kept]
        geom_feats = geom_feats[kept]

        # get tensors from the same voxel next to each other
        ranks = geom_feats[:, 0] * (self.nx[1] * self.nx[2] * B)\
            + geom_feats[:, 1] * (self.nx[2] * B)\
            + geom_feats[:, 2] * B\
            + geom_feats[:, 3]
        sorts = ranks.argsort()
        x, geom_feats, ranks = x[sorts], geom_feats[sorts], ranks[sorts]

        # cumsum trick
        if not self.use_quickcumsum:
            x, geom_feats = cumsum_trick(x, geom_feats, ranks)
        else:
            x, geom_feats = QuickCumsum.apply(x, geom_feats, ranks)

        # griddify (B x C x Z x X x Y)
        final = torch.zeros((B, C, self.nx[2], self.nx[0], self.nx[1]), device=x.device)
        final[geom_feats[:, 3], :, geom_feats[:, 2], geom_feats[:, 0], geom_feats[:, 1]] = x

        # collapse Z
        final = torch.cat(final.unbind(dim=2), 1)

        return final

    def get_voxels(self, x, rots, trans, intrins, post_rots, post_trans):
        geom = self.get_geometry(rots, trans, intrins, post_rots, post_trans)
        x = self.get_cam_feats(x)

        x = self.voxel_pooling(geom, x)

        return x
