人脸检测和对齐算法MTCNN
1. 概述
人脸识别在实际的生活中有着广泛的应用,得益于深度学习的发展,使得人脸识别的准确率得到大幅度提升。然而,为了做好人脸识别,第一步需要做的是对人脸检测,主要是通过对图片分析,定位出图片中的人脸。近年来,深度学习在人脸检测方面也得到了大力发展,在2016年Kaipeng Zhang, Zhanpeng Zhang等人提出了人脸检测算法MTCNN(Multi-task Cascaded Convolutional Networks)模型[1],MTCNN算法的效果也是得到了很多实际项目的验证,在工业界得到了广泛的应用,在我个人的实际项目中也得到了较多应用。在MTCNN算法中,主要有三点的创新:
- MTCNN的整体框架是一个多任务的级联框架,同步对人脸检测和人脸对齐两个项目学习;
- 在级联的框架中使用了三个卷积网络,并将这三个网络级联起来;
- 在训练的过程中使用到了在线困难样本挖掘的方法;
这三个方面的设计都是为了能够提升最终的检测和对齐的效果。
2. 算法原理
2.1. MTCNN的基本原理
MTCNN是多任务级联CNN的人脸检测深度学习模型,在MTCNN中是通过三个卷积网络的级联:
- 第一阶段的网络产出人脸的候选窗口
- 第二阶段的第一阶段产出的候选串口修正,去除掉不符合要求的候选窗口
- 第三阶段在第二阶段的基础上进一步修正,并给出最终的五个脸部的landmark
在网络的训练过程中综合考虑人脸边框回归和面部关键点检测。MTCNN的网络整体架构如下图所示:
由上图中可以看到,MTCNN主要由四个模块:
- 图像金字塔(Image Pyramid):通过对原始图像进行不同尺度的变换,得到图像金字塔,以适应不同大小的人脸的进行检测,在MTCNN中,是将图像resize成了三种大小,分别为 12 × 12 × 3 12\times 12\times 3 12×12×3, 24 × 24 × 3 24\times 24\times 3 24×24×3和 48 × 48 × 3 48\times 48\times3 48×48×3,这三种大小分别对应了以下三个阶段模型的输入
- 阶段1(Proposal Network): 对上述的图像金字塔中 12 × 12 × 3 12\times 12\times 3 12×12×3的图像提取Bounding-Box,并利用NMS过滤掉大部分的窗口
- 阶段2(Refine Network): 对上述的图像金字塔中 24 × 24 × 3 24\times 24\times 3 24×24×3的图像,根据阶段1中提取出的Bounding-Box进一步修正,去除掉不符合要求的bounding box
- 阶段3(Output Network): 对上述的图像金字塔中 48 × 48 × 3 48\times 48\times 3 48×48×3的图像,根据阶段2中提取出的Bounding-Box进行最终的分析,以得到最终的结果
2.2. 三个阶段的网络
2.2.1. 第一阶段P-Net
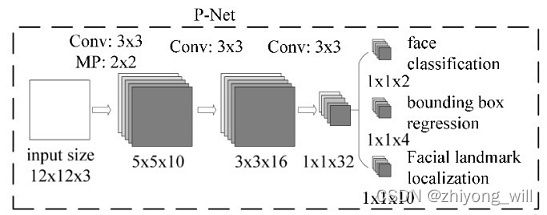
P-Net的网络结构如下图所示:
在P-Net中,包含了三个卷积+Max-Pooling操作,其中,卷积核的大小统一为 3 × 3 3\times 3 3×3,对于上述的网络结果,具体的参数分析如下:
- data:大小为 12 × 12 × 3 12\times 12\times 3 12×12×3
- 第一组卷积(包括conv,PReLU,Max-Pooling)
- conv:输入( 12 × 12 × 3 12\times 12\times 3 12×12×3),输出( 10 × 10 × 10 10\times 10\times 10 10×10×10,卷积核大小为 3 × 3 3\times 3 3×3,padding为 0 0 0,步长为 1 1 1,卷积核的个数为 10 10 10)
- PReLU:输入( 10 × 10 × 10 10\times 10\times 10 10×10×10),输出( 10 × 10 × 10 10\times 10\times 10 10×10×10)
- Max-Pooling:输入( 10 × 10 × 10 10\times 10\times 10 10×10×10),输出( 5 × 5 × 10 5\times 5\times 10 5×5×10,核的大小为 2 × 2 2\times 2 2×2,padding为 0 0 0,步长为 2 2 2)
- 第二组卷积(包括conv,PReLU)
- conv:输入( 5 × 5 × 10 5\times 5\times 10 5×5×10),输出( 3 × 3 × 16 3\times 3\times 16 3×3×16,卷积核大小为 3 × 3 3\times 3 3×3,padding为 0 0 0,步长为 1 1 1,卷积核的个数为 16 16 16)
- PReLU:输入( 3 × 3 × 16 3\times 3\times 16 3×3×16),输出( 3 × 3 × 16 3\times 3\times 16 3×3×16)
- 第三组卷积(包括conv,PReLU)
- conv:输入( 3 × 3 × 16 3\times 3\times 16 3×3×16),输出( 1 × 1 × 32 1\times 1\times 32 1×1×32,卷积核大小为 3 × 3 3\times 3 3×3,padding为 0 0 0,步长为 1 1 1,卷积核的个数为 32 32 32)
- PReLU:输入( 1 × 1 × 32 1\times 1\times 32 1×1×32),输出( 1 × 1 × 32 1\times 1\times 32 1×1×32)
最终得到 32 32 32个大小为 1 × 1 1\times 1 1×1的特征图,下面分为三个任务分别描述:
- face classification:输入( 1 × 1 × 32 1\times 1\times 32 1×1×32),输出( 1 × 1 × 2 1\times 1\times 2 1×1×2,卷积核大小为 1 × 1 1\times 1 1×1,padding为 0 0 0,步长为 1 1 1,卷积核的个数为 2 2 2)
- bounding box regression:输入( 1 × 1 × 32 1\times 1\times 32 1×1×32),输出( 1 × 1 × 4 1\times 1\times 4 1×1×4,卷积核大小为 1 × 1 1\times 1 1×1,padding为 0 0 0,步长为 1 1 1,卷积核的个数为 4 4 4)
- facial landmark localization:输入( 1 × 1 × 32 1\times 1\times 32 1×1×32),输出( 1 × 1 × 10 1\times 1\times 10 1×1×10,卷积核大小为 1 × 1 1\times 1 1×1,padding为 0 0 0,步长为 1 1 1,卷积核的个数为 10 10 10)
注:三个任务的输出都是直接在最后一层的特征图上使用卷积操作。
参考[2]的代码实现,P-Net的代码如下:
class PNet(NetWork):

    def setup(self, task='data', reuse=False):

        with tf.variable_scope('pnet', reuse=reuse):
            (
                self.feed(task) .conv( # 第一组卷积
                    3,
                    3,
                    10,
                    1,
                    1,
                    padding='VALID',
                    relu=False,
                    name='conv1') .prelu(
                    name='PReLU1') .max_pool(
                    2,
                    2,
                    2,
                    2,
                    name='pool1') .conv( # 第二组卷积
                    3,
                    3,
                    16,
                    1,
                    1,
                    padding='VALID',
                    relu=False,
                    name='conv2') .prelu(
                        name='PReLU2') .conv( # 第三组卷积
                            3,
                            3,
                            32,
                            1,
                            1,
                            task=task,
                            padding='VALID',
                            relu=False,
                            name='conv3',
                            wd=self.weight_decay_coeff) .prelu(
                                name='PReLU3'))

        if self.mode == 'train':
            if task == 'cls': # face classification
                (self.feed('PReLU3')
                     .conv(1, 1, 2, 1, 1, task=task, relu=False,
                           name='pnet/conv4-1', wd=self.weight_decay_coeff))
            elif task == 'bbx': # bounding box regression
                (self.feed('PReLU3')
                     .conv(1, 1, 4, 1, 1, task=task, relu=False,
                           name='pnet/conv4-2', wd=self.weight_decay_coeff))
            elif task == 'pts': # facial landmark localization
                (self.feed('PReLU3')
                     .conv(1, 1, 10, 1, 1, task=task, relu=False,
                           name='pnet/conv4-3', wd=self.weight_decay_coeff))
            self.out_put.append(self.get_output())
        else:
            (self.feed('PReLU3')
                 .conv(1, 1, 2, 1, 1, relu=False, name='pnet/conv4-1')
                 .softmax(name='softmax'))
            self.out_put.append(self.get_output())
            (self.feed('PReLU3')
                 .conv(1, 1, 4, 1, 1, relu=False, name='pnet/conv4-2'))
            self.out_put.append(self.get_output())
2.2.2. 第二阶段R-Net
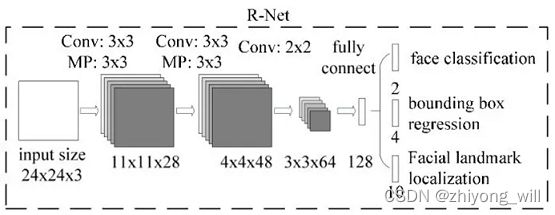
R-Net的网络结构如下图所示:
第二阶段的模型与第一阶段基本一致,只是在最后一层的特征图后接上了一个全连接层,同时在连接三个不同任务时也是使用了全连接的操作,参考[2]的代码如下:
class RNet(NetWork):

    def setup(self, task='data', reuse=False):

        with tf.variable_scope('rnet', reuse=reuse):
            (
                self.feed(task) .conv( # 第一个卷积
                    3,
                    3,
                    28,
                    1,
                    1,
                    padding='VALID',
                    relu=False,
                    name='conv1') .prelu(
                    name='prelu1') .max_pool(
                    3,
                    3,
                    2,
                    2,
                    name='pool1') .conv( # 第二个卷积
                    3,
                    3,
                    48,
                    1,
                    1,
                    padding='VALID',
                    relu=False,
                    name='conv2') .prelu(
                        name='prelu2') .max_pool(
                            3,
                            3,
                            2,
                            2,
                            padding='VALID',
                            name='pool2') .conv( # 第三个卷积
                                2,
                                2,
                                64,
                                1,
                                1,
                                padding='VALID',
                                task=task,
                                relu=False,
                                name='conv3',
                                wd=self.weight_decay_coeff) .prelu(
                                    name='prelu3') .fc( # 全连接层
                                        128,
                                        task=task,
                                        relu=False,
                                        name='conv4',
                                        wd=self.weight_decay_coeff) .prelu(
                                            name='prelu4'))

        if self.mode == 'train':
            if task == 'cls': # face classification,使用fc
                (self.feed('prelu4')
                     .fc(2, task=task, relu=False,
                         name='rnet/conv5-1', wd=self.weight_decay_coeff))
            elif task == 'bbx': # bounding box regression,使用fc
                (self.feed('prelu4')
                     .fc(4, task=task, relu=False,
                         name='rnet/conv5-2', wd=self.weight_decay_coeff))
            elif task == 'pts': # facial landmark localization,使用fc
                (self.feed('prelu4')
                     .fc(10, task=task, relu=False,
                         name='rnet/conv5-3', wd=self.weight_decay_coeff))
            self.out_put.append(self.get_output())
        else:
            (self.feed('prelu4')
                 .fc(2, relu=False, name='rnet/conv5-1')
                 .softmax(name='softmax'))
            self.out_put.append(self.get_output())
            (self.feed('prelu4')
                 .fc(4, relu=False, name='rnet/conv5-2'))
            self.out_put.append(self.get_output())
2.2.3. 第三阶段O-Net
第三阶段的网络O-Net时MTCNN网络的最后输出,ONet的模型结构如下所示:
第三阶段的模型与第二阶段基本一致,在最后一层的特征图后也是接上了一个全连接层,同时在连接三个不同任务时也是使用了全连接的操作,参考[2]的代码如下:
class ONet(NetWork):

    def setup(self, task='data', reuse=False):

        with tf.variable_scope('onet', reuse=reuse):
            (
                self.feed(task) .conv( # 第一组卷积
                    3,
                    3,
                    32,
                    1,
                    1,
                    padding='VALID',
                    relu=False,
                    name='conv1') .prelu(
                    name='prelu1') .max_pool(
                    3,
                    3,
                    2,
                    2,
                    name='pool1') .conv( # 第二组卷积
                    3,
                    3,
                    64,
                    1,
                    1,
                    padding='VALID',
                    relu=False,
                    name='conv2') .prelu(
                        name='prelu2') .max_pool(
                            3,
                            3,
                            2,
                            2,
                            padding='VALID',
                            name='pool2') .conv( # 第三组卷积
                                3,
                                3,
                                64,
                                1,
                                1,
                                padding='VALID',
                                relu=False,
                                name='conv3') .prelu(
                                    name='prelu3') .max_pool(
                                        2,
                                        2,
                                        2,
                                        2,
                                        name='pool3') .conv( # 第四组卷积
                                            2,
                                            2,
                                            128,
                                            1,
                                            1,
                                            padding='VALID',
                                            relu=False,
                                            name='conv4') .prelu(
                                                name='prelu4') .fc( # 全连接层
                                                    256,
                                                    relu=False,
                                                    name='conv5') .prelu(
                                                        name='prelu5'))

        if self.mode == 'train':
            if task == 'cls': # face classification,使用fc
                (self.feed('prelu5')
                     .fc(2, task=task, relu=False,
                         name='onet/conv6-1', wd=self.weight_decay_coeff))
            elif task == 'bbx': # bounding box regression,使用fc
                (self.feed('prelu5')
                     .fc(4, task=task, relu=False,
                         name='onet/conv6-2', wd=self.weight_decay_coeff))
            elif task == 'pts': # facial landmark localization,使用fc
                (self.feed('prelu5')
                     .fc(10, task=task, relu=False,
                         name='onet/conv6-3', wd=self.weight_decay_coeff))
            self.out_put.append(self.get_output())
        else:
            (self.feed('prelu5')
                 .fc(2, relu=False, name='onet/conv6-1')
                 .softmax(name='softmax'))
            self.out_put.append(self.get_output())
            (self.feed('prelu5')
                 .fc(4, relu=False, name='onet/conv6-2'))
            self.out_put.append(self.get_output())
            (self.feed('prelu5')
                 .fc(10, relu=False, name='onet/conv6-3'))
            self.out_put.append(self.get_output())
2.3. 训练目标
在上述的三个网络中,都包含了三个目标,分别为face classification,bounding box regression和facial landmark localization。
2.3.1. Face Classification
人脸分类的目标是用于判断网络生成的窗口部分是否是人脸,这个一个典型的分类问题,可以使用交叉熵的损失函数,具体的目标如下所示:
L i d e t = − ( y i d e t l o g ( p i ) + ( 1 − y i d e t ) ( 1 − l o g ( p i ) ) ) L_i^{det}=-\left ( y_i^{det}log\left ( p_i \right )+\left ( 1-y_i^{det} \right )\left ( 1-log\left ( p_i \right ) \right ) \right ) Lidet=−(yidetlog(pi)+(1−yidet)(1−log(pi)))
其中, p i p_i pi是模型产出的结果, y i d e t ∈ { 0 , 1 } y_i^{det}\in \left \{ 0,1 \right \} yidet∈{0,1}表示的是标注的结果。
2.3.2. Bounding Box Regression
Bounding Box的目的是为了生成人脸的目标框,在计算的过程中,需要计算当前的bounding box和标注的bounding box之间的差异,这个可以由回归问题表示,具体的目标如下所示:
L i b o x = ∥ y ^ i b o x − y i b o x ∥ 2 2 L_i^{box}=\left \| \hat{y}_i^{box}-y_i^{box} \right \|^2_2 Libox= y^ibox−yibox 22
其中, y ^ i b o x \hat{y}_i^{box} y^ibox是模型产出的结果, y i b o x ∈ R 4 y_i^{box}\in \mathbb{R}^4 yibox∈R4表示的是标注的bounding box,其中每一个bounding box是由四维数据组成,分别为:左上点坐标,长和宽。
2.3.3. Facial Landmark Localization
Facial Landmark Localization的目的是要生成人脸的landmark,与Bounding Box一样,需要比较模型产出的结果与标注结果之间的差异,也是可以通过回归问题来表示彼此之间的差异,具体的目标如下所示:
L i l a n d m a r k = ∥ y ^ i l a n d m a r k − y i l a n d m a r k ∥ 2 2 L_i^{landmark}=\left \| \hat{y}_i^{landmark}-y_i^{landmark} \right \|^2_2 Lilandmark= y^ilandmark−yilandmark 22
其中, y ^ i l a n d m a r k \hat{y}_i^{landmark} y^ilandmark是模型产出的结果, y i l a n d m a r k ∈ R 10 y_i^{landmark}\in \mathbb{R}^{10} yilandmark∈R10表示的是标注的landmark,其中每一个人脸的landmark是包括了五个点,分别为左眼,右眼,鼻子,嘴的左角,嘴的右角。
2.3.4. 多目标的融合
有了上述的三个目标函数,在训练的过程中,需要一个统一的目标的目标函数将上述的三个目标函数融合,具体可以由下面公式表示:
m i n ∑ i = 1 N ∑ j ∈ { d e t , b o x , l a n d m a r k } α j β i j L i j min\; \sum_{i=1}^{N}\sum_{j\in \left \{ det,box,landmark \right \}}\alpha _j\beta _i^jL_i^j mini=1∑Nj∈{det,box,landmark}∑αjβijLij
其中, α j \alpha _j αj和 β i j \beta _i^j βij是两个超参,但是在[1]中,给出了固定的值,其中 β i j ∈ { 0 , 1 } \beta _i^j\in \left \{ 0,1 \right \} βij∈{0,1}, α j \alpha _j αj的值为:
- P-Net和R-Net: α d e t = 1 \alpha _{det}=1 αdet=1, α b o x = 0.5 \alpha _{box}=0.5 αbox=0.5, α l a n d m a r k = 0.5 \alpha _{landmark }=0.5 αlandmark=0.5
- O-Net: α d e t = 1 \alpha _{det}=1 αdet=1, α b o x = 0.5 \alpha _{box}=0.5 αbox=0.5, α l a n d m a r k = 1 \alpha _{landmark }=1 αlandmark=1
2.4. 其他
除了上述对模型以及目标函数的分析,在MTCNN中,还有两点,一个是在模型中使用的是PReLU激活函数,另一个是在训练过程中,为了能提升模型的效果,使用到了在线困难样本挖掘(online hard sample mining)。
2.4.1. PReLU激活函数
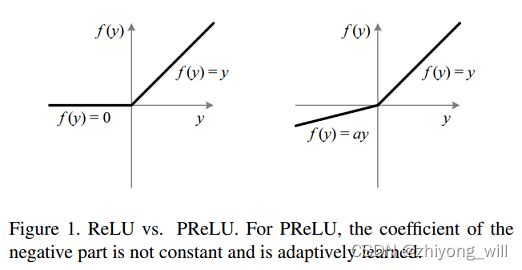
PReLU激活函数[3]与ReLU的对比如下图所示:
PReLU的具体形式为:
f ( y i ) = { y i if y i > 0 a i y i if y i ≤ 0 f\left ( y_i \right )=\begin{cases} y_i & \text{ if } y_i> 0 \\ a_iy_i & \text{ if } y_i\leq 0 \end{cases} f(yi)={yiaiyi if yi>0 if yi≤0
2.4.2. 在线困难样本挖掘
在线困难样本挖掘(Online Hard Sample Mining)旨在训练过程中找到难以训练正确的样本。在实际的过程中,在每个训练的mini-batch中,对当前的batch中的所有样本计算损失值,并排序,选择出top的70%作为hard samples,在反向计算的过程中,只计算这些样本的梯度值。在参考[2]中并未实现这部分的代码。
3. 总结
在现如今再回过头来看MTCNN这个模型,无论是模型还是思路上都已经比较落后,但在当时的条件下,确实由于其较好的表现,在业界得到了很多的应用。回顾MTCNN算法,整体的框架是一个多任务的级联框架,同步对人脸检测和人脸对齐两个项目学习,并且在级联的框架中使用了三个卷积网络,并将这三个网络级联起来,一步一步对结果精修,使得能够得到最终理想的效果,同时,在训练的过程中使用到了在线困难样本挖掘的方法,进一步帮助整个过程的训练。从现在再回过头来看MTCNN,存在着以下的几个问题:
- 三个网络模型(P-Net,R-Net和O-Net)是分开单独训练的,没有做到端到端
- 模型结构较为简单,卷积网络在后续得到了更多的发展
补充:在三个网络模型中,至于网络模型结构的设计,没有get到其设计的原理。
参考文献
[1] Zhang K, Zhang Z, Li Z, et al. Joint face detection and alignment using multitask cascaded convolutional networks[J]. IEEE signal processing letters, 2016, 23(10): 1499-1503.
[2] https://github.com/zhaozhiyong19890102/MTCNN-Tensorflow
[3] He K, Zhang X, Ren S, et al. Delving deep into rectifiers: Surpassing human-level performance on imagenet classification[C]//Proceedings of the IEEE international conference on computer vision. 2015: 1026-1034.


