MTCNN人脸检测论文+代码实现(python)(全)
MTCNN论文详解&代码测试
-
- 军军出品,最为精品
- 1.MTCNN的简要概括
- 2.Joint Face Detection and Alignment using
- 3.摘要:
- 4.介绍:
- 5.训练步骤
- 6.5相关步骤的代码实现(仅部分)
- 7.走近网络
-
- P-NET
- R-NET
- O-NET
- 7.1相关网络代码实现:
-
- NMS
- P-NET
- R-NET
- O-NET
- 扩展网络
- 8.MTCNN的细节(理论观点)
-
- 代价函数的解析
- 训练调用
-
- 训练代码
- 结果:
- 结尾:
论文地址:https://kpzhang93.github.io/MTCNN_face_detection_alignment/paper/spl.pdf
代码私信自取吧,调试改好了找不到链接了。
军军出品,最为精品
这是我根据代码的底层总结的,结合论文翻译一点一点理解,代码和模型文件我这都有,有需要直接私聊即可,稍后可能会放上github完整的文件,关于mtcnn之类,我也会进一步深刻理解的,如果有更好的我会时刻跟进博文,如果有什么指导直接私聊就好,感谢
1.MTCNN的简要概括
人脸检测和人脸对齐是人脸应用(人脸识别,人脸表情分析)的基础
现在人脸识别检测的问题:
1,传统人脸识别的应用性能十分差
2,需要大量的人脸打标标签去做
3,深度学习的方法会有很多的数据问题和计算参数的设备
4,人脸对齐方面在经过一些实时检测的前提下性能太差
2.Joint Face Detection and Alignment using
联合人脸检测和对齐使用,多任务级联卷积网络
参与人员:Kaipeng Zhang, Zhanpeng Zhang, Zhifeng Li, Senior Member, IEEE, and Yu Qiao, Senior Member, IEEE
3.摘要:
无约束环境下的人脸检测与对齐是由于各种姿势,照明和
遮挡。最近的研究表明,深度学习方法可以在这两项任务上取得令人印象深刻的表现。在这个本文提出了一种深度级联多任务框架利用检测和对齐之间的内在相关性来提高他们的表现。特别是我们的框架利用级联架构的三个阶段仔细设计深度卷积网络来预测人脸和地标从粗到细的位置。此外,我们建议一种新的在线硬样本挖掘策略进一步改进练习表演。我们的方法达到了极高的准确度挑战的最先进技术用于人脸检测的FDDB和WIDER FACE基准测试AFLW人脸校准基准,同时保持实时性能
(关于FDDB和WIDERFACE的数据集可以私信我)
人脸检测,人脸对齐,级联卷积,神经网络
4.介绍:
现在对人脸识别所带来的许多因素都有着至关重要的条件,如人脸识别和面部表情分析。然而,面部的视觉变化很大,比如遮挡,大的姿势变化和极端的光照,强加这些任务在实际应用中面临巨大挑战
对于以前的级联器相对来说效果已经算差精度不高,面部对齐引起了广泛的研究兴趣。这一领域的研究大致可分为两类,基于回归的方法和模板拟合方法,作者等人提出
将人脸属性识别作为辅助任务利用深度卷积增强人脸对齐性能神经网络,然而,以往大多数的人脸检测和人脸对齐
方法忽略了这两者之间的内在相关性任务。虽然现有的一些作品试图共同解决这些作品仍然有局限性。另一方面,在训练中挖掘硬样本是至关重要的增强探测器的能力。然而,传统的硬样本挖掘通常以脱机方式执行显著增加了手动操作。这是可取的设计了一种在线硬样本挖掘人脸检测方法,自动适应当前的训练状态
5.训练步骤
在本文中,我们提出了一个新的框架来集成这些通过多任务学习,使用统一的级联cnn实现两个任务。拟议的cnn包括三个阶段。在第一阶段,它通过一个浅的CNN快速生成候选窗口。然后,它通过拒绝大量的通过一个更复杂的CNN窗口。最后,它使用更强大的CNN再次提炼结果和输出五个面部标志位置多亏了这种多重任务学习框架,算法的性能可以图1所示。我们的级联框架的管道,包括三个阶段的多任务深卷积网络。首先,生成候选窗口通过一个快速提案网(P-Net)。在那之后,我们对这些候选人进行优化下一阶段通过细化网络(R-Net)。在第三阶段,输出网络(O-Net)产生最终的边界框和面部地标位置
![]()
本文的主要贡献归纳如下
(1)提出了一种新的基于级联的cnn框架对联合人脸进行检测和对准,并精心设计轻量级CNN架构的实时性能
(2)提出了一种有效的在线实施方法提高样本挖掘的性能。
(3)广泛的实验是在具有挑战性的基准上进行的吗提出的方法的显著性能改进与最先进的人脸检测技术相比和面部对齐任务
6.5相关步骤的代码实现(仅部分)
def adjust_input(in_data):#调整输入
    """
        adjust the input from (h, w, c) to ( 1, c, h, w) for network input

    Parameters:
    ----------
        in_data: numpy array of shape (h, w, c)
            input data
    Returns:
    -------
        out_data: numpy array of shape (1, c, h, w)
            reshaped array
    """
    if in_data.dtype is not np.dtype('float32'):
        out_data = in_data.astype(np.float32)
    else:
        out_data = in_data

    out_data = out_data.transpose((2,0,1))
    out_data = np.expand_dims(out_data, 0)
    out_data = (out_data - 127.5)*0.0078125
    return out_data

def generate_bbox(map, reg, scale, threshold):#生成bbox
     """
         generate bbox from feature map
     Parameters:
     ----------
         map: numpy array , n x m x 1
             detect score for each position
         reg: numpy array , n x m x 4
             bbox
         scale: float number
             scale of this detection
         threshold: float number
             detect threshold
     Returns:
     -------
         bbox array
     """
     stride = 2
     cellsize = 12

     t_index = np.where(map>threshold)

     # find nothing
     if t_index[0].size == 0:
         return np.array([])

     dx1, dy1, dx2, dy2 = [reg[0, i, t_index[0], t_index[1]] for i in range(4)]

     reg = np.array([dx1, dy1, dx2, dy2])
     score = map[t_index[0], t_index[1]]
     boundingbox = np.vstack([np.round((stride*t_index[1]+1)/scale),
                              np.round((stride*t_index[0]+1)/scale),
                              np.round((stride*t_index[1]+1+cellsize)/scale),
                              np.round((stride*t_index[0]+1+cellsize)/scale),
                              score,
                              reg])

     return boundingbox.T


def detect_first_stage(img, net, scale, threshold):#检测第一阶段
    """
        run PNet for first stage

    Parameters:
    ----------
        img: numpy array, bgr order
            input image
        scale: float number
            how much should the input image scale
        net: PNet
            worker
    Returns:
    -------
        total_boxes : bboxes
    """
    height, width, _ = img.shape
    hs = int(math.ceil(height * scale))
    ws = int(math.ceil(width * scale))

    im_data = cv2.resize(img, (ws,hs))

    # adjust for the network input
    input_buf = adjust_input(im_data)
    output = net.predict(input_buf)
    boxes = generate_bbox(output[1][0,1,:,:], output[0], scale, threshold)

    if boxes.size == 0:
        return None

    # nms
    pick = nms(boxes[:,0:5], 0.5, mode='Union')
    boxes = boxes[pick]
    return boxes

def detect_first_stage_warpper( args ):
    return detect_first_stage(*args)
7.走近网络
P-NET
我们方法的整体流程如图1所示。给定一个图像,我们首先调整它的大小到不同的比例来构建
一个图像金字塔,它是下面的输入三级级联框架:第一阶段,我们利用一个完全卷积的网络,叫做提案网络(P-Net),获取候选人脸窗口以及它们的边界盒回归向量。然后候选人是基于估计的边界盒回归进行校准的吗向量。之后,我们采用非最大抑制(NMS)合并高度重叠的候选人
![]()
R-NET
第二阶段:所有候选人都被送到CNN另一个叫Refine的网站网络(R-Net),这进一步拒绝了大量的假候选,使用边界盒回归进行校准,并进行NMS
![]()
O-NET
第三阶段:这一阶段与第二阶段相似,但在此阶段,我们的目标是识别更多的监督人脸区域。在
特别是,该网络将输出五个面部地标的位置。
![]()
设计了多个cnn用于人脸检测。然而,我们注意到它的性能可能受到以下事实:(1)卷积层中的一些滤波器缺乏多样性可能会限制他们的辨别能力。(2)相比对其他多类目标进行检测和分类人脸检测是一项具有挑战性的二值分类任务,所以每一层可能需要更少的过滤器。为此,我们减少过滤器的数量,将5×5过滤器改为3×3滤波以减少计算量,同时增加深度得到更好的性能。与这些改进相比在以前的架构中,我们可以得到更好的性能使用较少的运行时间(训练阶段的结果显示在表一,为了公平比较,我们使用相同的训练和每组验证数据)。我们的CNN架构是如图2所示。我们采用PReLU作为非线性激活功能后的卷积和完全连接层(输出层除外)。
7.1相关网络代码实现:
NMS
def nms(boxes, overlap_threshold, mode='Union'):
    """
        non max suppression(非极大抑制)

    Parameters:(参数设置)
    ----------
        box: numpy array n x 5
            input bbox array
        overlap_threshold: float number(重叠的阈值)
            threshold of overlap
        mode: float number
            how to compute overlap ratio, 'Union' or 'Min'如何计算重叠率、并集或最小值
    Returns:
    -------
        index array of the selected bbox
    """
    # if there are no boxes, return an empty list
    if len(boxes) == 0:
        return []

    # if the bounding boxes integers, convert them to floats
    if boxes.dtype.kind == "i":
        boxes = boxes.astype("float")

    # initialize the list of picked indexes
    pick = []

    # grab the coordinates of the bounding boxes
    x1, y1, x2, y2, score = [boxes[:, i] for i in range(5)]

    area = (x2 - x1 + 1) * (y2 - y1 + 1)
    idxs = np.argsort(score)

    # keep looping while some indexes still remain in the indexes list
    while len(idxs) > 0:
        # grab the last index in the indexes list and add the index value to the list of picked indexes
        last = len(idxs) - 1
        i = idxs[last]
        pick.append(i)

        xx1 = np.maximum(x1[i], x1[idxs[:last]])
        yy1 = np.maximum(y1[i], y1[idxs[:last]])
        xx2 = np.minimum(x2[i], x2[idxs[:last]])
        yy2 = np.minimum(y2[i], y2[idxs[:last]])

        # compute the width and height of the bounding box
        w = np.maximum(0, xx2 - xx1 + 1)
        h = np.maximum(0, yy2 - yy1 + 1)

        inter = w * h
        if mode == 'Min':
            overlap = inter / np.minimum(area[i], area[idxs[:last]])
        else:
            overlap = inter / (area[i] + area[idxs[:last]] - inter)

        # delete all indexes from the index list that have
        idxs = np.delete(idxs, np.concatenate(([last],
                                               np.where(overlap > overlap_threshold)[0])))

    return pick
P-NET
#############################################
        # first stage
        #############################################
        #for scale in scales:
        #    return_boxes = self.detect_first_stage(img, scale, 0)
        #    if return_boxes is not None:
        #        total_boxes.append(return_boxes)

        sliced_index = self.slice_index(len(scales))
        total_boxes = []
        for batch in sliced_index:
            local_boxes = self.Pool.map( detect_first_stage_warpper, \
                    zip(repeat(img), self.PNets[:len(batch)], [scales[i] for i in batch], repeat(self.threshold[0])) )
            total_boxes.extend(local_boxes)

        # remove the Nones
        total_boxes = [ i for i in total_boxes if i is not None]

        if len(total_boxes) == 0:
            return None

        total_boxes = np.vstack(total_boxes)

        if total_boxes.size == 0:
            return None

        # merge the detection from first stage
        pick = nms(total_boxes[:, 0:5], 0.7, 'Union')
        total_boxes = total_boxes[pick]

        bbw = total_boxes[:, 2] - total_boxes[:, 0] + 1
        bbh = total_boxes[:, 3] - total_boxes[:, 1] + 1

        # refine the bboxes
        total_boxes = np.vstack([total_boxes[:, 0]+total_boxes[:, 5] * bbw,
                                 total_boxes[:, 1]+total_boxes[:, 6] * bbh,
                                 total_boxes[:, 2]+total_boxes[:, 7] * bbw,
                                 total_boxes[:, 3]+total_boxes[:, 8] * bbh,
                                 total_boxes[:, 4]
                                 ])

        total_boxes = total_boxes.T
        total_boxes = self.convert_to_square(total_boxes)
        total_boxes[:, 0:4] = np.round(total_boxes[:, 0:4])
R-NET
 #############################################
        # second stage
        #############################################
        num_box = total_boxes.shape[0]

        # pad the bbox
        [dy, edy, dx, edx, y, ey, x, ex, tmpw, tmph] = self.pad(total_boxes, width, height)
        # (3, 24, 24) is the input shape for RNet
        input_buf = np.zeros((num_box, 3, 24, 24), dtype=np.float32)

        for i in range(num_box):
            tmp = np.zeros((tmph[i], tmpw[i], 3), dtype=np.uint8)
            tmp[dy[i]:edy[i]+1, dx[i]:edx[i]+1, :] = img[y[i]:ey[i]+1, x[i]:ex[i]+1, :]
            input_buf[i, :, :, :] = adjust_input(cv2.resize(tmp, (24, 24)))

        output = self.RNet.predict(input_buf)

        # filter the total_boxes with threshold
        passed = np.where(output[1][:, 1] > self.threshold[1])
        total_boxes = total_boxes[passed]

        if total_boxes.size == 0:
            return None

        total_boxes[:, 4] = output[1][passed, 1].reshape((-1,))
        reg = output[0][passed]

        # nms
        pick = nms(total_boxes, 0.7, 'Union')
        total_boxes = total_boxes[pick]
        total_boxes = self.calibrate_box(total_boxes, reg[pick])
        total_boxes = self.convert_to_square(total_boxes)
        total_boxes[:, 0:4] = np.round(total_boxes[:, 0:4])
O-NET
#############################################
        # third stage
        #############################################
        num_box = total_boxes.shape[0]

        # pad the bbox
        [dy, edy, dx, edx, y, ey, x, ex, tmpw, tmph] = self.pad(total_boxes, width, height)
        # (3, 48, 48) is the input shape for ONet
        input_buf = np.zeros((num_box, 3, 48, 48), dtype=np.float32)

        for i in range(num_box):
            tmp = np.zeros((tmph[i], tmpw[i], 3), dtype=np.float32)
            tmp[dy[i]:edy[i]+1, dx[i]:edx[i]+1, :] = img[y[i]:ey[i]+1, x[i]:ex[i]+1, :]
            input_buf[i, :, :, :] = adjust_input(cv2.resize(tmp, (48, 48)))

        output = self.ONet.predict(input_buf)

        # filter the total_boxes with threshold
        passed = np.where(output[2][:, 1] > self.threshold[2])
        total_boxes = total_boxes[passed]

        if total_boxes.size == 0:
            return None

        total_boxes[:, 4] = output[2][passed, 1].reshape((-1,))
        reg = output[1][passed]
        points = output[0][passed]

        # compute landmark points
        bbw = total_boxes[:, 2] - total_boxes[:, 0] + 1
        bbh = total_boxes[:, 3] - total_boxes[:, 1] + 1
        points[:, 0:5] = np.expand_dims(total_boxes[:, 0], 1) + np.expand_dims(bbw, 1) * points[:, 0:5]
        points[:, 5:10] = np.expand_dims(total_boxes[:, 1], 1) + np.expand_dims(bbh, 1) * points[:, 5:10]

        # nms
        total_boxes = self.calibrate_box(total_boxes, reg)
        pick = nms(total_boxes, 0.7, 'Min')
        total_boxes = total_boxes[pick]
        points = points[pick]

        if not self.accurate_landmark:
            return total_boxes, points
扩展网络
#############################################
        # extended stage
        #############################################
        num_box = total_boxes.shape[0]
        patchw = np.maximum(total_boxes[:, 2]-total_boxes[:, 0]+1, total_boxes[:, 3]-total_boxes[:, 1]+1)
        patchw = np.round(patchw*0.25)

        # make it even
        patchw[np.where(np.mod(patchw,2) == 1)] += 1

        input_buf = np.zeros((num_box, 15, 24, 24), dtype=np.float32)
        for i in range(5):
            x, y = points[:, i], points[:, i+5]
            x, y = np.round(x-0.5*patchw), np.round(y-0.5*patchw)
            [dy, edy, dx, edx, y, ey, x, ex, tmpw, tmph] = self.pad(np.vstack([x, y, x+patchw-1, y+patchw-1]).T,
                                                                    width,
                                                                    height)
            for j in range(num_box):
                tmpim = np.zeros((tmpw[j], tmpw[j], 3), dtype=np.float32)
                tmpim[dy[j]:edy[j]+1, dx[j]:edx[j]+1, :] = img[y[j]:ey[j]+1, x[j]:ex[j]+1, :]
                input_buf[j, i*3:i*3+3, :, :] = adjust_input(cv2.resize(tmpim, (24, 24)))

        output = self.LNet.predict(input_buf)

        pointx = np.zeros((num_box, 5))
        pointy = np.zeros((num_box, 5))

        for k in range(5):
            # do not make a large movement
            tmp_index = np.where(np.abs(output[k]-0.5) > 0.35)
            output[k][tmp_index[0]] = 0.5

            pointx[:, k] = np.round(points[:, k] - 0.5*patchw) + output[k][:, 0]*patchw
            pointy[:, k] = np.round(points[:, k+5] - 0.5*patchw) + output[k][:, 1]*patchw

        points = np.hstack([pointx, pointy])
        points = points.astype(np.int32)

        return total_boxes, points
8.MTCNN的细节(理论观点)
我们利用三个任务来训练我们的CNN探测器:人脸/非人脸分类,边界盒回归,以及
面部具有里程碑意义的本地化。
代价函数的解析
1,人脸分类:学习目标表示为两类分类问题。对于每个示例使用交叉损失,在哪里产生的网络概率,将概率值进行分类,最后表示ground-truth标签。
![]()
2,边界盒回归:对于每个候选窗口,我们预测它与最接近的地面真实值(即:边界框的左边、顶部、高度和宽度)。学习目的被表述为一个回归问题,我们使用每个样本的欧几里得损失,为从网络中得到这些目标的损失,从预测出预测边框与真实边框的坐标值。
![]()
3,面部地标定位:类似于边界框在回归任务中,人脸地标检测被表述为回归问题,最小化欧几里得损失。对于第i个样本。有五个面部标志,包括左眼,右眼,鼻子,左嘴角,右嘴角角落里,因此这个标签属于这个预测值中
![]()
4,多源培训:由于我们采用不同的任务每个CNN,都有不同类型的训练图像学习过程,如人脸、非人脸、部分对齐等脸在这种情况下,一些损失函数(即Eq. (1)-(3))不习惯。例如背景区域的样本,我们只计算有目标,另外两项损失设为0。这可以通过示例类型指示器直接实现。
采用随机梯度下降来实现多样cnn的训练。
![]()
训练调用
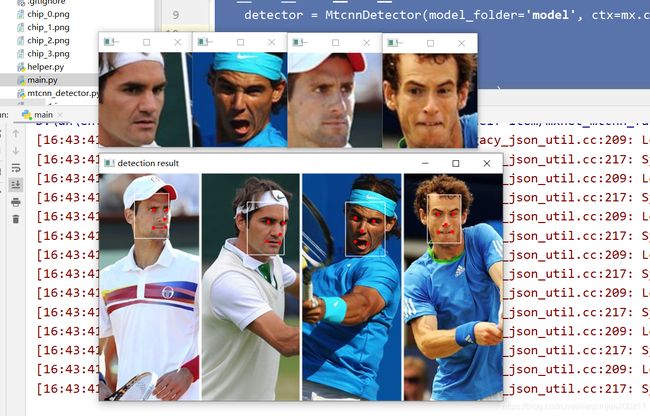
到这里论文的理论部分也差不多总结完了,接下来的一些训练结果评估可以直接在论文链接中查看,有很多可视化的结果展示,接下来展示下训练代码和训练结果
训练代码
# coding: utf-8
import mxnet as mx
from mtcnn_detector import MtcnnDetector
import cv2
import os
import time

if __name__ == '__main__':
    detector = MtcnnDetector(model_folder='model', ctx=mx.cpu(0), num_worker=4, accurate_landmark=False)

    img = cv2.imread('test2.jpg')
    # run detector
    results = detector.detect_face(img)

    if results is not None:

        total_boxes = results[0]
        points = results[1]

        # extract aligned face chips
        chips = detector.extract_image_chips(img, points, 144, 0.37)
        for i, chip in enumerate(chips):
            cv2.imshow('chip_'+str(i), chip)
            cv2.imwrite('chip_'+str(i)+'.png', chip)

        draw = img.copy()
        for b in total_boxes:
            cv2.rectangle(draw, (int(b[0]), int(b[1])), (int(b[2]), int(b[3])), (255, 255, 255))

        for p in points:
            for i in range(5):
                cv2.circle(draw, (int(p[i]), int(p[i + 5])), 1, (0, 0, 255), 2)

        cv2.imshow("detection result", draw)
        cv2.waitKey(0)

# --------------
# test on camera
# --------------

    # camera = cv2.VideoCapture(0)
    # while True:
    #     grab, frame = camera.read()
    #     img = cv2.resize(frame, (320,180))
    #
    #     t1 = time.time()
    #     results = detector.detect_face(img)
    #     print('time: ',time.time() - t1)
    #
    #     if results is None:
    #         continue
    #
    #     total_boxes = results[0]
    #     points = results[1]
    #
    #     draw = img.copy()
    #     for b in total_boxes:
    #         cv2.rectangle(draw, (int(b[0]), int(b[1])), (int(b[2]), int(b[3])), (255, 255, 255))
    #
    #     for p in points:
    #         for i in range(5):
    #             cv2.circle(draw, (int(p[i]), int(p[i + 5])), 1, (255, 0, 0), 2)
    #     cv2.imshow("detection result", draw)
    #     cv2.waitKey(30)
结果:
结尾:
准确率很高,摄像头测试在没有任何干扰项正常环境下,可以进行多人脸的检测,写一遍对自己印象也更加的深刻,有什么不对或者改进的地方,欢迎交流感谢支持。

