03_项目-基于Docker Swarm的高可用Web集群
文章目录
- 项目名称:基于Docker Swarm的高可用Web集群
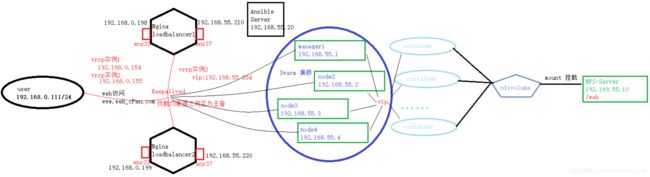
- 网络拓扑图
- 数据流程图
- 项目环境:Docker 20.10.3,CentOS 8.2(8台 1核1G),Ansible 2.9.17,Keepalived,Nginx 1.19.7,NFS
- 项目描述:
-
- 实现一个高可用的负载均衡Web服务器集群,融入Ansible实现自动化运维,后端采用Swarm管理的Docker集群来提供Web服务,大量使用容器来完成Web服务的扩展性、高可用性。
- 项目步骤:
-
- 1.规划设计整个集群的架构、网络拓扑,安装好8台CentOS 8.2的系统,部署好Ansible服务器,在所有的机器之间配置ssh免密通道;
- 2.负载均衡器部署好Keepalived,为内网提供网关,实现内网访问外网的功能;
- 3.编写好制作Nginx容器 镜像的脚本(编译安装Nginx),指定参数(如:安装路径等),里面可以使用netstat,vim,ping,ip等命令;
- 4.编写好部署Docker,Docker镜像,Nginx,Keepalived,NFS的脚本,编写Ansible的Playbook实现批量部署;
- 5.前端使用Nginx做负载均衡、Keepalived的双vip实现高可用,后端使用Swarm来实现负载均衡和高可用;
- 6.使用NFS服务为所有的Docker节点提供相同的Web数据,实现数据一致性;
- 7.后端采用Swarm来管理整个Docker集群,在Swarm manager节点上创建40个Nginx容器的副本,并使用Volume(挂载目录到NFS服务器下)来提供Web服务,达到所有容器都使用相同的数据;
- 8.访问测试、整理文档。
- 项目心得:
-
- 1.提前规划好整个集群的架构,可以提高项目开展时效率;
- 2.对本地hosts文件进行DNS集群域名解析记录,效果并不明显,考虑在前面加一个负载均衡器,实现论询效果;
- 3.通过整个项目更加深刻的理解了Docker的相关技术,使用Docker的集群解决方案比传统的集群解决方案更加快捷方便,Docker内部的高可用和负载均衡也非常不错;
- 4.通过实验锻炼了自己细心和trouble shooting的能力。
个人博客
https://blog.csdn.net/cPen_web
项目名称:基于Docker Swarm的高可用Web集群
网络拓扑图

数据流程图
项目环境:Docker 20.10.3,CentOS 8.2(8台 1核1G),Ansible 2.9.17,Keepalived,Nginx 1.19.7,NFS
项目描述:
实现一个高可用的负载均衡Web服务器集群,融入Ansible实现自动化运维,后端采用Swarm管理的Docker集群来提供Web服务,大量使用容器来完成Web服务的扩展性、高可用性。
项目步骤:
1.规划设计整个集群的架构、网络拓扑,安装好8台CentOS 8.2的系统,部署好Ansible服务器,在所有的机器之间配置ssh免密通道;
[root@ansible ~]# ssh-keygen -t ecdsa			# 生成密钥对
[root@ansible ~]# ssh-copy-id -i ~/.ssh/id_ecdsa.pub 192.168.55.210		# loadbalancer-1
[root@ansible ~]# ssh-copy-id -i ~/.ssh/id_ecdsa.pub 192.168.55.220		# loadbalancer-2
[root@ansible ~]# ssh-copy-id -i ~/.ssh/id_ecdsa.pub 192.168.55.10		# NFS-Server
[root@ansible ~]# ssh-copy-id -i ~/.ssh/id_ecdsa.pub 192.168.55.1		# Swarm manager1
[root@ansible ~]# ssh-copy-id -i ~/.ssh/id_ecdsa.pub 192.168.55.2		# Swarm node2
[root@ansible ~]# ssh-copy-id -i ~/.ssh/id_ecdsa.pub 192.168.55.3		# Swarm node3
[root@ansible ~]# ssh-copy-id -i ~/.ssh/id_ecdsa.pub 192.168.55.4		# Swarm node4
目的:让内网能够ping通外网
[root@loadbalancer-1 ~]# vim iptables_snat.sh
#!/bin/bash

service firewalld stop
systemctl disable firewalld

echo 1 >/proc/sys/net/ipv4/ip_forward
iptables -F
iptables -F -t nat

iptables -t nat -A POSTROUTING -s 192.168.55.0/24 -o ens33 -j SNAT --to-source 192.168.0.198
#iptables -t nat -A POSTROUTING -s 192.168.55.0/24 -o ens33 -j MASQUERADE

[root@loadbalancer-1 ~]# bash iptables_snat.sh
[root@loadbalancer-2 ~]# vim iptables_snat.sh
#!/bin/bash

service firewalld stop
systemctl disable firewalld

echo 1 >/proc/sys/net/ipv4/ip_forward
iptables -F
iptables -F -t nat

iptables -t nat -A POSTROUTING -s 192.168.55.0/24 -o ens33 -j SNAT --to-source 192.168.0.199
#iptables -t nat -A POSTROUTING -s 192.168.55.0/24 -o ens33 -j MASQUERADE

[root@loadbalancer-2 ~]# bash iptables_snat.sh
2.负载均衡器部署好Keepalived,为内网提供网关,实现内网访问外网的功能;
目的:让内网能够ping通外网
[root@loadbalancer-1 ~]# yum install keepalived -y
[root@loadbalancer-1 ~]# vim /etc/keepalived/keepalived.conf
[root@loadbalancer-1 ~]# cat /etc/keepalived/keepalived.conf
! Configuration File for keepalived

global_defs {
   notification_email {
     [email protected]
     [email protected]
     [email protected]
   }
   notification_email_from [email protected]
   smtp_server 192.168.200.1
   smtp_connect_timeout 30
   router_id LVS_DEVEL
   vrrp_skip_check_adv_addr
   #vrrp_strict
   vrrp_garp_interval 0
   vrrp_gna_interval 0
}

vrrp_instance VI_3 {
    state MASTER
    interface ens33
    virtual_router_id 201
    priority 110
    advert_int 1
    authentication {
        auth_type PASS
        auth_pass 123456
    }
    virtual_ipaddress {
        192.168.55.254
    }
}
[root@loadbalancer-1 ~]# service keepalived restart
[root@loadbalancer-2 ~]# yum install keepalived -y
[root@loadbalancer-2 ~]# vim /etc/keepalived/keepalived.conf
[root@loadbalancer-2 ~]# cat /etc/keepalived/keepalived.conf
! Configuration File for keepalived

global_defs {
   notification_email {
     [email protected]
     [email protected]
     [email protected]
   }
   notification_email_from [email protected]
   smtp_server 192.168.200.1
   smtp_connect_timeout 30
   router_id LVS_DEVEL
   vrrp_skip_check_adv_addr
   #vrrp_strict
   vrrp_garp_interval 0
   vrrp_gna_interval 0
}

vrrp_instance VI_3 {
    state BACKUP
    interface ens33
    virtual_router_id 201
    priority 100
    advert_int 1
    authentication {
        auth_type PASS
        auth_pass 123456
    }
    virtual_ipaddress {
        192.168.55.254
    }
}
[root@loadbalancer-2 ~]# service keepalived restart
3.编写好制作Nginx容器 镜像的脚本(编译安装Nginx),指定参数(如:安装路径等),里面可以使用netstat,vim,ping,ip等命令;
[root@ansible ~]# cat onekey_build_nginx_images.sh
#!/bin/bash

curl -O http://nginx.org/download/nginx-1.19.7.tar.gz

# 编译安装脚本
cat >onekey_install_nginx.sh <<EOF
#!/bin/bash

#解决软件的依赖关系,需要安装的软件包
yum -y install zlib zlib-devel openssl openssl-devel pcre pcre-devel gcc gcc-c++ autoconf automake make
#download nginx
mkdir -p /nginx
cd /nginx
#解压 下载的nginx的源码包
tar xf nginx-1.19.7.tar.gz
cd nginx-1.19.7
#生成编译前配置工作 --> Makefile
./configure --prefix=/usr/local/nginx --with-threads --with-http_ssl_module --with-http_realip_module  --with-http_v2_module --with-file-aio  --with-http_stub_status_module --with-stream
#编译
make
#编译安装 --> 将编译好的二进制程序安装到指定目录 /usr/local/nginx1
make install
EOF

# 编写Dockerfile
cat >Dockerfile <<EOF
FROM centos:latest
ENV NGINX_VERSION   1.19.7
ENV OS_VERSION   1.0
LABEL maintainer="chenpeng <[email protected]>"

WORKDIR /nginx
COPY . .
RUN bash onekey_install_nginx.sh; \
    yum install net-tools iproute iputils vim -y
EXPOSE 80

STOPSIGNAL SIGQUIT
ENV PATH /usr/local/nginx/sbin:$PATH
CMD ["nginx", "-g", "daemon off;"]
EOF

# 制作镜像
docker build -t centos-nginx:1.0 .
4.编写好部署Docker,Docker镜像,Nginx,Keepalived,NFS的脚本,编写Ansible的Playbook实现批量部署;
[root@ansible ~]# yum install epel-release -y
[root@ansible ~]# yum install ansible -y
[root@ansible ~]# cat /etc/ansible/hosts
[docker-swarm]
192.168.55.1
192.168.55.2
192.168.55.3
192.168.55.4

[loadbalancer]
192.168.55.210
192.168.55.220

[nfs]
192.168.55.10
192.168.55.1
192.168.55.2
192.168.55.3
192.168.55.4
[root@ansible ~]# cat ansible_playbook.yaml
- hosts: docker-swarm
  remote_user: root
  tasks:
  - name: deploy docker
    script: ~/install_docker.sh
  - name: build docker-images
    script: ~/onekey_build_nginx_images.sh

- hosts: loadbalancer
  remote_user: root
  tasks:
  - name: deploy keepalived
    script: ~/install_keepalived.sh
  - name: deploy nginx
    script: ~/onekey_install_nginx.sh

- hosts: nfs
  remote_user: root
  tasks:
  - name: install nfs-utils
    script: ~/install_nfs.sh

[root@ansible ~]# ansible-playbook ansible_playbook.yaml
使用ansible实现批量部署 效果图


部署Docker的脚本
[root@ansible ~]# cat install_docker.sh
#!/bin/bash

yum install yum-utils -y
yum-config-manager --add-repo http://mirrors.aliyun.com/docker-ce/linux/centos/docker-ce.repo
systemctl start docker
systemctl enable docker

setenforce 0
sed -i '/^SELINUX=/ s/enforcing/disabled/' /etc/sysconfig/selinux
部署Nginx的脚本
[root@ansible ~]# cat onekey_install_nginx.sh
#!/bin/bash

#解决软件的依赖关系,需要安装的软件包
yum -y install zlib zlib-devel openssl openssl-devel pcre pcre-devel gcc gcc-c++ autoconf automake make
#useradd cPen
id cPen || useradd -s /sbin/nologin cPen
#download nginx
mkdir -p /nginx
cd /nginx
curl -O http://nginx.org/download/nginx-1.19.7.tar.gz
#解压 下载的nginx的源码包
tar xf nginx-1.19.7.tar.gz
cd nginx-1.19.7
#生成编译前配置工作 --> Makefile
./configure --prefix=/usr/local/nginx  --user=cPen  --group=cPen --with-threads --with-http_ssl_module  --with-http_realip_module  --with-http_v2_module --with-file-aio  --with-http_stub_status_module --with-stream
#编译
make -j 2
#编译安装 --> 将编译好的二进制程序安装到指定目录 /usr/local/nginx1
make install

#修改PATH变量
echo "PATH=$PATH:/usr/local/nginx/sbin" >>/root/.bashrc
#执行修改了环境变量的脚本
source /root/.bashrc

#启动nginx
/usr/local/nginx/sbin/nginx

#firewalld and selinux

#stop firewalld和设置下次开机不启动firewalld
service firewalld stop
systemctl disable firewalld

#临时停止selinux和永久停止selinux
setenforce 0
sed -i '/^SELINUX=/ s/enforcing/disabled/' /etc/sysconfig/selinux

#开机自启
echo "/usr/local/nginx/sbin/nginx" >>/etc/rc.local
chmod +x /etc/rc.d/rc.local
制作Docker镜像的脚本
[root@ansible ~]# cat onekey_build_nginx_images.sh
#!/bin/bash

curl -O http://nginx.org/download/nginx-1.19.7.tar.gz

# 编译安装脚本
cat >onekey_install_nginx.sh <<EOF
#!/bin/bash

#解决软件的依赖关系,需要安装的软件包
yum -y install zlib zlib-devel openssl openssl-devel pcre pcre-devel gcc gcc-c++ autoconf automake make
#download nginx
mkdir -p /nginx
cd /nginx
#解压 下载的nginx的源码包
tar xf nginx-1.19.7.tar.gz
cd nginx-1.19.7
#生成编译前配置工作 --> Makefile
./configure --prefix=/usr/local/nginx --with-threads --with-http_ssl_module --with-http_realip_module  --with-http_v2_module --with-file-aio  --with-http_stub_status_module --with-stream
#编译
make
#编译安装 --> 将编译好的二进制程序安装到指定目录 /usr/local/nginx1
make install
EOF

# 编写Dockerfile
cat >Dockerfile <<EOF
FROM centos:latest
ENV NGINX_VERSION   1.19.7
ENV OS_VERSION   1.0
LABEL maintainer="chenpeng <[email protected]>"

WORKDIR /nginx
COPY . .
RUN bash onekey_install_nginx.sh; \
    yum install net-tools iproute iputils vim -y
EXPOSE 80

STOPSIGNAL SIGQUIT
ENV PATH /usr/local/nginx/sbin:$PATH
CMD ["nginx", "-g", "daemon off;"]
EOF

# 制作镜像
docker build -t centos-nginx:1.0 .
部署Keepalived的脚本
[root@ansible ~]# cat install_keepalived.sh
#!/bin/bash

#安装keepalived
yum install keepalived -y

#关闭防火墙
service firewalld stop
systemctl disable firewalld
部署NFS的脚本
[root@ansible ~]# cat install_nfs.sh
#!/bin/bash

yum install nfs-utils -y
service nfs-server start
systemctl enable nfs-server

setenforce 0
sed -i '/^SELINUX=/ s/enforcing/disabled/' /etc/sysconfig/selinux
service firewalld stop
systemctl disable firewalld
5.前端使用Nginx做负载均衡、Keepalived的双vip实现高可用,后端使用Swarm来实现负载均衡和高可用;
Nginx做7层负载均衡
[root@loadbalancer-1 ~]# vim /usr/local/nginx/conf/nginx.conf
    upstream myweb {
        server 192.168.55.1;
        server 192.168.55.2;
        server 192.168.55.3;
        server 192.168.55.4;
    }
    server {
        listen       80;
        server_name  www.web_cPen.com;

        location / {
            proxy_pass  http://myweb;
        }

[root@loadbalancer-1 ~]# nginx -s reload
[root@loadbalancer-2 ~]# vim /usr/local/nginx/conf/nginx.conf
    upstream myweb {
        server 192.168.55.1;
        server 192.168.55.2;
        server 192.168.55.3;
        server 192.168.55.4;
    }
    server {
        listen       80;
        server_name  www.web_cPen.com;

        location / {
            proxy_pass  http://myweb;
        }

[root@loadbalancer-2 ~]# nginx -s reload
Keepalived的双vip配置
[root@loadbalancer-1 ~]# cat /etc/keepalived/keepalived.conf
! Configuration File for keepalived

global_defs {
   notification_email {
     [email protected]
     [email protected]
     [email protected]
   }
   notification_email_from [email protected]
   smtp_server 192.168.200.1
   smtp_connect_timeout 30
   router_id LVS_DEVEL
   vrrp_skip_check_adv_addr
   #vrrp_strict
   vrrp_garp_interval 0
   vrrp_gna_interval 0
}

vrrp_instance VI_3 {
    state MASTER
    interface ens33
    virtual_router_id 201
    priority 110
    advert_int 1
    authentication {
        auth_type PASS
        auth_pass 123456
    }
    virtual_ipaddress {
        192.168.55.254
    }
}

vrrp_instance VI_1 {
    state MASTER
    interface ens33
    virtual_router_id 199
    priority 110
    advert_int 1
    authentication {
        auth_type PASS
        auth_pass 123456
    }
    virtual_ipaddress {
        192.168.0.154
    }
}

vrrp_instance VI_2 {
    state BACKUP
    interface ens33
    virtual_router_id 200
    priority 100
    advert_int 1
    authentication {
        auth_type PASS
        auth_pass 123456
    }
    virtual_ipaddress {
        192.168.0.155
    }
}

[root@loadbalancer-1 ~]# service keepalived restart
[root@loadbalancer-2 ~]# cat /etc/keepalived/keepalived.conf
! Configuration File for keepalived

global_defs {
   notification_email {
     [email protected]
     [email protected]
     [email protected]
   }
   notification_email_from [email protected]
   smtp_server 192.168.200.1
   smtp_connect_timeout 30
   router_id LVS_DEVEL
   vrrp_skip_check_adv_addr
   #vrrp_strict
   vrrp_garp_interval 0
   vrrp_gna_interval 0
}

vrrp_instance VI_3 {
    state BACKUP
    interface ens33
    virtual_router_id 201
    priority 100
    advert_int 1
    authentication {
        auth_type PASS
        auth_pass 123456
    }
    virtual_ipaddress {
        192.168.55.254
    }
}

vrrp_instance VI_1 {
    state BACKUP
    interface ens33
    virtual_router_id 199
    priority 100
    advert_int 1
    authentication {
        auth_type PASS
        auth_pass 123456
    }
    virtual_ipaddress {
        192.168.0.154
    }
}

vrrp_instance VI_2 {
    state MASTER
    interface ens33
    virtual_router_id 200
    priority 110
    advert_int 1
    authentication {
        auth_type PASS
        auth_pass 123456
    }
    virtual_ipaddress {
        192.168.0.155
    }
}

[root@loadbalancer-2 ~]# service keepalived restart
6.使用NFS服务为所有的Docker节点提供相同的Web数据,实现数据一致性;
NFS-Server共享文件
[root@nfs-server ~]# service nfs-server restart
[root@nfs-server ~]# systemctl enable nfs-server
[root@nfs-server ~]# cat /etc/exports
/web  192.168.55.0/24(rw,all_squash,sync)
[root@nfs-server ~]# mkdir /web
[root@nfs-server ~]# echo "welcome to www.web_test.com" >/web/index.html
[root@nfs-server ~]# chmod 777 /web
[root@nfs-server ~]# exportfs -rv
7.后端采用Swarm来管理整个Docker集群,在Swarm manager节点上创建40个Nginx容器的副本,并使用Volume(挂载目录到NFS服务器下)来提供Web服务,达到所有容器都使用相同的数据;
[root@ansible ~]# cat /etc/hosts
127.0.0.1   localhost localhost.localdomain localhost4 localhost4.localdomain4
::1         localhost localhost.localdomain localhost6 localhost6.localdomain6
192.168.50.1  manager1
192.168.50.2  node2
192.168.50.3  node3
192.168.50.4  node4
[root@ansible ~]# scp /etc/hosts 192.168.55.1:/etc/hosts
[root@ansible ~]# scp /etc/hosts 192.168.55.2:/etc/hosts
[root@ansible ~]# scp /etc/hosts 192.168.55.3:/etc/hosts
[root@ansible ~]# scp /etc/hosts 192.168.55.4:/etc/hosts
创建Swarm集群
[root@manager-1 ~]# service firewalld stop
[root@manager-1 ~]# docker swarm init --advertise-addr 192.168.55.1
Swarm initialized: current node (8xl5paxx507g8dcb8fdima7qm) is now a manager.

To add a worker to this swarm, run the following command:

    docker swarm join --token SWMTKN-1-3k05xqndk80tbjmhp0jy1875bkvu3w2x3u3xizsmmr5dbrx0ze-0ptold2kyw0oobung79jjz71e 192.168.55.1:2377

To add a manager to this swarm, run 'docker swarm join-token manager' and follow the instructions.
添加节点主机到Swarm集群
[root@node-2 ~]# service firewalld stop
[root@node-2 ~]# docker swarm join --token SWMTKN-1-3k05xqndk80tbjmhp0jy1875bkvu3w2x3u3xizsmmr5dbrx0ze-0ptold2kyw0oobung79jjz71e 192.168.55.1:2377
This node joined a swarm as a worker.
[root@node-3 ~]# service firewalld stop
[root@node-3 ~]# docker swarm join --token SWMTKN-1-3k05xqndk80tbjmhp0jy1875bkvu3w2x3u3xizsmmr5dbrx0ze-0ptold2kyw0oobung79jjz71e 192.168.55.1:2377
This node joined a swarm as a worker.
[root@node-4 ~]# service firewalld stop
Redirecting to /bin/systemctl stop firewalld.service
[root@node-4 ~]# docker swarm join --token SWMTKN-1-3k05xqndk80tbjmhp0jy1875bkvu3w2x3u3xizsmmr5dbrx0ze-0ptold2kyw0oobung79jjz71e 192.168.55.1:2377
This node joined a swarm as a worker.
Swarm批量起容器
[root@manager-1 ~]# docker service create -d \
>   --name web-service \
>   --mount 'type=volume,source=nfsvolume,target=/usr/local/nginx/html,volume-driver=local,volume-opt=type=nfs,volume-opt=device=:/web,"volume-opt=o=addr=192.168.55.10,rw,nfsvers=4,async"' \
>   --replicas 40  \
>   -p 80:80 \
>   centos-nginx:1.0
8.访问测试、整理文档。
修改Windows物理机本地hosts文件,模仿云服务器DNS集群域名解析
C:\Windows\System32\drivers\etc\hosts
192.168.0.154  www.web_test.com
192.168.0.155  www.web_test.com
浏览器访问 效果图