Flink - 源码阅读笔记(主节点JobManager启动分析)
一、JobManager三大核心组件
Flink 主从架构: 主节点: JobManager + 从节点: TaskManager
JobManager 是 Flink 集群的主节点,它包含三大重要的组件:
1、ResourceManager
Flink的集群资源管理器,只有一个,关于slot的管理和申请等工作,都由他负责
2、Dispatcher
负责接收用户提交的 JobGragh, 然后启动一个 JobMaster, 类似于 YARN 集群中的 AppMaster 角色 和 Spark Job 中的 Driver 角色
内部有一个持久服务:JobGraghStore,主节点迁移时恢复JobGragh执行
3、WebMonitorEndpoint Rest服务 内部启动了netty服务端,Rest请求注册到netty服务端
里面维护了很多很多的Handler,如果客户端通过 flink run 的方式来提交一个 job 到 flink 集群,最终, 是由 WebMonitorEndpoint 来接收,并且决定使用哪一个 Handler 来执行处理
例如:submitJob ===> JobSubmitHandler
当提交一个 Job 到 Flink 集群运行的时候:
4、JobMaster/JobManager
负责一个具体的 Job 的执行,在一个集群中,可能会有多个 JobManager 同时执行
类似于 YARN 集群中的 AppMaster 角色,类似于 Spark Job 中的 Driver 角色
由 createJobManagerRunner() 创建实现
关于 JobManager 的区分:
1、Flink 是主从架构,JobManager 就是指主节点,它包含上面讲述的三种角色:
ResourceManager,Dispatcher,WebMonitorEndpoint2、将 Job 提交到 YARN 运行的时候,事实上,可以通过启动一个小集群的方式来运行,这个小集群的主节点也是 JobManager,这就是 Flink on YARN 的 Session 模式。
把 job 提交到 YARN 运行的时候,有三种模式:per-job, session, application
总结一下:
Flink 集群的主节点内部运行着:ResourceManager 和 Dispatcher,当 client 提交一个 job 到 集群运行的时候(客户端会把该 Job 构建成一个 JobGragh 对象),主节点接收到提交 job 的 rest 请求之后,WebMonitorEndpoint 执行处理:会通过 Router 进行解析找到对应的 Hanlder 来执行处理,处理完毕之后,转交给 Dispatcher 来处理,Dispatcher 负责拉起 JobMaster 来负责这个 Job 内部的 Task 的部署执行,执行 Task 所需要的资源,JobMaster 向 ResourceManager 申请。
根据启动脚本分析:
JobManager 的启动主类:StandaloneSessionClusterEntrypoint (parent class -> ClusterEntrypoint)
// 入口,解析 命令行参数 和 配置文件 flink-conf.yaml
StandaloneSessionClusterEntrypoint.main()

    //entrypoint -> StandaloneSessionClusterEntrypoint
	ClusterEntrypoint.runClusterEntrypoint(entrypoint);

      // 启动插件组件,配置文件系统实例等(clusterEntrypoint -> StandaloneSessionClusterEntrypoint)
      clusterEntrypoint.startCluster();

    	runCluster(configuration, pluginManager);

    		// 第一步:初始化各种服务(8个基础服务)
    		initializeServices(configuration, pluginManager);

    		// 第二步:创建 DispatcherResourceManagerComponentFactory, 初始化各种组件的工厂实例
            // 其实内部包含了三个重要的成员变量:
            // 创建 ResourceManager 的工厂实例
            // 创建 Dispatcher 的工厂实例
            // 创建 WebMonitorEndpoint 的工厂实例
            createDispatcherResourceManagerComponentFactory(configuration);

            // 第三步:创建JobManager三大核心角色实例:WebMonitorEndpoint,Dispatcher, ResourceManager 等
            // 创建和启动 ResourceManager
            // 创建和启动 Dispatcher
            // 创建和启动 WebMonitorEndpoint
            clusterComponent = dispatcherResourceManagerComponentFactory.create(...)
第一步 initializeServices() 中做了很多服务组件的初始化:
JobManager对外提供服务的时候所需要的三大核心组件启动时所需要的基础服务
// 初始化和启动 AkkaRpcService,内部其实包装了一个 ActorSystem
commonRpcService = AkkaRpcServiceUtils.createRemoteRpcService(...)
	return new AkkaRpcService(actorSystem, AkkaRpcServiceConfiguration.fromConfiguration(configuration));

// 启动一个 JMXService,用于客户端链接 JobManager JVM 进行监控
//jmxServer: 9123
//可能端口被占用了,通过一个范围轮询的机制,找到一个未占用的
JMXService.startInstance(configuration.getString(JMXServerOptions.JMX_SERVER_PORT));

// 初始化一个负责 IO 的线程池
//假设当前节点32C cpu启动128个线程:4*Hardware.getNumberCPUCores()
//解决:Flink集群中很多地方的代码都是异步编程
ioExecutor = Executors.newFixedThreadPool(...)

// 初始化 HA 服务组件,负责 HA 服务的是:ZooKeeperHaServices,内部封装了一个zk客户端
//在flink-conf.yaml配置文件中:high-availability = zookeeper
haServices = createHaServices(configuration, ioExecutor);

// 初始化 BlobServer 服务端,大文件存储系统(jar、TaskManager上传的log文件等等)
blobServer = new BlobServer(configuration, haServices.createBlobStore());
blobServer.start();

// 初始化心跳服务组件, heartbeatServices = HeartbeatServices
//heartbeatInterval:10s
//heartbeatTimeout: 50s
heartbeatServices = createHeartbeatServices(configuration);
	return new HeartbeatServices(heartbeatInterval, heartbeatTimeout);

// 启动 metrics(性能监控) 相关的服务,内部也是启动一个 ActorSystem
MetricUtils.startRemoteMetricsRpcService(configuration,
commonRpcService.getAddress());

// 初始化一个用来存储 ExecutionGraph 的 Store, 实现是:
//per-job模式存储在内存中
//session模式存储在磁盘中
FileArchivedExecutionGraphStore
archivedExecutionGraphStore = createSerializableExecutionGraphStore(...)
第二步 createDispatcherResourceManagerComponentFactory(configuration) 中负责初始化了很多组件的工厂实例:
1、DispatcherRunnerFactory,默认实现:DefaultDispatcherRunnerFactory,生产 DefaultDispatcherRunner
2、ResourceManagerFactory,默认实现:StandaloneResourceManagerFactory,生产 StandaloneResourceManager
3、RestEndpointFactory,默认实现:SessionRestEndpointFactory,生产 DispatcherRestEndpoint
关于 DefaultDispatcherResourceManagerComponentFactory 这个组件工厂,它的内部组成:

其中,DispatcherRunnerFactory 内部也实例化了一个:
SessionDispatcherLeaderProcessFactoryFactory 组件
第三步 dispatcherResourceManagerComponentFactory.create(...) 中主要去创建 三个重要的组件(参数为初始化的八个基础服务组件):
1、DispatcherRunner,实现是:DefaultDispatcherRunner
2、ResourceManager,实现是:StandaloneResourceManager
3、WebMonitorEndpoint,实现是:DispatcherRestEndpoint
最终总结一下:
二:八个基础服务的初始化
1、创建 Akka rpc 服务 commonRpcService
// 创建一个 Akka rpc 服务 commonRpcService: 基于 Akka 的 RpcService 实现
//commonRpcService 其实是一个基于 akka 得 actorSystem,其实就是一个 tcp 的 rpc 服务,端口为:6123
commonRpcService = AkkaRpcServiceUtils                    .createRemoteRpcService(configuration,configuration.getString(JobManagerOptions.ADDRESS),getRPCPortRange(configuration),                 configuration.getString(JobManagerOptions.BIND_HOST),configuration.getOptional(JobManagerOptions.RPC_BIND_PORT));
	akkaRpcServiceBuilder.createAndStart()
		//初始化 ActorSystem
		final ActorSystem actorSystem;

		if(externalAddress == null) {
			// create local actor system
			actorSystem = BootstrapTools.startLocalActorSystem(configuration, actorSystemName, logger, actorSystemExecutorConfiguration, customConfig);
		} else {
			// create remote actor system
			actorSystem = BootstrapTools
					.startRemoteActorSystem(configuration, actorSystemName, externalAddress, externalPortRange, bindAddress, Optional.ofNullable(bindPort),
							logger, actorSystemExecutorConfiguration, customConfig);
		}

		new AkkaRpcService(actorSystem, AkkaRpcServiceConfiguration.fromConfiguration(configuration));
2、启动 JMXService
作用:用于监控jobmanager jvm
/**
 *  注释: jmxServer :  9123
 *  可能这个端口号被占用了: 通过一个范围轮询的机制,找一个未占用的
 *  while(true){
 *      try{
 *          正经业务代码
 *          break;
 *      }catch(){
 *          异常处理
 *      }
 *  }
 */
JMXService.startInstance(configuration.getString(JMXServerOptions.JMX_SERVER_PORT));
	//轮询获取端口
	Iterator ports = NetUtils.getPortRangeFromString(portsConfig);
	//启动jmx服务
	jmxServer = startJMXServerWithPortRanges(ports);
		JMXServer server = new JMXServer();
		server.start(port);
3、启动io线程池
//启动一个线程池
//如果你当前节点有 32 个 cpu ,那么当前这个 ioExecutor 启动的线程的数量为:128
//因为整个Flink 集群很多的地方的代码都是异步编程,
ioExecutor = Executors.newFixedThreadPool(ClusterEntrypointUtils.getPoolSize(configuration), new ExecutorThreadFactory("cluster-io"));
	//获取核心线程数的方法
	ClusterEntrypointUtils.getPoolSize(configuration)
		4 * Hardware.getNumberCPUCores()
			//cpu core
			Runtime.getRuntime().availableProcessors();
4、初始化 HA 高可用服务
//初始化 HA 高可用服务
//一般都搭建 基于 zk 的 HA 服务: ZooKeeperHaServices
haServices = createHaServices(configuration, ioExecutor);
	HighAvailabilityServicesUtils.createHighAvailabilityServices(configuration, executor,HighAvailabilityServicesUtils.AddressResolution.NO_ADDRESS_RESOLUTION);

		//在 fink-conf.yaml 配置文件中,我们会去配置:high-availability = zookeeper
		case ZOOKEEPER:BlobStoreService blobStoreService = BlobUtils.createBlobStoreFromConfig(configuration);

		//得到一个 ZooKeeperHaServices ,内部封装了一个 ZK 客户端(curator框架实现的)
		new ZooKeeperHaServices(ZooKeeperUtils.startCuratorFramework(configuration), executor, configuration, blobStoreService);
			CuratorFramework cf = CuratorFrameworkFactory.builder().connectString(zkQuorum).sessionTimeoutMs(sessionTimeout).connectionTimeoutMs(connectionTimeout)
				.retryPolicy(new ExponentialBackoffRetry(retryWait, maxRetryAttempts))
				.namespace(rootWithNamespace.startsWith("/") ? rootWithNamespace.substring(1) : rootWithNamespace).aclProvider(aclProvider).build();
5、初始化 BlobServer
//主要管理一些大文件的上传等,比如用户作业的 jar 包、TaskManager 上传 log 文件等
blobServer = new BlobServer(configuration, haServices.createBlobStore());
6、初始化心跳服务,具体实现是:HeartBeatImpl
// 初始化心跳服务,具体实现是:HeartBeatImpl
//后续的运行的一些心跳服务,都是基于这个 基础心跳服务来构建的
heartbeatServices = createHeartbeatServices(configuration);
	HeartbeatServices.fromConfiguration(configuration);
		// TODO_MA 注释: 10s (心跳间隔时间:heartbeat.interval)
		long heartbeatInterval = configuration.getLong(HeartbeatManagerOptions.HEARTBEAT_INTERVAL);
		// TODO_MA 注释: 50s (心跳超时时间:heartbeat.timeout)
		long heartbeatTimeout = configuration.getLong(HeartbeatManagerOptions.HEARTBEAT_TIMEOUT);

		new HeartbeatServices(heartbeatInterval, heartbeatTimeout);
7、metrics(性能监控) 相关的服务
//比如web ui看到的就是他实现的
metricRegistry = createMetricRegistry(configuration, pluginManager);
	new MetricRegistryImpl(MetricRegistryConfiguration.fromConfiguration(configuration)
		,ReporterSetup.fromConfiguration(configuration, pluginManager));
8、存储 ExecutionGraph 的服务
/*************************************************
 *  注释: ArchivedExecutionGraphStore: 存储 ExecutionGraph 的服务, 默认有两种实现
 *  1、MemoryArchivedExecutionGraphStore 主要是在内存中缓存
 *  2、FileArchivedExecutionGraphStore 会持久化到文件系统,也会在内存中缓存
 *  默认实现是基于 File 的: FileArchivedExecutionGraphStore
 *  -
 *  1、per-job 模式在内存中
 *  2、session 模式在磁盘中
 */
archivedExecutionGraphStore = createSerializableExecutionGraphStore(configuration, commonRpcService.getScheduledExecutor());
三、三大组件启动入口
入口
DispatcherResourceManagerComponent create(
        Configuration configuration,
        Executor ioExecutor,
        RpcService rpcService,
        HighAvailabilityServices highAvailabilityServices,
        BlobServer blobServer,
        HeartbeatServices heartbeatServices,
        MetricRegistry metricRegistry,
        ArchivedExecutionGraphStore archivedExecutionGraphStore,
        MetricQueryServiceRetriever metricQueryServiceRetriever,
        FatalErrorHandler fatalErrorHandler)
        throws Exception;

			// TODO 注释: DefaultLeaderRetrievalService 监控 Dispatcher
			dispatcherLeaderRetrievalService = highAvailabilityServices.getDispatcherLeaderRetriever();
			// TODO 注释: DefaultLeaderRetrievalService 监控 ResourceManager
			resourceManagerRetrievalService = highAvailabilityServices.getResourceManagerLeaderRetriever();
			// TODO 注释: Dispatcher 的 GatewayRetriever
			final LeaderGatewayRetriever dispatcherGatewayRetriever = new RpcGatewayRetriever<>(rpcService, DispatcherGateway.class,
					DispatcherId::fromUuid, new ExponentialBackoffRetryStrategy(12, Duration.ofMillis(10), Duration.ofMillis(50)));
			// TODO 注释: ResourceManager 的 GatewayRetriever
			final LeaderGatewayRetriever resourceManagerGatewayRetriever = new RpcGatewayRetriever<>(rpcService,
					ResourceManagerGateway.class, ResourceManagerId::fromUuid,
					new ExponentialBackoffRetryStrategy(12, Duration.ofMillis(10), Duration.ofMillis(50)));
			// TODO 注释: 创建线程池,用于执行 WebMonitorEndpoint 所接收到的 client 发送过来的请求
			final ScheduledExecutorService executor = WebMonitorEndpoint.createExecutorService(
					configuration.getInteger(RestOptions.SERVER_NUM_THREADS),
					configuration.getInteger(RestOptions.SERVER_THREAD_PRIORITY),
					"DispatcherRestEndpoint"
			);


			/*************************************************
			 * 创建三个核心组件
			 */

			/*************************************************
             *  注释: 创建 WebMonitorEndpoint 实例, 在 Standalone 模式下: DispatcherRestEndpoint
             *  1、restEndpointFactory = SessionRestEndpointFactory
             *  2、webMonitorEndpoint = DispatcherRestEndpoint
             *  当前这个 DispatcherRestEndpoint 的作用是:
             *  1、初始化的过程中,会初始化一大堆的 Handler
             *  2、启动一个 Netty 的服务端,绑定了这些 注册和排序这些 Handler
             *  3、当 client 通过 flink 命令提交了某些操作(发起 restful 请求),服务端由 webMonitorEndpoint 来执行处理
             *  举个例子:
             *  如果用户通过 flink run 提交一个 Job,那么最后是由 WebMonitorEndpoint 中的 JobSubmitHandler 来执行处理
             *  job 由 JobSubmitHandler 执行完毕之后,转交给 Dispatcher 去调度执行
             */
            webMonitorEndpoint = restEndpointFactory
                    .createRestEndpoint(configuration, dispatcherGatewayRetriever, resourceManagerGatewayRetriever, blobServer, executor, metricFetcher,highAvailabilityServices.getClusterRestEndpointLeaderElectionService(), fatalErrorHandler);

            log.debug("Starting Dispatcher REST endpoint.");
            webMonitorEndpoint.start();

            final String hostname = RpcUtils.getHostname(rpcService);

            /*************************************************
             *  注释:
             *  其实三个要点:
             *  1、ResourceManager 是一个 RpcEndpoint,当构建好了这个对象之后,去看它的 onStart() 即可
             *  2、ResourceManager 也是一个 LeaderContender,也会执行竞选,竞选处理
             *  3、启动 ResourceManager Service
             *      两个心跳服务
             *          从节点 和 主节点之间的心跳
             *          Job的主控程序 和 主节点之间的心跳
             *      两个定时服务
             *          TaskManager 的超时检查服务
             *          Slot申请的 超时检查服务
             */
            resourceManager = resourceManagerFactory
                    .createResourceManager(configuration, ResourceID.generate(), rpcService, highAvailabilityServices, heartbeatServices, fatalErrorHandler,new ClusterInformation(hostname, blobServer.getPort()), webMonitorEndpoint.getRestBaseUrl(), metricRegistry, hostname, ioExecutor);

            final HistoryServerArchivist historyServerArchivist = HistoryServerArchivist
                    .createHistoryServerArchivist(configuration, webMonitorEndpoint, ioExecutor);

            final PartialDispatcherServices partialDispatcherServices = new PartialDispatcherServices(configuration, highAvailabilityServices,resourceManagerGatewayRetriever, blobServer, heartbeatServices,() -> MetricUtils.instantiateJobManagerMetricGroup(metricRegistry, hostname), archivedExecutionGraphStore, fatalErrorHandler,historyServerArchivist, metricRegistry.getMetricQueryServiceGatewayRpcAddress(), ioExecutor);

            log.debug("Starting Dispatcher.");

            /*************************************************
             *  注释:
             *  1、在该代码的内部,会创建 Dispatcher 组件
             *  2、调用 start() 启动
             */
            dispatcherRunner = dispatcherRunnerFactory.createDispatcherRunner(highAvailabilityServices.getDispatcherLeaderElectionService(), fatalErrorHandler,new HaServicesJobGraphStoreFactory(highAvailabilityServices), ioExecutor, rpcService,partialDispatcherServices);

            log.debug("Starting ResourceManager.");
            resourceManager.start();

            resourceManagerRetrievalService.start(resourceManagerGatewayRetriever);
            dispatcherLeaderRetrievalService.start(dispatcherGatewayRetriever);

            /*************************************************
             *  注释:
             */
            return new DispatcherResourceManagerComponent(dispatcherRunner, DefaultResourceManagerService.createFor(resourceManager),dispatcherLeaderRetrievalService, resourceManagerRetrievalService, webMonitorEndpoint, fatalErrorHandler);
1、WebMonitorEndpoint 启动和初始化源码剖析
第一件事、继承关系:
DispatcherRestEndpoint extends WebMonitorEndpoint
WebMonitorEndpoint extends RestServerEndpoint implements LeaderContender, JsonArchivist

1、LeaderContender过程:
LeaderContender 是一个 竞选角色
leaderElectionService.start(LeaderContender)
如果成功:则回调 leaderElectionService 的 isLeader() 方法
	// TODO 注释: isLeader() 的方法的内部回调: LeaderContender 的 grantLeaderShip()
如果失败:则回调 leaderElectionService 的 notLeader() 方法

2、RestServerEndpoint并不是rpcEndpoint,里面没有onStart()方法 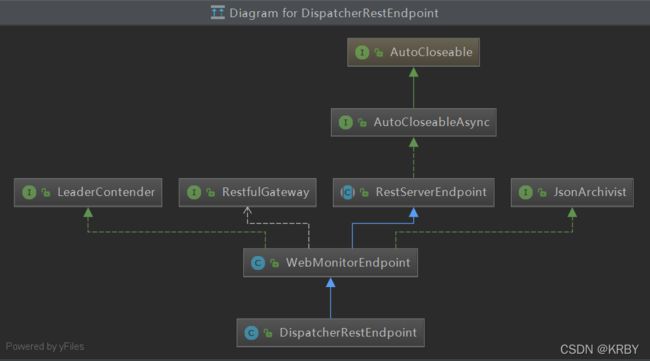
具体实现:
// 初始化 WebMonitorEndpoint(restEndpointFactory = SessionRestEndpointFactory)
webMonitorEndpoint = restEndpointFactory.createRestEndpoint(
            configuration,
            dispatcherGatewayRetriever,
            resourceManagerGatewayRetriever,
            blobServer,
            executor,
            metricFetcher,
  			highAvailabilityServices.getClusterRestEndpointLeaderElectionService(),
            fatalErrorHandler);

// 启动 WebMonitorEndpoint
webMonitorEndpoint.start();
	//注释: 路由器
	final Router router = new Router();

	//1、初始化一堆Handler
	handlers = initializerHandlers(restAddressFuture);
		//初始化一些通用的Handler (80-100多个)
		super.initializerHandlers(localAddressFuture)
		//初始化JobsubmitHandler
		JobSubmitHandler jobSubmitHandler = new JobSubmitHandler(leaderRetriever, timeout, responseHeaders, executor, clusterConfiguration);
			//处理client提交的restful提交作业请求
			handlerRequest(...)
				final JobSubmitRequestBody requestBody = request.getRequestBody();
				//注释: 恢复得到 JobGraph
				CompletableFuture jobGraphFuture = loadJobGraph(requestBody, nameToFile);
				//处理 jar
				Collection jarFiles = getJarFilesToUpload(requestBody.jarFileNames, nameToFile);
				Collection> artifacts = getArtifactFilesToUpload(requestBody.artifactFileNames,nameToFile);
				CompletableFuture finalizedJobGraphFuture = uploadJobGraphFiles(gateway,
        			jobGraphFuture,
        			jarFiles,
        			artifacts,
       			 	configuration);
       			//转交给 Dispatcher
       			CompletableFuture jobSubmissionFuture = finalizedJobGraphFuture.thenCompose(jobGraph -> gateway.submitJob(jobGraph, timeout));
       			return jobSubmissionFuture.thenCombine(jobGraphFuture,(ack, jobGraph) -> new JobSubmitResponseBody("/jobs/" + jobGraph.getJobID()));

	//排序,字典序,用于确认唯一性时只需要对比相邻的url即可 (handle地址排序)
	Collection.sort(handlers, RestHandlerUrlComparator.INSTANCE)
	//确认handler唯一性,url和handler一一对应
	checkAllEndpointsAndHandlersAreUnique(handlers)
	//注册handler(注册到了router,在router中管理了很多handle,通过它解析client rest请求,转发到对应的handler处理)
	handlers.forEach(handler -> registerHandler(router,handler,log))
		//根据 URL 来注册:hashMap
		//方便到时候接收到用户请求根据 URL 来找到对应的 Handler
		//拼接得到 URL
		final String versionedHandlerURL = '/' + supportedVersion.getURLVersionPrefix() + handlerURL;
		//完成注册
		registerHandler(router, versionedHandlerURL, specificationHandler.f0.getHttpMethod(), specificationHandler.f1);
			//对应不同类的 Http 请求方式,来注册不同类型的 Handler
			switch(httpMethod) {
            case GET:
                router.addGet(handlerURL, handler);
                break;
            case POST:
                router.addPost(handlerURL, handler);
                break;
            case DELETE:
                router.addDelete(handlerURL, handler);
                break;
            case PATCH:
                router.addPatch(handlerURL, handler);
                break;
            default:
                throw new RuntimeException("Unsupported http method: " + httpMethod + '.');
        	}


	//2、启动Netty Server,绑定端口号的时候通过轮休的方式,并将绑定端口号等信息都会持久化到ZK中
	NioEventLoopGroup bossGroup = new NioEventLoopGroup(1, new ExecutorThreadFactory("flink-rest-server-netty-boss"));
	NioEventLoopGroup workerGroup = new NioEventLoopGroup(0, new ExecutorThreadFactory("flink-rest-server-netty-worker"));
	bootstrap = new ServerBootstrap();
	bootstrap.group(bossGroup, workerGroup).channel(NioServerSocketChannel.class).childHandler(initializer);
		//channel pipeline
		ChannelInitializer initializer = new ChannelInitializer() {
			@Override
			protected void initChannel(SocketChannel ch) {
				RouterHandler handler = new RouterHandler(router, responseHeaders);
				// SSL should be the first handler in the pipeline
				if(isHttpsEnabled()) {
					ch.pipeline().addLast("ssl", new RedirectingSslHandler(restAddress, restAddressFuture, sslHandlerFactory));
				}
				ch.pipeline()
						.addLast(new HttpServerCodec())
						.addLast(new FileUploadHandler(uploadDir))
						.addLast(new FlinkHttpObjectAggregator(maxContentLength, responseHeaders))
						.addLast(new ChunkedWriteHandler())
						.addLast(handler.getName(), handler)
						.addLast(new PipelineErrorHandler(log, responseHeaders));
			}
		};
	/**
	*  bootstrao端口号(chosenPort)选择:
	*  可能这个端口号被占用了: 通过一个范围轮询的机制,找一个未占用的
	*  while(true){
	*      try{
	*          正经业务代码
	*          break;
	*      }catch(){
	*          异常处理
	*      }
	*  }
	*/
	channel = bootstrap.bind(restBindAddress, chosenPort);

	//3、启动一些基础服务
	//到此为止,我们的 主节点上的 WebMonitorEndpoint 组件的 Netty 服务端起好了。
	//任务提交的时候: 启动 Netty 的客户端
	startInternal();
		//执行选举,通过curator api向zk注册。
        //将sessionid,port,url持久化到zk中
		leaderElectionService.start(this)

		/*************************************************
 		*  注释: 启动 WebMonitorEndpoint
 		*  这个启动和 Flink-1.11 版本有个不同,把选举的代码做了一层封装,核心逻辑并没有改动
 		*  把选举的代码封装在: ZooKeeperLeaderElectionDriver
 		*
 		*  如果成功:则回调 leaderElectionService 的 isLeader() 方法
 		*		// TODO 注释: isLeader() 的方法的内部回调: LeaderContender 的 grantLeaderShip()
		*  如果失败:则回调 leaderElectionService 的 notLeader() 方法
 		*/
		leaderElectionService.start(this);
			//DefaultLeaderElectionService.start(LeaderContender contender)
			// LeaderContender = DispatcherRestEndpoint
			leaderContender = contender;
			//当前这个 leaderElectionDriver 就是负责给 leaderContender 执行选举的
			//如果选举成功,则回调: leaderElectionDriver 的 isLeader 方法
			leaderElectionDriver = leaderElectionDriverFactory.createLeaderElectionDriver(this, new LeaderElectionFatalErrorHandler(), leaderContender.getDescription());
				//ZooKeeperLeaderElectionDriver.createLeaderElectionDriver(...)
				//通过 Curator 的 LeaderLatch 来执行选举
				new ZooKeeperLeaderElectionDriver(client, latchPath, leaderPath, leaderEventHandler, fatalErrorHandler, leaderContenderDescription);
					//leaderLatch是curator框架中选举的实现
					LeaderLatch leaderLatch = new LeaderLatch(client, checkNotNull(latchPath));
					//Cache 是 Curator 对事件监听的包装,会自动的再次监听
					NodeCache cache = new NodeCache(client, leaderPath);
					//进行选举
					//leaderContender 就是当前的 ZooKeeperLeaderElectionDriver
					//所以选举后 调用的就是它本身的 isLeader()/notLeader()方法
					leaderLatch.addListener(this);
        			leaderLatch.start();

					/*************************************************
					*  注释: 选举开始之后,会在不久接收到响应:
					*  1、如果选举成功,则回调该类的 isLeader() 方法。
					*  2、如果选举失败,则回调该类的 notLeader() 方法。
					*/

					/*************************************************
					*  注释: Cache 是 Curator 对事件监听的包装,会自动的再次监听,我们就不需要自己手动的重复监听了。
					*  补充: ZooKeeper 的 Cache 有三种:
					*  NodeCache:用来监听节点的数据变化,当监听的节点的数据发生变化的时候就会回调对应的函数
					*  PathChildrenCache:用来监听指定节点 的子节点变化情况
					*  TreeCache:TreeCache既能够监听自身节点的变化、也能够监听子节点的变化
					*/
					cache.getListenable().addListener(this);
					cache.start();
					client.getConnectionStateListenable().addListener(listener);

					//竞选成功
					isLeader()
						leaderElectionEventHandler.onGrantLeadership();
							/*************************************************
							*  注释: 特别注意: LeaderContender 有四种情况:
							*  1、Dispatcher = DefaultDispatcherRunner
							*  2、JobMaster = JobManagerRunnerImpl
							*  3、ResourceManager = ResourceManager
							*  4、WebMonitorEndpint = WebMonitorEndpoint
							*/
							//当前leaderContender为WebMonitorEndpint
							leaderContender.grantLeadership(issuedLeaderSessionID);
								leaderElectionService.confirmLeadership(leaderSessionID, getRestBaseUrl());
									confirmLeaderInformation(leaderSessionID, leaderAddress);
										leaderElectionDriver.writeLeaderInformation(
											LeaderInformation.known(confirmedLeaderSessionID, confirmedLeaderAddress));
												// TODO 注释: 检查 znode 节点是否存在
												Stat stat = client.checkExists().forPath(leaderPath);
												//当前的sessionid = zk中记录的sessionid
												if(owner == sessionID) {
													//写入 zk 中(记录的是leaderAddress和leaderSessionID)
													client.setData().forPath(leaderPath, baos.toByteArray());
														//final ByteArrayOutputStream baos = new ByteArrayOutputStream();
														//final ObjectOutputStream oos = new ObjectOutputStream(baos);
														//oos.writeUTF(leaderInformation.getLeaderAddress());
														//oos.writeObject(leaderInformation.getLeaderSessionID());
												}

					//竞选失败
					notLeader()
						leaderElectionEventHandler.onRevokeLeadership();

		startExecutionGraphCacheCleanupTask();
核心流程:
1. 初始化一大堆 Handler
2. 启动一个 Netty 的服务端,注册这些 Handler(80-100个)
3. 当client通过flink命令提交了某些操作(发起restful请求),服务端通过webMoniterEndPoint来处理
例如:用户通过flink run提交一个Job,那么最后有WebMoniterEndpoint中的JobSubmitHandler来执行处理,处理完成后转交给Dispatcher去调度执行,然后启动JobMaster去调度执行
4. WebMoniterEndpoint **implements** LeaderContender
LeaderContender是一个竞选角色
执行竞选leaderElectionService.start(LeaderContender)
(1)如果成功:则回调leaderElectionService 的 isLeader()方法
isLeader()的方法的内部回调:LeaderContender的grantLeaderShip(),将 WebMontiroEndpoint 的 address 以及跟 zookeeper 的 sessionID 写入到 znode 中
(2)如果失败:则回调leaderElectionService 的 notLeader()方法
2、ResourceManager 启动和初始化源码剖析
核心入口:
/*************************************************
 *  注释:
 *  其实三个要点:
 *  1、ResourceManager 是一个 RpcEndpoint,当构建好了这个对象之后,去看它的 onStart() 即可
 *  2、ResourceManager 也是一个 LeaderContender,也会执行竞选,竞选处理
 *  3、启动 ResourceManager Service
 *      两个心跳服务
 *          从节点 和 主节点之间的心跳
 *          Job的主控程序 和 主节点之间的心跳
 *      两个定时服务
 *          TaskManager 的超时检查服务
 *          Slot申请的 超时检查服务
 */
resourceManager = resourceManagerFactory
        .createResourceManager(configuration, ResourceID.generate(), rpcService, highAvailabilityServices, heartbeatServices, fatalErrorHandler,new ClusterInformation(hostname, blobServer.getPort()), webMonitorEndpoint.getRestBaseUrl(), metricRegistry, hostname, ioExecutor);

//内部没做什么重要的事情
resourceManager.start();
	//自己给自己发送消息,表示rpcEndpint已经启动好了
	rpcEndpoint.tell(ControlMessages.START, ActorRef.noSender());
第二件事:
// 初始化 ResourceManager
resourceManager = resourceManagerFactory.createResourceManager(
            configuration,
            ResourceID.generate(),
            rpcService,
            highAvailabilityServices,
            heartbeatServices,
            fatalErrorHandler,
            new ClusterInformation(hostname,blobServer.getPort()),
            webMonitorEndpoint.getRestBaseUrl(),
            metricRegistry,
            hostname
         );

	//构建ResourceManagerRuntimeServices,初始化了很多配置
	ResourceManagerRuntimeServices resourceManagerRuntimeServices = createResourceManagerRuntimeServices(conf,highAvailabilityServices,slotManagerMetricGroup);
		ResourceManagerRuntimeServices.fromConfiguration(createResourceManagerRuntimeServicesConfiguration(configuration), highAvailabilityServices,rpcService.getScheduledExecutor(), slotManagerMetricGroup);
			// createResourceManagerRuntimeServicesConfiguration(configuration)
			//Job提交超时: 5min(job提交了5min还没有被处理,则该job任务就是超时了)
			String strJobTimeout = configuration.getString(ResourceManagerOptions.JOB_TIMEOUT);
			//SlotManager相关配置
			SlotManagerConfiguration slotManagerConfiguration = SlotManagerConfiguration.fromConfiguration(..)
				//slot申请超时时间: 5*60*1000ms
				final Time slotRequestTimeout = getSlotRequestTimeout(configuration);
				//TaskManager超时时间:30s,用于yarn session模式
				final Time taskManagerTimeout = Time.milliseconds(configuration.getLong(ResourceManagerOptions.TASK_MANAGER_TIMEOUT));
				// 每个节点的 slot 个数: 默认是 1, 可配置
				int numSlotsPerWorker = configuration.getInteger(TaskManagerOptions.NUM_TASK_SLOTS);
				//  每个节点最大的 slot 个数: Integer.MAX_VALUE
				int maxSlotNum = configuration.getInteger(ResourceManagerOptions.MAX_SLOT_NUM);
				// 多余的 TaskManager 个数: 默认是 0
				int redundantTaskManagerNum = configuration.getInteger(ResourceManagerOptions.REDUNDANT_TASK_MANAGER_NUM);
				return new SlotManagerConfiguration(rpcTimeout, slotRequestTimeout, taskManagerTimeout,waitResultConsumedBeforeRelease, slotMatchingStrategy,defaultWorkerResourceSpec, numSlotsPerWorker, maxSlotNum, redundantTaskManagerNum);


	//创建ResourceManager
	return createResourceManager(...)
		/*************************************************
 		*  注释: ResourceManager 启动时间: 从启动到 有 TaskManager 汇报这段时间
 		*  可以通过: resourcemanager.standalone.start-up-time 进行设置
 		*  如果没有设置,则默认等于 Slot 申请的超时时间
 		*/
		final Time standaloneClusterStartupPeriodTime = ConfigurationUtils.getStandaloneClusterStartupPeriodTime(configuration);

		new StandaloneResourceManager(...)
			/*************************************************
         	*  注释: 记住:由于 ResourceManager 是一个 RpcEndpoint
         	*  所以在构造好了 ResourceManager 实例对象之后,需要执行 onStart() 方法
         	*/
        	super(rpcService, AkkaRpcServiceUtils.createRandomName(RESOURCE_MANAGER_NAME), null);
			//ResourceManager是一个RpcEndpoint,构建好了之后需要执行onStart()
			//执行 onStart() 方法
			startResourceManagerServices();
			  //获取DefaultLeaderElectionServices,基于ZK
			  leaderElectionServices = highAvailabilityServices.getResourceManagerLeaderElectionServices()
			  //初始化(standalone 模式下该方法为空)
			  initialize();
			  //执行竞选(当前竞选角色为:ResourceManager,leaderElectionService为:DefaultLeaderElectionService)
			  leaderElectionService.start(this)
				//通过Curator的LeaderLatch来执行选举
				new ZookeeperLeaderElectionDriver(..)
					//进行选举
					leaderLatch.start()
						//选举成功
						isLeader()
							//当前的leaderContender为ResourceManager
							leaderContender.grantLeadership(issuedLeaderSessionID)
								//回调
								tryAcceptLeaderShip(newLeaderSessionID)
									/*************************************************
 									*  注释: 启动服务
 									*  1、启动心跳服务
 									*  	启动两个心跳定时服务
									*  2、启动 SlotManager 服务
 									*  	启动两个定时任务
 									*/
									startServicesOnLeaderShip();
										//1、启动心跳服务:启动两个心跳定时服务
										startHeartbeatServies();
											//heartbeatServices是开始初始的八个基础服务中的心跳服务
											//ResourceManager 维持和 TaskExecutor 之间的心跳
											taskManagerHeartbeatManager = heartbeatServices.createHeartManagerSender(resourId,new TaskManagerHeartbeatListener(),getMainThreadExecutor());
											  new HeartbeatManagerSenderImpl<>(heartbeatInterval, heartbeatTimeout, resourceId, heartbeatListener, mainThreadExecutor, log);
												//延时调度
												//调用this的run()方法,立即执行一次
												mainThreadExecutor.schedule(this, 0L, TimeUnit.MILLISECONDS);
												//run()方法:心跳服务
												//HeartbeatMonitor
												//HeartbeatTartget
												requestHeartbeat(heartbeatMointor)
												//这句代码就实现心跳 的无限循环,每10s执行一次!一直执行上面的requestHeartbeat(...)方法
												getMainThreadExecutor().schedule(this, heartbeatPeriod, TimeUnit.MILLISECONDS);

											//ResourceManager 维持和 JobMaster 之间的心跳
											jobManagerHeartbeatManager = heartbeatServices.createHeartManagerSender(resourId,new JobManagerHeartbeatListener(),getMainThreadExecutor());

										//2、启动SlotManager服务:启动两个定时服务
										//SlotManager是存在于ResourceManager中用于管理所有TaskManager汇报和注册Slot工作的
										slotManager.start(getFencingToken(), getMainThreadExecutor(), new ResourceActionsImpl());
											//checkTaskManagerTimeoutsAndRedundancy() 30s执行一次,检查空闲的taskmanager
											taskManagerTimeoutsAndRedundancyCheck = scheduledExecutor.scheduleWithFixedDelay(() -> mainThreadExecutor.execute(() -> checkTaskManagerTimeoutsAndRedundancy()), 0L,taskManagerTimeout.toMilliseconds(),TimeUnit.MILLISECONDS);
											//checkSlotRequestTimeouts() 5min执行一次
											//SlotRequest -> 处于申请中,则这个slotRequest -> PendingRequest
											//检查PendingRequest超时时间
											 slotRequestTimeoutCheck = scheduledExecutor.scheduleWithFixedDelay(() -> mainThreadExecutor.execute(() -> checkSlotRequestTimeouts()), 0L, slotRequestTimeout.toMilliseconds(),TimeUnit.MILLISECONDS);
											 	//获取所有的 处于待定状态中的 SlotRequest
											 	Iterator> slotRequestIterator = pendingSlotRequests.entrySet().iterator();
											 	//执行超时校验
											 	if(currentTime - slotRequest.getCreationTimestamp() >= slotRequestTimeout.toMilliseconds()) {			  //移除对该slot的请求
											 		slotRequestIterator.remove();
											 		//Assigned
											 		//ResourceManager 已经分配某个 TaskManager 上的某个 Slot 给了某个 Job
											 		//但是,到现在为止: TaskManager 还不知道!
											 		//所以需要取消该slot请求
											 		if(slotRequest.isAssigned()) {
											 			cancelPendingSlotRequest(slotRequest);
											 		}
											 		//通知失败!
											 		resourceActions.notifyAllocationFailure(slotRequest.getJobId(), slotRequest.getAllocationId(),new TimeoutException("The allocation could not be fulfilled in time."));
											 	}

										//开启 启动期
										OnleaderShip();
											//开启 启动期
											//jobManager启动好了之后,如果过了一段时间,还是没有任何的TaskManager从节点注册
											//当JobManager启动好了,到第一个TaskManager过来注册的时间,如果超过这段时间,则启动失败
											startStartUpPeriod()
												//将不能满足的请求置为失败
												//例如:当有些请求slot,但是没有任何的从节点过来注册,没有slot资源,将该请求置为失败
												setFailUnfulfillableRequest(false);
												//启动定时任务
												final long startupPeriodMillis = startupPeriodTime.toMilliseconds();
												if(startupPeriodMillis > 0) {
													scheduleRunAsync(() -> setFailUnfulfillableRequest(true), startupPeriodMillis, TimeUnit.MILLISECONDS);
												}


						//选举失败,删除zk中本节点session相关信息
						notLeader()


// 启动 ResourceManager
resourceManager.start();
	//自己给自己发送消息,表示rpcEndpint已经启动好了
	rpcEndpoint.tell(ControlMessage.START, ActorRef.noSender());
总结:
1、它是 RpcEndpoint 的子类, 关注 onStart()
2、它是 LeaderContender 的子类,所以要关注:选举
3、启动 ResourceManagerService:
(1)两个心跳服务
从节点和主节点之间的心跳
Job的主控程序和主节点之间的心跳
(2)两个定时服务
TaskManager的超时检查服务
Slot申请的超时检查服务
3、Dispatcher 启动和初始化源码剖
第三件事:
/*************************************************
 *  注释:
 *  1、在该代码的内部,会创建 Dispatcher 组件
 *  2、调用 start() 启动
 */
dispatcherRunner = dispatcherRunnerFactory.createDispatcherRunner(

	highAvailabilityServices.getDispatcherLeaderElectionService(),
	fatalErrorHandler,
    // TODO 注释: 注意第三个参数
    new HaServicesJobGraphStoreFactory(highAvailabilityServices),
    ioExecutor,
    rpcService,
    partialDispatcherServices);
dispatchper = createDispatcher();
dispatchper.start();

	return DefaultDispatcherRunner.create(leaderElectionService, fatalErrorHandler, dispatcherLeaderProcessFactory);
		//DefaultDispatcherRunner是dispatcherRunner的具体实现
		final DefaultDispatcherRunner dispatcherRunner = new DefaultDispatcherRunner(leaderElectionService, fatalErrorHandler, dispatcherLeaderProcessFactory);
		return DispatcherRunnerLeaderElectionLifecycleManager.createFor(dispatcherRunner, leaderElectionService);
			//执行竞选
			//注意这个 LeaderContender = DefaultDispatcherRunner
			leaderContender = contender;
			//当前这个 leaderElectionDriver 就是负责给 leaderContender 执行选举的
			//如果选举成功,则回调: leaderElectionDriver 的 isLeader 方法
    		leaderElectionDriver = leaderElectionDriverFactory.createLeaderElectionDriver(this, new LeaderElectionFatalErrorHandler(), leaderContender.getDescription());
    			//通过 Curator 的 LeaderLatch 来执行选举
    			return new ZooKeeperLeaderElectionDriver(client, latchPath, leaderPath, leaderEventHandler, fatalErrorHandler, leaderContenderDescription);
    				LeaderLatch leaderLatch = new LeaderLatch(client, checkNotNull(latchPath));
        			NodeCache cache = new NodeCache(client, leaderPath);
    				//进行选举
    				leaderLatch.addListener(this);
					leaderLatch.start();
					/*************************************************
 					 *  注释: 选举开始之后,会在不久接收到响应:
 					 *  1、如果选举成功,则回调该类的 isLeader() 方法。
 					 *  2、如果选举失败,则回调该类的 notLeader() 方法。
 					 */
 					/*************************************************
					*  注释: Cache 是 Curator 对事件监听的包装,会自动的再次监听,我们就不需要自己手动的重复监听了。
					*  补充: ZooKeeper 的 Cache 有三种:
					*  NodeCache:用来监听节点的数据变化,当监听的节点的数据发生变化的时候就会回调对应的函数
					*  PathChildrenCache:用来监听指定节点 的子节点变化情况
					*  TreeCache:TreeCache既能够监听自身节点的变化、也能够监听子节点的变化
					*/
					cache.getListenable().addListener(this);
					cache.start();
					client.getConnectionStateListenable().addListener(listener);


					//1、如果选举成功,则回调该类的 isLeader() 方法。
					leaderElectionEventHandler.onGrantLeadership();
						//当前的leaderContender为:DefaultDispatcherRunner
						leaderContender.grantLeadership(issuedLeaderSessionID);
							runActionIfRunning(() -> startNewDispatcherLeaderProcess(leaderSessionID));
								//关闭已有的dispatcher
								stopDispatcherLeaderProcess();
								//创建新的dispatcher: SessionDispatcherLeaderProcess
								dispatcherLeaderProcess = createNewDispatcherLeaderProcess(leaderSessionID);
								//启动 Dispatcher
								FutureUtils.assertNoException(
								previousDispatcherLeaderProcessTerminationFuture.thenRun(newDispatcherLeaderProcess::start));
									runIfStateIs(State.CREATED, this::startInternal);
										onStart();

											//启动 Dispatcher 的服务
											startServices();
												jobGraphStore.start(this);
													//DefaultJobGraphStore.start(JobGraphListener jobGraphListener)
													//启动监听,基于ZooKeeperJobGraphStoreWatcher
													jobGraphStoreWatcher.start(this);
													running = true;
													//存在两个回调函数:
													//1、onAddedJobGraph(JobID jobId)
													jobGraphListener.onAddedJobGraph(jobId);
													//2、onRemovedJobGraph(JobID jobId)
													jobGraphListener.onRemovedJobGraph(jobId);

											//1、recoverJobsAsync(): 恢复 job, 从 JobGraphStore 中恢复得到所有的 JobGraph
											//2、createDispatcherIfRunning(): 启动
											onGoingRecoveryOperation = recoverJobsAsync().thenAccept(
												this::createDispatcherIfRunning).handle(this::onErrorIfRunning);

												//1、recoverJobsAsync()
												CompletableFuture.supplyAsync(this::recoverJobsIfRunning, ioExecutor);
												//恢复 job
												CompletableFuture.supplyAsync(this::recoverJobsIfRunning, ioExecutor);
													Collection recoveredJobGraphs = new ArrayList<>();
													for(JobID jobId : jobIds) {
    													recoveredJobGraphs.add(recoverJob(jobId));
													}
														//recoverJob(jobId)
														//jobGraphStore = DefaultJobGraphStore
														jobGraphStore.recoverJobGraph(jobId);

												//2、createDispatcherIfRunning()
												runIfStateIs(State.RUNNING, () -> createDispatcher(jobGraphs));
													final DispatcherGatewayService dispatcherService = dispatcherGatewayServiceFactory.create(DispatcherId.fromUuid(getLeaderSessionId()), jobGraphs, jobGraphStore);
														//DefaultDispatcherGatewayServiceFactory.create(...)
														dispatcher = dispatcherFactory.createDispatcher(
															rpcService,
															fencingToken,
															recoveredJobs,
															(dispatcherGateway, scheduledExecutor, errorHandler)
																-> new NoOpDispatcherBootstrap(),
                    										PartialDispatcherServicesWithJobGraphStore
                    											.from(partialDispatcherServices, jobGraphWriter));
                    											new StandaloneDispatcher(...)
                    												//执行完毕,去到Dispatcher.onStart() 方法
                    												//1、只是启动了一个 性能监控服务
                    												startDispatcherServices();
                    												//2、恢复job
                    												startRecoveredJobs();
                    													for(JobGraph recoveredJob : recoveredJobs) {
    																		runRecoveredJob(recoveredJob);
    																			//job运行模式是:RECOVERY
    																			runJob(recoveredJob, ExecutionType.RECOVERY);
    																				//flink client 提交一个 job 之前, 会去启动一个 JobMaster,会去调用这个 runJob
																		}
																		recoveredJobs.clear();
																	//3、什么也没做
																	this.dispatcherBootstrap = this.dispatcherBootstrapFactory.create(getSelfGateway(DispatcherGateway.class), this.getRpcService().getScheduledExecutor(), this::onFatalError);

                    										//Dispatcher 也是一个 RpcEndpoint
                    										//启动起来了之后,给自己发送一个 Hello 消息证明启动
                    										dispatcher.start();
                    											rpcEndpoint.tell(ControlMessages.START, ActorRef.noSender());

												completeDispatcherSetup(dispatcherService);

					2、如果选举失败,则回调该类的 notLeader() 方法。
					//删除zk信息
总结:
1、启动JobGraphStore 服务
通过JobGraphStoreWatcher监控器,监听JobGraphStore的状态
onAddedJobGraph
onRemoveJobGraph
2、从 JobGraphStrore 恢复执行 Job, 要启动 Dispatcher
recoverJobsAsync() 恢复Job,从JobGraphStore中得到所有待恢复的JonGraph
createDispatcherIfRunniong() 启动dispathcer
四、总结
主要讲解了主节点 JobManager 的启动,在启动过程中,会有 各种服务组件的初始化工作
1、Flink RPC 剖析
2、Flink 集群启动脚本分析
3、Flink 集群启动 JobManager 启动源码剖析
4、WebMonitorEndpoint 启动和初始化源码剖析
5、ResourceManager 启动和初始化源码剖析
6、Dispatcher 启动和初始化源码剖
Flink Standalone 集群的主节点 JobManager 的内部包含非常重要的三大组件,在启动过 过程中,会依次启动,这三大组件分别是:
1、WebMonitorEndpoint
2、ResourceManager
3、Dispatcher