(转帖)如何在DE2上安裝μClinux作業系統? (Nios II )
原创地址:http://www.cnblogs.com/oomusou/archive/2008/06/08/uclinux_de2.html
Abstract
若要在DE2上使用作業系統,除了Nios II EDS內建支援的μC/OS-II外,μClinux也能在DE2上跑。
Introduction
使用環境:Quartus II 7.2 SP1 + Nios II EDS 7.2 SP1 + DE2(Cyclone II EP2C35F627C6) + VMWare 6.0.2 + CentOS 5.1
既然Nios II EDS已經支援μC/OS-II,為什麼還要另外跑μClinux呢?
μC/OS-II
優點:所占的資源很少,只要FPGA上的on-chip memory就可以跑。
缺點:將原本在Linux上的open source軟體porting到μC/OS-II難度較高。
μClinux
優點:使用Linux kernel,所以將Linux上open source軟體porting到μClinux較容易。
缺點:所占的資源較多,須要使用到SDRAM。
所以μC/OS-II和μClinux各擅勝場,開發人員可視實際需要選擇使用哪一個OS。
DE2安裝μClinux的幾個方法
1.兩台PC,一台使用Windows作業系統,另一台使用Linux作業系統:
Windows上安裝Quartus II與SOPC Builder產生硬體.sof與.ptf,而在Linux進行μClinux的cross compiler,兩台PC透過ftp或Samba傳檔。
2.一台PC,使用Linux作業系統:
安裝Linux版的Quartus II與SOPC Builder產生硬體.sof與.ptf,也在Linux上進行μClinux的cross compiler,軟硬體皆在Linux上完成。
3.一台PC,使用Windows作業系統:
安裝Windows版的Quartus II與SOPC Builder產生硬體.sof與.ptf,並安裝cygwin進行μClinux的cross compiler,軟硬體皆在Windows上完成。
4.一台PC,使用Windows作業系統,並在VMWare安裝Linux作業系統:
安裝Windows版的Quartus II與SOPC Builder產生硬體.sof與.ptf,並在VMWare上安裝Linux進行μClinux的cross compiler,Windows與Linux之間透過VMWare Tools傳檔,請參閱(原創) 如何在CentOS安裝VMWare Tools? (OS) (Linux) (CentOS) (VMWare)。
第一種方式,需要兩台PC,當然是最麻煩的方式。若只有一台PC,而且你只用Linux,就用第二種方式,若你只有一台PC,且使用Windows,第三種方式與第四種方式皆可行,看你習慣哪一種。本文討論的是第四種方式配合VMWare。
DE2的硬體設計
你可以自行用Verilog設計硬體並搭配SOPC Builder產生Nios II,最後用Quartus II編譯產生.sof與.ptf,這方面我在之前的文章已經討論了很多,都在IC Design分類下,請自行參閱。為了簡化起見,我使用友晶科技CD所提供的Reference Design。Nios II的Reference Design放在DE2 CD中的\DE2_demonstrations\SOPC_Builder\Reference_Design\下,(或從http://www.terasic.com/downloads/cd-rom/de2/ 下載),若你想自己從頭到尾自己由SOPC Builder建立,請參閱(原創) 如何自己用SOPC Builder建立一個能在DE2上跑μC/OS-II的Nios II系統? (IC Design) (DE2) (Quartus II) (Nios II) (SOPC Builder) (μC/OS-II)。
友晶提供的Reference Design是Quartus II 6.0與7.1的版本,若你使用7.2或更高的版本,建議你用SOPC Builder開啟後,更新SOPC Builder格式並重新generate system_0.ptf,然後用Quartus II重新compile DE2_NIOS.sof,這兩個檔等一下會用到。
在Linux上安裝Nios II gcc cross compiler
等一下我們會下載μClinux的source code,重新編譯成能在Nios II跑的版本,在此之前必須先安裝Nios II gcc cross compiler。
Step 1:
下載nios2gcc.tar.bz2或Altera原廠的nios2gcc-20080203.tar.bz2至/usr/local/src
Step 2:
將nios2gcc.tar.bz2解壓縮到/opt/nios2
Step 3:
設定cross compiler路徑
修改bash_profile的內容如下所示,加上/opt/nios2/bin路徑
# Get the aliases and functions
if [ -f ~/.bashrc ] ; then
. ~/.bashrc
fi
# User specific environment and startup programs
PATH = $PATH:$HOME/bin:/opt/nios2/bin
export PATH
unset USERNAME
Step 4:
重新執行bash_profile script,讓所設定的路徑馬上生效,不必再重新登出登入
Step 5:
測試Nios II gcc cross compiler是否安裝成功
若出現以下結果,表示Nios II gcc cross compiler已經設定成功
Configured with: /root/buildroot/toolchain_build_nios2/gcc- 3.4.6 /configure --prefix = /opt/nios2 --build = i386-pc-linux-gnu --host = i386-pc-linux-gnu --target = nios2-linux-uclibc --enable-languages = c --enable-shared --disable-__cxa_atexit --enable-target-optspace --with-gnu-ld --disable-nls --enable-threads --disable-multilib --enable-cxx-flags = -static
Thread model: posix
gcc version 3.4.6
編譯μClinux核心
Step 1:
到Embedded Linux/Microcontroller Project下載μClinux到/usr/local/src,本文用的是uClinux-dist-20070130.tar.gz。
Step 2:
將uClinux-dist-20070130.tar.gz解壓縮
uClinux-dist-20070130.tar.gz解開後占1.9GB,若解壓縮過程有錯誤,大部分原因都是硬碟滿了,請注意你VMWare所設定的硬碟大小。
Step 3:
下載μClinux kernel patch for Nios II:uClinux-dist-20070130-nios2-02.7z到/usr/local/src/uClinux-dist。
Step 4:
安裝μClinux kernel patch for Nios II
若出現以下結果,表示patch成功
patching file vendors/Altera/nios2nommu/config.linux- 2.6 .x
patching file lib/libpng/Makefile
patching file linux- 2.6 .x/include/asm-nios2nommu/ide.h
patching file linux- 2.6 .x/include/linux/elf-em.h
patching file linux- 2.6 .x/usr/Makefile
patching file linux- 2.6 .x/arch/nios2nommu/kernel/vmlinux.lds.S
patching file linux- 2.6 .x/arch/nios2nommu/drivers/Kconfig
patching file linux- 2.6 .x/arch/nios2nommu/drivers/altcf.c
patching file linux- 2.6 .x/arch/nios2nommu/drivers/pci/Kconfig
patching file linux- 2.6 .x/arch/nios2nommu/drivers/pci/pci-auto.c
patching file linux- 2.6 .x/arch/nios2nommu/drivers/pci/pci.c
patching file linux- 2.6 .x/arch/nios2nommu/drivers/pci/Makefile
patching file linux- 2.6 .x/arch/nios2nommu/drivers/spi.c
patching file linux- 2.6 .x/arch/nios2nommu/drivers/Makefile
patching file linux- 2.6 .x/drivers/mtd/maps/altera.c
patching file linux- 2.6 .x/drivers/mtd/maps/Kconfig
patching file linux- 2.6 .x/drivers/net/Kconfig
patching file linux- 2.6 .x/drivers/net/Makefile
patching file linux- 2.6 .x/drivers/net/dm9ks.c
patching file linux- 2.6 .x/drivers/net/open_eth.c
patching file linux- 2.6 .x/drivers/net/dm9000.c
patching file linux- 2.6 .x/drivers/net/Space.c
patching file linux- 2.6 .x/drivers/net/smc91x.c
patching file linux- 2.6 .x/drivers/net/smc911x.c
patching file linux- 2.6 .x/drivers/net/mtip1000.c
patching file linux- 2.6 .x/drivers/usb/Kconfig
patching file linux- 2.6 .x/drivers/usb/host/Kconfig
patching file linux- 2.6 .x/drivers/usb/host/isp1362-hcd.c
patching file linux- 2.6 .x/drivers/usb/host/Makefile
patching file linux- 2.6 .x/drivers/usb/host/isp1362.h
patching file linux- 2.6 .x/drivers/usb/Makefile
patching file linux- 2.6 .x/drivers/ide/ide.c
patching file user/microwin/src/fonts/X6x13.c
patching file user/microwin/src/demos/nxroach/Makefile
patching file user/microwin/src/demos/nanox/nxterm.c
patching file user/microwin/src/demos/nanox/nterm.c
patching file user/microwin/src/demos/nxkbd/keynum.c
patching file user/microwin/src/demos/nxkbd/keyctrl.c
patching file user/microwin/src/demos/nxkbd/keyshft.c
patching file user/microwin/src/Makefile.rules
patching file user/microwin/src/drivers/kbd_ttyscan.c
patching file user/microwin/src/drivers/scr_fb.c
patching file user/microwin/src/drivers/mou_ser.c
patching file user/ftpd/ftpcmd.c
patching file user/ftpd/Makefile
Step 5:
建立make file

在Vendor/Product Selection如下設定

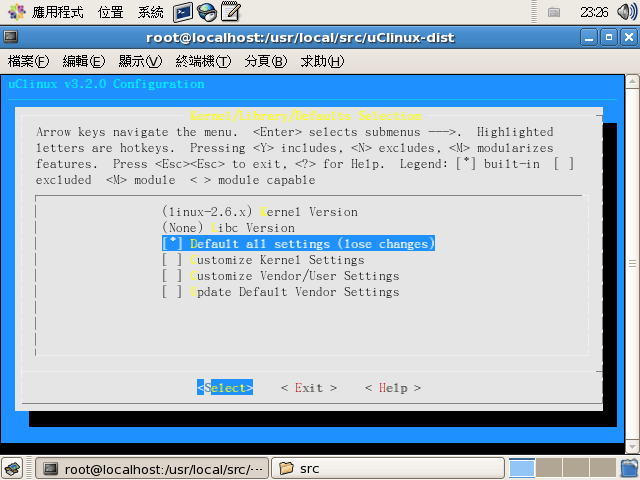
在Kernel/Library/Defaults Selection如下設定
最後選<Yes>存檔

Step 6:
將SOPC Builder設定檔system_0.ptf複製到/usr/local/src
Step 7:
根據DE2硬體配置設定make file
最後會有選擇動作,分別選擇 1 (CPU_0),1 (cfi_flash_0),2 (sdram)。
( 1 ) cpu_0 - Class: altera_nios2 Type: f Version: 7.071
Selection: 1
--- Please select a device to upload the kernel to:
( 1 ) cfi_flash_0
Class: altera_avalon_cfi_flash
Size: 4194304 bytes
Selection: 1
--- Please select a device to execute kernel from:
( 1 ) sram_0
Class: sram_16bit_512k
Size: 524288 bytes
( 2 ) sdram_0
Class: altera_avalon_new_sdram_controller
Size: 8388608 bytes
( 3 ) epcs_controller
Class: altera_avalon_epcs_flash_controller
Size: 2048 bytes
Selection: 2
最後成功的結果如下所示
PTF: /usr/local/src/system_0.ptf
CPU: cpu_0
Device to upload to: cfi_flash_0
Program memory to execute from: sdram_0
--- Settings written to /usr/local/src/uClinux-dist/linux- 2.6 .x/arch/nios2nommu/hardware.mk
make [ 3 ] : Leaving directory `/usr/local/src/uClinux-dist/linux- 2.6 .x'
make [ 2 ] : Leaving directory `/usr/local/src/uClinux-dist/vendors/Altera/nios2nommu'
make [ 1 ] : Leaving directory `/usr/local/src/uClinux-dist/vendors'
Step 8:
建立romfs資料夾,過程會有錯誤訊息,可忽略。
Step 9:
編譯μClinux核心
Step 10:
產生image
最後會在/usr/local/src/uClinux-dist/linux-2.6.x/arch/nios2nommu/boot/下找到zImage
Step 11:
將zImage複製到Windows的C:\altera\72\nios2eds\examples\下
將軟硬體燒入到DE2
Step 1:
將DE2_NIOS2.sof複製到C:\altera\72\nios2eds\examples\下
Step 2:
啟動Nios II Command Shell
開始 -> 程式集 -> Altera -> Nios II EDS 7.2 -> Nios II 7.2 Command Shell
Step 3:
將硬體燒入到DE2
執行結果
in .
DE2_NIOS.sof
Info: *******************************************************************
Info: Running Quartus II Programmer
Info: Command: quartus_pgm --no_banner --mode = jtag -o p ; DE2_NIOS.sof
Info: Using programming cable " USB-Blaster [USB-0] "
Info: Started Programmer operation at Mon Jun 09 03 : 01 : 45 2008
Info: Configuring device index 1
Info: Device 1 contains JTAG ID code 0x020B40DD
Info: Configuration succeeded -- 1 device(s) configured
Info: Successfully performed operation(s)
Info: Ended Programmer operation at Mon Jun 09 03 : 01 : 46 2008
Info: Quartus II Programmer was successful. 0 errors , 0 warnings
Info: Allocated 54 megabytes of memory during processing
Info: Processing ended: Mon Jun 09 03 : 01 : 46 2008
Info: Elapsed time: 00 : 00 : 02
Step 4:
將μClinux的zImage下載到SDRAM
執行結果
Pausing target processor: OK
Initializing CPU cache (if present)
OK
Downloaded 1197KB in 14 .4s ( 83 .1KB/s)
Verified OK
Starting processor at address 0x00D00000
Step 5:
啟動μClinux
執行結果
 Ok
,
booting the kernel.
Ok
,
booting the kernel.Linux version 2.6.19 -uc1 ([email protected]) (gcc version 3.4.6 ) # 2 PR
EMPT Sun Jun 8 23 : 28 : 30 CST 2008
uClinux/Nios II
Altera Nios II support (C) 2004 Microtronix Datacom Ltd.
Built 1 zonelists. Total pages: 2032
Kernel command line:
PID hash table entries: 32 (order: 5 , 128 bytes)
Dentry cache hash table entries: 1024 (order: 0 , 4096 bytes)
Inode-cache hash table entries: 1024 (order: 0 , 4096 bytes)
Memory available: 5956k/8192k RAM , 0k/0k ROM (1465k kernel code , 680k data)
Mount-cache hash table entries: 512
NET: Registered protocol family 16
NET: Registered protocol family 2
IP route cache hash table entries: 1024 (order: 0 , 4096 bytes)
TCP established hash table entries: 1024 (order: 0 , 4096 bytes)
TCP bind hash table entries: 1024 (order: 0 , 4096 bytes)
TCP: Hash tables configured (established 1024 bind 1024 )
TCP reno registered
io scheduler noop registered
io scheduler deadline registered (default)
Serial: JTAG UART driver $Revision: 1.3 $
ttyJ0 at MMIO 0x806810f0 (irq = 1 ) is a jtag_uart
TCP cubic registered
NET: Registered protocol family 1
NET: Registered protocol family 17
Freeing unused kernel memory: 572k freed (0x97a000 - 0xa08000)
Shell invoked to run file: /etc/rc
Command: hostname uClinux
Command: mount -t proc proc /proc
Command: mount -t sysfs sysfs /sys
Command: mount -t usbfs none /proc/bus/usb
mount: Mounting none on /proc/bus/usb failed: No such file or directory
Command: mkdir /var/tmp
Command: mkdir /var/log
Command: mkdir /var/run
Command: mkdir /var/lock
Command: mkdir /var/empty
Command: ifconfig lo 127.0.0.1
Command: route add -net 127.0.0.0 netmask 255.0.0.0 lo
Command: cat /etc/motd
Welcome to
____ _ _
/ __| ||_|
_ _| | | | _ ____ _ _ _ _
| | | | | | || | _ \| | | |\ \/ /
| |_| | |__| || | | | | |_| |/ \
| ___\____|_||_|_| |_|\____|\_/\_/
| |
|_|
For further information check:
http://www.uclinux.org/
Execution Finished , Exiting
Sash command shell (version 1.1.1 )
/>
若看到這個畫面,表示μClinux已經順利執行在DE2上。
Conclusion
當我最後看到μClinux的logo出現時,真的是既讚嘆又感恩,讚嘆的是Linux就這樣跑在嵌入式系統了,感恩的是前人的porting讓我們能在DE2順利的跑μClinux。這真是一次奇妙的軟硬體合作經驗,從FPGA到OS,又從Linux回到Windows,不得不讚嘆嵌入式系統的神奇。
See Also
(原創) 如何在μClinux開發第一支Hello World程式? (IC Design) (DE2) (Nios II) (OS) (Linux) (μClinux) (C/C++) (gcc)
(原創) 如何在CentOS安裝VMWare Tools? (OS) (Linux) (CentOS) (VMWare)
(原創) 如何自己用SOPC Builder建立一個能在DE2上跑μC/OS-II的Nios II系統? (IC Design) (DE2) (Quartus II) (Nios II) (SOPC Builder) (μC/OS-II)
(原創) 如何解決『Error: More than one programming cable found in available hardware list --use--list option to display available hardware list and specify correct cableprogramming』錯誤訊息? (SOC) (Nios II) (μClinux) (DE2) (DE2-70)