搭建CNN网络训练fashion-mnist数据集(加入过拟合手段对比)
目录
-
- 1.导入相关的包
- 2. 载入数据集
- 3. 用代码将随机数据样本及对应标签显示出来
- 4. 未添加防止过拟合手段
- 5. 添加防止过拟合手段
- 6. 对比
1.导入相关的包
# 导入相关的包
import tensorflow as tf
import os
import numpy as np
from matplotlib import pyplot as plt
from tensorflow import keras
from tensorflow.keras.layers import Conv2D, BatchNormalization, Activation, MaxPooling2D, Dropout, Flatten, Dense
from tensorflow.keras import Model
from  tensorflow.keras.models import Sequential
2. 载入数据集
np.set_printoptions(threshold=np.inf)
# 将数据集载入,x_train为训练集数据,y_train为训练集标签,x_test为测试集数据,y_test为测试集标签
fashion = tf.keras.datasets.fashion_mnist
(x_train, y_train), (x_test, y_test) = fashion.load_data()
print("x_train.shape", x_train.shape)
x_train, x_test = x_train / 255.0, x_test / 255.0
x_train = x_train.reshape(x_train.shape[0], 28, 28, 1)  # 给数据增加一个维度,使数据和网络结构匹配
x_test = x_test.reshape(x_test.shape[0], 28, 28, 1)
print("x_train.shape", x_train.shape)
print("x_train.type", type(x_train))
print("y_train.shape", y_train.shape)
print("y_train.type", type(y_train))
3. 用代码将随机数据样本及对应标签显示出来
class_names = ['T-shirt/top', 'Trouser', 'Pullover', 'Dress', 'Coat',
               'Sandal', 'Shirt', 'Sneaker', 'Bag', 'Ankle boot']
plt.figure(figsize=(10,10))
for i in range(25):
    plt.subplot(5,5,i+1)
    plt.xticks([])
    plt.yticks([])
    plt.grid(False)
    plt.imshow(x_train[i], cmap=plt.cm.binary)
    plt.xlabel(class_names[y_train[i]])
plt.show()
4. 未添加防止过拟合手段
np.set_printoptions(threshold=np.inf)
# 将数据集载入,x_train为训练集数据,y_train为训练集标签,x_test为测试集数据,y_test为测试集标签
fashion = tf.keras.datasets.fashion_mnist
(x_train, y_train), (x_test, y_test) = fashion.load_data()
x_train, x_test = x_train / 255.0, x_test / 255.0
x_train = x_train.reshape(x_train.shape[0], 28, 28, 1)  # 给数据增加一个维度,使数据和网络结构匹配
x_test = x_test.reshape(x_test.shape[0], 28, 28, 1)
# 模型建立
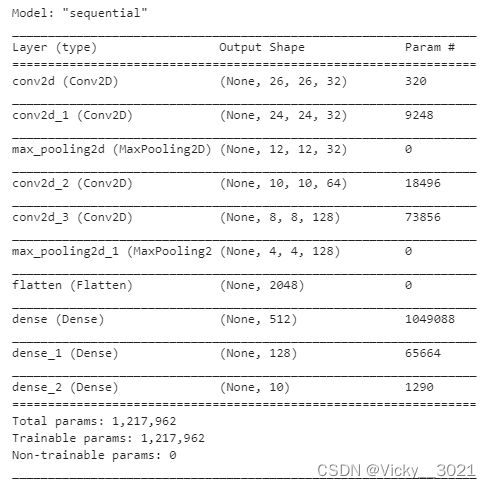
model1 = Sequential()
model1.add(Conv2D(32, kernel_size=(3, 3), activation='relu', input_shape=(28, 28, 1)))
model1.add(Conv2D(32, kernel_size=(3, 3), activation='relu'))
model1.add(MaxPooling2D(pool_size=(2, 2)))
model1.add(Conv2D(64, kernel_size=(3, 3), activation='relu'))
model1.add(Conv2D(128, kernel_size=(3, 3), activation='relu'))
model1.add(MaxPooling2D(pool_size=(2, 2)))
model1.add(Flatten())
model1.add(Dense(512, activation='relu'))
model1.add(Dense(128, activation='relu'))
model1.add(Dense(10, activation='softmax'))
# 模型编译
model1.compile(loss=tf.keras.losses.SparseCategoricalCrossentropy(from_logits=True),
               optimizer='adam',
               metrics=['accuracy'])
# 模型展示
model1.summary()
# 模型训练
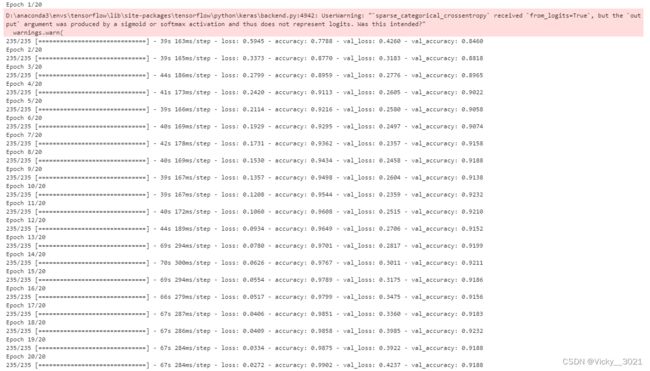
history1 = model1.fit(x_train, y_train,
                    batch_size=256,
                    epochs=20,
                    verbose=1,
                    validation_data=(x_test, y_test))
# 模型测试
test_loss1, test_acc1 = model1.evaluate(x_test, y_test, verbose=1)
print('\nTest accuracy:', test_acc1)
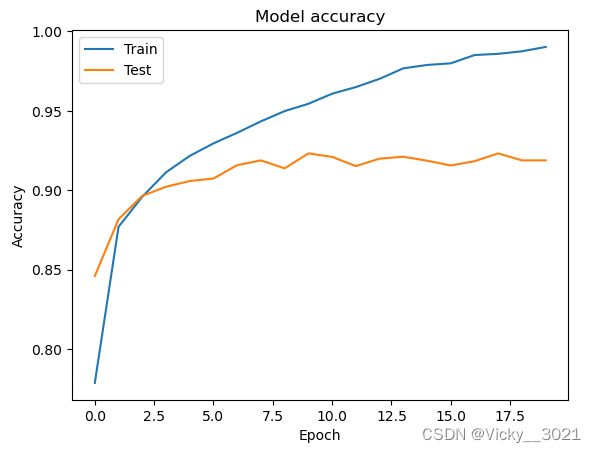
# 绘制训练过程中训练集和测试集合的准确率值
plt.plot(history1.history['accuracy'])
plt.plot(history1.history['val_accuracy'])
plt.title('Model accuracy')
plt.ylabel('Accuracy')
plt.xlabel('Epoch')
plt.legend(['Train', 'Test'], loc='upper left')
plt.show()
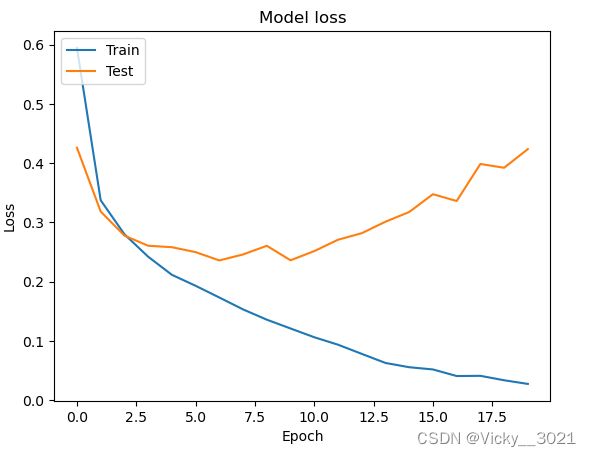
# 绘制训练过程中训练集和测试集合的损失值
plt.plot(history1.history['loss'])
plt.plot(history1.history['val_loss'])
plt.title('Model loss')
plt.ylabel('Loss')
plt.xlabel('Epoch')
plt.legend(['Train', 'Test'], loc='upper left')
plt.show()
5. 添加防止过拟合手段
import tensorflow as tf
import os
import numpy as np
from matplotlib import pyplot as plt
from tensorflow.keras.layers import Conv2D, BatchNormalization, Activation, MaxPool2D, Dropout, Flatten, Dense
from tensorflow.keras import Model
np.set_printoptions(threshold=np.inf)
# 将数据集载入,x_train为训练集数据,y_train为训练集标签,x_test为测试集数据,y_test为测试集标签
fashion = tf.keras.datasets.fashion_mnist
(x_train, y_train), (x_test, y_test) = fashion.load_data()
x_train, x_test = x_train / 255.0, x_test / 255.0
x_train = x_train.reshape(x_train.shape[0], 28, 28, 1)  # 给数据增加一个维度,使数据和网络结构匹配
x_test = x_test.reshape(x_test.shape[0], 28, 28, 1)
# 模型建立
model2 = Sequential()
model2.add(Conv2D(32, kernel_size=(3, 3), activation='relu', input_shape=(28, 28, 1)))
model2.add(BatchNormalization())

model2.add(Conv2D(32, kernel_size=(3, 3), activation='relu'))
model2.add(BatchNormalization())
model2.add(MaxPooling2D(pool_size=(2, 2)))
model2.add(Dropout(0.25))

model2.add(Conv2D(64, kernel_size=(3, 3), activation='relu'))
model2.add(BatchNormalization())
model2.add(Dropout(0.25))

model2.add(Conv2D(128, kernel_size=(3, 3), activation='relu'))
model2.add(BatchNormalization())
model2.add(MaxPooling2D(pool_size=(2, 2)))
model2.add(Dropout(0.25))

model2.add(Flatten())

model2.add(Dense(512, activation='relu'))
model2.add(BatchNormalization())
model2.add(Dropout(0.5))

model2.add(Dense(128, activation='relu'))
model2.add(BatchNormalization())
model2.add(Dropout(0.5))

model2.add(Dense(10, activation='softmax'))
# 模型编译
model2.compile(loss=tf.keras.losses.SparseCategoricalCrossentropy(from_logits=True),
               optimizer='adam',
               metrics=['accuracy'])
# 模型展示
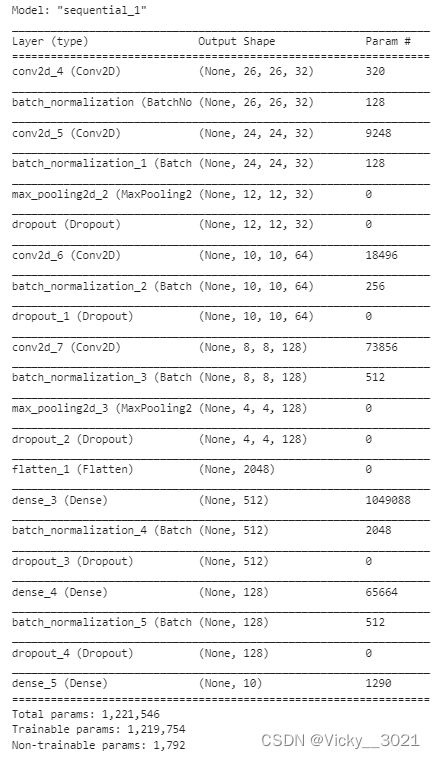
model2.summary()
# 模型训练
history2 = model2.fit(x_train, y_train,
                      batch_size=256,
                      epochs=20,
                      verbose=1,
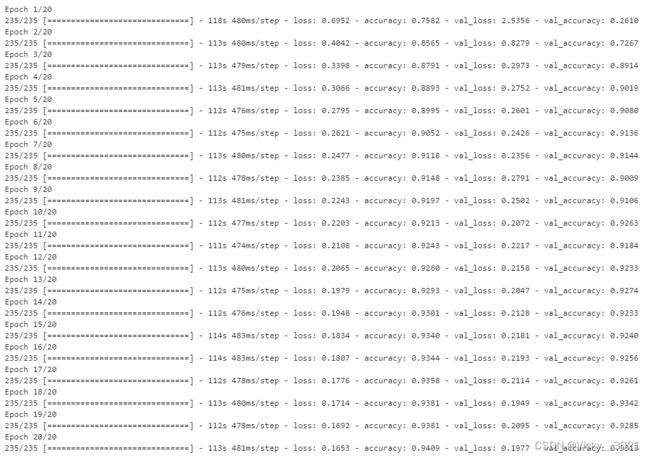
                      validation_data=(x_test, y_test))
# 模型测试
test_loss2, test_acc2 = model2.evaluate(x_test, y_test, verbose=1)
print('\nTest accuracy:', test_acc2)
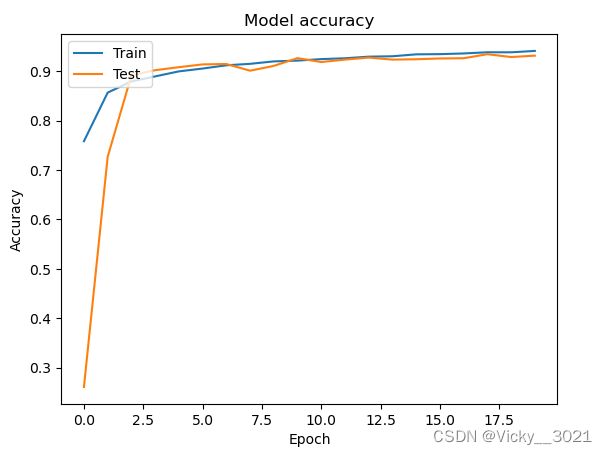
# 绘制训练过程中训练集和测试集合的准确率值
plt.plot(history2.history['accuracy'])
plt.plot(history2.history['val_accuracy'])
plt.title('Model accuracy')
plt.ylabel('Accuracy')
plt.xlabel('Epoch')
plt.legend(['Train', 'Test'], loc='upper left')
plt.show()
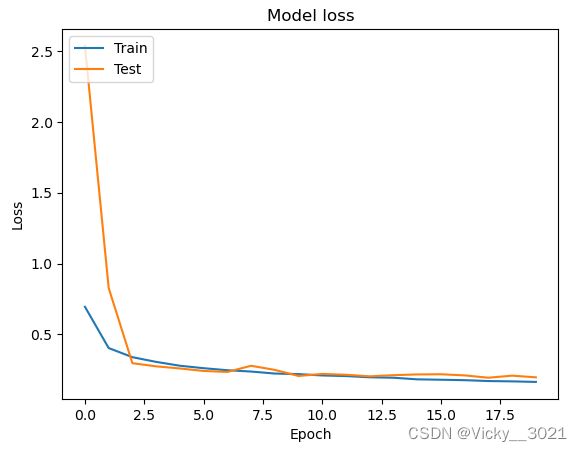
# 绘制训练过程中训练集和测试集合的损失值
plt.plot(history2.history['loss'])
plt.plot(history2.history['val_loss'])
plt.title('Model loss')
plt.ylabel('Loss')
plt.xlabel('Epoch')
plt.legend(['Train', 'Test'], loc='upper left')
plt.show()
6. 对比
print('未加防止过拟合手段时的准确率:', test_acc1)
print('添加防止过拟合手段时的准确率:', test_acc2)
# 绘制训练过程中训练集和测试集合的损失值
plt.plot(history1.history['loss'])
plt.plot(history1.history['val_loss'])
plt.title('Model loss')
plt.ylabel('Loss')
plt.xlabel('Epoch')
plt.legend(['Train', 'Test'], loc='upper left')
plt.show()
# 绘制训练过程中训练集和测试集合的损失值
plt.plot(history2.history['loss'])
plt.plot(history2.history['val_loss'])
plt.title('Model loss')
plt.ylabel('Loss')
plt.xlabel('Epoch')
plt.legend(['Train', 'Test'], loc='upper left')
plt.show()
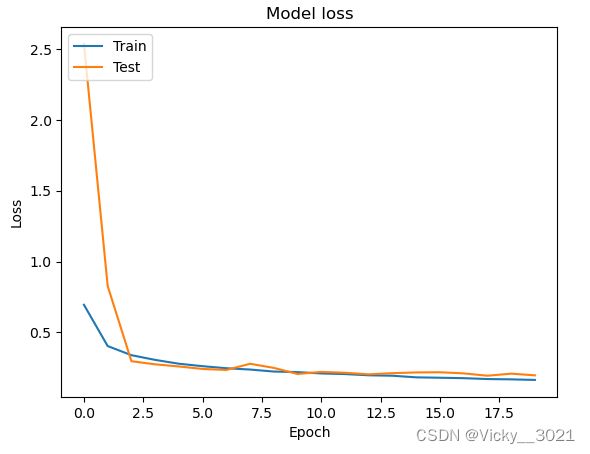
从以上准确率对比以及两幅loss值的变化图表可以得知,未加防止过拟合手段时,网络出现过拟合现象,添加防止过拟合手段之后,准确率提升,说明添加的防止过拟合手段是有效的。

