springcloudalibaba集成nacos+openfeign+gateway+sentinel+seata
文章目录
-
- 前言
- 创建项目
-
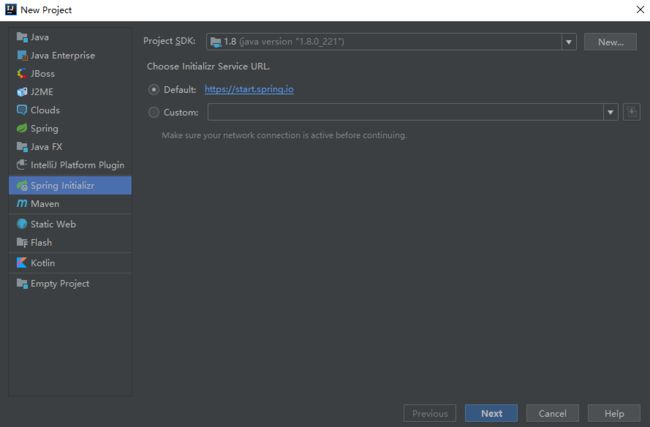
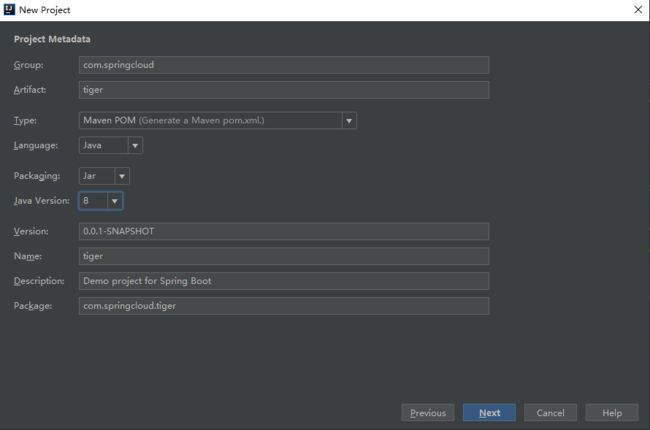
- 1、创建父项目
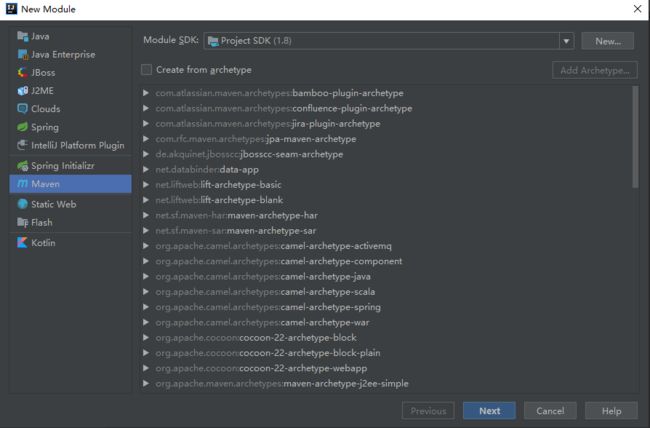
- 2、创建订单模块
- 3、创建库存模块
- nacos服务注册发现
-
- nacos下载
- nacos启动
-
- 内存单机模式启动
- 更改内存为MySQL数据库
- 集群方式
- nacos注册发现代码集成
- 服务间远程调用
-
- 1、RestTemplate调用
- 2、openfeign
- nacos配置中心
- sentinel
-
- 安装配置sentinel
- 代码集成sentinel
- Seata
-
- 1、下载安装配置seata
- 2、代码集成seata
- gateway
前言
最近学习了SpringCloudAlibaba,对SpringCloudAlibaba做了一个学习的记录,就当是个笔记吧,好记性不如烂笔头嘛。
这次的SpringCloudAlibaba用了如下技术:springboot+nacos+ribbon+openfeign+sentinel+seata+gateway
创建项目
我这里展示的就是订单和库存的业务。
1、创建父项目
<project xmlns="http://maven.apache.org/POM/4.0.0" xmlns:xsi="http://www.w3.org/2001/XMLSchema-instance"
         xsi:schemaLocation="http://maven.apache.org/POM/4.0.0 https://maven.apache.org/xsd/maven-4.0.0.xsd">
    <modelVersion>4.0.0modelVersion>
    <packaging>pompackaging>
    <modules>
        <module>ordermodule>
        <module>stockmodule>
        <module>shopmodule>
        <module>gatewaymodule>
    modules>
    <groupId>com.springcloudgroupId>
    <artifactId>tigerartifactId>
    <version>0.0.1-SNAPSHOTversion>
    <name>tigername>
    <description>springcloud父项目description>

    <properties>
        <java.version>1.8java.version>
        <spring-boot.version>2.3.12.RELEASEspring-boot.version>
        <spring-cloud.version>Hoxton.SR12spring-cloud.version>
        <spring-cloud-alibaba.version>2.2.8.RELEASEspring-cloud-alibaba.version>
    properties>

    <dependencies>
        <dependency>
            <groupId>org.springframework.bootgroupId>
            <artifactId>spring-boot-starterartifactId>
        dependency>

        <dependency>
            <groupId>org.springframework.bootgroupId>
            <artifactId>spring-boot-starter-testartifactId>
            <scope>testscope>
        dependency>
    dependencies>

    <dependencyManagement>
        <dependencies>

            <dependency>
                <groupId>com.alibaba.cloudgroupId>
                <artifactId>spring-cloud-alibaba-dependenciesartifactId>
                <version>${spring-cloud-alibaba.version}version>
                <type>pomtype>
                <scope>importscope>
            dependency>


            <dependency>
                <groupId>org.springframework.cloudgroupId>
                <artifactId>spring-cloud-dependenciesartifactId>
                <version>${spring-cloud.version}version>
                <type>pomtype>
                <scope>importscope>
            dependency>


            <dependency>
                <groupId>org.springframework.bootgroupId>
                <artifactId>spring-boot-dependenciesartifactId>
                <version>${spring-boot.version}version>
                <type>pomtype>
                <scope>importscope>
            dependency>
        dependencies>
    dependencyManagement>

    <build>
        <plugins>
            <plugin>
                <groupId>org.springframework.bootgroupId>
                <artifactId>spring-boot-maven-pluginartifactId>
            plugin>
        plugins>
    build>

project>
2、创建订单模块
<project xmlns="http://maven.apache.org/POM/4.0.0"
         xmlns:xsi="http://www.w3.org/2001/XMLSchema-instance"
         xsi:schemaLocation="http://maven.apache.org/POM/4.0.0 http://maven.apache.org/xsd/maven-4.0.0.xsd">
    <parent>
        <artifactId>tigerartifactId>
        <groupId>com.springcloudgroupId>
        <version>0.0.1-SNAPSHOTversion>
    parent>
    <modelVersion>4.0.0modelVersion>

    <groupId>com.springcloudgroupId>
    <artifactId>orderartifactId>

    <dependencies>
        <dependency>
            <groupId>org.springframework.bootgroupId>
            <artifactId>spring-boot-starter-webartifactId>
        dependency>

        <dependency>
            <groupId>com.alibaba.cloudgroupId>
            <artifactId>spring-cloud-starter-alibaba-nacos-discoveryartifactId>
        dependency>

        <dependency>
            <groupId>com.alibaba.cloudgroupId>
            <artifactId>spring-cloud-starter-alibaba-nacos-configartifactId>
        dependency>

        <dependency>
            <groupId>org.springframework.cloudgroupId>
            <artifactId>spring-cloud-starter-openfeignartifactId>
        dependency>


        <dependency>
            <groupId>com.alibaba.cloudgroupId>
            <artifactId>spring-cloud-starter-alibaba-sentinelartifactId>
        dependency>
        <dependency>
            <groupId>com.baomidougroupId>
            <artifactId>mybatis-plus-boot-starterartifactId>
            <version>3.0.7.1version>
            <exclusions>
                <exclusion>
                    <groupId>com.baomidougroupId>
                    <artifactId>mybatis-plus-generatorartifactId>
                exclusion>
            exclusions>
        dependency>
        <dependency>
            <groupId>org.projectlombokgroupId>
            <artifactId>lombokartifactId>
            <version>1.16.22version>
        dependency>

        <dependency>
            <groupId>mysqlgroupId>
            <artifactId>mysql-connector-javaartifactId>
            <version>8.0.11version>
        dependency>

        <dependency>
            <groupId>com.alibabagroupId>
            <artifactId>druid-spring-boot-starterartifactId>
            <version>1.1.13version>
        dependency>

        <dependency>
            <groupId>com.alibaba.cloudgroupId>
            <artifactId>spring-cloud-starter-alibaba-seataartifactId>
        dependency>
    dependencies>
project>
application.yml里面设置服务名和端口号
server:
  port: 8001
spring:
  application:
    name: order-service
3、创建库存模块
和订单模块一样,创建出一个库存模块
pom.xml如下:
<project xmlns="http://maven.apache.org/POM/4.0.0"
         xmlns:xsi="http://www.w3.org/2001/XMLSchema-instance"
         xsi:schemaLocation="http://maven.apache.org/POM/4.0.0 http://maven.apache.org/xsd/maven-4.0.0.xsd">
    <parent>
        <artifactId>tigerartifactId>
        <groupId>com.springcloudgroupId>
        <version>0.0.1-SNAPSHOTversion>
    parent>
    <modelVersion>4.0.0modelVersion>

    <groupId>com.springcloudgroupId>
    <artifactId>stockartifactId>

    <dependencies>
        <dependency>
            <groupId>org.springframework.bootgroupId>
            <artifactId>spring-boot-starter-webartifactId>
        dependency>

        <dependency>
            <groupId>com.alibaba.cloudgroupId>
            <artifactId>spring-cloud-starter-alibaba-nacos-discoveryartifactId>
        dependency>

        <dependency>
            <groupId>com.alibaba.cloudgroupId>
            <artifactId>spring-cloud-starter-alibaba-nacos-configartifactId>
        dependency>
        <dependency>
            <groupId>com.baomidougroupId>
            <artifactId>mybatis-plus-boot-starterartifactId>
            <version>3.0.7.1version>
            <exclusions>
                <exclusion>
                    <groupId>com.baomidougroupId>
                    <artifactId>mybatis-plus-generatorartifactId>
                exclusion>
            exclusions>
        dependency>
        <dependency>
            <groupId>org.projectlombokgroupId>
            <artifactId>lombokartifactId>
            <version>1.16.22version>
        dependency>

        <dependency>
            <groupId>mysqlgroupId>
            <artifactId>mysql-connector-javaartifactId>
            <version>8.0.11version>
        dependency>

        <dependency>
            <groupId>com.alibabagroupId>
            <artifactId>druid-spring-boot-starterartifactId>
            <version>1.1.13version>
        dependency>

        <dependency>
            <groupId>com.alibaba.cloudgroupId>
            <artifactId>spring-cloud-starter-alibaba-seataartifactId>
        dependency>
    dependencies>
project>
application.yml里面设置服务名和端口号
server:
  port: 8002
spring:
  application:
    name: stock-service
nacos服务注册发现
nacos是springcloudalibaba的推荐的注册中心,功能非常强大,而且既可以当注册中心也可以当配置中心。
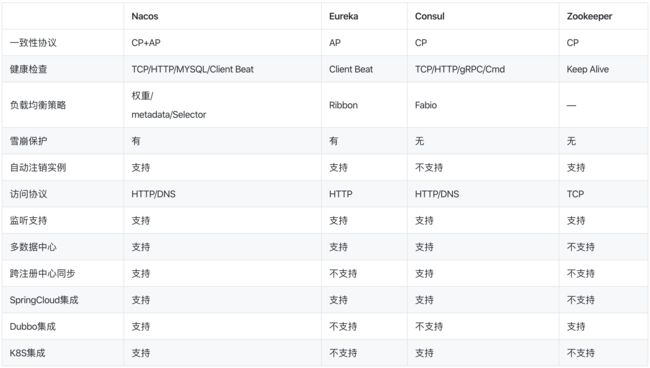
我们现在进行nacos的下载安装和代码集成
nacos下载
因为springcloudalibaba各个组件的版本非常多,一旦版本不一致就很容易报错,所以我们要严格按照版本对应关系来,我这次用的SpringCloudAlibaba是目前最新的
2.2.8RELEASE,所以用的nacos版本是2.1.0

Nacos下载地址:https://github.com/alibaba/nacos/releases
Nacos官方文档:https://nacos.io/zh-cn/docs/quick-start.html
nacos启动
nacos从存储上可以分为内存和数据库,从启动方式上分为单机启动还有集群启动,一般来说我们都是使用mysql数据库启动,单机启动的话除了数据库不需要更改其他配置,如果是集群启动的话需要多台服务器(学习的时候也可以多个服务部署在同一个服务器上,做伪集群,多个服务器的话可以使用虚拟机来实现。)
内存单机模式启动
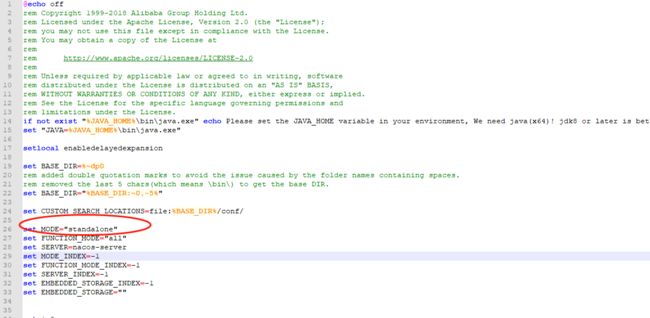
下载完打开startup.cmd(windows版本),如果是linux系统就是startup.sh,把里面的模式改成单机standalone,默认是集群cluster
启动startup.cmd(Linux系统下是startup.sh)
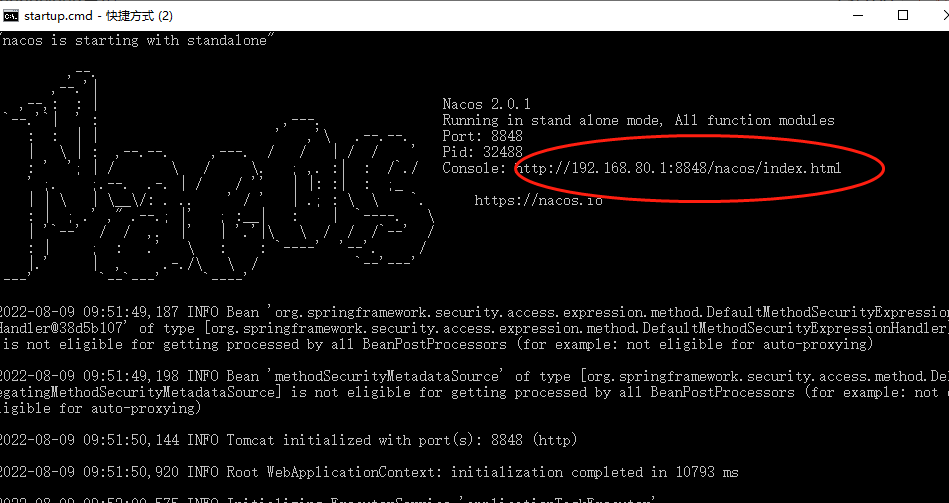
访问上面的路径 http://192.168.80.1:8848/nacos/index.html,然后登陆,用户名和密码都是nacos
更改内存为MySQL数据库
更改application.properties
spring.datasource.platform=mysql
db.num=1
#db.url.0=jdbc:mysql://localhost:3306/ry-config?characterEncoding=utf8&connectTimeout=1000&socketTimeout=10000&autoReconnect=true&serverTimezone=UTC
db.url.0=jdbc:mysql://localhost:3306/nacos?characterEncoding=utf8&connectTimeout=1000&socketTimeout=10000&autoReconnect=true&serverTimezone=UTC
db.user=root
db.password=123456
集群方式
准备三个虚拟机,也可以同一个虚拟机做伪集群,虚拟机需要联网,如何联网,并且设置固定ip查看 https://dbhx.vip/article/70
我这里准备了192.168.6.11、192.168.6.12、192.168.6.13三个虚拟机
分别将nacos-server-2.1.0-BETA.tar.gz传到/usr/local/nacos里面并解压
tar -zxvf nacos-server-2.1.0-BETA.tar.gz
cd /usr/local/nacos/nacos/conf
主要有三个步骤:
1、startup.sh里面的export MODE=“cluster”,确保模式为集群模式
2、startup.sh里面集群情况下内存大小改小一点,改为-Xms512m -Xmx512m -Xmn256m,不然有可能会提示内存不足。
#===========================================================================================
# JVM Configuration
#===========================================================================================
if [[ "${MODE}" == "standalone" ]]; then
    JAVA_OPT="${JAVA_OPT} -Xms512m -Xmx512m -Xmn256m"
    JAVA_OPT="${JAVA_OPT} -Dnacos.standalone=true"
else
    if [[ "${EMBEDDED_STORAGE}" == "embedded" ]]; then
        JAVA_OPT="${JAVA_OPT} -DembeddedStorage=true"
    fi
    JAVA_OPT="${JAVA_OPT} -server -Xms512m -Xmx512m -Xmn256m -XX:MetaspaceSize=128m -XX:MaxMetaspaceSize=320m"
    JAVA_OPT="${JAVA_OPT} -XX:-OmitStackTraceInFastThrow -XX:+HeapDumpOnOutOfMemoryError -XX:HeapDumpPath=${BASE_DIR}/logs/java_heapdump.hprof"
    JAVA_OPT="${JAVA_OPT} -XX:-UseLargePages"
3、改成mysql数据库模式
4、在里面新增cluster.conf文件,添加集群的几个机器的ip和端口
192.168.6.11:8848
192.168.6.12:8848
192.168.6.13:8848
以上几个步骤要在三个虚拟机上都操作一遍
执行/usr/local/nacos/nacos/bin下面的startup.sh,然后看看192.168.6.11:8848/nacos,192.168.6.12:8848/nacos,192.168.6.13:8848/nacos在浏览器里打开,看看是否可以访问,当然前提是把8848端口开放
打开linux系统端口的命令如下:
firewall-cmd --zone=public --add-port=8848/tcp --permanent
firewall-cmd --reload
5、负载均衡
等三个虚拟机安装的nacos都没问题了之后,我们需要使用nginx来做负载均衡
如何安装nginx查看https://www.dbhx.vip/article/65
我这里nginx安装在了192.168.6.11上面
打开/usr/local/nginx/conf里面的nginx.conf,在http下面添加
    upstream nacoscluster {
        server 192.168.6.11:8848;
        server 192.168.6.12:8848;
        server 192.168.6.13:8848;
    }
    server {
        listen       8847;
        server_name  localhost;

        location /nacos {
            proxy_pass   http://nacoscluster/nacos;
            root   html;
            index  index.html index.htm;
        }
        error_page   500 502 503 504  /50x.html;
        location = /50x.html {
            root   html;
        }
    }
然后重启nginx
这个时候我们访问192.168.6.11:8847就可以访问了(在浏览器打开的话先把8847端口打开放)。
nacos注册发现代码集成
1、引入jar包
<dependency>
    <groupId>com.alibaba.cloudgroupId>
    <artifactId>spring-cloud-starter-alibaba-nacos-discoveryartifactId>
dependency>
2、在bootstrap.yml里面添加配置(和组件有关的比较喜欢放在bootstrap里面)
spring:
  cloud:
    nacos:
      discovery:
#        server-addr: 192.168.6.11:8848,192.168.6.12:8848,192.168.6.13:8848
#        server-addr: 192.168.6.11:8847
        server-addr: localhost:8848
这里集群可以是nginx指定的集群ip和端口,也可以是几个服务器+端口用逗号隔开,也可以是单个nacos服务地址。
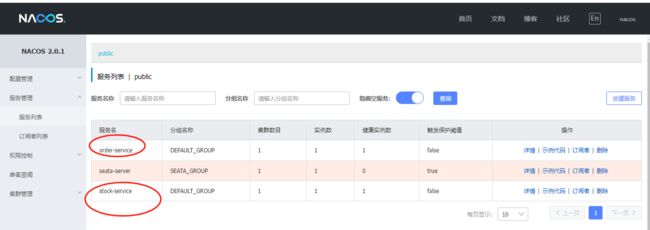
在order-service和stock-service项目里面将这两步完成之后,我们启动项目,在nacos浏览器界面上会发现这两个项目,这就是已经注册好了,至于服务发现,我在下面的服务间远程调用里面说。
服务间远程调用
服务内接口调用很简单,但是我们服务间远程调用的话我比较喜欢RestTemplate和OpenFeign这两种,第一个不仅仅可以用来调用微服务的接口,也可以调用其他远程接口,但是如果在微服务里面推荐用OpenFeign,比较方便,而且功能比较强大。
这里我用订单服务order-service调用存储服务stock-service里面的接口进行测试。
1、RestTemplate调用
我们先使用RestTemplate来调用远程接口
在order-service和stock-service里面引入springmvc的包,RequestMapping,RestController以及RestTemplate都在这个包里面。
<dependency>
    <groupId>org.springframework.bootgroupId>
    <artifactId>spring-boot-starter-webartifactId>
dependency>
在order-service里面新增controller方法
package com.order.controller;

import org.springframework.beans.factory.annotation.Autowired;
import org.springframework.web.bind.annotation.RequestMapping;
import org.springframework.web.bind.annotation.RestController;
import org.springframework.web.client.RestTemplate;

@RestController
@RequestMapping("/order")
public class OrderController {
    @Autowired
    private RestTemplate restTemplate;

    @RequestMapping("/add")
    public String add(){
        System.out.println("生成订单");
        String message = restTemplate.getForObject("http://localhost:8002/stock/reduce/1", String.class);
        return "生成订单"+message+message2;
    }
}
使用RestTemplate時候要加上配置,不然会提示找不到类
@Bean
public RestTemplate restTemplate(RestTemplateBuilder builder) {
    return builder.build();
}
stock-service里面新增被调用的接口
package com.stock.controller;

import com.stock.service.StockService;
import org.springframework.beans.factory.annotation.Autowired;
import org.springframework.beans.factory.annotation.Value;
import org.springframework.web.bind.annotation.PathVariable;
import org.springframework.web.bind.annotation.RequestMapping;
import org.springframework.web.bind.annotation.RestController;

@RestController
@RequestMapping("/stock")
public class StockController {

    @Autowired
    private StockService stockService;

    @Value("${server.port}")
    private String port;
    @RequestMapping("/reduce/{id}")
    public String reduce(@PathVariable("id") String id) throws InterruptedException {
        System.out.println("库存被减少了reduce");
        return "库存被减少了,库存端口是"+port+"------"+id;
    }
}
启动两个服务,在浏览器里访问http://localhost:8001/order/add,会显示

因为我们使用了nacos服务发现,所以我们这里除了可以访问http://localhost:8001/order/add,我们可以使用服务名来访问,也就是http://order-service/order/add
但是我们必须要在刚刚的配置上加一个注解@LoadBalanced,不然会提示找不到要访问的stock-service服务。
@Bean
@LoadBalanced
public RestTemplate restTemplate(RestTemplateBuilder builder) {
    return builder.build();
}
这里stock-service是单一的服务,我们可以启动多个stock-ervice服务,这样就可以使用负载均衡。
但是我们同一套代码启动出多个服务,我们不可能复制多份代码,这样太麻烦,所以我们在idea里面可以这样启动:
我们复制一份启动配置
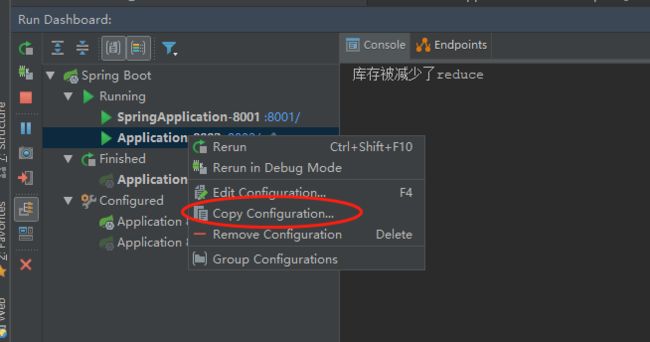

我们修改一下服务名称以及端口号。这样操作我们就可以实现同一份代码启动多个不通端口的stock-service服务.
我们在nacos界面查看stock-service,查看详情,里面有三个服务,端口不同。

我们在浏览器里面不断访问http://localhost:8001/order/add,会发现发挥的端口是8002,8003,8005轮流出现(我在stock-service的接口里面返回了stock-service的端口),我们可以发现nacos默认的是负载均衡是轮询。
当然nacos的负载均衡是可以修改的,有两种方法。
1、配置类
配置类的方法有个坑,就是配置类不能放启动类可以扫描到的目录下面,否则会对所有客户端生效。
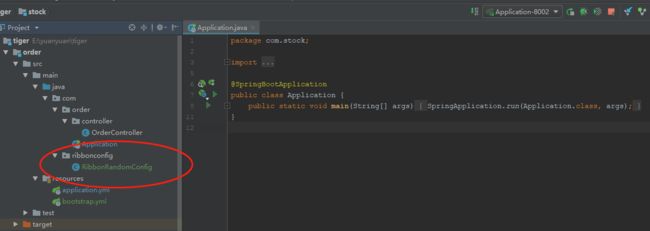
配置类如下:
package com.ribbonconfig;

import com.netflix.loadbalancer.IRule;
import com.netflix.loadbalancer.RandomRule;
import org.springframework.context.annotation.Bean;
import org.springframework.context.annotation.Configuration;

@Configuration
public class RibbonRandomConfig {
    @Bean
    public IRule iRule(){
        return new RandomRule();
    }
}
定义好配置类我们如何使用它呢?
在启动类上面加上注解:
@RibbonClients(value = @RibbonClient(name = "stock-service",configuration = com.ribbonconfig.RibbonRandomConfig.class))
RandomRule就是随机的策略,策略一共7种
1.轮询策略 RoundRobinRule
2 权重策略 WeightedResponseTimeRule
3 .随机策略 RandomRule
4 最小连接数策略 BestAvailableRule
5 重试策略 RetryRule
6 可用性敏感策略 AvailabilityFilteringRule
7 区域敏感策略 ZoneAvoidanceRule
2、yml配置文件
stock-service:
  ribbon:
    NFLoadBalancerRuleClassName: com.alibaba.cloud.nacos.ribbon.NacosRule
stock-service为服务提供者,com.alibaba.cloud.nacos.ribbon.NacosRule是策略的类路径
其中负载均衡策略的类路径:
1.轮询策略 com.netflix.loadbalancer.RoundRobinRule
2 权重策略 com.netflix.loadbalancer.WeightedResponseTimeRule(但是这个权重是策略自己根据服务运行情况每30秒一次来计算出来的权重,如果要自己设定权重的话要用nacos扩展的策略:com.alibaba.cloud.nacos.ribbon.NacosRule)
3 .随机策略 com.netflix.loadbalancer.RandomRule
4 最小连接数策略 com.netflix.loadbalancer.BestAvailableRule
5 重试策略 com.netflix.loadbalancer.RetryRule
6 可用性敏感策略 com.netflix.loadbalancer.AvailabilityFilteringRule
7 区域敏感策略 com.netflix.loadbalancer.ZoneAvoidanceRule
3、自定义负载均衡策略
我们之前说了ribbon自带的负载均衡策略大概有其中左右,如果我们觉得不够用其实可以自定义负载均衡策略,方法很简单,照着源码里的例子写就是了,我们以随机策略为例,这个比较简单
随机策略是RandomRule,源码如下:
package com.netflix.loadbalancer;

import com.netflix.client.config.IClientConfig;
import edu.umd.cs.findbugs.annotations.SuppressWarnings;
import java.util.List;
import java.util.concurrent.ThreadLocalRandom;

public class RandomRule extends AbstractLoadBalancerRule {
    public RandomRule() {
    }

    @SuppressWarnings({"RCN_REDUNDANT_NULLCHECK_OF_NULL_VALUE"})
    public Server choose(ILoadBalancer lb, Object key) {
        if (lb == null) {
            return null;
        } else {
            Server server = null;

            while(server == null) {
                if (Thread.interrupted()) {
                    return null;
                }

                List<Server> upList = lb.getReachableServers();
                List<Server> allList = lb.getAllServers();
                int serverCount = allList.size();
                if (serverCount == 0) {
                    return null;
                }

                int index = this.chooseRandomInt(serverCount);
                server = (Server)upList.get(index);
                if (server == null) {
                    Thread.yield();
                } else {
                    if (server.isAlive()) {
                        return server;
                    }

                    server = null;
                    Thread.yield();
                }
            }

            return server;
        }
    }

    protected int chooseRandomInt(int serverCount) {
        return ThreadLocalRandom.current().nextInt(serverCount);
    }

    public Server choose(Object key) {
        return this.choose(this.getLoadBalancer(), key);
    }

    public void initWithNiwsConfig(IClientConfig clientConfig) {
    }
}
我们可以看到是继承抽象类AbstractLoadBalancerRule,然后实现里面的choose方法
我们自己建个自定义策略类
package com.ribbonconfig;

import com.netflix.client.config.IClientConfig;
import com.netflix.loadbalancer.AbstractLoadBalancerRule;
import com.netflix.loadbalancer.Server;

public class CustomRule extends AbstractLoadBalancerRule {
    public Server choose(Object o) {
    	ILoadBalancer loadBalancer = this.getLoadBalancer();
        //获取可用的服务实例
        List<Server> reachableServers = loadBalancer.getReachableServers();
        //获取所有的服务实例
        List<Server> allServers = loadBalancer.getAllServers();
        //实现自己的逻辑
        ...
        return null;
    }

    public void initWithNiwsConfig(IClientConfig iClientConfig) {

    }
}
然后把配置文件里面的策略类还掉就行了
stock-service:
  ribbon:
    NFLoadBalancerRuleClassName: com.ribbonconfig.CustomRule
这里注意:我们一般不用配置类的方法,因为不仅麻烦,要加一个class类,然后在启动类上面加注解,而且加的位置如果不对,容易作用于所有的客户端,所以我们一直使用配置文件的方式
2、openfeign
下面就说一说比较常用的openfeign。
1、集成openfeign
pom引入jar包
<dependency>
    <groupId>org.springframework.cloudgroupId>
    <artifactId>spring-cloud-starter-openfeignartifactId>
dependency>
使用openfeign的时候我们需要新建一个接口,用来和要调用的远程服务里面的controller一一对应。
stock-service里面的controller代码如下:
package com.stock.controller;

import com.stock.service.StockService;
//import io.seata.spring.annotation.GlobalTransactional;
import org.springframework.beans.factory.annotation.Autowired;
import org.springframework.beans.factory.annotation.Value;
import org.springframework.web.bind.annotation.PathVariable;
import org.springframework.web.bind.annotation.RequestMapping;
import org.springframework.web.bind.annotation.RestController;

@RestController
@RequestMapping("/stock")
public class StockController {

    @Autowired
    private StockService stockService;

    @Value("${server.port}")
    private String port;
    @RequestMapping("/reduce/{id}")
    public String reduce(@PathVariable("id") String id) throws InterruptedException {
        System.out.println("库存被减少了reduce");
        return "库存被减少了,库存端口是"+port+"------"+id;
    }
}
在order-service里面新建的接口代码如下:
package com.order.openfeign;

import org.springframework.cloud.openfeign.FeignClient;
import org.springframework.web.bind.annotation.PathVariable;
import org.springframework.web.bind.annotation.RequestMapping;

@FeignClient(value = "stock-service",path = "/stock")
public interface StockService {

    @RequestMapping("/reduce/{id}")
    public String reduce(@PathVariable("id") String id);
}
stock-service是服务的名称,stock就是服务端的controller的路径,方法参数之类的和服务端的方法一致就行了
另外在启动类上面加一个注解@EnableFeignClients
然后可以用这个StockService 调用服务端的接口了,order-service里面的add方法改造如下
	@Autowired
    private StockService stockService;
    @RequestMapping("/add")
    public String add(){
        System.out.println("生成订单");
        //String message = restTemplate.getForObject("http://localhost:8002/stock/reduce/1", String.class);
        String message = stockService.reduce("222");
        return "生成订单"+message;
    }
浏览器里面访问http://localhost:8001/order/add,显示如下:

2、openfeign日志
如何显示openfeign的日志呢,范围来讲有全局,一种是全局的,就是用@Configuration,一种是局部就是不用这个注解,自己指定配置类
全局的日志的话配置类要放在启动类可以扫描到的地方
package com.order.feignconfig;

import feign.Logger;
import org.springframework.context.annotation.Bean;
import org.springframework.context.annotation.Configuration;

@Configuration
public class LogConfig {

    @Bean
    public Logger.Level customFeignLoggerLevel(){
        return Logger.Level.FULL;
    }
}
方法名可以自己定义,不过最好长一点,防止重复
要把springboot本身的日志级别打开为debug,因为springboot本身的级别为info,导致无法查看feign的日志。
logging:
  level:
    com.order.openfeign: debug
com.order.openfeign为feign接口所在的目录,只显示所在目录的日志,直接debug会显示所有的日志。

如果想要具体给某一个服务开启feign日志的话,有两种方式
一种是把LogConfig配置类的@Configuration去掉,然后在某一个服务的feign接口里面指定配置类
package com.order.openfeign;

import com.order.feignconfig.LogConfig;
import org.springframework.cloud.openfeign.FeignClient;
import org.springframework.web.bind.annotation.PathVariable;
import org.springframework.web.bind.annotation.RequestMapping;

@FeignClient(value = "stock-service",path = "/stock",configuration = LogConfig.class)
public interface StockService {

    @RequestMapping("/reduce/{id}")
    String reduce(@PathVariable("id") String id);
}
另一种简单点就是配置文件的方式,在yml里面添加以下配置
feign:
  client:
    config:
      stock-service:   #服务端的服务名称
        loggerLevel: FULL
3、openfeign原生注解
我们现在用的是open feign,可以把远程调用和springmvc接口一样使用注解,那么如果我们目前用的就是原生feign,现在我要升级为openfeign怎么办呢,我们可以把注解全部改掉,也可以不改,可以使用契约配置,就是改为使用原生配置
一种是配置类的方法
@Bean
    public Contract feignContractConfig(){
        return new Contract.Default();
    }
一种是yml配置
feign:
  client:
    config:
      stock-service:
        loggerLevel: FULL
        contract: feign.Contract.Default
feign接口里面的RequestMapping改成RequestLine,括号里面要写上请求方式,参数都用Param传递。
    @RequestLine("GET /reduce/{id}")
    String reduce(@Param("id") String id);
4、openfeign超时时间
feign调用远程服务还可以设置一下超时的时间,服务不通总不能一直等是吧
也是一样,分为两种,配置类或者yml配置
配置类
@Bean
    public Request.Options timeOptionsConfig(){
        return new Request.Options(5000,2000);
    }
yml配置
feign:
  client:
    config:
      stock-service:
        loggerLevel: FULL
#        contract: feign.Contract.Default
        connectTimeOut: 3000
        readTimeOut: 2000
5、openfeign拦截器
我们有时候在使用feign的时候,有的时候需要拦截器进行一些访问前的操作
写一个拦截器
package com.order.intercepter;

import feign.RequestInterceptor;
import feign.RequestTemplate;

public class FeignIntercepter implements RequestInterceptor {
    public void apply(RequestTemplate requestTemplate) {
        requestTemplate.uri("reduce/999");
    }
}
指定哪个服务的话可以用配置类或者yml配置
配置类
@Bean
    public FeignIntercepter customFeignInteceptor(){
        return new FeignIntercepter();
    }
yml配置
feign:
  client:
    config:
      stock-service:
        loggerLevel: FULL
#        contract: feign.Contract.Default
        connectTimeOut: 3000
        readTimeOut: 2000
        requestInterceptors[0]: com.order.intercepter.FeignIntercepter
nacos配置中心
引入pom
<dependency>
    <groupId>com.alibaba.cloudgroupId>
    <artifactId>spring-cloud-starter-alibaba-nacos-configartifactId>
dependency>
然后在yml里面指定nacos的ip和端口
spring:
  cloud:
    nacos:
      config:
        server-addr: localhost:8848
在nacos里面新增配置文件

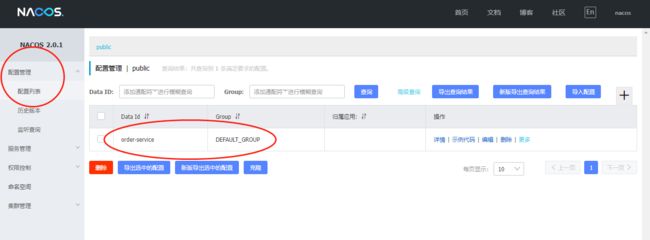
我们来读取一下配置里面的内容:
package com.order.controller;

import com.alibaba.csp.sentinel.Entry;
import com.alibaba.csp.sentinel.SphU;
import com.alibaba.csp.sentinel.annotation.SentinelResource;
import com.alibaba.csp.sentinel.slots.block.BlockException;
import com.order.openfeign.ShopFeignService;
import com.order.openfeign.StockFeignService;
import com.order.service.OrderService;
//import io.seata.spring.annotation.GlobalTransactional;
import org.springframework.beans.factory.annotation.Autowired;
import org.springframework.beans.factory.annotation.Value;
import org.springframework.cloud.context.config.annotation.RefreshScope;
import org.springframework.transaction.annotation.Transactional;
import org.springframework.web.bind.annotation.RequestMapping;
import org.springframework.web.bind.annotation.RestController;
import org.springframework.web.client.RestTemplate;

@RestController
@RequestMapping("/order")
@RefreshScope
public class OrderController {
    @Value("${name}")
    private String name;
    @Value("${type}")
    private String type;
    @RequestMapping("/getName")
    public String getName(){
        System.out.println("name="+name);
        return name+"-----"+type;
    }
}
这里有个有意思的地方,我们在代码里用@value的时候是不会实时的获取nacos配置修改的内容的,需添加@RefreshScope这个注解。
nacos配置的Data ID和服务的名称一样就可以自动获取了。
遵循 服务名-${profile}.{后缀名}
如果springcloud配置文件里面配了后缀名,会优先读取nacos里面对应后缀名结尾的配置文件
如果springcloud没有配置后缀名,会优先读取properties里面的后缀名,没有的话再去读取没有后缀名的配置文件,但是不会去读取yml后缀名。
nacos客户端会每10ms去拉取一次,根据MD5
我们如果有一些公共配置,可以用extension-configs或者shared-configs
优先级:profile>默认>extension-configs>shared-configs>代码里的application.yml>代码里面的bootstrap.yml
一般公共的用shared-configs
spring:
  cloud:
    nacos:
      discovery:
        server-addr: localhost:8848
        namespace: public
      config:
        server-addr: localhost:8848
        file-extension: properties
        shared-configs[0]:
          data-id: shared0
          refresh: true
        shared-configs[1]:
          data-id: shared1
          refresh: true
        extension-configs:
          - data-id: extension0
            refresh: true
          - data-id: extension1
            refresh: true
  profiles:
    active: dev
我们可以用下标来配extension-configs和shared-configs,也可以用-,如果用-,name从上到下下标依次为0,1,2,3…,下标越大优先级越高
在配置文件中nacos的用户名和密码默认都是nacos,可以不写,但是如果开放了权限管理,是一定要写的。
sentinel
一般电商项目在双11,节日或者秒杀的时候都会出现在短时间内有高访问量的情况,按照正常的情况,这么高访问量,系统肯定是会崩溃的,springcloudalibaba针对这种情况提出了sentinel组件来进行限流。
安装配置sentinel
下载sentinel
地址:https://github.com/alibaba/Sentinel/releases
启动jar,我是放在F盘根目录的,新建一个bat文件,因为sentinel默认端口是8080,我这里把他改成了8087,内容如下:
cd F:
F:
java -Dserver.port=8087 -Dcsp.sentinel.dashboard.server=localhost:8080 -Dproject.name=sentinel-dashboard -jar sentinel-dashboard-1.8.4.jar
代码集成sentinel
1、不需要sentinel面板
因为sentinel他是可以单独使用的,所以我们既可以纯代码使用,也可以配合面板使用
在pom里面添加jar包
<dependency>
     <groupId>com.alibaba.cspgroupId>
     <artifactId>sentinel-coreartifactId>
dependency>
因为引用了springcloudalibaba,所以版本默认为是springcloudalibaba自己管理的版本
private static final String RESOURCE_NAME="getProperty";
@RequestMapping("/getProperty")
    public String getProperty(){
        Entry entry = null;
        try {
            entry = SphU.entry(RESOURCE_NAME);
        } catch (BlockException e) {
            e.printStackTrace();
            return "资源被限流了";
        }
        System.out.println("name="+name);
        return name+"-----"+type;
    }
    @PostConstruct
    private static void initFlowRules(){
        List<FlowRule> rules = new ArrayList<>();
        FlowRule rule = new FlowRule();
        rule.setResource(RESOURCE_NAME);
        rule.setGrade(RuleConstant.FLOW_GRADE_QPS);//使用QPS的方式
        // Set limit QPS to 20.
        rule.setCount(1);//一秒钟的同时访问数
        rules.add(rule);
        FlowRuleManager.loadRules(rules);
    }
但是这种方式有个很大的弊端,就是代码的侵入性太强了,完全融入到了业务代码里面了。
我们可以升级为注解的方式
引入jar包
<dependency>
    <groupId>com.alibaba.cspgroupId>
    <artifactId>sentinel-annotation-aspectjartifactId>
dependency>
在配置类里面加上
@Bean
public SentinelResourceAspect sentinelResourceAspect(){
    return new SentinelResourceAspect();
}
private static final String RESOURCE_NAME="getName";
//初始化规则
@PostConstruct
    private static void initFlowRules(){
        List<FlowRule> rules = new ArrayList<>();
        FlowRule rule = new FlowRule();
        rule.setResource(RESOURCE_NAME);
        rule.setGrade(RuleConstant.FLOW_GRADE_QPS);
        // Set limit QPS to 20.
        rule.setCount(1);
        rules.add(rule);
        FlowRuleManager.loadRules(rules);
    }

    @RequestMapping("/getName")
    @SentinelResource(value = RESOURCE_NAME,blockHandler = "blockHandlerForGetName",fallback = "fallbackforGetName")
    public String getName(){
        System.out.println("name="+name);
        return name+"-----"+type;
    }

    public String blockHandlerForGetName(BlockException ex){
        ex.printStackTrace();
        return "被流控了";
    }

    public String fallbackforGetName(Throwable ex){
        ex.printStackTrace();
        return "出现异常了";
    }
RESOURCE_NAME为资源名称,和初始化方法里面的资源名称对应,blockHandlerForGetName为不符合规则的处理方法,要求返回值和参数和原方法一样,不过可以在最后可以添加参数BlockException
fallbackforGetName为出现异常的处理方法,里面可以放参数Throwable
blockHandler 的优先级要比fallback 高
这两个方法必须和资源放在同一个类里面,如果一定要放在其他类里面,需要设置一下,可以使用blockHandlerClass和fallbackClass
2、sentinel面板
这是用代码配置规则,我们还可以用界面来配置,项目如何集成呢?
添加面板的jar包
<dependency>
    <groupId>com.alibaba.cspgroupId>
    <artifactId>sentinel-transport-simple-httpartifactId>
dependency>
然后在项目的启动配置上配置-Dcsp.sentinel.dashboard.server=127.0.0.1:8087,127.0.0.1:8087是sentinel的路径,可以自己修改
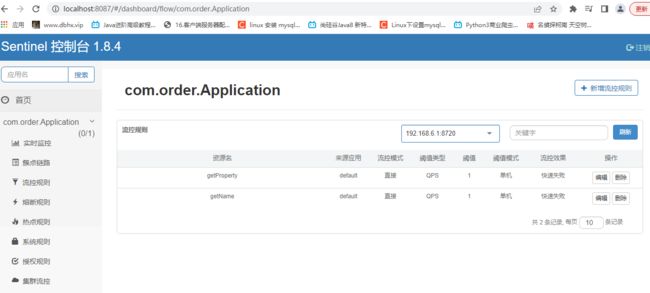
开始sentinel面板里面是没有内容的,我们需要访问一下服务里面的接口,然后面板刷新会出现当前项目的信息。

我们新增一个流控规则代替之前代码里面的规则:一秒钟内只允许访问一次

3、springcloudalibaba集成sentinel
我们之前的操作都是不用springcloudalibaba也可以使用sentinel
下面我们集成在springcloudalibaba里面。
<dependency>
    <groupId>com.alibaba.cloudgroupId>
    <artifactId>spring-cloud-starter-alibaba-sentinelartifactId>
dependency>
bootstrap.xml里面配置一下sentinel面板地址
spring:
  cloud:
    sentinel:
      transport:
        dashboard: 127.0.0.1:8087
这样之前的那些jar包以及jvm里面的配置就不需要了,是不是很简单。
4、sentinel配合openfeign
sentinel其实也可以配合open feign使用,做一些熔断降级。
创建一个继承feign接口类的类
@FeignClient(value = "shop-service",path = "/shop")
public interface ShopService {

    @RequestMapping("/reduce/{id}")
    String reduce(@PathVariable("id") String id);
}
这里我是调用了一个新的商品服务里面的接口,controller是
package com.shop.controller;

import org.springframework.beans.factory.annotation.Value;
import org.springframework.web.bind.annotation.PathVariable;
import org.springframework.web.bind.annotation.RequestMapping;
import org.springframework.web.bind.annotation.RestController;

@RestController
@RequestMapping("/shop")
public class ShopController {

    @Value("${server.port}")
    private String port;
    @RequestMapping("/reduce/{id}")
    public String reduce(@PathVariable("id") String id){
        System.out.println("商品被减少了");
        return "商品被减少了,商品端口是"+port+"------"+id;
    }
}
我们定一个类来继承这个feign接口,来进行降级的处理。
package com.order.fallback;

import com.order.openfeign.ShopService;
import org.springframework.stereotype.Component;

@Component
public class ShopFallBackException implements ShopService {
    public String reduce(String id) {
        return "商品接口降级了";
    }
}
在feign接口上面指定刚刚的类fallback = ShopFallBackException.class
@FeignClient(value = "shop-service",path = "/shop",fallback = ShopFallBackException.class)
public interface ShopService {

    @RequestMapping("/reduce/{id}")
    String reduce(@PathVariable("id") String id);
}
在配置文件里面开启feign对sentinel的支持
feign:
  sentinel:
    enabled: true
Seata
我们在单服务的情况下来进行事务处理经常会使用@Transactional注解,但是在分布式微服务里面我们怎么处理事务呢?
我们这里是用的是seata
1、下载安装配置seata
seata下载
https://github.com/seata/seata/releases
按照版本对应关系,我下载的是1.5.1
解压seata-server-1.5.1.zip
1、修改配置文件
修改application.yml
server:
  port: 7091

spring:
  application:
    name: seata-server

logging:
  config: classpath:logback-spring.xml
  file:
    path: ${user.home}/logs/seata
  extend:
    logstash-appender:
      destination: 127.0.0.1:4560
    kafka-appender:
      bootstrap-servers: 127.0.0.1:9092
      topic: logback_to_logstash

console:
  user:
    username: seata
    password: seata

seata:
  config:
    # support: nacos 、 consul 、 apollo 、 zk  、 etcd3
    type: nacos
    nacos:
      server-addr: 127.0.0.1:8848
      namespace:
      group: SEATA_GROUP
      username: nacos
      password: nacos
      ##if use MSE Nacos with auth, mutex with username/password attribute
      #access-key: ""
      #secret-key: ""
      data-id: seata-server.properties
  registry:
    # support: nacos 、 eureka 、 redis 、 zk  、 consul 、 etcd3 、 sofa
    type: nacos
    preferred-networks: 30.240.*
    nacos:
      application: seata-server
      server-addr: 127.0.0.1:8848
      group: SEATA_GROUP
      namespace:
      cluster: default
      username: nacos
      password: nacos
      ##if use MSE Nacos with auth, mutex with username/password attribute
      #access-key: ""
      #secret-key: ""
  security:
    secretKey: SeataSecretKey0c382ef121d778043159209298fd40bf3850a017
    tokenValidityInMilliseconds: 1800000
    ignore:
      urls: /,/**/*.css,/**/*.js,/**/*.html,/**/*.map,/**/*.svg,/**/*.png,/**/*.ico,/console-fe/public/**,/api/v1/auth/login
2、在本地nacos添加配置文件seata-server.properties
dataid 为seata-server.properties,group为SEATA_GROUP,内容为
#For details about configuration items, see https://seata.io/zh-cn/docs/user/configurations.html
#Transport configuration, for client and server
transport.type=TCP
transport.server=NIO
transport.heartbeat=true
transport.enableTmClientBatchSendRequest=false
transport.enableRmClientBatchSendRequest=true
transport.enableTcServerBatchSendResponse=false
transport.rpcRmRequestTimeout=30000
transport.rpcTmRequestTimeout=30000
transport.rpcTcRequestTimeout=30000
transport.threadFactory.bossThreadPrefix=NettyBoss
transport.threadFactory.workerThreadPrefix=NettyServerNIOWorker
transport.threadFactory.serverExecutorThreadPrefix=NettyServerBizHandler
transport.threadFactory.shareBossWorker=false
transport.threadFactory.clientSelectorThreadPrefix=NettyClientSelector
transport.threadFactory.clientSelectorThreadSize=1
transport.threadFactory.clientWorkerThreadPrefix=NettyClientWorkerThread
transport.threadFactory.bossThreadSize=1
transport.threadFactory.workerThreadSize=default
transport.shutdown.wait=3
transport.serialization=seata
transport.compressor=none

#Transaction routing rules configuration, only for the client
service.vgroupMapping.default_tx_group=default
#If you use a registry, you can ignore it
service.default.grouplist=127.0.0.1:8091
service.enableDegrade=false
service.disableGlobalTransaction=false

#Transaction rule configuration, only for the client
client.rm.asyncCommitBufferLimit=10000
client.rm.lock.retryInterval=10
client.rm.lock.retryTimes=30
client.rm.lock.retryPolicyBranchRollbackOnConflict=true
client.rm.reportRetryCount=5
client.rm.tableMetaCheckEnable=true
client.rm.tableMetaCheckerInterval=60000
client.rm.sqlParserType=druid
client.rm.reportSuccessEnable=false
client.rm.sagaBranchRegisterEnable=false
client.rm.sagaJsonParser=fastjson
client.rm.tccActionInterceptorOrder=-2147482648
client.tm.commitRetryCount=5
client.tm.rollbackRetryCount=5
client.tm.defaultGlobalTransactionTimeout=60000
client.tm.degradeCheck=false
client.tm.degradeCheckAllowTimes=10
client.tm.degradeCheckPeriod=2000
client.tm.interceptorOrder=-2147482648
client.undo.dataValidation=true
client.undo.logSerialization=jackson
client.undo.onlyCareUpdateColumns=true
server.undo.logSaveDays=7
server.undo.logDeletePeriod=86400000
client.undo.logTable=undo_log
client.undo.compress.enable=true
client.undo.compress.type=zip
client.undo.compress.threshold=64k
#For TCC transaction mode
tcc.fence.logTableName=tcc_fence_log
tcc.fence.cleanPeriod=1h

#Log rule configuration, for client and server
log.exceptionRate=100

#Transaction storage configuration, only for the server. The file, DB, and redis configuration values are optional.
store.mode=db
store.lock.mode=db
store.session.mode=db
#Used for password encryption
store.publicKey=

#These configurations are required if the `store mode` is `db`. If `store.mode,store.lock.mode,store.session.mode` are not equal to `db`, you can remove the configuration block.
store.db.datasource=druid
store.db.dbType=mysql
store.db.driverClassName=com.mysql.jdbc.Driver
store.db.url=jdbc:mysql://127.0.0.1:3306/seata-server?useUnicode=true&rewriteBatchedStatements=true
store.db.user=root
store.db.password=123456
store.db.minConn=5
store.db.maxConn=30
store.db.globalTable=global_table
store.db.branchTable=branch_table
store.db.distributedLockTable=distributed_lock
store.db.queryLimit=100
store.db.lockTable=lock_table
store.db.maxWait=5000

#Transaction rule configuration, only for the server
server.recovery.committingRetryPeriod=1000
server.recovery.asynCommittingRetryPeriod=1000
server.recovery.rollbackingRetryPeriod=1000
server.recovery.timeoutRetryPeriod=1000
server.maxCommitRetryTimeout=-1
server.maxRollbackRetryTimeout=-1
server.rollbackRetryTimeoutUnlockEnable=false
server.distributedLockExpireTime=10000
server.xaerNotaRetryTimeout=60000
server.session.branchAsyncQueueSize=5000
server.session.enableBranchAsyncRemove=false
server.enableParallelRequestHandle=false

#Metrics configuration, only for the server
metrics.enabled=false
metrics.registryType=compact
metrics.exporterList=prometheus
metrics.exporterPrometheusPort=9898
然后新增一个数据库seata-server
-- -------------------------------- The script used when storeMode is 'db' --------------------------------
-- the table to store GlobalSession data
CREATE TABLE IF NOT EXISTS `global_table`
(
    `xid`                       VARCHAR(128) NOT NULL,
    `transaction_id`            BIGINT,
    `status`                    TINYINT      NOT NULL,
    `application_id`            VARCHAR(32),
    `transaction_service_group` VARCHAR(32),
    `transaction_name`          VARCHAR(128),
    `timeout`                   INT,
    `begin_time`                BIGINT,
    `application_data`          VARCHAR(2000),
    `gmt_create`                DATETIME,
    `gmt_modified`              DATETIME,
    PRIMARY KEY (`xid`),
    KEY `idx_status_gmt_modified` (`status` , `gmt_modified`),
    KEY `idx_transaction_id` (`transaction_id`)
) ENGINE = InnoDB
  DEFAULT CHARSET = utf8mb4;

-- the table to store BranchSession data
CREATE TABLE IF NOT EXISTS `branch_table`
(
    `branch_id`         BIGINT       NOT NULL,
    `xid`               VARCHAR(128) NOT NULL,
    `transaction_id`    BIGINT,
    `resource_group_id` VARCHAR(32),
    `resource_id`       VARCHAR(256),
    `branch_type`       VARCHAR(8),
    `status`            TINYINT,
    `client_id`         VARCHAR(64),
    `application_data`  VARCHAR(2000),
    `gmt_create`        DATETIME(6),
    `gmt_modified`      DATETIME(6),
    PRIMARY KEY (`branch_id`),
    KEY `idx_xid` (`xid`)
) ENGINE = InnoDB
  DEFAULT CHARSET = utf8mb4;

-- the table to store lock data
CREATE TABLE IF NOT EXISTS `lock_table`
(
    `row_key`        VARCHAR(128) NOT NULL,
    `xid`            VARCHAR(128),
    `transaction_id` BIGINT,
    `branch_id`      BIGINT       NOT NULL,
    `resource_id`    VARCHAR(256),
    `table_name`     VARCHAR(32),
    `pk`             VARCHAR(36),
    `status`         TINYINT      NOT NULL DEFAULT '0' COMMENT '0:locked ,1:rollbacking',
    `gmt_create`     DATETIME,
    `gmt_modified`   DATETIME,
    PRIMARY KEY (`row_key`),
    KEY `idx_status` (`status`),
    KEY `idx_branch_id` (`branch_id`),
    KEY `idx_xid` (`xid`)
) ENGINE = InnoDB
  DEFAULT CHARSET = utf8mb4;

CREATE TABLE IF NOT EXISTS `distributed_lock`
(
    `lock_key`       CHAR(20) NOT NULL,
    `lock_value`     VARCHAR(20) NOT NULL,
    `expire`         BIGINT,
    primary key (`lock_key`)
) ENGINE = InnoDB
  DEFAULT CHARSET = utf8mb4;

INSERT INTO `distributed_lock` (lock_key, lock_value, expire) VALUES ('AsyncCommitting', ' ', 0);
INSERT INTO `distributed_lock` (lock_key, lock_value, expire) VALUES ('RetryCommitting', ' ', 0);
INSERT INTO `distributed_lock` (lock_key, lock_value, expire) VALUES ('RetryRollbacking', ' ', 0);
INSERT INTO `distributed_lock` (lock_key, lock_value, expire) VALUES ('TxTimeoutCheck', ' ', 0);
启动bin目录下面的seata-server.bat
2、代码集成seata
引入jar包
<dependency>
    <groupId>com.alibaba.cloudgroupId>
    <artifactId>spring-cloud-starter-alibaba-seataartifactId>
dependency>
配置文件里面加上seata的配置
seata:
  tx-service-group: default_tx_group
  service.vgroupMapping.default_tx_group: default
  service.grouplist.default: 127.0.0.1:8091
  register:
    type: nacos
    nacos:
      server-addr: 127.0.0.1:8848
      application: seata-server
      username: nacos
      password: nacos
      group: SEATA_GROUP
  config:
    nacos:
      server-addr: 127.0.0.1:8848
      application: seata-server
      username: nacos
      password: nacos
      group: SEATA_GROUP
这里的值都是默认的,如果要改的话要和服务端的值一致
在对应的数据库里面创建表
-- for AT mode you must to init this sql for you business database. the seata server not need it.
CREATE TABLE IF NOT EXISTS `undo_log`
(
    `branch_id`     BIGINT       NOT NULL COMMENT 'branch transaction id',
    `xid`           VARCHAR(128) NOT NULL COMMENT 'global transaction id',
    `context`       VARCHAR(128) NOT NULL COMMENT 'undo_log context,such as serialization',
    `rollback_info` LONGBLOB     NOT NULL COMMENT 'rollback info',
    `log_status`    INT(11)      NOT NULL COMMENT '0:normal status,1:defense status',
    `log_created`   DATETIME(6)  NOT NULL COMMENT 'create datetime',
    `log_modified`  DATETIME(6)  NOT NULL COMMENT 'modify datetime',
    UNIQUE KEY `ux_undo_log` (`xid`, `branch_id`)
) ENGINE = InnoDB
  AUTO_INCREMENT = 1
  DEFAULT CHARSET = utf8mb4 COMMENT ='AT transaction mode undo table';
在进行第一阶段提交的时候,数据库发生了变更,但是seata会把变更前的数据变更后的数据都存入到这个undo_log表,这样一旦发生错误会进行再次变更,变更到之前的数据。

最后一步就是在业务接口上加上seata的注解@GlobalTransactional
gateway
当我们后台项目非常多的时候,前端调用会非常麻烦,每个服务都有自己的端口号,都有一样的接口名称,所有我们通常在微服务里面都会用网关来管理众多的服务。
这里我们用的是gateway
新建一个gateway模块
首先我们引入jar包
        <dependency>
            <groupId>com.alibaba.cloudgroupId>
            <artifactId>spring-cloud-starter-alibaba-nacos-discoveryartifactId>
        dependency>

        <dependency>
            <groupId>com.alibaba.cloudgroupId>
            <artifactId>spring-cloud-starter-alibaba-nacos-configartifactId>
        dependency>

        <dependency>
            <groupId>org.springframework.cloudgroupId>
            <artifactId>spring-cloud-starter-gatewayartifactId>
        dependency>
添加配置
server:
  port: 8888
spring:
  application:
    name: gateway-server
  cloud:
    nacos:
      discovery:
        server-addr: 127.0.0.1:8848
      config:
        server-addr: 127.0.0.1:8848
    gateway:
      discovery:
        locator:
          enabled: true
#      routes:
#        - id: order-service
#          uri: lb://order-service
#          predicates:
#            - Path=/order-service/**
#          filters:
#            - StripPrefix=1
启动gateway服务,注册到nacos里面。
这个时候我们访问http://localhost:8888/order-service/order/add的时候就可以访问转为访问
discovery:
   locator:
     enabled: true
意思是直接通过服务名称来匹配
      routes:
        - id: order-service
          uri: lb://order-service
          predicates:
            - Path=/order-service/**
          filters:
            - StripPrefix=1
意思是如果访问localhost:8888/order-service/接口路径,就转发到order-service服务里面的接口路径。
总的来说,springcloudalibaba里面的内容主要就是这些,至于rocketmq之类的后面再研究吧。
我的博客:https://www.dbhx.vip/article/86
